How to Get Rid of Little Black Ants in the Kitchen
They are tiny, jet black, and moving in a thin line from the baseboard to the cat food bowl. They look like moving specks of pepper. These are little black ants, and unlike the slightly larger dark brown sugar ants, they almost always nest outdoors and enter through foundation cracks.
Little black ants, Monomorium minimum, are one of the smallest ant species that invade kitchens. They are about one sixteenth of an inch long, shiny black, and form distinct trails. The colony is outside under a rock, in a crack in the driveway, in the mulch, or in the soil next to the foundation. The ants you see in the kitchen are foraging workers. Kill them without addressing the outdoor nest and new workers replace them within days. Here is how to find the nest outside and stop them at the source.
Little Black Ants vs. Other Tiny Kitchen Ants
Proper identification saves you from using the wrong bait. Little black ants are jet black and shiny with a two-segmented waist. They are smaller than odorous house ants, which are dark brown and smell like rotten coconut when crushed. They are larger than pharaoh ants, which are pale yellow and translucent. They move in distinct single-file trails rather than the scattered foraging pattern of larger ants.
Little black ants prefer sweets in spring and summer, then switch to protein and grease in late summer and fall. If you put out sugar bait and they ignore it, they are in a protein-feeding phase. Put out a dab of peanut butter or cat food next to the sugar bait. Whichever the ants swarm is what the colony currently wants.
Find the Outdoor Nest by Following the Trail
Little black ants nest outdoors. The nest is usually within 30 feet of the kitchen. Finding it is the fastest path to elimination because you can treat the colony directly rather than waiting for bait to travel through the foraging chain.
Follow the ant trail from the kitchen backward. Watch where the line of ants enters the kitchen. Is it through a crack in the baseboard? Under the door? Through the gap around a pipe under the sink? Go to the other side of that entry point and find where the ants emerge outside. For baseboard entry, go to the exterior wall on the other side. For pipe entry, check where the pipe exits the foundation. For door entry, check the door threshold from outside.
Once outside, follow the trail across the ground. Little black ant trails on soil, concrete, and mulch are visible as a moving line of black specks. The trail will lead to a small opening in the soil, a crack in the driveway, under a rock, in mulch, or along the foundation edge. The nest entrance is a small hole surrounded by fine soil particles. You may see ants carrying bits of food into the hole.
Nests are easiest to find in the morning and late afternoon when ants are most active. If you lose the trail, place a dab of jelly or honey at the point where ants enter the house from outside. Wait 30 minutes. A new trail will form directly from the nest to the food. Follow it.
Treat the Outdoor Nest Directly
Once you have located the nest, you can eliminate the entire colony in one treatment. This is faster and more effective than weeks of indoor baiting.
Pour a pot of boiling water slowly into the nest entrance. The water penetrates the soil and kills ants on contact through heat. This works for nests in soil and lawn. It does not work for nests in driveway cracks or under slabs, where the water drains away before reaching the colony. Boiling water kills grass and plants it contacts. Use it on nests in bare soil or lawn edges away from desirable plants.
For nests in cracks, under rocks, or in locations where boiling water is impractical, apply food-grade diatomaceous earth directly into and around the nest entrance. Use a bulb duster to puff the powder into the opening. Ants walking through the treated entrance carry the powder into the nest on their bodies. The colony dies over several days as the powder spreads through the galleries.
For large nests or nests in difficult locations, use a boric acid bait station placed directly at the nest entrance. Mix one cup of warm water, two tablespoons of sugar, and half a teaspoon of boric acid. Soak a cotton ball in the solution and place it immediately next to the nest opening. The foraging ants will carry the bait directly into the colony. Skip the long trail into your kitchen entirely. The colony feeds on poison at its own front door.
Indoor Baiting When You Cannot Find the Nest
If the nest is under the foundation slab, in a neighbor’s yard, or in a location you cannot find, bait indoors using the same approach as for sugar ants. Place sugar-based bait on the active trail inside the kitchen. The ants carry the bait back to the outdoor nest over several days. This takes longer than direct nest treatment but works for the same reason. The queen eats the bait and the colony collapses.
Use Terro Liquid Ant Bait or a homemade borax and sugar water solution. Little black ants respond well to borax baits. Do not spray insecticide on the trail while baiting. The spray kills foragers and the colony sends replacements. The bait kills the queen and the colony stops producing replacements. These are fundamentally different outcomes. One suppresses for a few days. The other eliminates permanently.
Seal Entry Points After the Nest Is Dead
Wait until you have seen zero ant activity for three days. Then seal the entry point the ants were using. Common little black ant entry points include cracks in the foundation where the concrete meets the sill plate, gaps around plumbing and utility penetrations where pipes enter the house, gaps under exterior doors without sweeps, cracks in window frames and failed caulking around windows, and gaps where siding meets the foundation.
Use silicone caulk for cracks and gaps. Use expanding foam for larger openings around pipes. Install door sweeps on exterior doors. These are one-time fixes that prevent ants from finding new entry points next season. The outdoor colony may still exist in the yard. You are not eliminating all ants from your property. You are blocking their route into your kitchen.
Prevention: Keep the Next Colony Out
Little black ants are outdoor insects. They enter homes because something inside is worth eating and something outside leads them to your door.
Keep the foundation perimeter dry and clear. Remove mulch, leaves, and organic debris from the first three feet around the foundation. Replace with gravel if possible. This creates a dry zone that ants avoid. Trim vegetation that touches the house. Ants use plant stems and branches as bridges from the soil to the siding and windows.
Store firewood, lumber, and landscape materials away from the house. A stack of firewood against the foundation is home to multiple ant colonies and provides a highway directly to your siding. Move it at least 20 feet away and elevate it on a rack.
Inspect the foundation perimeter each spring for new cracks and ant activity before the foraging season begins. A five-minute walk around the house in April with a tube of caulk prevents a summer of ants in the kitchen.
Frequently Asked Questions
Are little black ants the same as sugar ants?
No. Little black ants are a distinct species, Monomorium minimum, that is jet black and nests almost exclusively outdoors. Sugar ants is a common name that usually refers to odorous house ants, which are dark brown, smell like rotten coconut when crushed, and often nest indoors in wall voids. The treatment approach is different. Sugar ants require indoor baiting because the colony may be inside the walls. Little black ants require outdoor nest location and treatment because the colony is outside. If you use the wrong approach, you spend weeks baiting indoors for an outdoor problem or searching your yard for an indoor nest.
Why are the ants ignoring my bait?
Three possible reasons. The bait is the wrong food type. If the ants are in a protein-feeding phase, they ignore sugar bait. Put out peanut butter or cat food next to the bait. If they swarm the protein, switch to a protein bait. The bait has too much borax. If ants die within hours on the bait, the concentration is too high. Dilute it. The bait is not on the trail. Ants follow chemical trails precisely. If the bait is six inches from the trail, they may never find it. Place bait directly on the active trail.
I kill them and they keep coming back. What am I doing wrong?
You are killing workers, not the queen. Ant spray, soapy water, and squishing kill the ants you see. The queen, protected in the outdoor nest, continues laying eggs. Every ant you kill is replaced within days. The solution is not to kill more ants more efficiently. It is to find the nest and kill the queen. Follow the trail outside. Treat the nest. The ants in the kitchen disappear because the factory that produces them has shut down.
How to Choose the Perfect Furniture for Your Guest Bedroom
Many guest bedrooms end up filled with leftover furniture that does not quite match or serve a clear purpose. While this may seem convenient and inexpensive, it often creates a space that feels cluttered or uncomfortable for your visitors.
Finding the rightbedroom furniture in the UAE can transform your spare room into a warm, functional retreat for your guests.
Let’s take a look at the top tips that can help you create the perfect guestrooms with the right furniture pieces.
Start with the Right Bed Size and Mattress
Every guest room begins with the bed. It’s the piece that determines how relaxed and comfortable the space feels for visitors. A queen-sized bed is often the most practical choice since it gives couples enough space to sleep comfortably without taking over the entire room.
A twin bed or daybed works well if you have a compact guest room.
Mattress selection also deserves careful attention. A medium-firm mattress usually works well for most people, as it strikes a balance between softness and support.
Memory foam and hybrid mattresses tend to suit a wide range of sleep styles, which makes them a safe option for guest rooms.
The bed frame should support the mattress properly and blend with the room’s design. Upholstered headboards, wooden frames, and simple platform beds remain popular choices since they work with many interior styles.
Choose Essential Guest Bedroom Furniture Pieces
Once the bed is in place, the next step is adding furniture that makes the room convenient for guests. Nightstands are among the most useful pieces in a guest room because they provide visitors with a place for their phones, glasses, or a glass of water that’s within easy reach.
Storage matters as well. Guests often appreciate having somewhere to unpack their belongings. A dresser or wardrobe helps them organize their clothes during their stay.
A compact chest of drawers can provide storage in smaller bedrooms without making the space feel crowded.
Add a mirror to make the room more practical and visually open. A small desk or writing table may help guests who need a spot to work, read, or place personal items during their visit.
Consider Multifunctional and Space-Saving Furniture
Many guest bedrooms double as other rooms when visitors are not around. The space may act as a home office, reading area, or quiet corner in the house. Multifunctional furniture helps the room adapt to different needs.
A sleeper sofa or daybed can easily convert an office into a guest room. Murphy beds offer another practical solution since they fold into the wall and free up floor space during the day.
Storage benches at the end of the bed provide seating along with hidden storage.
Vertical storage can make a huge difference in compact rooms. Tall wardrobes or wall shelves use height instead of floor space, keeping the room organized without feeling cramped.
The guest bedroom should feel connected to the rest of the home rather than completely different from it. Keeping furniture styles consistent helps the room feel balanced and thoughtfully arranged.
Homes with modern interiors may lean toward clean lines and simple materials, while traditional spaces often include wood finishes and classic shapes.
Material choices help shape the room’s overall look. Wooden furniture brings warmth and works well in many interiors. Upholstered beds can soften a room’s appearance and add comfort.
Other decor elements bring the room together. These include rugs, table lamps, framed artwork, and curtains.
A calm color palette with a few accent pieces can also help give the room a relaxing vibe without making it feel overly styled.
Balance Quality, Budget, and Long-Term Comfort
Finding the right balance between cost and durability is important when furnishing your guest room. Inexpensive furniture may seem appealing, but well-made pieces tend to last longer and hold their appearance over time.
Prioritize comfort above all else. Even if your guests might stay for only a few nights, a comfy bed and other well-chosen fixtures can make their experience pleasant and memorable.
Look for pieces made from long-lasting materials, with practical storage, and with a timeless design. Furniture that blends comfort with durability tends to serve the space well for many years.
Frequently Asked Questions
Read more facts and tips about furnishing a guest bedroom:
How important is mattress quality in a guest bedroom?
Mattress quality strongly affects how well guests sleep. A supportive mattress reduces discomfort and improves overall rest. It helps ensure your guests wake up rested and satisfied with their stay.
How often should a guest bedroom mattress be replaced?
Most guest bedroom mattresses should be replaced every seven to ten years. Even if the room is used occasionally, materials naturally lose support over time. It may be time to replace a mattress if you start noticing sagging or discomfort.
Should guest room furniture match the rest of the house?
Matching the guest room furniture with the rest of your interior style isn’t required, but it’s best if the room feels connected to your home’s overall style. You can choose furniture with similar colors, materials, or design elements to help maintain a cohesive look across different rooms.
The best guest rooms let your visitors walk in, put their things down, and feel comfortable without having to figure out where everything goes. A few well-chosen pieces of furniture usually do the job better than a room filled with extras.
Shutter Etiquette: The Unwritten Rules of Exterior Shutter Design Your Neighbors Will Notice
Many homeowners underestimate the visual impact shutters can have. Following simple, practical guidelines ensures your home stands out in a tasteful way while keeping everything harmonious. Knowing these unwritten rules will help you make choices that both you and your neighbors can appreciate.
Match Proportions to Windows
The most noticeable rule is sizing. Shutters should complement the windows, not overpower them. A common misstep is choosing panels that are too wide or too narrow. Keep these points in mind:
Shutters should be roughly two-thirds the width of the window.
Height should align with the window frame for a balanced appearance.
Avoid overcrowding with decorative elements that distract from symmetry.
Correct proportions help maintain a visually pleasing facade and prevent your home from looking top-heavy or mismatched.
Stick With Simple Styles
Complex shutter designs may seem appealing at first, but simple styles often look more polished. Louvered or raised panel shutters are timeless and versatile. Consider:
Matching the style to your home’s architecture for cohesion.
Limiting ornate features to accent pieces only.
Choosing subtle textures over flashy patterns.
Simplicity doesn’t mean boring—it means refined. Homes with understated shutters often feel more welcoming and thoughtfully designed.
Harmonize Colors With Your Exterior
Color selection is critical. Shutters should complement siding, trim, and doors without clashing. Some practical tips include:
Darker shutters for lighter exteriors create classic contrast.
Soft, neutral shades blend naturally and reduce visual tension.
Reserve bold colors for small accents if desired.
Color harmony reinforces a cohesive look that enhances curb appeal without drawing undue attention.
Ensure Functional Placement
Even if shutters are purely decorative, proper placement signals care. Mount them as though they could function, even if they never close. This creates a sense of authenticity and balance across the facade.
Consider Custom Options
Every home is unique, and sometimes stock shutters don’t fit perfectly. Investing in custom shutters allows you to:
Match exact window dimensions.
Pick materials that suit your local climate.
Choose finishes that reflect your personal style.
For homeowners looking to personalize their space, custom shutters provide tailored solutions that maintain aesthetic appeal and functionality.
Make Ordering Easy
With modern options, installing shutters is simpler than ever. You can order exterior shutters online and have them shipped directly to your home, saving time while ensuring quality. Online ordering platforms often provide measurement guidance and color previews to help make the right choice.
By paying attention to size, style, color, and placement, your exterior shutters can transform your home’s look in a subtle yet striking way. Thoughtful choices demonstrate care and can even inspire neighbors to rethink their own facades.
Solar Waterfall Pumps for Backyard Landscapes
There’s something unique and fascinating about the sounds of running water in a backyard landscape. It helps to mask outside noises from the road. It brings life to a small garden. Many homeowners would want that, but without the hassle of complicated wiring and electricity bills, of course. This is where a solar waterfall pump comes in, designed to provide water movement without the hassle of electricity and wiring. But does it really work well? Let’s explore what a solar waterfall pump really is and what you can expect from it.
What Is a Solar Waterfall Pump
Defining a Solar Waterfall Pump System
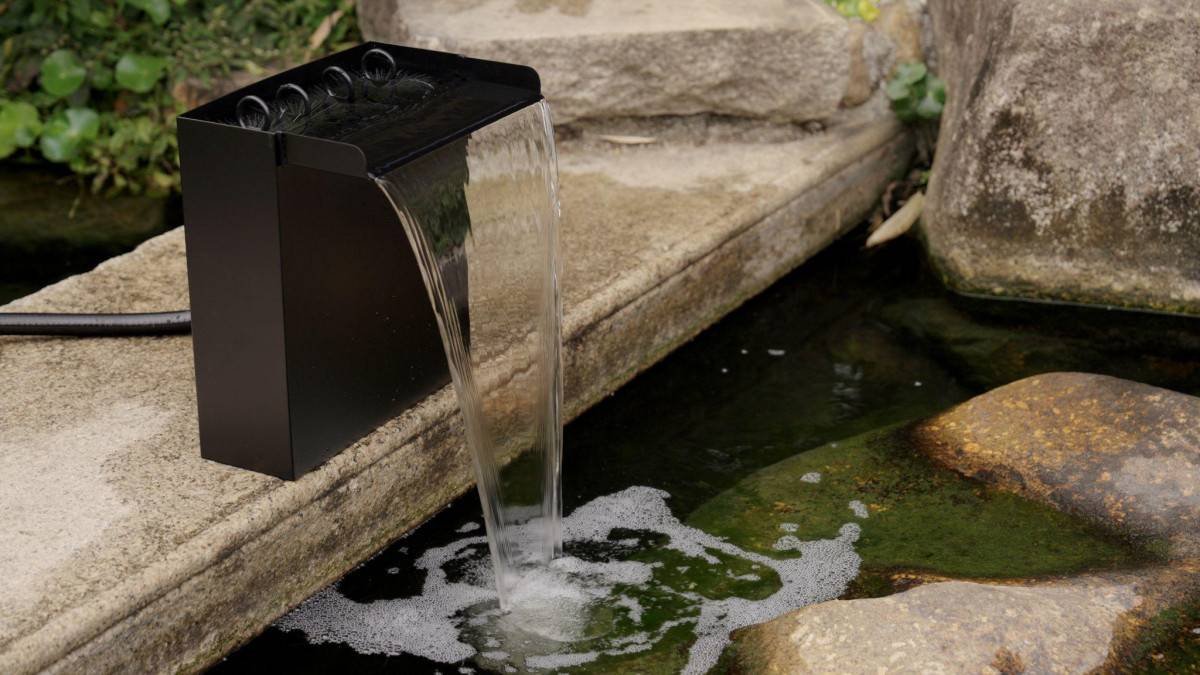
A solar waterfall pump, as the name implies, is a type of pump that uses the energy of the sun to push water upwards to the top of a waterfall or a stream, and then let it flow down due to gravity. A solar waterfall pump system generally includes:
A solar panel
A pump
Tubing
A battery (optional)
The solar panel collects sunlight and converts it into electricity, which then powers the pump, and then pushes water through the tubes and into the waterfall outlet. The water then flows down and into the basin, and then the cycle starts again and again in a continuous loop of water circulation.
How a Solar Powered Waterfall Pump Works
A solar water pump for fountain, as a whole, uses photovoltaic cells, which are solar cells that are used to collect sunlight and convert them into electricity, and then electricity into water flow. In full sun, the pump runs at full speed, and the waterfall appears to be running at a smooth pace. But as the sun starts to hide due to cloud cover, the flow of water appears to slow down, and that’s perfectly normal for a solar powered fountain pump water system. Some may also come with a battery. This battery holds additional power during bright hours. It may be used during short cloudy hours.
Solar Panel Waterfall Pump vs. Other Electric Waterfall Pumps
An electric pump uses electricity from a wall outlet. It always operates. The weather does not impact its operation. The solar panel uses sunlight for its operation. This means that it is flexible and not constant. Electric pumps may be more powerful. Solar panel pumps may be easier to set up. There is no wire to dig into the ground. The solar panel pump may be an excellent solution for small and medium waterfalls.
Why Solar Waterfall Pumps Are Ideal for Backyard Landscapes
Creating Natural Movement and Sound in Garden Design
Water impacts the ambiance of an environment. Even small water features can be effective. The steady flow of water drowns out other background noises. It also creates movement for static areas. The solar panel makes this movement and sound easier to implement. It requires sunlight and water.
No Wiring Needed for Flexible Landscape Layouts
Not all backyard designs feature electricity near water features. The solar panel waterfall pump is an answer to this problem. It can be placed anywhere you want your waterfall. Additionally, this pump is easily portable to accommodate any design change you want to implement. This flexibility makes solar panel pumps an excellent solution for do-it-yourself projects.
Energy Savings and Eco-Friendly Water Features
Solar panel pumps use solar energy, which is renewable energy. It does not increase your electricity bills. This will save money over time. It will also be better for the environment. For people who want to live more “green,” solar water features are an easy step in the right direction.
Enhancing Small Ponds, Streams, and Waterfalls
Solar pumps are ideal for:
Small backyard ponds
Decorative garden streams
Compact waterfall walls
Pondless waterfalls (where water flows into a hidden basin)
They may not be powerful enough for large waterfalls. For small backyard waterfalls, they are usually adequate.
How to Choose the Right Solar Waterfall Pump
Understanding Flow Rate and Waterfall Height Requirements
Flow rate is measured in gallons per hour (GPH). This is the amount of water that the pump will move in an hour. A small waterfall requires moderate water flow. For a wide waterfall, more GPH is needed. The height of the waterfall is also an issue. The pump must be able to lift water from the basin to the top of the waterfall. This is called head height or vertical lift distance. When selecting a solar waterfall pump, be sure to get one that will handle slightly more head height than your waterfall requires.
Matching Solar Panel Output to Pump Power
The solar panel must be able to produce enough power to run the pump. If the pump requires 25 watts of power, the solar panel must be able to produce at least that much power when there is direct sunlight. If the solar panel does not produce enough power, the pump will have weak water flow. A balanced system, where solar panel and pump are designed to work together, will give better performance.
Head Height, Hose Length, and Real World Performance
Hoses that are too long will have less water pressure. Sharp turns in the hose will also have an adverse effect. Keep the hose as short as possible with as few bends as necessary. In real-life conditions, the performance may be slightly lower than the product ratings. It is always wise to select a pump with extra capacity.
Battery Backup vs. Direct Solar Operation
Direct solar operation only functions when sunlight is available. Battery backup systems have the ability to store energy during bright hours of the day. They provide some ability to function during cloudy periods or early evenings. If sound is important to your landscape design, battery backup may be beneficial.
Common Challenges with Solar Powered Waterfall Pumps
Performance in Low Sunlight or Shaded Areas
Shade has a great impact on solar power because sunlight is greatly reduced. If trees or buildings block sunlight most of the day, you may experience poor performance. The solar panel has to be exposed to at least several hours of direct sunlight to have strong performance.
Water Flow Consistency and Seasonal Changes
In summer, long hours of sunlight are available every day. Performance is strong. In the winter, sunlight hours are shorter. This change is normal and should be anticipated to prevent disappointment.
Maintenance Needs for Solar Powered Pump and Solar Panel
It is important to note that solar-powered systems are not maintenance-free. The solar panel should be regularly maintained to ensure its surface is clean. The pump intake should be maintained to ensure leaves and other matter are kept clean. It is important to regularly maintain the solar-powered system to ensure its smooth operation.
Tips for Getting the Best Performance
Optimal Solar Panel Placement and Angle
The solar panel should be placed to ensure it receives direct sunlight. The solar panel should be placed to ensure it is not shaded during peak hours of the day. The solar panel should be tilted slightly to face the path of the sun.
Proper Pump Positioning and Water Intake Protection
The pump should be placed to ensure proper water depth. The intake should be protected to ensure leaves and other matter are kept clean. The pump should be placed flat on the bottom.
How to Reduce the Loss of Flow in the Design of a Backyard Waterfall
Hoses should be short. Avoid tight bends. Excessive vertical heights should be minimized. This will help improve the efficiency of the flow.
When to Upgrade to a Higher Power Solar Powered Waterfall Pump
If the waterfall looks weak, it is time to upgrade. Upgrade to a higher GPH model if: The waterfall is to be raised, the tubing is to be extended, or the waterfall effect is to be stronger. A slightly stronger solar powered waterfall kitpump can produce better results.
How to Tell When It’s Time to Replace Your Duvet Insert
We all have that one piece of bedding that we are attached to and cannot seem to let go, right? Your duvet insert may be one of those pieces you have formed a connection with over the years, wrapping you in coziness night after night because of its ability to bring you comfort. While your duvet insert has brought you coziness over the years, it has an expiration date just like any other bedding, and holding onto it too long could be messing up your sleep. So many people are sleeping under duvet inserts that probably should have been replaced years ago, only to find themselves tossing and turning at night and wondering why they feel less refreshed in the morning. The truth is, your duvet insert has many signs it shows, especially when it comes to offering comfort, which also helps to know when it is time to replace it. In this article, you will know everything about how to tell when it’s time to replace your duvet insert.
Physical Changes Signal Replacement Time
When your duvet insert is already worn out, it will show some physical signs of wear and tear. One of the most obvious signs that it is time for a duvet insert to be replaced is a lumpy and uneven filling. Does your duvet insert feel thin and flat? Those are signs of structural breakdowns on the inside. Good quality duvet inserts maintain their shape and distribution of fill for years, but over time, constant usage will degrade the integrity of your duvet insert. These are indications that it’s probably time for a duvet insert replacement. Any rips or tears will let the fill escape and ultimately, diminish the insulating efficiency of your duvet insert; it could also cause an allergic problem as fill tries to escape through any compromised area. Small holes and rips can become large ones, especially after frequent use or washing. Make sure to check all corners and edge seams of the duvet insert, as this will keep you posted on your next plan of replacement.
Loss of Loft and Warmth Regulation
An insert is expected to continue feeling soft and maintain its loft properly, just as the day you first purchased it. If the duvet insert you are using is flat when you are done using it, or if it remains flat and does not regain its fluffiness, then the fill has lost its capacity. Loss of loft will affect temperature regulation, either causing a hot or cold sleep experience. Down duvet inserts keep their loft longer than synthetic alternatives, but high-grade down will flatten eventually. The best way to check the loft on a duvet insert is to push it down with your hands; if it returns within seconds, then you’re good. If it is still maintaining its loft or just having trouble recovering length after compressing, consider that the time is right to replace it. However, the older your duvet insert gets can lead to temperature regulation issues, which can cause discomfort while sleeping. The temperature regulation quality of your duvet insert can be affected when the fill material has become damaged or compressed, and compromised loft results in compromised air circulation and insulation. This issue can be resolved only if you change to a new duvet insert. A duvet insert that has lost its loft can leave your body unable to maintain warm and comfortable sleeping conditions. If you are at the point of realizing that your duvet insert doesn’t meet your body needs, it is time to get a new insert.
Age and Usage Guidelines
The age of your duvet insert will give you major signs for when to replace it. High-quality down duvet inserts will last 10 to 15 years with proper care, and good-quality synthetics will last 5 to 7 years with proper care. However, the time of usage of this duvet insert will also determine how long it will last. If you use your duvet insert every night for the entire year, the aging will be different compared to seasonal usage. Inserts in guest bedrooms generally get less use and will last longer than their lifespan. You should consider how many times you have washed your insert in certain situations, too, as too much washing of inserts damages and reduces expected use, and too little washing leads to hygiene problems. How you use it will determine the dominant situation for replacement. For instance, people with sensitive skin will need to have to replace their duvet insert more often, as their body requires something clean and smooth. No matter the type of sleeper you are, it is important to always pay attention to your duvet insert to know when it’s time for replacement, especially when you’ve been using it for many years.
Conclusion
Replacing your duvet insert is an investment in your sleep and also your overall well-being. Don’t wait until your duvet insert cannot be used any longer. Getting a new duvet insert will change your sleeping experience, adding enough support and comfort to your body. If you’re ready to invest in a high-quality duvet insert, the right place to get the best product is Pure Parima. Pure Parima has the top-rated duvet inserts that are available in the market. Why the wait? Visit their website for your next replacement and have the best product at hand.
How to Style Queen Comforter Sets for a Modern Bedroom Look
The ease of creating a modern bedroom design using a queen comforter set has been grossly underestimated by many. Creating this look does not require changing the layout of your entire home or breaking the bank. One effective way to get started on giving your bedroom that contemporary look you desire is to use a quality queen comforter set as the central piece to tie all other elements of the space together. A key part of making a queen comforter set look stylish, but also not just plain basic, is to know what layers to apply, which color palette choices are best suited to match your desired modern style, how to combine various textures to give contrast to each element, and then adding those final finishing touches. These four areas are the primary focus of this article, and will show you step-by-step how to achieve a modern bedroom look, based upon any number of modern design styles, and most importantly, make the process simple, fast, and affordable.
Choose the Right Base Color and Pattern for a Clean Foundation
Begin by choosing a queen comforter set in either a neutral or soft base color, as most contemporary bedrooms are built around simplicity and calmness. A neutral colored queen comforter will help to make your room appear larger since it provides an uncluttered background from which all else can come forward. If you choose to have some pattern on your queen comforter set, then choose one that has a subtle design. Examples are small geometric lines, faint grid, or tone-on-tone. Do NOT choose a print with large flowers, etc. That would be far too busy for a modern bedroom. Both Cotton Sateen and Percale fabrics provide a smooth fabric that drapes nicely. Both styles also provide the same type of finish found on very high-quality bedding. We suggest avoiding any comforters that are overly shiny or textured at this point. Reserve those for your accent pieces. Once you’ve selected the right queen comforter set with a simple and neutral color scheme and design style for your modern bedroom, you’ll find that your entire room looks modern and together instantly when compared to what you had previously.
Layer with Intention Using Euro Shams and Minimal Accents
Layering today is really about using intentional layers of bedding, compared to just layering too much onto your bed. After adding your comforter to your bed, take the 2 large euro shams and place them at the back of your standard pillows. These will give your bed height as well as provide a structural element. Add a second shade or texture to your euro shams that will add some additional visual interest. Make sure that these are a lighter shade than your comforter so that they do not compete with the comforter. It is important when adding the additional pillows that you keep this to a minimum and don’t overdo it. Also, allow your additional pillows to simply add a little personality. When you use intentional layering in your bedroom, it will have a clean and elegant feel that defines modern bedroom style.
Incorporate Texture Contrast Without Overdoing It
While the use of texture in today’s modern bedrooms is what gives them appeal, its use needs to be tempered. Pairing one or two accent pillows made of a rougher textured material (such as a linen pillow with a slightly loose weave) to a smooth cotton sateen comforter provides enough contrast to add some depth to the look of the bed, and avoid having the bed appear flat or uninteresting. A simple combination will provide a similar contrast and visually elevate the appearance of the bed. This just ends up making the entire comforter set appear to be higher quality.
Pay Good Attention to Lighting and How It Affects the Overall Look
Lighting is crucial when determining overall appearance. The interaction of lighting and surface is one of the most critical elements of contemporary bedroom design. Therefore, you should determine whether your queen comforter set appears as it does during the daytime and nighttime. In contrast to other bedding options, some queen comforters have a subtle sheen to them and appear beautiful when catching the light of the evening. In doing so, this adds a level of quiet luxury to the bed. If the queen comforter set you select works effectively with your layers of lighting, it creates a more harmonious environment and contributes to making your bedroom feel expensive during the course of the day.
Add Minimal Accessories to Complete the Modern Look
Using fewer than ten items per room is all that’s needed to create this clean look. The same is true of your bedroom. The addition of a throw will add some color and warmth to your bedroom. A throw can be made from many different materials. Most importantly, a throw must always complement the bedding. Next, put decorative pillows on your bench at the bottom of the bed. Just one or two pillows are enough. Next, use only a few decorative items for each side table. At least two things are required to create a nice design. These two things should include one item to provide lighting and another item to add greenery. One final thing you should do is to leave plenty of empty space around everything else in your bedroom. In fact, you should always leave about 50% of every surface completely empty. That way, there will never be a crowded feeling in your bedroom.
Conclusion
When designing a modern bed, it’s all about using neutral tones or a clean color palette, thoughtfully layering bedding, and creating a comfortable sleep environment by considering the lighting levels needed for restful sleep. If you wish to achieve this modern feel, quickly visit our site at LatestBedding. We provide many beautiful Queen Comforter Sets with clean lines, quality cotton fabric, reversible, and also include additional items to match at affordable price points. Plus, at LatestBedding, we offer free standard shipping on most orders throughout the entire year and have ongoing sales to make shopping for a new Modern Queen Comforter Set easier than ever. Browse through our comforter collections now and pick out one that can assist you in styling a modern, luxury bedroom that you will enjoy going back to after work or school.
Best Backyard Placement Ideas for Outdoor Spa Installations
Best Backyard Placement Ideas for Outdoor Spa Installations
Designing a relaxing space at home often begins with thoughtful placement of your spa or hot tub. The right location combines privacy, accessibility, and visual harmony. Whether you are planning an outdoor sauna or a full spa retreat, strategic positioning can make all the difference in comfort and long-term enjoyment.
Considering Privacy and Views
Privacy is often the first factor when deciding where to install a spa. A secluded corner of the yard helps create a tranquil atmosphere while reducing visibility from neighboring properties. At the same time, consider your view. Positioning the spa to overlook a garden or a scenic element adds a touch of serenity and connection with nature.
Natural barriers such as hedges, fences, or trellises can enhance seclusion without enclosing the space entirely. This balance ensures you feel both sheltered and open to the outdoors.
Accessibility and Functionality
Convenient access is essential for frequent use. Locating your spa close to a back door or patio keeps it easy to reach, especially in colder seasons. At the same time, ensure there is enough space for maintenance and ventilation around the unit. Installing on a stable, level surface supports safety and longevity.
Lighting also plays a key role. A well-lit path between the house and the spa ensures safety during evening use while contributing to the overall ambiance of the space.
Integrating with Landscape Design
A spa should complement the existing landscape rather than overpower it. Surrounding it with plants, stones, or wood decking can blend the installation naturally into the yard. Earth tones and organic textures often create the most cohesive look.
Consider how seasonal changes affect the area. Falling leaves, snow, or heavy rain can impact both maintenance and appearance. Choosing materials that handle local weather well helps preserve the spa’s condition and beauty over time.
Combining with an Outdoor Sauna
Many homeowners enjoy pairing a spa with a sauna for a complete backyard wellness experience. Placing an outdoor sauna nearby allows for easy transitions between heat and cool-down sessions. When arranged thoughtfully, the two features become a harmonious retreat where relaxation meets rejuvenation.
Ensure there is clear spacing between the sauna and the spa to allow for foot traffic and ventilation. Coordinated materials and colors can visually tie the units together, creating a cohesive and inviting design.
Working with Site Conditions
Topography, drainage, and exposure to sun or wind influence the ideal location. Elevated areas may provide great views but need secure foundations. Shaded corners offer comfort in warm climates, while sunny spots help naturally warm the water in cooler regions.
Assess how water runoff behaves during rain. Proper grading prevents pooling and keeps the area clean and safe. A few adjustments to the landscape can significantly improve the overall spa environment.
Enhancing the Experience with Thoughtful Details
Small design touches elevate the spa experience. Surrounding seating areas, soft lighting, and subtle landscaping help create a peaceful retreat. Adding a pathway of natural stone or wood planks provides both function and beauty.
Partnering design elements with wellness features, such as a nearby shower or relaxation nook, enhances the sense of escape. With careful planning, your backyard can become a space that supports rest, reflection, and renewal.
Exploring Backyard Inspiration
Every property offers unique possibilities for outdoor wellness spaces. Drawing ideas from established projects can spark creativity and ensure practical results. Resources from Backyard Canada can help you visualize how different layouts and materials work together for long-term comfort and style.
10 Benefits of Installing a Mixer Shower Instead of a Traditional Shower
The primary mixer shower benefits include superior temperature stability, higher water flow rates, and the ability to use multiple outlets like a rainfall head and a handheld wand simultaneously. Unlike traditional electric showers that heat water on demand with limited pressure, a mixer shower blends existing hot and cold water from your boiler or tank to provide a more powerful, consistent, and aesthetic experience. These systems also offer advanced safety features like thermostatic control, which prevents sudden temperature spikes when other taps are used in the home.
Many homeowners stick with traditional showers without realising the practical advantages of upgrading. You might be used to a basic electric shower that hums loudly. Or perhaps you use manual taps that are hard to balance. While these systems work, they often fall short in modern UK homes.
In this guide, we explore 10 real benefits of making the switch. We will explain how these systems work in real-life scenarios to help you decide if they are right for your bathroom.
1. Consistent Water Temperature Control
The most common complaint about traditional manual showers is the “temperature shock.” This happens when someone turns on a tap elsewhere in the house. A mixer shower solves this problem by balancing hot and cold water before it leaves the head.
Most mixer showers UK homeowners choose today are thermostatic. This means they have a built-in valve that reacts to pressure changes. If the cold water pressure drops, the valve adjusts the hot water instantly. This keeps your shower at the exact temperature you set. It is a major upgrade over traditional manual taps where you have to constantly fiddle with the handles.
2. More Comfortable Daily Shower Experience
A mixer shower provides a level of comfort that basic electric showers cannot match. Electric showers must heat water instantly. This often leads to a weak flow, especially in winter when the incoming water is very cold.
A mixer shower uses the hot water already stored in your boiler or tank. This allows for a much higher flow rate. The result is an invigorating, “hotel-feel” shower every morning. For families, this makes the morning rush much easier. It is faster to rinse out shampoo and soap, making the whole process more efficient.
3. Greater Flexibility with Shower Functions
Traditional showers usually only have one fixed showerhead. Mixer showers offer far more flexibility. You can choose a setup that fits your exact lifestyle.
Single function shower: A simple, high-quality setup with one head.
Twin function shower: This is very popular. It features a large “monsoon” head and a smaller handheld wand.
Triple function shower: The premium choice. You can run an overhead, a handset, and even a bath filler or body jets from one valve.
This variety of modern shower systems allows you to customize your experience. You can use the rainfall head for a relaxing soak and the handset for cleaning the enclosure or washing a pet.
4. Better Water Flow Control
In many traditional setups, you only have one speed: on or off. A mixer shower gives you much more control over the water flow. Most valves allow you to adjust the power of the water independently of the temperature.
This is very useful for saving water. You can turn the flow down while you are lathering and up when you need a powerful rinse. It makes the shower more usable for everyone in the family. Small children might prefer a softer flow, while adults might want a high-pressure experience after a workout.
5. Works Well with Modern Plumbing Systems
Most modern UK homes use combi boilers or unvented hot water cylinders. These systems provide high-pressure water throughout the house. Mixer showers are designed specifically to work with these setups.
While electric showers are often “stand-alone,” a mixer integrates with your home’s central plumbing. This means you aren’t limited by the power of a small internal heating element. As long as your boiler is working, your mixer shower will perform at its best. It is a more natural fit for the way modern homes are built.
6. Choice Between Exposed and Concealed Designs
One of the best design-led mixer shower benefits is the choice of installation style. You are not stuck with a bulky white box on the wall.
Exposed showers: The valve sits on the tiles. This is great for a quick upgrade. It is easier to install because you don’t need to go behind the wall. It works well in traditional or industrial designs.
Concealed showers: All the pipework is hidden. Only the control handles and the showerhead are visible. This creates a stunning, minimalist look. It is the best choice for high-end, modern renovations.
7. Improved Aesthetics for Modern Bathrooms
Traditional electric showers often look dated. They are usually large, plastic units that can ruin a sleek design. Mixer showers are much more elegant. They come in various finishes like chrome, matte black, and brushed brass shower.
By choosing a mixer, you can match your shower to your taps and towel rails. This creates a cohesive look. A concealed mixer, in particular, makes a small bathroom feel much more spacious. It removes visual clutter and makes the shower area look professionally designed.
8. Easier Integration with Shower Mixer Kits
Many people worry that switching to a mixer is difficult. However, the rise of shower mixer kits has made it much simpler. These kits include the valve, the rail, the hose, and the head in one box.
Using a kit ensures that every part is compatible. It takes the guesswork out of the installation. You can find a wide range of shower mixer kits that fit standard UK plumbing. This makes them a very practical upgrade for a DIY-savvy homeowner or a plumber. It is often faster to install a new kit than to try and repair an old electric unit.
9. Suitable for a Wide Range of Bathroom Sizes
Mixer showers are incredibly versatile when it comes to space. In a small ensuite, a concealed mixer takes up almost zero room on the wall. In a large family bathroom, a twin-function system fills the space with a luxury feature.
Because the valve itself is quite small, you have more freedom with where you place it. You can even have the controls on one wall and the showerhead on another. This “remote” setup is impossible with traditional units. It allows you to turn the shower on without getting your arm wet!
10. Long-Term Practical Upgrade Over Traditional Systems
A mixer shower is a durable investment. Electric showers have complex heating elements that can scale up in hard water areas. They often need replacing every few years.
A mixer shower is a mechanical valve. It has fewer parts that can break. If a cartridge fails, it is usually a simple part to swap out. This makes it a more sustainable choice. It adds real value to your property. Buyers in the UK often prefer a thermostatic mixer over an electric shower, as it feels more premium and reliable.
Conclusion
Upgrading from a traditional setup to a mixer shower is a smart move for any UK homeowner. The mixer shower benefits are clear: you gain better control, higher pressure, and a much better-looking bathroom. It turns a basic chore into a relaxing part of your day.
Whether you choose a simple single-function unit or a luxury triple-function kit, you will notice the difference instantly. Modern mixer showers offer the safety and flexibility that old-fashioned systems lack. By focusing on quality and design, you can transform your bathroom into a functional, high-end sanctuary. Explore the latest designs today and see how a mixer can improve your home life.
Landscaping Ideas Front Garden: Transform Your Curb Appeal in 2026
A well-planned front garden adds 5 to 10 percent to a home’s resale value, according to a widely cited study by Michigan State University’s Department of Horticulture. That return rivals some kitchen renovations, yet most homeowners underestimate how dramatically a thoughtful front yard makeover can shift buyer and neighbor perception alike, a point the Keyrenter Silicon Valley Palo Alto team can help owners consider within a broader property strategy.
The front garden is the one outdoor space every passerby judges. The best landscaping ideas front garden owners act on balance aesthetics, maintenance reality, climate, and budget within a space that typically gets less attention than the backyard.
Assess Your Front Garden Before You Plant Anything
Before buying a single plant or bag of mulch, spend time observing how your front yard actually behaves. Take note of where puddles sit after rain, which spots get harsh afternoon sun, and where shadows fall from the house or street trees.
Three factors dictate every landscape design decision: light, drainage, and scale. A front garden shaded by a mature oak needs entirely different plants than a south-facing strip that bakes from June through September.
Walk to the curb and study the view back toward your house. Most homeowners never do this. Notice the proportion between open lawn, planting beds, and hardscaping. A yard dominated by a single element, all lawn or all mulch beds, reads as unfinished regardless of how neat it looks.
Check your local HOA guidelines or municipal codes before planning anything structural. Fences, retaining walls, and even certain plant heights can require permits or neighbor notification in many communities.
Landscaping Ideas Front Garden: Design Styles and Aesthetics
Choosing a coherent design style prevents the cluttered, mismatched look that plagues many DIY front yards. Each style below suits different house architecture, maintenance tolerance, and climate.
Design Style
Key Characteristics
Best For
Maintenance Level
Est. Cost (500 sq ft)
Formal / Classic
Symmetry, clipped hedges, defined borders
Colonial, Georgian homes
High (regular pruning)
$2,500–$6,000
Cottage Garden
Informal, layered perennials, colorful blooms
Craftsman, Victorian homes
Medium
$800–$2,500
Modern / Minimalist
Clean lines, ornamental grasses, bold texture
Contemporary, midcentury homes
Low–Medium
$1,500–$4,000
Mediterranean
Gravel, drought-tolerant shrubs, terracotta
Spanish-style, stucco homes
Low
$1,000–$3,000
Native / Naturalistic
Regional wildflowers, grasses, no lawn
Any style, eco-conscious owners
Very Low
$600–$2,000
Cottage Rock Garden
Boulders, ground covers, alpine plants
Sloped lots, xeric climates
Very Low
$700–$2,200
The most common mistake is mixing elements from two or three incompatible styles. Cottage garden abundance doesn’t pair well with minimalist concrete paths. Pick one direction and commit to its plant palette and hardscape vocabulary.
That commitment is also where most resale value gets created. A yard with a recognizable, coherent identity photographs better and reads as “cared for” to buyers who can’t name a single plant in it.
Plant Selection: Flowers, Shrubs and Trees That Actually Thrive
The right plant in the right place is not a cliché but a practical rule that saves hundreds of dollars every year. A plant stressed by wrong light or soil conditions becomes a maintenance burden and rarely looks as good as the same species planted correctly elsewhere in the yard.
For foundation plantings, compact evergreens such as dwarf yew (Taxus densiformis), boxwood (Buxus sempervirens), or inkberry holly (Ilex glabra) provide year-round structure without outgrowing their space within five years. Many older suburban homes suffer from foundation shrubs that have grown into the windows because the original installer chose the wrong mature size.
Flowering perennials add seasonal color with less replanting effort than annuals. Coneflowers (Echinacea purpurea), black-eyed Susans (Rudbeckia fulgida), and catmint (Nepeta racemosa) return reliably in USDA zones 3 to 8 and require minimal supplemental water once established.
For front garden trees, scale matters above all else. A Japanese maple (Acer palmatum) stays under 15 feet at maturity, making it a proportionate choice for most residential lots. Fast-growing shade trees, by contrast, can crack sidewalks and create root conflicts with sewage lines within 15 to 20 years.
According to the National Gardening Association’s 2024 consumer research, 63 percent of homeowners cite “wrong plant choice” as the primary reason their front yard projects fail within three years. Matching plant to site, not to the nursery display, is the most impactful single decision in any front garden redesign.
Hardscaping Ideas: Paths, Borders and Surfaces That Last
Hardscaping provides the permanent framework that defines your planting beds and directs foot traffic. Done well, it also dramatically reduces ongoing maintenance by minimizing the lawn area that needs mowing and edging.
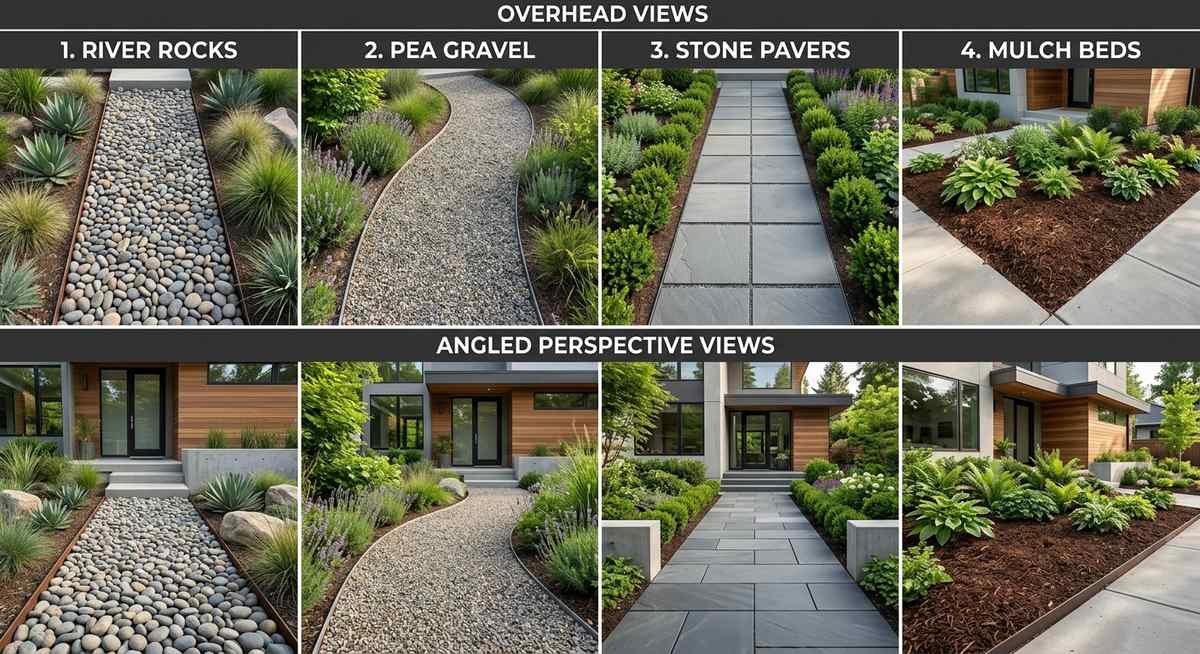
Hardscaping material comparison: each option differs significantly in cost, lifespan, and visual character.
Material selection shapes both the look and the lifetime cost of any hardscape project. The table below compares the most common options for front garden surfaces and borders.
Material
Cost per sq ft (installed)
Lifespan
Maintenance
Best Use
Concrete pavers
$8–$20
25–50 years
Low (occasional re-leveling)
Paths, driveways
Natural stone (flagstone)
$15–$30
30+ years
Low–Medium
Accent paths, patios
Pea gravel
$2–$5
Indefinite
Medium (weed control, raking)
Bed fill, dry streambeds
River rock (2–3 inch)
$3–$7
Indefinite
Low
Borders, dry creek beds
Mulch (shredded hardwood)
$2–$4
1–3 years
Annual refresh needed
Planting beds
Concrete edging
$3–$8 (linear ft)
10–20 years
Low
Bed borders
Pathway design has a direct effect on how the house reads from the street. A straight path from sidewalk to front door looks formal and intentional. A gently curved path with planted borders on both sides reads as relaxed and inviting. Match the pathway geometry to your chosen design style, and you’ve solved 40 percent of the visual coherence problem without touching a plant.
Front Garden Landscaping with Rocks and Drought-Tolerant Plants
Rock gardens and xeriscaping represent the fastest-growing segment of residential front yard landscaping, driven by water restrictions in Western states and a broader cultural shift away from high-maintenance lawns. In California alone, the state Water Resources Control Board reports that outdoor irrigation accounts for approximately 50 percent of residential water use.
A rock-based front garden typically combines three elements: a weed-suppressing underlayer (landscape fabric or cardboard), a layer of decorative stone or gravel 3 to 4 inches deep, and carefully spaced drought-tolerant plants that provide texture and seasonal interest.
Effective drought-tolerant plant pairings for rock gardens include:
Ornamental grasses: Blue oat grass (Helictotrichon sempervirens) and feather reed grass (Calamagrostis acutiflora) provide movement and four-season interest.
Low-growing perennials: Sedum (Sedum acre), creeping thyme (Thymus serpyllum), and hen-and-chicks (Sempervivum) fill gaps and suppress weeds without irrigation.
Flowering shrubs: Russian sage (Salvia yangii), lavender (Lavandula angustifolia), and salvia provide color and pollinator habitat with minimal water once established.
Boulders as focal points: One or two large boulders (12 to 24 inches) anchored 20 to 30 percent into the soil look natural and create visual weight that smaller rocks cannot provide.
Rock gardens do have a failure mode: the “dumped gravel” look that results from too little plant density relative to stone area. A ratio of roughly 60 percent ground cover plants to 40 percent exposed stone is a practical starting target. Thin that over time as plants spread.
Low-Maintenance Front Garden Landscaping
Low-maintenance does not mean no-maintenance, and understanding that distinction saves significant frustration and money. Every garden requires some input. The goal is to design a system where that input is predictable, modest, and seasonal rather than weekly and reactive.
The single most impactful low-maintenance decision is replacing lawn with planted beds or hardscaping. Lawn requires more labor hours per square foot than almost any other landscape element: weekly mowing, seasonal aeration, fertilization, and weed control. A 200 square foot planting bed planted with established perennials typically needs 4 to 6 hours of annual attention. The same area in lawn requires 20 to 30 hours per growing season.
Native plants are the other high-value choice. Once established (typically 2 to 3 growing seasons), plants native to your region require no supplemental irrigation, minimal or no fertilization, and rarely suffer from pest pressure serious enough to require intervention. The National Wildlife Federation’s native plant finder (available at nwf.org) allows homeowners to search by zip code for species native to their specific county.
Mulching planting beds 2 to 3 inches deep each spring suppresses weeds, retains moisture, and moderates soil temperature, effectively doing the work of several hours of weeding per season. Per the University of Minnesota Extension, a proper mulch layer reduces weed germination by 50 to 80 percent compared to unmulched beds.
Budget-Tiered Front Garden Makeover Plans
Front garden projects succeed at almost any budget when the scope is matched honestly to available funds. The three tiers below are based on material costs (labor not included for DIY) for a typical 400 to 600 square foot front garden.
Under $400: The Refresh
A front garden refresh at this budget focuses on maximum visual impact per dollar. Edge all existing beds cleanly, add 3 inches of fresh mulch (one cubic yard covers approximately 100 square feet at that depth), and introduce three to five focal plants in strategic positions: at the mailbox, flanking the front door, and at the corner of the main bed.
Recommended plants at this tier: ornamental grasses ($8–$15 per 1-gallon container), black-eyed Susans from seed ($3–$6 per packet), and one dwarf ornamental shrub near the entryway ($25–$40). Total materials including mulch and edging: $150–$380 depending on existing bed square footage.
$400–$1,500: The Redesign
At this budget, a front garden redesign can include a new pathway section, a defined planting bed with a mix of perennials and a small feature shrub, and a modest hardscaping element (landscape border stones or stepping stones to the mailbox or side gate).
A practical allocation: $80–$150 on pathway materials or border edging, $200–$500 on plants (mix of 3-gallon perennials and one small ornamental tree), $80–$200 on mulch and soil amendment, and $40–$150 on tools if needed. Remaining budget covers contingencies.
$1,500 and Above: The Transformation
A full front garden transformation at this level can include a new concrete paver or flagstone path, a complete bed redesign with layered plantings, hardscaping edging in stone or concrete, and a focal tree or large structural shrub. Professional plant installation for this scope typically runs $2,500 to $6,000 in most U.S. markets, making DIY installation at $1,500 to $3,000 in materials a substantial saving.
The landscaping industry’s own data, from the National Association of Landscape Professionals’ 2023 survey, indicates that the median homeowner spends $3,200 on front yard landscaping projects, with the highest-value projects centering on hardscaping (patios, paths, retaining walls) rather than plant material alone.
Small Front Garden Landscaping Ideas
A compact front garden, under 300 square feet, rewards restraint and vertical thinking more than any other yard type. Every element needs to earn its space twice over.
The most effective technique for small front gardens is vertical layering: ground cover plants at the lowest level (under 12 inches), mid-layer perennials and ornamental grasses at 18 to 36 inches, and one structural vertical element at 4 to 8 feet, whether a small ornamental tree, a trained espalier against the house, or a trellis with a climbing rose or clematis.
Restraint in plant variety matters as much as vertical structure. Three to five plant species in a small front garden read as designed. Twelve species in the same space read as collected or accidental. Pick a palette of two or three complementary colors and repeat those same species in multiple places to create visual rhythm within the limited footprint.
For town houses and narrow lots with a strip of garden rather than a true yard, a row of uniform plantings, three to five identical ornamental grasses or box balls, creates structure and intentionality that a random assortment never achieves, regardless of how individually attractive each plant is.
Common Front Garden Landscaping Mistakes to Avoid
Most front garden mistakes fall into one of two categories: planting errors (wrong plant, wrong place, wrong scale) and design errors (no focal point, no coherent style, no defined path). Knowing the specific failure modes prevents expensive backtracking.
Over-planting and crowding: Plants installed at nursery size look sparse for two to three years, prompting many homeowners to add more plants that eventually crowd each other. Match spacing to mature size, not current size, and use annual flowers to fill gaps in the first few seasons.
Choosing plants for the display tag photo, not the real site: A plant that thrives in full sun will decline slowly in partial shade. That decline takes one to two seasons to become obvious, by which time the plant is too stressed to recover easily.
Ignoring drainage: Areas where water pools after rain will rot the roots of most ornamental plants within one to two seasons. Correct drainage problems before planting by grading soil away from the house and installing French drains where necessary.
No focal point: A front garden without a visual anchor reads as background rather than design. One specimen tree, a large decorative urn, a distinctive pathway material, or a well-placed boulder provides the focal point that makes everything else read as intentional.
Skipping edge definition: Clean edges between lawn and planting beds are the single fastest visual upgrade available to any front garden. A half-moon edger and 30 minutes of work transforms a ragged, neglected-looking border into something that reads as maintained, regardless of what’s growing inside it.
Mismatching hardscape materials to house style: Rustic flagstone paths clash with a sleek contemporary facade. Polished concrete pavers look odd in front of a Victorian cottage. Match the hardscape material’s texture and color palette to the house’s architectural character.
Underestimating maintenance commitment: Formal box hedges and rose borders are beautiful but require consistent pruning and care. Low-maintenance native beds require almost no care but look “wild” for the first two seasons while establishing. Choose the maintenance level that matches your actual available time, not your ideal scenario.
Front Garden Landscaping FAQs
What landscaping ideas front garden owners can do on a small budget?
Clean, defined bed edges and a fresh layer of mulch produce the highest visual return for the lowest material cost. Add three to five well-placed plants in complementary colors, and even a neglected front garden reads as intentional. Budget: $80–$200 in materials for most typical front gardens.
What are the best plants for a front garden?
For structure: dwarf boxwood, inkberry holly, or ornamental grasses. For color: coneflowers, black-eyed Susans, and catmint. For trees: Japanese maple or serviceberry. All tolerate typical residential conditions and provide multi-season interest with moderate to low maintenance.
How much does a front garden landscaping project cost?
A basic refresh (mulch, edging, a few plants) runs $150 to $400 in materials for a 400 to 600 square foot front garden. A full redesign with new hardscaping and layered planting typically costs $1,500 to $3,000 DIY, or $3,000 to $8,000 professionally installed. According to the National Association of Landscape Professionals, the median U.S. homeowner spends $3,200 on front yard projects.
What is the best low-maintenance front garden landscaping?
A combination of regional native perennials, a 3-inch mulch layer, and defined hardscape edging requires the least ongoing labor. Native plants, once established (typically two to three seasons), need no supplemental irrigation and minimal fertilization. Replacing even 30 percent of lawn with planted beds cuts annual maintenance time significantly.
How do I create a rock garden in my front yard?
Install a weed-suppressing layer (landscape fabric or two layers of cardboard), add 3 to 4 inches of your chosen stone or gravel, and plant drought-tolerant species at a density of one plant per 2 to 3 square feet. Anchor one or two larger boulders by burying 20 to 30 percent of their height for a natural appearance. Allow ground cover plants to fill in over two to three seasons.
Does front garden landscaping increase home value?
Yes, consistently. Michigan State University research found well-executed front yard landscaping increases perceived home value by 5 to 10 percent. That translates to $15,000 to $30,000 on a $300,000 home. Hardscaping (paths, walls, defined structure) and mature trees provide the strongest individual ROI. Overgrown or poorly maintained landscaping, by contrast, can reduce perceived value by 5 to 15 percent.
How do I design a front garden landscaping plan from scratch?
Start with a simple site assessment: light levels, drainage patterns, and the scale relationship between house and yard. Choose a single design style that matches your home’s architecture. Define the path, beds, and lawn areas before buying any plants. Select plants last, choosing species suited to your assessed light and drainage conditions. The best front garden landscaping ideas always begin with honest site observation, not catalog browsing.
When is the best time to execute landscaping ideas front garden projects?
Fall is the optimal planting season for trees, shrubs, and perennials in most of North America. Soil is still warm enough for root establishment, but cooler air temperatures reduce transplant stress. Spring is the second-best window. Summer planting is possible but requires consistent irrigation for the first season. Avoid planting during heat waves or when ground is frozen.
What should I avoid when landscaping my front garden?
The most common mistakes are over-planting (choosing spacing based on current nursery size, not mature plant size), ignoring drainage problems before planting, and selecting plants based on visual appeal rather than site conditions. Also avoid mixing incompatible design styles and skipping regular bed edging, which has an outsized effect on overall appearance.
Putting Your Landscaping Ideas Front Garden Plans Into Action
Acting on the right landscaping ideas front garden style requires starting with the lowest-effort, highest-impact changes: clean edges, fresh mulch, and three well-placed plants in key visual positions. That single afternoon of work establishes the baseline from which every future improvement becomes easier to see and plan.
From there, choose one design direction, consult your site conditions honestly, and add elements in sequence rather than all at once. A front garden built in stages over two to three seasons tends to look more coherent and considered than one installed in a single weekend push.
The yards that hold their appeal and value year after year share one quality: they were designed for the actual conditions of the site, not for an imagined version of it.
Fixed-Rate vs. Adjustable-Rate Mortgage: Which One Saves You More?
The fixed rate vs adjustable mortgage decision is one of the most consequential choices a homebuyer makes, yet most borrowers spend less than an hour comparing the two. A fixed-rate mortgage locks your interest rate for the entire loan term, keeping monthly payments identical from the first payment to the last. An adjustable-rate mortgage (ARM) starts with a lower introductory rate that can rise or fall after an initial fixed period, typically three to ten years. For most long-term homeowners, the fixed rate offers certainty worth paying for. For buyers who plan to sell or refinance within seven years, an ARM can cut thousands in interest costs during that window.
How a Fixed-Rate Mortgage Works
A fixed-rate mortgage carries the same interest rate from origination to payoff, regardless of what happens to market rates. If you close at 6.75%, that number stays put whether the Fed raises rates ten more times or cuts them to near zero.
The most common terms are 15 years and 30 years, though lenders also offer 10- and 20-year options. On a 30-year fixed loan, your principal-and-interest payment never changes, which makes budgeting straightforward for decades at a time.
According to Freddie Mac’s Primary Mortgage Market Survey, the 30-year fixed rate averaged around 6.8% through early 2026, down from the 7.8% peak seen in late 2023. The 15-year fixed ran about 75 to 100 basis points lower.
The predictability has a real dollar cost. Because lenders assume all the rate risk on a fixed product, they charge a premium above where short-term rates sit. That spread is the price of certainty.
How an Adjustable-Rate Mortgage Works
An ARM starts with a fixed introductory rate, then adjusts periodically based on a benchmark index, most commonly the Secured Overnight Financing Rate (SOFR). The naming convention tells you the structure: a 5/1 ARM holds its initial rate for five years, then resets annually. A 7/6 ARM fixes for seven years, then adjusts every six months.
Lenders set the margin, typically 2.25% to 3%, which gets added to the index at each adjustment. If SOFR is sitting at 4.5% and your margin is 2.5%, your new rate is 7%. That arithmetic runs every adjustment period for the remaining life of the loan.
The appeal is simple: introductory ARM rates typically run 0.5% to 1.5% lower than comparable fixed rates. On a $400,000 loan, a 1% rate difference translates to roughly $235 per month in savings during the initial period.
Fixed-Rate vs. Adjustable-Rate Mortgage: Head-to-Head Comparison
The fixed rate vs adjustable mortgage comparison comes down to one core trade-off: stability versus initial cost savings. Fixed-rate mortgages eliminate payment uncertainty entirely; ARMs offer lower entry costs in exchange for future rate risk.
Feature
Fixed-Rate Mortgage
Adjustable-Rate Mortgage (ARM)
Interest rate
Locked for entire loan term
Fixed initially, then adjusts periodically
Monthly payment
Never changes (P&I)
Can rise or fall after initial period
Common terms
10, 15, 20, 30 years
3/1, 5/1, 7/1, 7/6, 10/1 ARMs
Typical starting rate (2026)
6.5%–7.2% (30-yr)
5.9%–6.6% (7/1 ARM)
Rate risk
None — lender bears it
Borrower bears it after initial period
Best for
Long-term owners, fixed-income budgets
Short-term owners, falling rate environments
Refinancing need
Optional
Often strategically timed before reset
Rate protection
Complete
Partial (rate caps apply)
Payment example on a $400,000 loan at current rates: a 30-year fixed at 6.9% produces a monthly principal and interest payment of approximately $2,646. A 7/1 ARM at 6.3% produces approximately $2,481 per month for the first seven years, saving $165 monthly and $13,860 over the initial fixed window.
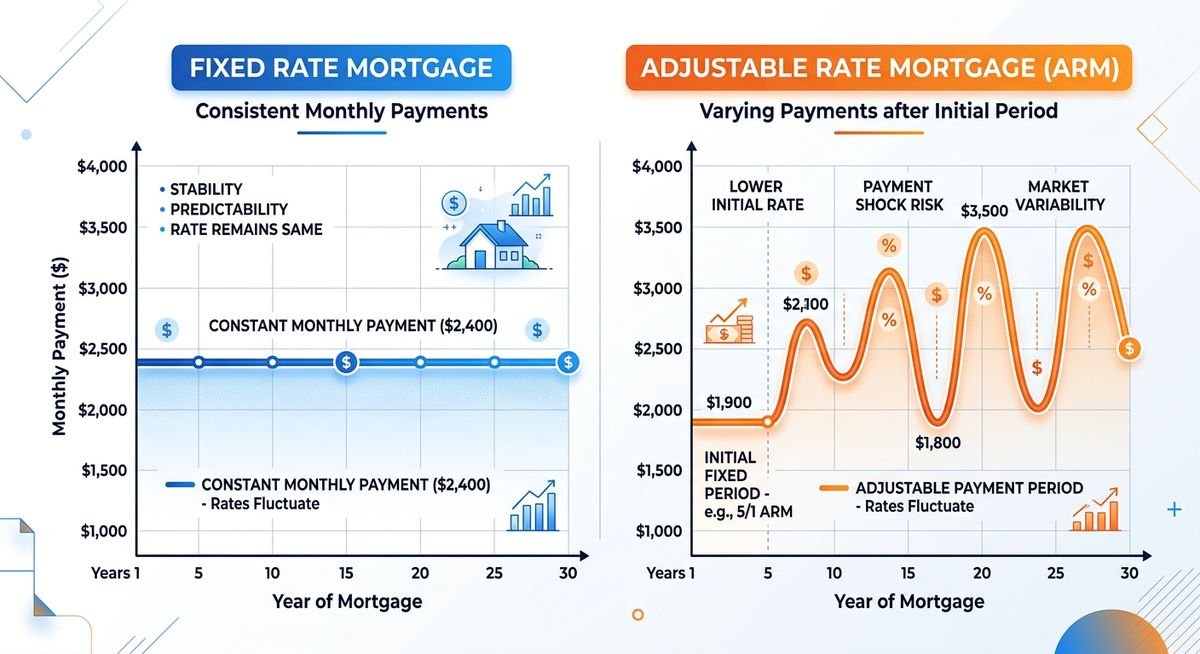
Illustration of how fixed-rate and adjustable-rate mortgage payments diverge after the ARM introductory period
ARM Rate Caps: The Math Behind Your Worst-Case Payment
Rate caps are the contractual limits on how much an ARM rate can move, and understanding them is non-negotiable before signing. Every ARM has three cap numbers, typically expressed as a sequence like 2/2/5.
Initial cap: Maximum rate change at the first adjustment. A 2% initial cap means if you started at 6.3%, your first reset cannot push the rate above 8.3%.
Periodic cap: Maximum change at any subsequent adjustment. A 2% periodic cap prevents the rate from jumping more than 2 percentage points in any single adjustment period.
Lifetime cap: Maximum increase over the original start rate for the life of the loan. A 5% lifetime cap means a 6.3% ARM can never exceed 11.3%.
Most conventional ARMs today carry a 2/2/5 cap structure. Working through the worst case on that $400,000 loan: if the 7/1 ARM at 6.3% hits its lifetime cap of 11.3% after seven years, the monthly payment would climb from $2,481 to approximately $4,013. That is a $1,532 monthly increase on a single rate adjustment scenario playing out to maximum. The Consumer Financial Protection Bureau (CFPB) requires lenders to show borrowers the worst-case payment scenario in writing before closing, which gives you concrete numbers to stress-test against your income.
Most borrowers do not hit lifetime caps. But the fact that the number exists at all is the honest reason many people choose the fixed option.
When to Choose a Fixed-Rate Mortgage
The fixed rate makes the most financial sense when you plan to stay in the home long enough to absorb the rate premium through stability, typically beyond seven to ten years.
Specific situations that point strongly toward fixed:
You are buying a long-term family home and do not plan to move within the ARM’s introductory window.
Your income is relatively fixed, including salaried employees, retirees on fixed income, or single-income households where payment predictability is critical.
Current ARM rates are close to fixed rates, narrowing the break-even period to the point where the risk is not worth the modest savings.
You believe interest rates will trend higher over the next decade, meaning ARMs are likely to reset upward.
You have experienced difficulty qualifying and want no risk of payment increases affecting your ability to stay current.
There is something worth acknowledging about the psychology here: millions of homeowners who locked 30-year rates between 2020 and 2022 at 2.75% to 3.5% have stayed in homes they might otherwise have sold, because their payment is irreplaceable at current market rates. The fixed rate is not just a financial instrument. It is occasionally a life anchor.
When an ARM Makes Financial Sense
ARMs are genuinely the better financial product in a narrow but real set of circumstances. The math works in your favor when your ownership timeline is shorter than the ARM’s introductory window.
A 7/1 ARM is a straightforward win if you are buying a home you intend to sell or refinance within five to six years. You capture seven years of below-market rates and exit before the first adjustment. The savings can easily reach $15,000 to $25,000 on a standard loan amount.
Other scenarios where ARMs perform well:
Medical residents or early-career professionals who expect significant income growth and may refinance into a fixed rate once equity builds.
Buyers in a high-rate environment who expect rates to fall materially within the ARM’s introductory period, positioning them to refinance into a better fixed rate before the ARM adjusts.
Buyers purchasing a starter home who plan to move up within seven years as family or career circumstances change.
Investors who plan to sell a property within a defined time horizon.
According to data from the Mortgage Bankers Association, ARM applications historically spike when the spread between fixed and adjustable rates widens beyond 150 basis points. At that differential, the break-even calculation decisively favors the ARM for ownership periods under seven years.
Fixed vs. ARM in 2026: What the Current Rate Environment Changes
The fixed vs. ARM decision does not exist in a vacuum. The interest rate environment shapes which product makes more tactical sense at any given time.
As of early 2026, the 30-year fixed rate sits in the 6.7%–7.2% range according to Freddie Mac’s weekly Primary Mortgage Market Survey (PMMS), while many 7/1 ARMs are being offered in the 6.0%–6.5% range. That spread of roughly 50 to 75 basis points is narrower than the historical average of 100 to 150 basis points, which compresses the ARM’s advantage. The break-even period for choosing an ARM over a fixed rate at that spread extends to roughly nine to twelve years of ownership for the math to pay out, which is longer than many ARM borrowers expect to stay.
The Federal Reserve began easing rates in late 2024, and market expectations through 2025 anticipated continued cuts. That trajectory, if sustained, benefits ARM holders because the index rate underlying most ARM adjustments would fall, pulling adjusted payments lower or keeping them near the introductory rate. Borrowers who took ARMs in 2023 at their peak rates have already seen their first adjustments come in below their introductory rate in some cases, a counterintuitive outcome that reflects how rate cycles work in practice.
The honest answer in 2026 is that neither product is obviously superior at current spreads. The fixed rate is not dramatically overpriced, and the ARM’s discount is not compelling enough to override the stability argument for most long-term owners. The decision comes back to ownership timeline and risk tolerance, as it always has.
“We’re in year 3 of our 7/1 ARM and the rate just adjusted for the first time. It went down by 0.3% because SOFR dropped. We’re paying less than our initial rate now. People act like ARMs always go up, but they move with market rates — that cuts both ways.”
— r/Mortgages, October 2024 (9 upvotes)
This aligns with how ARM mechanics actually work: the adjustment formula is purely mathematical, tied to an index that moves in both directions. The Wikipedia overview of adjustable-rate mortgages provides a useful reference on how index benchmarks influence ARM resets across different rate environments.
Frequently Asked Questions
Which is better: fixed rate vs adjustable mortgage?
Neither is universally better in the fixed rate vs adjustable mortgage comparison. A fixed-rate mortgage is better for homeowners planning to stay long-term who want payment certainty. An ARM is better for buyers who will sell or refinance before the introductory period ends, because the lower starting rate reduces total interest paid over a short ownership window.
What happens when an ARM adjusts?
When an ARM’s introductory period ends, the lender calculates a new rate by adding the margin (typically 2.25%–3%) to the current benchmark index, usually SOFR. The result is your new interest rate, subject to the periodic and lifetime caps outlined in your loan documents. The adjusted rate applies to the remaining loan balance, and your monthly payment is recalculated accordingly.
Can an ARM rate go down after adjustment?
Yes. If the benchmark index falls between adjustment dates, your ARM rate can decrease, resulting in a lower monthly payment. This happened for many ARM borrowers in 2024 and 2025 as the Federal Reserve cut rates, with some seeing their rate adjust downward at the first reset. ARM rates move in both directions with market conditions.
How long do you need to stay home for an ARM to save money?
For a 7/1 ARM with a 0.75% rate advantage over a fixed loan, you need to sell or refinance before approximately year eight for the ARM to deliver net savings, accounting for the risk that the adjusted rate will exceed the fixed rate after the introductory window. At narrower spreads of 0.5% or less, the ARM’s advantage disappears before year six.
What does a 2/2/5 cap structure mean on an ARM?
A 2/2/5 cap structure means the rate can increase no more than 2% at the first adjustment, no more than 2% at any subsequent adjustment, and no more than 5% above the original start rate over the life of the loan. On a 6.3% ARM with a 2/2/5 cap, the rate can never exceed 11.3%, regardless of how high market rates climb.
Should I refinance my ARM before it resets?
Refinancing before your ARM’s first adjustment is a sound strategy if current fixed rates are acceptable relative to your existing rate, you plan to stay in the home long-term, and refinancing costs can be recouped within two to four years. If fixed rates are significantly higher than your ARM’s current rate, you may be better served waiting to see where the adjustment lands given prevailing market conditions.
As a first-time buyer, should I choose a fixed or ARM?
Most financial advisors recommend fixed-rate mortgages for first-time buyers because the payment predictability supports budgeting stability during a period when other homeownership costs (maintenance, property taxes, insurance) are also new and uncertain. An ARM can still make sense for first-time buyers who are confident they will move or refinance within the introductory period and have enough income cushion to absorb a worst-case payment increase if plans change.
The Bottom Line
The fixed-rate vs. adjustable-rate mortgage decision is ultimately a bet on how long you will stay and where rates will go, two things no one can know with certainty.
For homeowners planning to stay more than ten years, the fixed rate offers something that cannot be quantified entirely in monthly payment savings: the ability to set your housing cost and walk away from rate anxiety entirely. For buyers with a clear short-term timeline and meaningful income flexibility, an ARM can cut real costs over the ownership window.
Run the numbers on both options with current rate quotes, model the ARM’s worst-case payment against your income, and align the choice with how long you honestly expect to own the home. The math will usually point you in the right direction.