Aqviz

How to Spot Potential Water Damage in a Home Before You Buy

Water damage is one of the most costly and consequential defects a homebuyer can encounter, explains Quality Rental Homes Specialists. Unlike structural issues that are often visible to the naked eye, water damage frequently hides behind walls, under floors, and above ceilings, revealing itself only after it has progressed to the point where remediation is expensive and disruptive. According to industry estimates, water damage and mold remediation costs can range from a few thousand dollars for minor issues to tens of thousands for extensive damage involving structural components or widespread mold colonization. Learning to identify the warning signs of water damage before making an offer is one of the most valuable skills a homebuyer can develop.
Water damage can originate from multiple sources: roof leaks, plumbing failures, foundation infiltration, HVAC condensation, and appliance malfunctions are among the most common. Each source tends to produce characteristic patterns of damage in specific locations. A systematic inspection of the property – both interior and exterior – combined with a professional home inspection that includes moisture testing, provides the most comprehensive assessment of a property’s water damage history and current condition.

Interior Warning Signs: What to Look for Room by Room

Begin your interior inspection in the rooms most susceptible to water intrusion: the basement, bathrooms, kitchen, and laundry room. In the basement, look for efflorescence (white mineral deposits) on concrete walls, which indicates water has been migrating through the foundation. Staining at the base of walls, a musty or earthy odor, and rust stains around floor drains are additional indicators of chronic moisture intrusion. Tap on basement walls; a hollow sound in areas that should be solid can indicate that moisture has caused the material to delaminate.

In bathrooms, inspect the caulking and grout around the tub, shower, and toilet base. Deteriorated, cracked, or missing caulk allows water to penetrate behind tile and into the subfloor, causing progressive damage that may not be visible until the subfloor has been significantly compromised. Soft or spongy flooring near the toilet or tub is a reliable indicator of subfloor damage. Check under bathroom sinks for staining, warping of cabinet materials, or the presence of mold on the back wall of the cabinet.

Ceiling and Wall Stains: Reading the Evidence

Ceiling stains are among the most visible indicators of water damage and should always be investigated. A yellow or brown ring-shaped stain on a ceiling typically indicates a past or ongoing roof leak or plumbing leak from the floor above. The shape and color of the stain can provide clues about the source: a stain directly below a bathroom is more likely to indicate a plumbing leak, while a stain near an exterior wall or in a corner may suggest roof or flashing issues.

Fresh paint over a stain is a common attempt to conceal water damage. Look for areas of ceiling or wall paint that appear newer or have a slightly different sheen than the surrounding surface. A moisture meter – a tool that measures the moisture content of building materials – can detect elevated moisture levels behind painted surfaces and is a standard tool in a professional home inspector’s kit. Buyers who are particularly concerned about water damage can request that the inspector use a moisture meter throughout the property.

Basement and Foundation Water Intrusion

how-to-spot-potential-water-damage-in-a-home-befor-2

Foundation water intrusion is among the most serious forms of water damage, as it can affect the structural integrity of the home and create chronic moisture conditions that support mold growth. Signs of foundation water intrusion include horizontal cracks in poured concrete or block foundation walls (which can indicate hydrostatic pressure from saturated soil), staining at the base of foundation walls, and the presence of a sump pump – which, while a legitimate water management tool, indicates that the basement is prone to water accumulation.

Exterior grading – the slope of the ground immediately surrounding the foundation – plays a critical role in directing surface water away from the home. Negative grading, in which the ground slopes toward the foundation, allows rainwater to pool against the foundation wall and infiltrate the basement. Inspect the grading around the entire perimeter of the home during your visit, and note any areas where soil, mulch, or hardscaping has settled in a way that directs water toward the foundation.

Roof and Attic Inspection for Water Damage

The roof is the primary barrier between the home’s interior and the elements, and roof-related water damage is one of the most common sources of interior moisture problems. During a property tour, look for missing, curling, or cracked shingles, damaged flashing around chimneys and skylights, and sagging areas that may indicate structural damage from chronic moisture. Gutters that are clogged, damaged, or improperly pitched can cause water to overflow and pool against the foundation or infiltrate behind the fascia board.

The attic is often the first place where roof leaks manifest. During a professional inspection, the inspector should access the attic and look for water stains on the roof sheathing, daylight visible through the roof, and signs of mold or mildew on the framing members. Inadequate attic ventilation can also cause moisture problems by allowing condensation to accumulate on cold surfaces during winter months.

Plumbing System Inspection

Plumbing leaks – both active and historical – are a significant source of water damage in residential properties. During a property tour, turn on faucets and flush toilets to observe water pressure and drainage. Check under all sinks for staining, warping, or mold on cabinet materials. Inspect the area around the water heater for rust stains, corrosion, or pooling water. In homes with older galvanized steel pipes, ask about the plumbing history and whether any sections have been replaced.

The washing machine connection is a frequently overlooked source of water damage. Rubber washing machine hoses have a typical lifespan of five years and are a leading cause of residential water damage when they fail. Inspect the hose connections for signs of bulging, cracking, or mineral deposits, and note whether the hoses are rubber or the more durable braided stainless steel variety.

Frequently Asked Questions

What are the common signs of hidden water damage?

Common signs include musty odors, unexplained staining on ceilings or walls, bubbling or peeling paint, warped or soft flooring, and visible mold growth.

How can I detect water leaks in my home?

Monitor your water meter for unexplained usage, check under sinks and around appliances for staining, and listen for running water when all fixtures are off.

When should I call a professional for water damage?

Call a professional when you discover active leaks, significant staining or mold growth, soft or structurally compromised materials, or when a musty odor persists.

What are the risks of undetected water damage?

Undetected water damage can lead to progressive structural deterioration, mold colonization, and compromised insulation – all of which become exponentially more expensive to address over time.

How can I prevent future water damage?

Inspect and maintain the roof annually, clean gutters seasonally, maintain proper grading around the foundation, replace washing machine hoses every five years, and install water leak detectors.

Conclusion

Water damage is a pervasive and potentially devastating defect in residential real estate. Buyers who develop the ability to recognize its warning signs – and who invest in a thorough professional inspection that includes moisture testing – are far better positioned to avoid purchasing a property with hidden water damage issues. When water damage is discovered during the due diligence process, it becomes a negotiating opportunity: buyers can request remediation, a price reduction, or a repair credit that reflects the true cost of addressing the problem. The key is to identify the issue before closing, while you still have the leverage to act on it.

How to Budget for Unexpected Home Repair Costs

One of the most common financial surprises that new homeowners encounter is the cost of maintaining and repairing a home, reports Property Manage CT specialist. Unlike renting, where maintenance responsibilities fall to the landlord, homeownership requires the owner to fund every repair, replacement, and improvement – from a leaking faucet to a failed HVAC system to a roof replacement. These costs are not merely inconvenient; they can be financially destabilizing for homeowners who have not planned for them. Developing a realistic home repair budget and building the financial reserves to fund it is one of the most important steps a homeowner can take to protect their financial stability and the long-term value of their property.
The challenge of budgeting for home repairs lies in their inherent unpredictability. While some maintenance tasks are scheduled and predictable – annual HVAC servicing, gutter cleaning, exterior painting on a regular cycle – others are sudden and costly: a water heater that fails without warning, a roof damaged by a storm, a sewer line that backs up. The goal of a home repair budget is not to predict exactly when each repair will occur, but to accumulate sufficient reserves so that when repairs do occur – as they inevitably will – they do not create a financial crisis.

The 1 Percent Rule and Its Limitations

The most widely cited guideline for home maintenance budgeting is the 1 percent rule: set aside 1 percent of the home’s purchase price each year for maintenance and repairs. On a $400,000 home, this translates to $4,000 per year, or approximately $333 per month. This rule provides a simple, memorable starting point, but it has significant limitations that buyers should understand.

The 1 percent rule does not account for the age or condition of the home. A newly constructed home with modern systems and a full builder’s warranty will have substantially lower maintenance costs in its early years than a 40-year-old home with original systems approaching the end of their useful lives. For older homes, a more appropriate guideline is 2 to 4 percent of the home’s value annually. Additionally, the 1 percent rule is based on purchase price, which may not reflect current replacement costs in markets where home values have appreciated significantly since purchase.

Home Age Recommended Annual Budget Example (on $400K home)
0-10 years (new construction) 0.5-1% of value $2,000-$4,000/yr
10-25 years 1-2% of value $4,000-$8,000/yr
25-40 years 2-3% of value $8,000-$12,000/yr
40+ years 3-4% of value $12,000-$16,000/yr

Building a Dedicated Home Repair Fund

how-to-budget-for-unexpected-home-repair-costs-2

The most effective way to prepare for home repair costs is to establish a dedicated savings account specifically for this purpose and to fund it consistently through automatic monthly transfers. Keeping home repair funds separate from your general savings or checking account serves two important purposes: it prevents the funds from being spent on non-emergency items, and it provides a clear, real-time picture of your repair reserve balance.

A high-yield savings account is an appropriate vehicle for a home repair fund. The funds should be liquid – accessible within a day or two without penalty – since emergency repairs cannot wait for investment accounts to be liquidated. The interest earned on a high-yield savings account, while modest, provides a small return on the accumulated balance while maintaining full liquidity. Avoid investing home repair funds in volatile assets; the purpose of this fund is stability and accessibility, not growth.

Prioritizing Preventive Maintenance

Preventive maintenance is the most cost-effective approach to managing home repair costs over time. Regular, scheduled maintenance tasks – cleaning gutters, servicing the HVAC system, inspecting the roof, caulking windows and doors, and testing smoke and carbon monoxide detectors – prevent small problems from escalating into large, expensive ones. The cost of an annual HVAC service call ($80 to $150) is trivial compared to the cost of replacing a failed system ($5,000 to $15,000 or more). The cost of cleaning gutters ($100 to $250) is negligible compared to the cost of repairing water damage caused by overflowing gutters ($1,000 to $10,000 or more).

Developing a seasonal maintenance checklist and adhering to it consistently is one of the highest-return activities available to a homeowner. Spring maintenance should include inspecting the roof and gutters after winter, servicing the air conditioning system, and checking the foundation for any settling or cracking. Fall maintenance should include servicing the heating system, cleaning gutters after leaf fall, and inspecting weatherstripping and caulking before winter. A written checklist, reviewed and completed twice annually, provides both a reminder system and a maintenance record that can be valuable when selling the home.

Understanding Major System Lifespans

Effective long-term budgeting for home repairs requires an understanding of the typical useful life of major home systems and components. This knowledge allows homeowners to anticipate major expenditures and begin saving for them in advance, rather than being caught off guard when a system fails. The following are typical lifespans for major home systems, though actual longevity varies significantly based on quality of installation, maintenance history, and local climate conditions.

Roofing materials vary widely in lifespan: asphalt shingles typically last 20 to 30 years, while metal roofing can last 40 to 70 years. HVAC systems generally last 15 to 25 years. Water heaters have a typical lifespan of 8 to 12 years for tank-style units and 20 years or more for tankless units. Kitchen appliances typically last 10 to 15 years. Exterior paint on wood siding requires repainting every 5 to 7 years. Understanding where each major system in your home falls within its expected lifespan allows you to plan and budget for replacements proactively.

Home Warranties: A Supplemental Safety Net

A home warranty is a service contract that covers the repair or replacement of major home systems and appliances for a defined period, typically one year, in exchange for an annual premium and a per-service-call deductible. Home warranties are commonly offered by sellers as an incentive in real estate transactions, but buyers can also purchase them independently. Annual premiums typically range from $400 to $700, with per-service-call fees of $75 to $125.

The value of a home warranty depends heavily on the age and condition of the covered systems. For buyers of older homes with aging HVAC systems, water heaters, or appliances, a home warranty can provide meaningful financial protection. For buyers of newer homes with systems still under manufacturer’s warranties, the incremental value of a home warranty is lower. Read the contract carefully before purchasing, as home warranties typically contain exclusions for pre-existing conditions, improper installation, and lack of maintenance that can limit their practical utility.

Frequently Asked Questions

How much should you budget for home maintenance?

A common guideline is to budget 1 to 4 percent of your home’s value annually for maintenance and repairs, with the appropriate percentage depending on the age and condition of the property.

What is the 1% rule for home maintenance?

The 1 percent rule suggests setting aside 1 percent of your home’s purchase price each year for maintenance and repairs.

How do I save for unexpected home repairs?

Establish a dedicated home repair savings account and set up automatic monthly transfers from your checking account. Keeping these funds separate ensures they are available when needed.

What factors influence home maintenance costs?

The primary factors are the age of the home, the size of the home, the geographic location, and the quality of construction and materials used in the original build.

Is a home warranty worth it?

A home warranty can be worth it, particularly for buyers of older homes with aging systems. The annual cost of $500 to $700 can be offset by a single covered repair.

Conclusion

Budgeting for home repair costs is not a passive activity – it requires proactive planning, consistent saving, and a working knowledge of the systems and components that make up your home. Homeowners who establish a dedicated repair fund, adhere to a preventive maintenance schedule, and understand the expected lifespan of their home’s major systems are far better prepared to handle the inevitable costs of homeownership without financial disruption. The goal is not to eliminate surprise – in homeownership, surprises are inevitable – but to ensure that when they occur, you have the resources to address them promptly and effectively.

5 Common Mistakes to Avoid When Choosing a Party Wall Surveyor in Essex

Are you planning a construction or renovation project in Essex? You need to choose the right party wall surveyor to make sure your project complies with Party Wall etc. Act 1996.

If you make any mistakes as you pick a party wall surveyor in Essex, you could experience delays to your project and incur unnecessary costs. In this article, we look at the top five mistakes you should avoid when choosing a party wall surveyor for your project in Essex, so you make a smarter decision.

Basing your choice on price alone

One of the biggest mistakes you can make as a property owner is going for the cheapest surveyor available. Although it may seem like a cost-saving decision, a surveyor charging unusually low fees could be an indicator of inexperience or shortcuts in service delivery. Typical surveyor fees in Essex vary a great deal and several factors influence them, including project complexity and disputes.

In some cases, low-cost surveyors may lack the expertise to deal with complications, and this could potentially lead to high costs later due to errors or delays. Instead, you should focus on value, often shown by experience, reliability and transparency, but not just on price.

Ignoring qualifications and experience

Not all party wall surveyors in Essex are equally qualified. Unfortunately, some people may claim to be “party wall surveyors” even when they don’t have what it takes to offer the service.

Before hiring a party wall surveyor in Essex, take some time to check their credentials. You should especially check on membership in professional bodies like the Royal Institute of Chartered Surveyors (RICS) to avoid exposing yourself to risk. The beauty of working with an experienced surveyor is that they understand the nuances of notices, awards and dispute resolution. This ensures your project stays compliant and efficient.

Overlooking impartiality

You may have the notion that a party wall surveyor in Essex works solely in your interest. This couldn’t be farther from the truth, as these professionals should act impartially under the law even when you’re the one who appointed them.

Thus, choosing a surveyor who comes out as biased or too “client-friendly” can backfire on you. If a party wall surveyor lacks independence, this may be considered a professional failing. It may even lead to poor decisions or disputes. You must ensure that your lawyer always demonstrates fairness and a clear understanding of their statutory role.

Failing to research before appointing one

You should avoid the mistake committed by many project owners who rush into hiring the first surveyor they find. The risk in this is that after appointing a party wall surveyor, replacing them is not easy.

It is unwise to skip research steps such as reading reviews. Check past projects or get recommendations. The mistake can leave you with an underperforming professional. You can escape long-term frustration by taking time to vet your options.

Believing unrealistic promises

It is crucial to exercise caution when dealing with a party wall surveyor in Essex who guarantees quick approvals, fixed timelines and zero disputes. This is because the party wall process involves many parties and legal steps, most of which fall beyond the surveyor’s control.

You should take such promises as red flags. Among the qualities of trustworthy surveyors is setting realistic expectations and explaining potential challenges, but not overselling outcomes.

Conclusion

If you avoid the above mistakes, you can save time, money, and avoid unnecessary stress when choosing a party wall surveyor in Essex. You need to focus more on qualifications, proven experience and impartiality rather than their rates or convenience.

How to Patch Large Holes in Drywall: Two Methods That Actually Work

What Counts as a Large Hole

A small hole is something you can cover with an adhesive mesh patch and a few swipes of joint compound. A large hole is anything wider than six inches across, the kind left behind by a doorknob punch-through, a plumbing access cutout, or a badly aimed piece of furniture during a move. At this size, standard drywall mesh alone will not hold. The patch needs structural support behind it, or you need to cut a new piece of drywall to fit.

There are two approaches that work, and which one you pick depends on the hole size and your comfort level with drywall work. The backer board method is the standard, the one professionals use.

The California patch, sometimes called a butterfly patch, is faster and requires fewer materials but demands more precision. Both beat the hack job of stuffing newspaper in the hole and mudding over it, which absolutely does not work and you already knew that.

“How to fix a somewhat large hole in the drywall? About the size of a fist. My landlord is coming next week and I need to get this sorted.”

— u/anonymous in r/HomeMaintenance · 30 upvotes · 43 comments

Tools and Materials You Need

Before cutting into anything, gather everything. Nothing is more frustrating than holding a piece of drywall in place with one hand and realizing the screw gun is still in the garage. Here is what you need for either method:

  • Drywall panel (2 ft x 2 ft patch panel covers most holes, about $8 at Home Depot)
  • Utility knife with fresh blades
  • Drywall saw or jab saw
  • Measuring tape and pencil
  • Wood backer board, 1×3 or 1×4 pine (only needed for backer board method)
  • 1-1/4 inch drywall screws
  • Power drill or screwdriver
  • Mesh drywall tape
  • All-purpose joint compound (pre-mixed tub, about $12)
  • 6-inch and 10-inch putty knives
  • 150-grit sandpaper and sanding block
  • Primer and matching paint

Method 1: The Backer Board Technique

method 1 the backer board technique
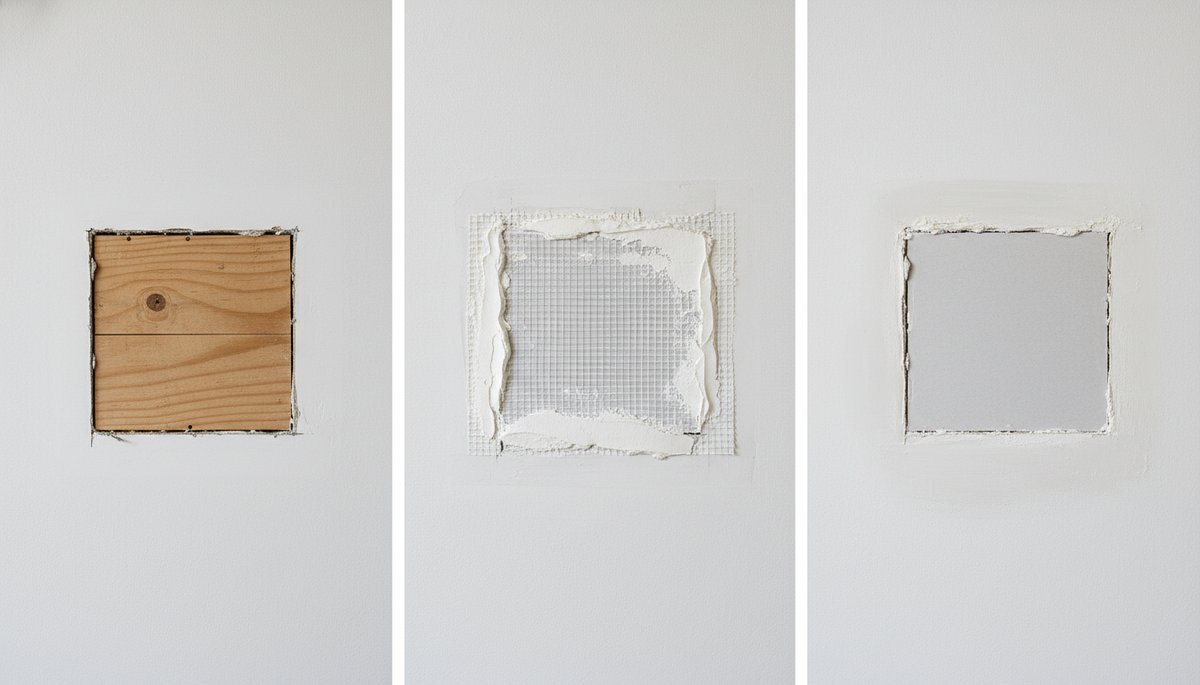
The three stages of a backer board patch: framing the support behind the opening, applying tape and compound, and the finished result ready for paint.

This is the method for holes larger than about twelve inches across, or any hole where structural support behind the patch matters. It takes longer than the California patch but produces a repair that is indistinguishable from the original wall once painted.

Step 1: Square up the hole. Use the drywall saw to cut the damaged area into a clean rectangle or square. Find the nearest studs on either side of the hole. Ideally, your cutout extends to the center of the studs on both sides so you have something to screw into. If the hole does not reach the studs, no problem. That is what the backer board is for.

Step 2: Install the backer board. Cut two pieces of 1×3 or 1×4 pine about four inches longer than the height of your cutout. Slide one piece into the hole and position it vertically behind the drywall on the left side of the opening.

Screw through the existing drywall into the backer board above and below the hole. Repeat on the right side. You now have a solid frame behind the opening to screw your patch into.

Step 3: Cut and attach the patch. Measure the opening and cut a piece of drywall to fit. It should be slightly smaller than the opening to leave a thin gap around all four sides for joint compound to fill. Screw the patch into the backer boards using drywall screws spaced every six inches. The screw heads should dimple slightly below the surface without breaking the paper face.

Step 4: Tape, mud, sand, repeat. Cover all four seams with mesh drywall tape. Apply the first coat of joint compound with the six-inch knife, pressing it through the tape and feathering the edges out about four inches beyond the seams.

Let it dry completely, usually 24 hours. Apply a second coat with the ten-inch knife, feathering farther out. Sand lightly between coats. Most patches need three coats to disappear. Prime and paint to match.

“Large hole in drywall. How to fix? This is behind my bathroom door. The doorstop failed and the handle went straight through.”

— u/anonymous in r/HomeMaintenance · 28 upvotes · 51 comments

Method 2: The California Patch

The California patch works for holes roughly six to twelve inches across. It is faster than the backer board method because you do not need wood supports or to screw into studs. The patch itself provides the structure. The trick is cutting the drywall correctly.

Step 1: Cut the patch blank. Cut a square of drywall about two inches larger than the hole in both directions. On the back side of this piece, measure in two inches from each edge and score a line through the gypsum core with a utility knife, but do not cut through the front paper.

Snap the gypsum along the score lines and peel away the excess, leaving a two-inch paper border around all four sides of the face. This paper flap is what bonds the patch to the wall.

Step 2: Trace and cut the wall opening. Hold the patch over the hole and trace around the gypsum portion, not the paper border. Cut along this line with the drywall saw. The opening in the wall should now match the gypsum piece exactly.

Step 3: Mud and set the patch. Spread a thin layer of joint compound around the edges of the opening on the wall. Press the patch into place. The paper border should lay flat against the surrounding wall surface.

Use the putty knife to embed the paper into the compound, working from the center outward to squeeze out air bubbles. Apply a thin skim coat over the entire patch and paper border.

Step 4: Finish like normal. Let the first coat dry. Apply two more coats, feathering each one wider than the last. Sand, prime, paint. The paper border creates a seamless transition that, done right, disappears completely.

“Can I patch a hole in drywall without using mesh tape? I ran out and the store is closed. My wife wants this fixed tonight.”

— u/anonymous in r/HomeImprovement · 16 upvotes · 37 comments

Mistakes That Turn a One-Day Job Into a Week

Skipping the backer board when you need it. If the hole is wider than twelve inches and you try a California patch, the unsupported drywall will flex every time someone leans on the wall. The joint compound cracks. You end up doing the job twice. Use the right method for the hole size.

Applying joint compound too thick. Joint compound shrinks as it dries. If you trowel it on a quarter-inch thick hoping to finish in one coat, you get shrinkage cracks and a lumpy surface. Three thin coats always beat one thick one. Dry time between coats is not optional. If the compound feels cool to the touch, it is still wet inside even if the surface looks white.

Sanding without dust control. Drywall dust is fine enough to float through an entire house. Tape plastic sheeting over doorways to contain the mess. A damp sponge can knock down ridges between coats without generating dust at all. For final sanding, hook a shop vac to a sanding block with a dust port, or use a vacuum-assisted hand sander. Your lungs and your furniture will thank you. Once the wall is patched and painted, take the opportunity to inspect the rest of your home for hidden issues. A quick foundation check can catch structural problems before they turn into bigger repairs.

Painting over unprimed compound. Joint compound is porous. If you paint directly over it without primer, the paint absorbs at a different rate than the surrounding wall and the patch flashes through no matter how many coats you apply. One coat of PVA drywall primer, then paint.

Frequently Asked Questions

How to patch large holes in drywall without replacing the whole sheet?

Both the backer board method and the California patch avoid replacing the entire drywall sheet. For holes up to twelve inches, the California patch is faster and requires fewer materials. For larger holes, the backer board method provides structural support that a paper-only patch cannot match. Neither method requires removing full sheets.

Can you use spackle for large drywall holes?

Spackle is designed for nail holes and small dents, not structural repairs. For holes larger than a few inches, spackle lacks the strength to bridge gaps and will crack as it dries. Joint compound, applied in thin layers over mesh tape or a drywall patch, is the correct material. Spackle is the wrong tool for this job.

How long does a drywall patch take from start to finish?

Expect two to three days for a professional-looking repair. Day one: cut the hole, install the patch, and apply the first coat of compound. Day two: apply second and third coats with drying time between. Day three: sand, prime, and paint. Rushing the drying between coats is the number one reason patches fail.

What if there are wires or pipes behind the hole?

Before cutting, probe the hole with a bent wire hanger to check for obstructions. If you find electrical wiring or plumbing, keep your saw shallow. Cut through the drywall only, not deeper. For peace of mind, shut off power to the room at the breaker before working near any wall that might contain wiring. If the hole is from a doorknob, the only thing behind it is empty stud space.

Do you need to use mesh tape on drywall patches?

For the backer board method, yes. Mesh tape prevents cracks from forming along the seams where the patch meets the existing wall. For the California patch, the paper border serves the same purpose as tape. The paper flap bonds to the joint compound and creates a reinforced seam without needing separate mesh tape.

Are Home Warranty Plans Worth It? An Honest Look at the Numbers

What a Home Warranty Actually Covers

A home warranty is a service contract, not insurance. The distinction matters because it shapes everything about what gets covered and what gets denied. A home warranty steps in when your water heater rusts out or your oven stops heating. It does nothing when a tree falls through your roof or a pipe bursts and floods the basement. That is homeowners insurance territory.

Most standard plans cover major built-in systems: electrical, plumbing, and HVAC. They also cover a handful of major appliances: refrigerator, dishwasher, oven, washing machine. Some plans include the garage door opener. Some even count the ceiling fan. The list looks generous until you read the exclusions.

Cosmetic damage, pre-existing conditions, improper installation, code violations, and lack of maintenance records all serve as grounds for denial. If your air conditioner died because the filter had not been changed in three years, the warranty company has a valid reason to say no.

Coverage caps are the other thing nobody reads until it is too late. A plan might cover your HVAC system, but only up to $1,500 per repair. If the compressor fails and the bill comes to $3,200, you are covering the difference.

Some providers cap total annual payouts at $3,000 or $5,000 regardless of how many things break. These numbers, buried in the fine print, make or break whether the plan ever pays for itself.

What This Actually Costs You

The math on home warranty plans is not complicated, but most people never run it. According to the American Home Shield website, the average annual premium runs between $500 and $700, depending on your location and the level of coverage, as documented by Wikipedia. On top of that, every service call triggers a trade fee, typically $75 to $125, paid directly to the technician who shows up at your door.

So the minimum annual cost if nothing breaks is the premium: call it $600. If one appliance fails and you call for service, you are at $700. Two failures: $800. And if the technician determines the failure is not covered, which happens more often than the brochures suggest, you still pay that $100 trade fee for a diagnosis that leads nowhere.

Consumer Reports ran the numbers in their 2025 analysis and concluded that the average homeowner who buys a warranty will spend more on premiums than they recoup in covered repairs. This is not a secret. The warranty industry is profitable for a reason. Most people pay more than they claim. That is how insurance and service contracts work, and home warranties are no exception.

“Thoughts on home warranties? Are they worth it? We’re closing on a house in Phoenix next month and the seller is offering to include a one-year home warranty. Trying to figure out if we should ask for something else instead.”

— u/anonymous in r/phoenix · 0 upvotes · 54 comments

When a Home Warranty Actually Makes Sense

There are specific situations where buying a home warranty is not just defensible but genuinely smart. The most common is when you are buying an older home with aging systems.

If the house has a fifteen-year-old HVAC unit and a water heater from the Obama administration, the odds of a major failure in the first year are high enough to shift the math in your favor. A single AC compressor replacement can easily exceed $2,000, which covers several years of premiums.

Sellers sometimes throw in a one-year home warranty as a closing incentive. If the seller is paying, there is zero reason to say no. The warranty can buffer the transition period when any deferred maintenance from the previous owner might surface.

First-time homebuyers who have drained their savings on the down payment and cannot absorb a surprise $1,500 repair are also reasonable candidates. The warranty buys peace of mind during the financially tightest stretch of homeownership.

Real estate agents often recommend home warranties for exactly these scenarios. It is not because the plans are universally good. It is because the agent has seen deals fall apart over inspection findings, and a warranty can reassure nervous buyers enough to close. The warranty serves a purpose beyond the coverage, it lubricates the transaction.

When You Are Better Off Saying No

If your home is less than ten years old and the major systems are still under manufacturer warranty, a home warranty is almost certainly a waste of money. The same goes for anyone with a healthy emergency fund.

If you have $5,000 set aside for home repairs, you are self-insured. You are the warranty. Setting aside the $600 premium into that fund every year builds a repair budget that does not come with exclusions, coverage caps, or thirty minutes of hold music to file a claim.

Another scenario to avoid: buying a warranty expecting it to cover pre-existing problems. Warranty companies typically require a thirty-day waiting period before coverage kicks in, and they will send an inspector if a major claim comes through in the first few months. If your HVAC was on its last legs when you bought the policy, they will find out and deny the claim.

The fine print on exclusions is worth a dedicated read before signing anything. Some plans exclude specific expensive components like refrigerant line sets, ductwork modifications, or disposal fees for old appliances. A repair that looks fully covered on paper can end up costing hundreds out of pocket once the line-item exclusions stack up.

Alternatives Worth Considering

If a home warranty does not make sense for your situation, there are better ways to protect yourself. The simplest is a dedicated home repair savings account. Automate a monthly transfer of $50 to $75 into a separate account labeled house emergencies. In a year you will have $600 to $900, which covers most single-appliance failures. In three years you will have enough to replace a major system.

For specific high-cost items, manufacturer extended warranties sometimes offer better terms than home warranty plans. An HVAC manufacturer warranty that extends coverage to ten years for a few hundred dollars covers the single most expensive system in your home without the overhead of a general service contract.

Regular preventive maintenance is its own form of warranty. A $150 annual HVAC tune-up catches small problems before they become compressor-level disasters, and it creates the maintenance paper trail that home warranty companies demand anyway.

Keeping your home’s major systems in good shape reduces the odds of a catastrophic failure regardless of whether you have a warranty. A seasonal roof maintenance routine and regular inspections of your home’s foundation catch problems early and keep repair costs manageable.

5 Questions to Ask Before You Sign Anything

Whether are home warranty plans worth it depends heavily on the fine print. Most home warranty complaints trace back to assumptions the buyer made before reading the contract. These five questions cut through the sales pitch and reveal what a plan is actually worth.

What is the per-item coverage cap? A plan that covers your HVAC up to $1,500 is a very different product than one that covers it up to $5,000. If your home has a high-end system, a low cap plan leaves you exposed on the single most expensive repair. Ask for the cap schedule in writing before comparing plans.

What are the specific exclusions? Every plan has a list. Refrigerant line sets on AC units. Ductwork modifications. Disposal fees for old appliances. Code upgrades required after a repair. These line items can turn a covered repair into a four-figure out-of-pocket bill. Get the exclusion list, not the brochure summary.

How are service providers chosen? Most warranty companies select the contractor and dispatch them. You do not get to pick your own HVAC guy. If the contractor they send has mixed reviews and a two-week wait time, you are stuck. Some plans allow you to choose your own contractor with pre-approval. That flexibility is worth paying for.

What is the claims process timeline? Some companies promise same-day dispatch. Others take 48 to 72 hours just to assign a contractor, then another week for the appointment. If your air conditioner fails in July in Phoenix, a two-week wait is not a solution. Ask for the average response time in your zip code, not the national marketing number.

Is the plan renewable at the same rate? First-year premiums are often discounted. Year two renewals can jump by twenty to thirty percent. If the plan only made financial sense at the introductory rate, it will not make sense at the renewal rate. Lock in the renewal terms before you buy the first year.

How to Pick a Provider Without Getting Burned

Not all home warranty companies are interchangeable. Check the Better Business Bureau rating and read the complaint volume, not just the star rating. A company with a 4.2 rating and twelve thousand complaints is a different story than one with a 3.8 rating and two hundred complaints. The volume tells you more than the average.

Look for a provider that has been in business at least ten years. The home warranty industry has a high failure rate. Companies that survive a decade have figured out how to balance claims payouts with premium revenue without going under.

A newer company offering significantly lower premiums may be underpricing to gain market share, and that strategy ends when the claims start rolling in. You do not want to hold a policy from a company that declares bankruptcy.

Read reviews with a filter. Happy customers rarely leave reviews for warranty companies. The people who post are the ones who got denied. That said, look for patterns. If dozens of reviews mention the same exclusion being used to deny claims, or the same contractor showing up late over and over, those are systemic problems, not one-off bad experiences.

Frequently Asked Questions

Are home warranty plans worth it for older homes?

Older homes with aging systems are the strongest case for a home warranty. A single HVAC or water heater replacement can cost $2,000 to $5,000, dwarfing the $500 to $700 annual premium. If the home is over fifteen years old and the major systems are original, a warranty can provide genuine financial protection during the first few years of ownership.

What does a home warranty typically exclude?

Home warranties exclude cosmetic damage, pre-existing conditions, improper installation, code violations, and items lacking maintenance records. Many also cap coverage per repair and per year. Outdoor systems like sprinklers and pools are usually excluded from base plans. Always read the specific exclusions in your contract before purchasing.

How much do home warranty plans cost per year?

Annual premiums range from $500 to $700 for a standard plan covering major systems and appliances, according to industry data. Service call fees add $75 to $125 per visit. Comprehensive plans covering additional items like pools or well pumps cost more, sometimes exceeding $1,000 annually.

Can I buy a home warranty after closing on a house?

Yes. Home warranties can be purchased at any time, not just during a real estate transaction. Most providers allow you to enroll online and coverage typically begins after a thirty-day waiting period. This waiting period prevents people from buying a warranty only after something breaks.

What is the best alternative to a home warranty?

The most effective alternative is a dedicated home repair savings fund. Setting aside $50 to $75 monthly builds a repair budget without coverage exclusions or service fees. For high-cost items like HVAC systems, manufacturer extended warranties often provide better value than a general home warranty plan.

How to Waterproof Plywood: 5 Methods That Actually Hold Up

Plywood Is Not Waterproof, and That’s a Problem

Standard plywood soaks up water like a sponge. Its layered veneer construction, held together by adhesives that vary widely in water resistance, as explained by Wikipedia, means moisture can seep in from any edge, any cut surface, any scratch in the face. Once water gets inside, the plies delaminate. The wood swells. Mold follows. Left unchecked, a piece of plywood that cost you forty bucks can rot through in a single wet season.

Knowing how to waterproof plywood correctly changes the equation entirely. A well-applied waterproof coating doesn’t just sit on the surface, it penetrates, bonds, and creates a barrier that turns a fragile material into something you can trust outdoors, in bathrooms, on boat decks, under tile, anywhere moisture lives.

The method you pick depends on where the plywood lives, what it needs to look like, and how long you need it to last.

“Need advice for waterproofing plywood. I made an exhaust fan manifold for my camper van. What would you use to seal the plywood? Polyurethane? I’ll try to avoid camping in heavy rain, but I want it to handle it.”

— u/kirbykoot in r/woodworking · 54 upvotes · 121 comments

Before Anything: Surface Prep Is Not Optional

No coating, no matter how expensive, will save plywood that hasn’t been prepped. The surface needs to be clean, dry, and slightly rough for any sealant to grip properly. Sand the plywood with 120 to 150 grit sandpaper, focusing on edges and corners where moisture intrusion starts.

Wipe away all dust with a tack cloth or a rag dampened with mineral spirits. Do not use water for cleaning, you are literally trying to keep water out of the wood.

Fill any voids, knot holes, or gaps with wood filler and sand flush once dry. The edges of plywood are the most vulnerable point. End grain is exposed across every ply, and water wicks into those layers fast. If you are doing this right, you will spend extra time on the edges with every method below.

“Will this waterproof my plywood? Planning to use it as a base for my outdoor turtle pond area.”

— u/potchy_22 in r/BeginnerWoodWorking · 9 comments

Method 1: Exterior Paint (Budget-Friendly, Solid Protection)

Exterior-grade latex or oil-based paint is the most accessible way to waterproof plywood. It is cheap, comes in any color, and requires no special equipment beyond a brush or roller. The paint forms a protective film on the surface that repels water and blocks UV damage. For plywood used in outdoor furniture, shed walls, or garden boxes, paint is often the right answer.

Start with an exterior wood primer, one coat, allowed to dry fully. Then apply two to three coats of exterior paint, letting each coat dry before the next. Pay extra attention to edges. Give them an extra pass.

Paint will crack and peel eventually, especially somewhere with freeze-thaw cycles, so plan on repainting every two to three years. It is not a forever solution, but it is a perfectly good one for most people.

Method 2: Polyurethane Varnish (Clear Finish, Natural Wood Look)

If you want the plywood to still look like wood, polyurethane is the move. Oil-based polyurethane penetrates deeper and provides better water resistance than water-based versions, though both work. The trade-off: oil-based poly yellows slightly over time, which matters on light woods like birch, but on darker plywood the color shift is barely noticeable.

Apply with a high-quality brush in thin, even coats. Thin coats cure harder and more evenly than thick ones. Sand lightly with 220 grit between coats to knock down any raised grain. Three coats is standard, four if the piece lives outside. Polyurethane holds up well on plywood furniture, cabinet boxes, and interior trim in moisture-prone rooms like bathrooms and laundry areas.

Method 3: Epoxy Resin (Maximum Protection, Marine-Grade)

Epoxy is what you use when the plywood absolutely cannot fail. Boat builders use it. Shower pan installers use it. Anyone who has ever watched a plywood project disintegrate and swore never again uses it. Epoxy creates a hard, impermeable shell that water cannot penetrate, period. It also adds structural strength, bonding the veneers together more tightly than the original glue.

The catch is cost and effort. Epoxy is expensive, requires mixing two parts in precise ratios, has a limited working time once mixed, and needs proper ventilation and gloves. You apply it with a roller or spreader, working quickly.

Two coats are typical, with light sanding between coats. The result is a glassy, nearly indestructible surface. If you are waterproofing a plywood boat deck or an outdoor kitchen countertop, epoxy is the answer and everything else is a compromise.

Method 4: Penetrating Wood Oil (Natural Look, Easy Reapplication)

Tung oil, linseed oil, and specialized deck oils soak into the wood fibers rather than sitting on top. They do not create a film, which means they never peel or crack. The wood breathes.

The trade-off: protection is less absolute than epoxy or polyurethane, and you need to reapply every six to twelve months depending on exposure. For plywood garden furniture, raised beds, or decorative outdoor pieces where you want the wood grain visible and you don’t mind an annual maintenance ritual, oil is the simplest path.

Apply liberally with a rag or brush, let it soak in for fifteen to twenty minutes, then wipe off the excess. Multiple thin coats beat one heavy one. The oil darkens the wood slightly and gives it a warm, matte finish that paint and poly can’t match.

Method 5: Liquid Rubber or Membrane Coating (Heavy-Duty, Flexible)

Liquid rubber coatings like Durabak or Red Guard create a thick, flexible waterproof membrane. Unlike paint or epoxy, these coatings stretch slightly as the wood expands and contracts with temperature and humidity changes. This makes them ideal for plywood decks, balconies, and flat roofs where movement is inevitable.

Application is straightforward: roll it on like thick paint, two to three coats, with curing time between each.

The finish is textured and rubbery, not something you would use on furniture, but for structural applications it is hard to beat. Red Guard waterproofing membrane is one of the most widely available options for this approach, commonly used under tile in bathrooms but equally effective on exterior plywood when applied according to manufacturer specs.

If the plywood will be walked on heavily, consider a deck coating waterproof system designed for foot traffic rather than a standard membrane product.

“What’s the best way to waterproof plywood for a travel trailer floor? I’ve got a 1991 camper and the floor needs replaced. Trying to figure out what product to use so I don’t have to do this again.”

— u/mountain_ad_8332 in r/traveltrailers · 7 upvotes · 10 comments

Which Method Should You Pick?

which method should you pick
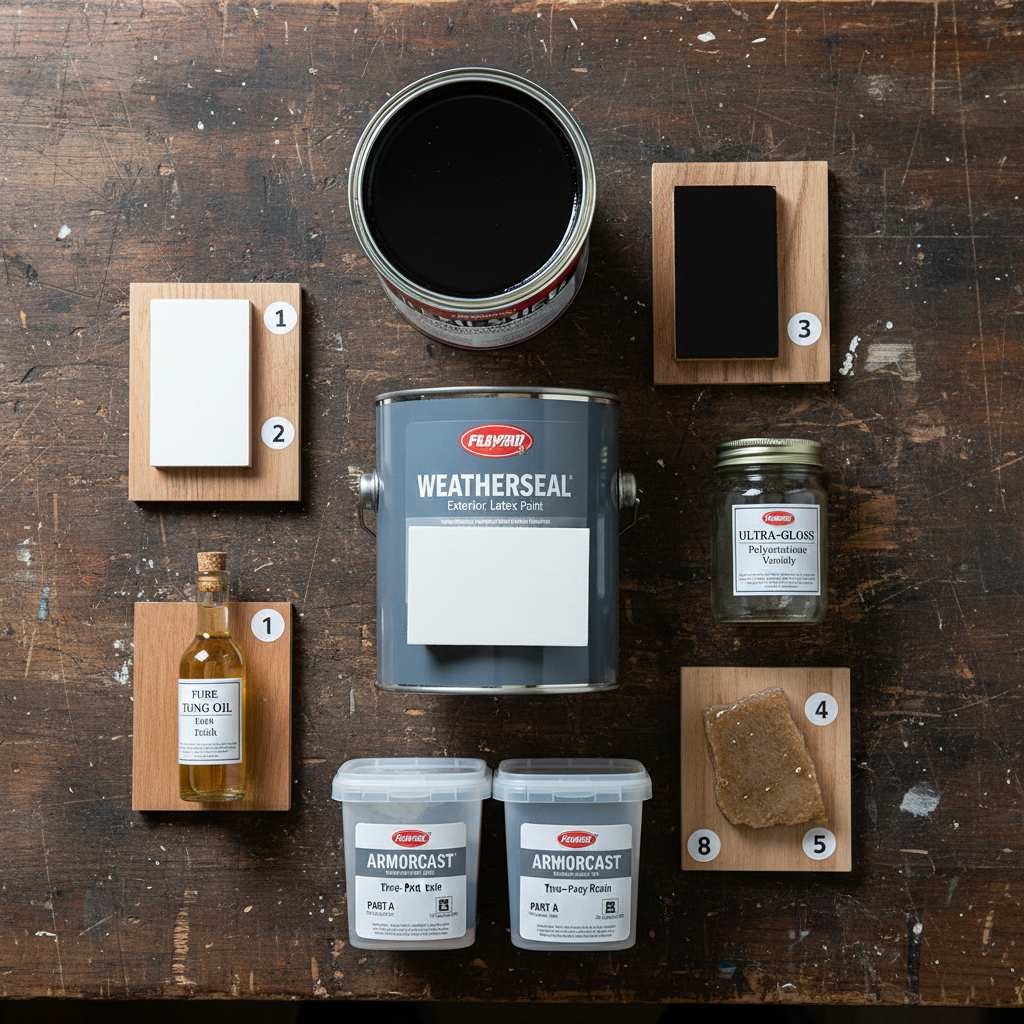
Five waterproofing options side by side: exterior paint, polyurethane, epoxy resin, tung oil, and liquid rubber membrane, each tested on a plywood square.
Situation Best Method Durability
Outdoor furniture, visible wood grain wanted Polyurethane or Wood Oil 2-4 years
Painted shed/garden box Exterior Paint 2-3 years
Boat deck, shower pan, absolute waterproof Epoxy Resin 10+ years
Balcony, deck, flat roof Liquid Rubber / Membrane 5-10 years
Camper van, trailer floor Epoxy or Liquid Rubber 5-10 years

Frequently Asked Questions

Can you permanently waterproof plywood?

No method makes plywood permanently waterproof in all conditions. Epoxy resin comes closest, lasting a decade or more with proper application. But all coatings degrade over time from UV exposure, temperature swings, and physical wear. The goal is to choose a method where the maintenance cycle matches your willingness to reapply.

How to waterproof plywood for outdoor use?

For outdoor plywood, exterior paint is the simplest option and works well for most projects. Epoxy resin offers the longest protection if you are willing to invest the time and money. Liquid rubber membranes excel on horizontal surfaces like decks. The key for all outdoor applications is sealing the edges thoroughly, since that is where water enters first.

Do you need to waterproof both sides of plywood?

Yes. Waterproofing only one side creates uneven moisture absorption, which leads to warping and cupping. Seal all six sides, faces and edges, for any plywood that will face moisture. If one side is inaccessible after installation, seal it before you put the piece in place.

Is marine plywood already waterproof?

Marine plywood uses waterproof glue between the veneers, but the wood itself still absorbs moisture. It resists delamination far better than standard plywood, but it still benefits from a surface sealant. Think of marine plywood as water-resistant, not waterproof. A coat of epoxy or polyurethane on top extends its life significantly.

How long does waterproofed plywood last outside?

With proper sealing and maintenance, outdoor plywood can last five to fifteen years depending on the method used and climate conditions. Epoxy-sealed plywood in a moderate climate can last over a decade. Painted plywood in a wet climate may need attention every two to three years. The biggest variable is how well the edges were sealed at the start.

Everything Homeowners Need To Know About Water Softeners

Water quality plays a major role in the comfort, efficiency, and longevity of a home. Many homeowners deal with hard water without fully realizing its impact on plumbing and appliances. Hard water contains high levels of calcium and magnesium that build up over time. These minerals reduce cleaning effectiveness and cause visible residue. Long term exposure can lead to costly maintenance issues. A water softener helps address these challenges by treating water before it enters the home. Understanding how water softeners work allows homeowners to make smarter decisions.

What Hard Water Is And Why It Matters

Hard water forms when groundwater absorbs minerals from soil and rock. These minerals are not harmful to drink, but they affect household systems. Scale buildup inside pipes restricts water flow and efficiency. Appliances like water heaters and dishwashers wear out faster with hard water exposure. Soap and detergent become less effective, increasing usage and cost. Fixtures often develop spotting and buildup. Recognizing hard water problems is the first step toward improvement.

How Water Softeners Work In A Home

Water softeners remove hardness minerals through a process called ion exchange. The system replaces calcium and magnesium with sodium or potassium ions. Resin beads inside the unit attract and trap unwanted minerals. Once saturated, the system regenerates using a salt solution. This process restores resin efficiency. Softened water then flows throughout the home. This cycle occurs automatically based on usage or schedules.

Key Components Of A Water Softener System

A typical water softener includes several important components. The resin tank contains beads responsible for mineral removal. The brine tank stores salt used during regeneration. Control valves manage water flow and regeneration timing. Distribution tubes ensure even contact with resin. Each part must function properly for optimal performance. Understanding components helps homeowners recognize potential issues.

Benefits Of Installing A Water Softener

Softened water provides noticeable benefits throughout the home. Soap lathers more effectively during cleaning and bathing. Appliances operate more efficiently and last longer. Plumbing systems experience less scaling and corrosion. Energy efficiency improves as water heaters heat softened water faster. Skin and hair often feel cleaner after bathing. Overall maintenance costs decrease over time.

Different Types Of Water Softeners Available

Several types of water softeners are available to homeowners. Salt based systems are the most common and effective. Salt free alternatives condition water without removing minerals. Dual tank systems support uninterrupted softened water supply. Magnetic and electronic systems claim improvement but vary in effectiveness. Choosing the right system depends on water hardness and household needs. Professional guidance helps ensure correct selection.

Choosing The Right Size And Capacity

Proper sizing ensures consistent soft water availability. System capacity depends on household size and water usage. Oversized units waste resources while undersized ones regenerate frequently. Water hardness levels influence capacity requirements. Accurate testing is necessary before purchase. Matching system size to needs improves efficiency. Correct sizing supports long term performance.

Efficiency And Modern Water Softener Technology

Modern systems offer significant improvements over older designs. Advanced controls minimize water and salt usage. Smart monitoring adjusts regeneration based on demand. A high efficiency water softener reduces operating costs while maintaining performance. These systems support sustainability and convenience. Improved technology enhances reliability. Efficiency upgrades benefit both homeowners and the environment.

Installation And Ongoing Maintenance Considerations

Installation can be professional or homeowner handled depending on complexity. Proper placement ensures effective whole home coverage. Routine maintenance includes salt refills and occasional cleaning. Annual inspections help identify wear or inefficiency. Brine tank maintenance prevents clogs and bridging. Consistent care extends system lifespan. Maintenance ensures continued water quality.

Conclusion

Water softeners offer practical solutions for managing hard water challenges. They protect plumbing, appliances, and home surfaces. Understanding system function helps homeowners make informed choices. Proper sizing and modern efficiency improve performance. Regular maintenance supports long term reliability. Softened water increases comfort and reduces costs. Knowledge empowers homeowners to improve water quality effectively.

What to Look for in a Home’s Foundation: A Comprehensive Guide

The foundation of a home is its most critical structural component, serving as the bedrock upon which the entire structure rests. It bears the immense weight of the house, distributes loads evenly to the ground, and protects the interior from moisture and ground movement. Despite its paramount importance, the foundation is often out of sight and, consequently, out of mind for many homeowners and prospective buyers. However, understanding the signs of a healthy foundation and recognizing potential issues is crucial for safeguarding one of life’s most significant investments, and KRS Lynchburg solutions can help owners approach that investment with a broader property-management mindset.

For homebuyers, a thorough assessment of a home’s foundation is non-negotiable. Foundation problems, if left unaddressed, can lead to a cascade of structural damage throughout the house, including cracked walls, uneven floors, and compromised structural integrity. The financial implications of repairing significant foundation damage can be substantial, often running into tens of thousands of dollars, and can severely impact a property’s resale value. Therefore, being equipped with the knowledge to identify early warning signs can save considerable time, money, and stress in the long run.

This comprehensive guide aims to demystify the complexities of home foundations. We will explore the different types of foundations commonly found in residential properties, detail the key interior and exterior indicators of potential problems, and help distinguish between minor cosmetic flaws and serious structural concerns. Furthermore, we will discuss the vital role of professional home inspectors and offer practical advice on preventative measures and ongoing maintenance. By the end of this article, you will be better prepared to evaluate a home’s foundation with confidence, ensuring the stability and longevity of your potential property.
what-to-look-for-in-a-homes-foundation-a-comprehen-2

Understanding Different Foundation Types

Before delving into the specifics of identifying foundation problems, it is essential to understand the various types of foundations commonly used in residential construction. Each type has its own characteristics, advantages, and potential vulnerabilities, which can influence how issues manifest and how they are addressed.

A. Slab-on-Grade Foundations

Slab-on-grade foundations are among the most common types, particularly in warmer climates. They consist of a single, thick concrete slab poured directly onto the ground. This slab is typically reinforced with steel rods or post-tension cables to enhance its strength and prevent cracking. The edges of the slab are often thicker, forming an integral footing that extends deeper into the ground. While cost-effective and quick to construct, slab foundations offer no crawl space or basement, making access to plumbing and electrical systems more challenging for repairs. They are also more susceptible to issues arising from soil expansion and contraction, which can lead to cracking if not properly engineered for local soil conditions.

B. Crawl Space Foundations

A crawl space foundation elevates the home a few feet off the ground, creating a shallow space between the bottom of the house and the earth. This space, typically 1 to 3 feet high, allows for easier access to plumbing, electrical wiring, and HVAC ducts for maintenance and repairs. Crawl spaces can be vented or unvented (encapsulated). Vented crawl spaces are common but can be prone to moisture issues, mold growth, and pest infestations if not properly managed. Unvented or encapsulated crawl spaces, which are sealed and often conditioned, offer better energy efficiency and moisture control but require careful installation to prevent humidity problems.

C. Basement Foundations

Basement foundations provide a full-height, habitable space beneath the main living areas of the home. They are constructed by excavating deep into the ground and building concrete or masonry walls that support the house above. Basements offer significant advantages, including additional living or storage space, protection from severe weather, and easy access to utilities. However, they are also the most expensive type of foundation to build and are particularly vulnerable to water intrusion, such as leaks, flooding, and hydrostatic pressure, which can lead to cracks in walls and floors. Proper waterproofing and drainage systems are critical for maintaining a dry and stable basement.

D. Common Materials

Regardless of the type, foundations are primarily constructed using durable materials designed to withstand significant loads and environmental stresses. The most common materials include poured concrete, concrete blocks (CMUs), and sometimes stone. Poured concrete foundations are known for their strength and monolithic nature, offering excellent resistance to water. Concrete block foundations are built using individual blocks mortared together, which can be more susceptible to cracking along mortar joints. Stone foundations, often found in older homes, are durable but can be prone to moisture penetration and require specialized repair techniques.

Key Indicators of Foundation Problems: What to Look For

Identifying foundation problems early can prevent more extensive and costly damage. While some signs might be subtle, others are glaring red flags that demand immediate attention. It’s crucial for homebuyers to conduct a thorough visual inspection, both inside and outside the property, and to understand what these indicators signify.

A. Exterior Warning Signs

The exterior of a home often provides the first clues about underlying foundation issues. A careful walk around the perimeter can reveal significant problems:

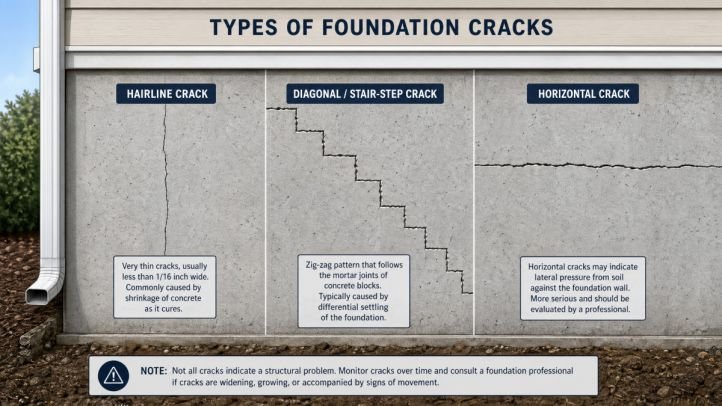
  • Cracks in Concrete/Brick: Not all cracks are created equal. Hairline cracks (less than 1/16 inch wide) in concrete or brick are often cosmetic, resulting from normal settling or concrete curing. However, diagonal or “stair-step” cracks in brickwork or masonry, especially those wider than 1/8 inch, are strong indicators of differential settlement or movement. Horizontal cracks are particularly concerning, as they often suggest significant hydrostatic pressure or soil expansion pushing against the foundation walls, potentially leading to structural failure.
  • Damaged or Uneven Brick Lines: If the brick or siding lines appear wavy, bowed, or uneven when viewed from a distance, it can indicate that the foundation beneath is shifting or settling unevenly.
  • Gaps Between Soil and Foundation: In dry climates or during periods of drought, soil can shrink and pull away from the foundation, creating gaps. This can lead to a lack of support for the foundation and potential for further settlement. Conversely, soil that is constantly saturated can exert immense pressure, leading to bowing or cracking.
  • Leaning or Bowing Walls: Exterior foundation walls that visibly lean inward or outward, or appear to bulge, are serious signs of structural distress. This is often caused by excessive lateral pressure from expansive soils or improper drainage.
  • Poor Drainage Around the Foundation: Water is the foundation’s worst enemy. If rainwater pools near the foundation, or if the ground slopes towards the house instead of away from it, it can lead to soil saturation, erosion, and increased hydrostatic pressure, all of which contribute to foundation problems. Look for signs of standing water, eroded soil, or damaged gutters and downspouts.

B. Interior Warning Signs

Foundation problems rarely stay confined to the exterior. As the foundation shifts, it impacts the entire structure, leading to noticeable signs inside the home:

  • Cracks in Walls and Ceilings: Similar to exterior cracks, interior cracks can be indicative of foundation movement. Look for cracks in drywall or plaster, especially those that are diagonal, stair-step, or wider than hairline. Cracks appearing above doorways, windows, or where walls meet ceilings are particularly suspicious.
  • Sticking Doors and Windows: If doors and windows suddenly become difficult to open or close, or if they no longer latch properly, it can be a sign that their frames have become distorted due to foundation shifting. Gaps between window frames and walls are also a red flag.
  • Uneven or Sloping Floors: Floors that feel spongy, sloped, or uneven when walked upon can indicate significant foundation settlement or pier and beam issues. Use a level to confirm any suspected slopes.
  • Gaps Between Walls and Ceilings/Floors: Visible gaps where walls meet ceilings or floors, or where baseboards have pulled away from the wall, suggest structural movement.
  • Separation of Cabinets or Countertops from Walls: In kitchens and bathrooms, if cabinets or countertops appear to be pulling away from the wall, it can be a secondary indicator of wall movement caused by foundation issues.

C. Basement/Crawl Space Specific Signs

These areas, being closest to the foundation, often reveal the most direct evidence of problems:

  • Moisture, Mold, or Musty Odors: Any signs of dampness, water stains, mold growth, or persistent musty odors in the basement or crawl space are critical indicators of water intrusion, which can severely compromise the foundation and indoor air quality.
  • Standing Water or Dampness: Puddles, wet spots, or consistently damp concrete or dirt floors point to drainage issues, leaks, or high water tables affecting the foundation.
  • Bowed or Leaning Basement Walls: Concrete or block basement walls that are visibly bowed inward, leaning, or show significant horizontal cracks are under immense pressure and are at risk of collapse.
  • Rotting Wood in Support Beams: In crawl spaces, inspect wooden support beams, floor joists, and subflooring for signs of rot, decay, or pest damage, often caused by excessive moisture.
  • Efflorescence (White Powdery Residue) on Walls: This crystalline deposit on concrete or masonry walls is a sign that water is seeping through the foundation, dissolving salts in the material, and leaving them behind as the water evaporates.

Differentiating Cosmetic vs. Structural Issues

When encountering cracks or other signs of potential foundation problems, it’s crucial to distinguish between cosmetic issues, which are often harmless, and structural concerns, which demand immediate attention. Misinterpreting these signs can lead to unnecessary worry or, conversely, to neglecting serious problems.

A. When to Worry: Signs of Structural Problems

Structural foundation problems typically indicate significant movement or failure of the foundation system, posing a threat to the home’s integrity. These issues are often characterized by:

  • Cracks Wider Than 1/8 Inch: While hairline cracks are usually benign, cracks that are consistently wider than 1/8 inch, especially if they are growing, are a strong indicator of structural movement.
  • Horizontal Cracks: As mentioned previously, horizontal cracks in foundation walls are almost always a sign of serious structural stress, often caused by hydrostatic pressure from saturated soil pushing against the wall. These cracks can compromise the wall’s ability to support vertical loads.
  • Vertical Cracks with Differential Movement: If a vertical crack shows one side of the crack higher or lower than the other, or if there’s a noticeable offset, it suggests significant vertical settlement or heaving.
  • Stair-Step Cracks in Masonry or Brickwork: While some minor stair-step cracks can be cosmetic, those that are wide, extend through multiple courses of brick, or show signs of differential movement are indicative of foundation settlement.
  • Rapidly Worsening Cracks: Any crack that appears suddenly or grows noticeably larger over a short period (weeks or months) is a cause for concern and should be evaluated by a professional.
  • Multiple Concurrent Signs: If you observe several warning signs simultaneously—for example, wide cracks, sticking doors, and sloping floors—it significantly increases the likelihood of a structural foundation problem.
  • Separation of Structural Elements: Gaps where the chimney pulls away from the house, or where additions separate from the main structure, are clear signs of differential movement.

B. When It Might Be Normal Settling: Cosmetic Issues

Many homes, especially newer constructions, experience some degree of settling as the soil beneath the foundation compacts and adjusts to the weight of the structure. This normal settling can lead to minor, non-structural issues:

  • Hairline Cracks: Very thin, superficial cracks (less than 1/16 inch wide) in concrete slabs, drywall, or plaster are common and usually harmless. They often result from concrete curing, minor temperature fluctuations, or the natural settling of the house.
  • Small Vertical Cracks: Short, thin vertical cracks in foundation walls or slabs that do not show any signs of widening or differential movement are often due to concrete shrinkage during curing and are typically not structural.
  • Minor Drywall Cracks at Corners: Small cracks that appear at the corners of windows or doors in drywall can be a result of normal stress concentrations and minor building movement, rather than significant foundation issues.
  • Seasonal Movement: Some homes, particularly in regions with expansive clay soils, may experience minor seasonal movement (heaving and settling) due to changes in soil moisture content. While these can cause minor cosmetic cracks, they are generally not indicative of a failing foundation if the movement is consistent and reversible.

It is always advisable to err on the side of caution. If you are unsure whether a crack or other sign is cosmetic or structural, consulting with a qualified home inspector or a structural engineer is the best course of action. Their expertise can provide an accurate assessment and recommend appropriate steps.

The Role of a Professional Home Inspector

Given the complexities of foundation systems and the potential severity of structural issues, the expertise of a professional home inspector is invaluable during the homebuying process. While a general home inspection covers numerous aspects of a property, a specialized foundation inspection or the keen eye of an experienced general inspector can be critical in identifying hidden problems.

A. Why a Specialized Foundation Inspection Might Be Necessary

In many cases, a standard home inspection will include a visual assessment of the foundation. However, if the general inspector identifies potential red flags, or if the property is older, located in an area known for soil instability, or shows multiple warning signs, a specialized foundation inspection by a structural engineer or a foundation repair specialist is highly recommended. These professionals possess the in-depth knowledge and specialized tools to conduct a more thorough evaluation, often involving detailed measurements, soil analysis, and an assessment of the entire structural system.

B. What a Professional Inspector Looks For

A professional home inspector, particularly one with experience in foundation issues, will systematically examine both the interior and exterior of the property. Their inspection typically includes:

  • Exterior Assessment: They will look for all the exterior warning signs discussed previously, such as cracks in brickwork, bowing walls, gaps between the foundation and soil, and proper drainage. They will also assess the grading around the house and the condition of gutters and downspouts.
  • Interior Assessment: Inside the home, they will meticulously check for cracks in walls and ceilings, sticking doors and windows, uneven floors, and gaps where structural elements meet. They may use a level or laser to detect subtle slopes or deflections.
  • Basement/Crawl Space Examination: This is often the most revealing part of the inspection. Inspectors will look for moisture intrusion, mold, efflorescence, bowed or leaning walls, signs of pest infestation (especially in wood), and the condition of support beams and piers. They will also assess the ventilation and insulation in crawl spaces.
  • Structural Components: Beyond the foundation walls themselves, inspectors will evaluate the integrity of the framing, floor joists, and roof structure, as foundation problems can manifest in these areas.
  • Soil and Site Conditions: While not always a full geotechnical analysis, an inspector will consider the type of soil, the slope of the land, and any nearby trees or water sources that could impact the foundation.

C. Importance of Getting a Second Opinion for Serious Concerns

If a home inspector identifies significant foundation issues, it is prudent to obtain a second opinion, ideally from a licensed structural engineer. A structural engineer can provide a more definitive diagnosis of the problem, determine its root cause, and recommend specific, engineered solutions. Their report can be invaluable during negotiations with sellers and in planning for future repairs. Never rely solely on a general contractor or a foundation repair company for a diagnosis, as they may have a vested interest in recommending costly repairs. An independent structural engineer provides an unbiased assessment, ensuring you have the most accurate information to make an informed decision.

Preventative Measures and Maintenance

While some foundation issues are unavoidable due to soil conditions or natural settling, many problems can be prevented or mitigated through proactive measures and diligent maintenance. Homeowners can significantly extend the life of their foundation and avoid costly repairs by implementing these strategies.

A. Proper Grading and Drainage

Effective water management around the home is paramount to foundation health. The ground surrounding the foundation should slope away from the house at a minimum rate of 6 inches over the first 10 feet. This ensures that rainwater and snowmelt are directed away from the foundation walls, preventing water from pooling and saturating the soil. Additionally, ensure that gutters are clean and free of debris, and that downspouts extend at least 5 to 10 feet away from the foundation, discharging water into a proper drainage system or a splash block.

B. Managing Vegetation Near the Foundation

Trees, shrubs, and other plants can have a significant impact on soil moisture levels around the foundation. Large trees with extensive root systems can draw a considerable amount of moisture from the soil, leading to soil shrinkage and potential settlement. Conversely, during periods of heavy rain, dense vegetation can trap moisture near the foundation. It is advisable to plant trees and large shrubs a safe distance from the foundation (typically at least the mature height of the tree) and to maintain a consistent moisture level in the soil around the foundation, especially during dry spells, to prevent extreme expansion and contraction.

C. Regular Visual Inspections by Homeowners

Homeowners should conduct regular visual inspections of their foundation, both inside and out, at least once a year, and more frequently after significant weather events (e.g., heavy rains, droughts, freezes). This proactive approach allows for the early detection of minor issues before they escalate into major problems. Look for new cracks, changes in existing cracks, signs of moisture, or any other anomalies. Pay particular attention to areas where plumbing lines enter or exit the foundation, as these are common points for water intrusion.

By taking these preventative steps and staying vigilant, homeowners can play a crucial role in maintaining the integrity of their home’s foundation, protecting their investment, and ensuring a safe and stable living environment.

Frequently Asked Questions (FAQ)

Q: How much does foundation repair cost?
A: The cost of foundation repair varies widely depending on the type of foundation, the severity of the damage, the repair method required, and the local labor rates. Minor repairs, such as crack injections, might cost a few hundred to a couple of thousand dollars. More extensive repairs, like pier and beam adjustments, slab jacking, or underpinning, can range from $5,000 to $20,000 or more. In severe cases, a complete foundation replacement can exceed $50,000. It is crucial to get multiple quotes from reputable foundation repair specialists and, ideally, a structural engineer’s assessment before proceeding.
Q: Can I buy a house with foundation problems?
A: Yes, it is possible to buy a house with foundation problems, but it requires careful consideration and due diligence. If you are considering such a purchase, it is imperative to have a thorough inspection by a qualified structural engineer to understand the extent of the damage, the cause, and the recommended repairs. Obtain detailed repair estimates and factor these costs into your offer. Ensure that the repairs are performed by licensed professionals and come with a transferable warranty. Buying a home with existing foundation issues can be a good opportunity to negotiate a lower price, but it also comes with inherent risks and potential future headaches if not managed properly.
Q: What causes foundation problems?
A: Foundation problems are typically caused by a combination of factors, primarily related to soil conditions and water management. Common causes include:

  • Expansive Soils: Clay-rich soils that expand when wet and shrink when dry can exert immense pressure on foundations, leading to movement.
  • Poor Drainage: Inadequate grading, clogged gutters, or improper downspout extensions can lead to water pooling around the foundation, saturating the soil and causing hydrostatic pressure or erosion.
  • Soil Settlement: Poorly compacted fill soil or natural soil consolidation over time can lead to uneven settlement of the foundation.
  • Plumbing Leaks: Leaking pipes under the slab or in the crawl space can saturate the soil, leading to localized settlement or heave.
  • Tree Roots: Large tree roots near the foundation can draw moisture from the soil, causing it to shrink, or physically push against the foundation.
  • Earthquakes or Seismic Activity: While less common, significant seismic events can cause sudden and severe foundation damage.
Q: How long do foundations last?
A: The lifespan of a home foundation can vary significantly based on its type, construction quality, soil conditions, climate, and maintenance. Generally, well-built concrete slab and poured concrete basement foundations can last for 75 to 100 years or even longer with proper care. Concrete block foundations typically have a similar lifespan. However, factors like persistent moisture issues, expansive soils, or lack of maintenance can significantly shorten a foundation’s effective life. Regular inspections and timely repairs are key to maximizing a foundation’s longevity.

Conclusion: Protecting Your Investment

The foundation is the silent guardian of your home, tirelessly supporting its structure and protecting your investment. While often overlooked, its health is paramount to the overall stability and longevity of the property. For both prospective homebuyers and current homeowners, understanding the nuances of foundation types, recognizing the subtle and overt signs of distress, and knowing when to seek professional help are indispensable skills.

From hairline cracks that are merely cosmetic to significant horizontal fissures that signal serious structural compromise, the ability to differentiate between minor settling and critical issues can save considerable financial burden and emotional stress. Remember that water management through proper grading and drainage, along with thoughtful landscaping, plays a crucial role in preventing many common foundation problems.

Ultimately, a home is one of the most significant investments you will make. By being proactive in your inspections, informed about potential warning signs, and judicious in seeking expert advice from qualified home inspectors and structural engineers, you can ensure that the bedrock of your home remains solid for years to come. Protecting your foundation is not just about maintaining the physical structure; it is about safeguarding your peace of mind and the value of your property.
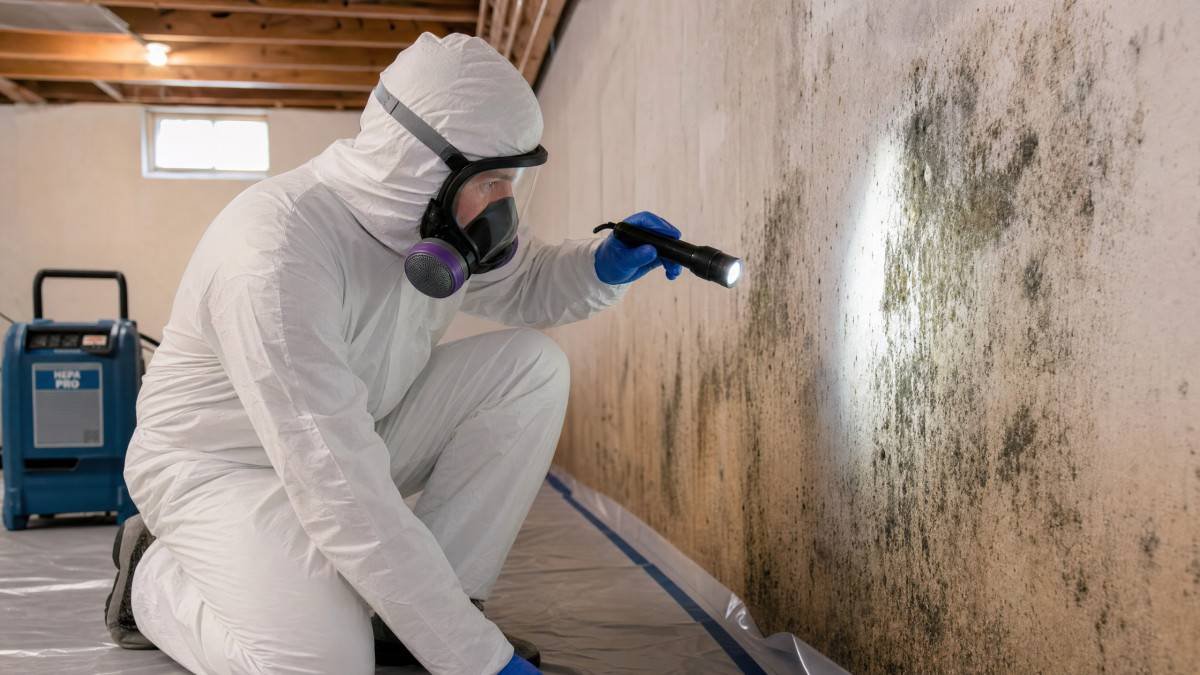
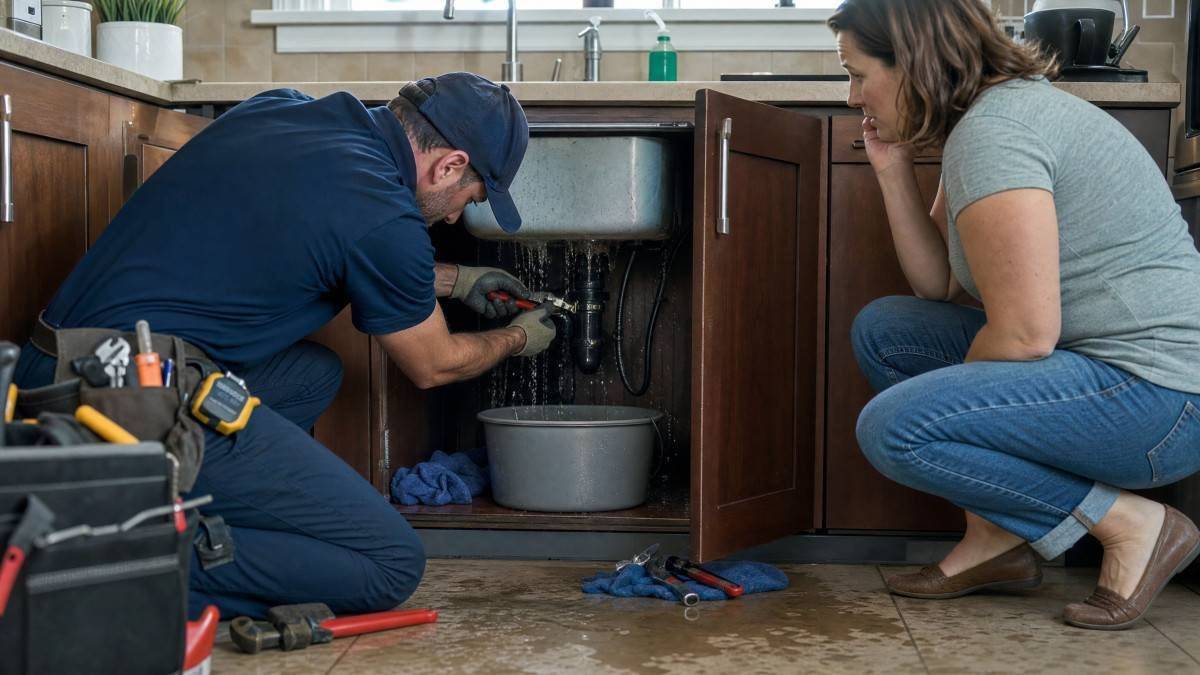
Evaluating the Energy Efficiency of a House

In an era of rising energy costs and increasing environmental awareness, the energy efficiency of a home has become a critical factor for both homeowners and prospective buyers. An energy-efficient house not only contributes to a healthier planet but also translates into significant savings on utility bills, enhanced indoor comfort, and often a higher resale value. Understanding how to evaluate a home’s energy performance is essential for making informed decisions, whether you’re looking to reduce your carbon footprint or simply save money. This comprehensive article will guide you through various methods of assessing a home’s energy efficiency, highlight key features to look for, and explain the benefits of professional energy audits and certifications, empowering you to create or choose a more sustainable and cost-effective living space, with property management Richmond VA offering another lens for long-term property planning.

Understanding Home Energy Audits

A home energy audit, also known as a home energy assessment, is a systematic evaluation of a home’s energy consumption. Its primary purpose is to identify areas where energy is being wasted and to recommend improvements that can enhance efficiency.

evaluating-the-energy-efficiency-of-a-house-2

A. What is a Home Energy Audit?

An energy audit involves a thorough inspection of a home’s structure, systems, and appliances to pinpoint inefficiencies. This can range from obvious issues like leaky windows to hidden problems such as inadequate insulation or inefficient HVAC systems. The goal is to provide a holistic view of a home’s energy performance and suggest cost-effective solutions.

B. DIY Home Energy Assessment

While a professional audit offers the most comprehensive insights, homeowners can perform a basic DIY assessment to identify common energy waste culprits:

  • Visual Inspection: Look for obvious signs of wear and tear, such as cracks in walls, gaps around pipes, or damaged weatherstripping around doors and windows.
  • Checking Insulation Levels: Inspect insulation in the attic, walls, and floors. Ensure it meets recommended R-values for your climate zone and is free from gaps or compression.
  • Identifying Air Leaks: Perform a simple
    candle test around windows, doors, and electrical outlets to detect drafts. Smoke pencils or incense sticks can also reveal air movement.
  • Inspecting Heating and Cooling Equipment (HVAC): Check filters regularly and ensure the system is properly maintained. Note the age of the unit, as older systems are typically less efficient.
  • Assessing Lighting and Appliance Efficiency: Replace incandescent bulbs with LEDs and consider the energy ratings of major appliances.

C. Professional Home Energy Audit

For a more detailed and accurate assessment, a professional home energy audit is recommended. Certified energy auditors use specialized tools and techniques to provide a comprehensive analysis:

  • Blower Door Test: This test depressurizes the house to locate and quantify air leaks, revealing areas where conditioned air is escaping.
  • Thermographic Scan: Using infrared cameras, auditors can visualize heat loss and gain through walls, ceilings, and windows, identifying areas of poor insulation or air leakage.
  • Combustion Analysis: This ensures that heating systems are operating safely and efficiently, checking for proper ventilation and potential carbon monoxide leaks.

The auditor provides a detailed report with prioritized recommendations for improvements, often including estimated cost savings and payback periods.

Key Features of an Energy-Efficient Home

When evaluating a home, several key features contribute significantly to its overall energy efficiency.

A. Insulation and Air Sealing

Proper insulation in the attic, walls, and floors is paramount for maintaining comfortable indoor temperatures and reducing the workload on HVAC systems. The effectiveness of insulation is measured by its R-value, with higher values indicating better thermal resistance. Equally important is air sealing, which involves caulking and weatherstripping gaps and cracks to prevent conditioned air from escaping and unconditioned air from entering.

B. Windows and Doors

Windows and doors can be major sources of heat loss or gain. Energy-efficient windows, such as double or triple-pane with low-emissivity (low-E) coatings, significantly reduce heat transfer. Properly sealed and insulated doors also play a crucial role in preventing drafts and maintaining indoor comfort.

C. HVAC Systems

The heating, ventilation, and air conditioning (HVAC) system is often the largest energy consumer in a home. High-efficiency furnaces, air conditioners, and heat pumps, particularly those with ENERGY STAR ratings, can drastically reduce energy consumption. Regular maintenance, including filter changes and professional tune-ups, ensures optimal performance. Proper sizing of the HVAC system is also critical; an oversized unit will cycle on and off frequently, leading to inefficiency and discomfort.

D. Water Heating

Water heating accounts for a significant portion of household energy use. Tankless water heaters, which heat water on demand, and heat pump water heaters, which extract heat from the air, are more energy-efficient alternatives to traditional storage tank models. Insulating hot water pipes and the water heater tank itself can also reduce heat loss.

E. Appliances and Electronics

Modern appliances with ENERGY STAR certification are designed to consume less energy. Beyond major appliances, smart thermostats and home energy management systems can optimize energy use by learning household patterns and adjusting settings accordingly. Unplugging electronics when not in use (vampire load) also contributes to savings.

F. Lighting

Switching from incandescent bulbs to LED lighting can dramatically reduce electricity consumption. Maximizing natural daylight through strategic window placement and interior design can also lessen the reliance on artificial lighting.

G. Roofing and Siding

The exterior envelope of a home plays a vital role in its energy performance. Cool roofs, which use reflective materials, can reduce heat absorption, especially in warmer climates. Insulated siding can add an extra layer of thermal protection to the home’s exterior.

Energy Ratings and Certifications

Several standardized ratings and certifications help quantify a home’s energy efficiency.

A. Home Energy Rating System (HERS) Index

The HERS Index is a nationally recognized system for inspecting and calculating a home’s energy performance. A HERS Index score of 100 represents the energy use of a standard new home, while a score of 0 indicates a net-zero energy home. The lower the HERS Index score, the more energy-efficient the home. This index provides a clear benchmark for comparing the energy performance of different properties.

B. ENERGY STAR Certification

Homes and appliances that earn the ENERGY STAR label meet strict energy efficiency guidelines set by the U.S. Environmental Protection Agency. ENERGY STAR certified homes are typically 10-20% more energy-efficient than standard homes, offering superior comfort and lower utility bills.

C. Other Green Building Certifications

Other certifications like LEED (Leadership in Energy and Environmental Design) and Green Globes also recognize homes built with sustainable and energy-efficient practices, often encompassing broader environmental considerations beyond just energy use.

Improving Your Home’s Energy Efficiency

Even if a home isn’t perfectly energy-efficient, there are many ways to improve its performance.

A. Prioritizing Upgrades

Energy auditors can help prioritize upgrades based on their cost-effectiveness and potential return on investment (ROI). Often, sealing air leaks and improving insulation offer the quickest and most significant savings.

B. Available Incentives and Rebates

Many federal, state, and local governments, as well as utility companies, offer incentives, rebates, and tax credits for energy-efficient home improvements. Researching these programs can significantly reduce the cost of upgrades.

C. Behavioral Changes

Simple behavioral changes, such as adjusting thermostat settings, turning off lights when leaving a room, and using appliances during off-peak hours, can also contribute to reduced energy consumption.

Conclusion: Investing in a Sustainable Future

Evaluating the energy efficiency of a house is a crucial step for any homeowner or prospective buyer. By understanding the principles of energy audits, recognizing key energy-efficient features, and leveraging available ratings and certifications, you can make informed decisions that lead to a more comfortable, cost-effective, and environmentally friendly living space. Investing in energy efficiency not only benefits your wallet and well-being but also contributes to a more sustainable future for everyone. Proactive engagement with your home’s energy performance is an investment that pays dividends for years to come.

Waterproofing Cinder Block Walls: A Complete How-To Guide

Waterproofing cinder block walls requires cleaning the surface, repairing cracks, and applying a penetrating masonry sealer or elastomeric coating in two coats. Interior sealers like DRYLOK stop vapor and minor seepage; exterior drainage membranes handle heavy hydrostatic pressure. Most homeowners complete the interior approach in a weekend for under $200, while Keyrenter Richmond can be a useful resource for owners considering ongoing property upkeep.

Why Cinder Block Walls Leak — and What You’re Really Fighting

Cinder block walls leak because concrete masonry units (CMUs) are porous by design, with voids inside each block and mortar joints that crack over time as the foundation settles. Water migrates through three pathways: capillary absorption through the block face, direct infiltration through cracked mortar joints, and hydrostatic pressure forcing water through the hollow cores during heavy rain.

The white chalky residue you see on older block walls is efflorescence — mineral salts carried to the surface by evaporating moisture. It’s cosmetic on its own, but it signals active moisture movement through the wall. Left untreated, repeated wet-dry cycles cause spalling, freeze-thaw damage, and eventually structural compromise of the mortar joints.

Two other forces work against you:

  • Hydrostatic pressure: Saturated soil outside the wall can exert 60+ lbs per square foot of outward force on the block face, driving water through even hairline cracks.
  • Negative-side pressure: Water vapor migrates from wetter soil toward the drier interior, pushing through the block regardless of surface coatings applied only to the outside.

Interior vs. Exterior Waterproofing: Which Approach Is Right for You?

Interior waterproofing blocks moisture from entering the living space; exterior waterproofing keeps water away from the foundation itself. Interior methods are cheaper and accessible without excavation, but they don’t address the source. Exterior methods are the gold standard but cost 10–20× more due to excavation.

Approach Best For DIY Difficulty Average Cost Longevity
Interior masonry sealer (DRYLOK, RadonSeal) Vapor/minor seepage, new builds Easy $0.15–$0.30/sq ft 5–10 years
Interior elastomeric coating Moderate seepage, visible cracks Moderate $0.50–$1.00/sq ft 10–15 years
Interior drainage system (French drain + sump) Chronic flooding, high water table Professional only $4,000–$12,000 25+ years
Exterior membrane + drainage board New construction, severe hydrostatic pressure Professional only $8,000–$25,000 Lifetime

For most homeowners dealing with damp walls, minor seepage, or efflorescence, interior masonry sealer is the right starting point. It stops vapor transmission and minor capillary water without requiring excavation.

How to Waterproof Cinder Block Walls: Step-by-Step

Waterproofing cinder block walls starts with thorough surface preparation — the sealer is only as good as the bond it makes with the block. Budget a full day for prep and two half-days for application and cure between coats.

What You’ll Need

  • Wire brush and masonry chisel
  • Muriatic acid or masonry cleaner (for efflorescence)
  • Hydraulic cement (for active cracks and holes)
  • Masonry waterproofer: DRYLOK Extreme, RadonSeal Plus, or equivalent
  • Thick-nap (¾”) roller and masonry brush for joints
  • Safety glasses, nitrile gloves, and respirator

Step 1 — Remove Efflorescence and Loose Material

Scrub all white mineral deposits off the block face using a stiff wire brush. For heavy buildup, apply a diluted muriatic acid solution (1 part acid to 10 parts water), let it fizz for 5 minutes, then neutralize with a baking soda wash. Chip away any spalling concrete or loose mortar with a masonry chisel.

Step 2 — Repair Cracks and Mortar Joints

Fill cracks wider than 1/16″ with hydraulic cement, which expands as it cures and can stop active water flow. For deteriorated mortar joints, rake out the loose material to a depth of ¾” and repoint with Type S mortar. Allow 24–48 hours of cure time before waterproofing.

Step 3, Clean the Wall Thoroughly

Rinse the entire wall with clean water and let it dry to a damp but not wet state. Most masonry sealers actually bond better to a slightly damp surface, check your product label. Remove all dust, oil stains, and any previous paint or sealer that is peeling or flaking.

Step 4, Apply the First Coat

Work the sealer into the block face and mortar joints using a masonry brush first, then back-roll with a ¾” nap roller to ensure complete coverage. Apply generously, DRYLOK Extreme, for example, recommends a minimum of 1 gallon per 75 sq ft for the first coat. Work from top to bottom to catch drips.

Step 5, Apply the Second Coat

Allow the first coat to cure per manufacturer directions (typically 4–6 hours for DRYLOK). Apply a second full coat in the opposite direction from the first (horizontal vs. vertical strokes) to eliminate pinholes. Two coats are not optional, a single coat leaves micro-voids that allow vapor passage.

Step 6, Address the Exterior Grade

Even the best interior sealer won’t last if soil grading pushes water toward your foundation. Ensure the ground slopes away from the house at a minimum of 6″ drop per 10′ run. Clean gutters and extend downspouts at least 6 feet from the foundation to redirect roof runoff.

Best Products for Waterproofing Cinder Block Walls

Not all masonry waterproofers work the same way on cinder blocks. Penetrating sealers bond chemically inside the block’s pores; surface coatings create a physical barrier on top. Here’s how the leading products compare:

Product Type Coverage Best For Price (1 gal)
DRYLOK Extreme Elastomeric surface coating 75 sq ft/gal (1st coat) Minor to moderate seepage, painted look ~$35
RadonSeal Plus Penetrating silicate sealer 100–200 sq ft/gal Vapor control, radon reduction, new blocks ~$45
Ames Block & Wall Liquid rubber coating 50 sq ft/gal Heavy seepage, flexible crack bridging ~$65
UGL Drylok Fast Plug Hydraulic cement plug Spot repair only Active water leaks, crack filling ~$18

Bottom line: DRYLOK Extreme is the most widely available and beginner-friendly for standard damp basement walls. RadonSeal Plus is the better choice if radon is also a concern (common in CMU basements) since its penetrating chemistry also reduces radon entry pathways. For walls with active seepage or cracks wider than 1/8″, Ames Block & Wall’s rubber-based formula bridges movement better than rigid surface coatings.

Hard Cases: Efflorescence Keeps Coming Back, Active Leaks, and Hollow CMU Cores

Some cinder block walls resist standard treatment because the problem is deeper than the surface. If efflorescence reappears within a year after waterproofing, or if you see water actively weeping through the wall after heavy rain, you’re dealing with conditions that require a different approach.

Persistent efflorescence: The mineral salts are being continuously fed by moisture migrating through the block cores. Apply a penetrating silicate sealer (RadonSeal Plus or similar) first to chemically densify the block, then follow with a surface elastomeric coat. The two-product approach addresses both the vapor pathway and the surface protection.

Active water entry through mortar joints: Mix hydraulic cement to a stiff putty consistency and press it firmly into the wet joint, holding for 3–5 minutes until it sets. For large areas of deteriorated mortar, repointing the entire wall before waterproofing is more durable than trying to seal over crumbling joints.

Hollow CMU cores (extreme cases): When hydrostatic pressure forces water through the hollow interior cavities of the blocks, thinset mortar injection or an epoxy injection system (such as the ElastiPoxy method used by contractors) fills the voids and stops the entry path entirely. This is generally a professional repair costing $800–$2,500 depending on wall area.

When to Call a Waterproofing Contractor

DIY interior sealing works well for vapor transmission and minor dampness, but certain conditions require professional intervention to protect your foundation’s long-term structural integrity and prevent costly damage.

Call a professional when you notice:

  • Standing water on the basement floor after rain (not just damp walls)
  • Horizontal cracks in the block wall (a sign of lateral soil pressure, not just moisture)
  • Bowing or bulging of the wall face
  • Water entering through the floor-wall joint rather than through the wall itself
  • Interior drainage systems that already exist but are failing

Professional waterproofing for a 1,000 sq ft basement typically runs $5,000–$15,000 for interior drainage systems. For a detailed look at how professional waterproofing companies like B-Dry Waterproofing approach foundation sealing, see our full review of their patented system and pricing and $15,000–$30,000 for full exterior excavation and membrane installation. Three competitive quotes are essential, pricing varies widely by region and contractor approach.

For homes built before 1978, be aware that lead-based paint may be present on interior block walls, which affects how you can prep and disturb the surface. Federal RRP rules require certified contractors for projects that disturb more than 6 sq ft of painted surface in pre-1978 homes.

Frequently Asked Questions

How long does waterproofing cinder block walls last?

Interior surface coatings like DRYLOK Extreme typically last 5–10 years before needing reapplication, depending on the severity of moisture pressure. Penetrating sealers bond permanently to the block chemistry and don’t need reapplication, but surface coatings applied over them still wear. Exterior membrane systems last the lifetime of the foundation when properly installed.

Can I waterproof cinder block walls from the inside?

Yes, interior waterproofing is effective for stopping vapor transmission and minor seepage, which covers the majority of residential basement moisture problems. It does not work for walls under sustained hydrostatic pressure from a high water table, which requires exterior drainage or an interior French drain system to relieve the pressure before sealing.

Do I need to paint over waterproofing sealer?

Elastomeric sealers like DRYLOK come in white and tintable versions, so many homeowners use them as the final finish coat. If you want a different color or texture, you can paint over cured masonry sealer with latex masonry paint. Avoid oil-based paints over elastomeric coatings as they may not bond well or allow moisture vapor to pass through properly.

What’s the difference between cinder blocks and concrete blocks?

Original cinder blocks used coal cinders as aggregate and are no longer manufactured; most modern “cinder block” foundations are actually CMUs (concrete masonry units) made with Portland cement and aggregate. Both have similar porosity and are treated the same way for waterproofing purposes. The distinction matters only when sourcing specialty materials, as some product labels still specify “cinder block” vs. “concrete masonry unit.”

How do I know if my waterproofing cinder block walls project worked?

Inspect the wall after the first heavy rain following treatment. A properly sealed wall stays dry to the touch with no new efflorescence forming. For added confidence, tape a 12×12″ piece of plastic sheeting to the wall with foil tape and leave it for 24 hours, condensation on the room side means indoor humidity is the source, while moisture on the wall side confirms ongoing water infiltration that needs further attention.