Aqviz

How to Fix a Leaky Faucet: A Complete Step-by-Step Repair Guide

A dripping faucet wastes more than 3,000 gallons of water per year, according to the U.S. Environmental Protection Agency (EPA, 2023). Most faucet leaks trace back to a worn washer, a failing O-ring, or a degraded cartridge — all parts that cost less than $15 and require no licensed plumber to replace, making routine maintenance easier to plan alongside resources such as Murray Property Management.

This guide covers the complete repair process for the four most common faucet types, including cartridge, compression, ball, and ceramic disc designs.

Identify Your Faucet Type Before You Start

The correct repair method depends on your faucet’s internal mechanism — cartridge, compression, ball, or ceramic disc. Identifying your type before buying parts saves a wasted trip and ensures the repair actually holds.

Faucet Type Handle Style Internal Part Typical Repair
Compression Two separate handles Rubber seat washer Replace washer ($2–$5)
Cartridge Single or double handle Plastic/brass cartridge Replace cartridge ($10–$30)
Ball Single rotating ball Spring, seat, O-rings Replace ball kit ($15–$25)
Ceramic disc Single lever Ceramic cylinder Clean or replace disc ($20–$50)

Compression faucets are common in older homes built before the 1970s. Cartridge and ceramic disc models dominate modern kitchens and bathrooms from brands like Moen, Delta, and Kohler.

Tools and Materials You Will Need

Gathering everything before turning off the water supply keeps the repair moving without a mid-job hardware store run. Most items cost under $5 each and most homeowners already own the hand tools.

  • Adjustable wrench or basin wrench
  • Phillips and flathead screwdrivers
  • Allen key set (hex keys, typically 1/8″ to 3/16″)
  • Needle-nose pliers
  • Replacement cartridge or washer kit (brand-specific)
  • O-ring kit or plumber’s grease (silicone-based)
  • Plumber’s tape (PTFE thread seal tape)
  • A bucket or towel to catch residual water

Total materials cost for a standard cartridge repair runs $10–$35 depending on your faucet brand. Most homeowners already own the hand tools.

How to Fix a Leaky Faucet: Step-by-Step

These steps apply to the most common repair scenario — a cartridge or compression faucet dripping from the spout. Adjust the cartridge removal step for your specific faucet type using the manufacturer’s instructions or the table above.

Step 1: Shut Off the Water Supply

Locate the shutoff valves beneath the sink and turn them clockwise until they stop. If no shutoff valves exist, turn off the main house supply valve instead.

Open the faucet fully to drain residual pressure before disassembly. Place a towel or bucket under the work area.

Step 2: Remove the Handle

Look for a decorative cap on top of the handle, which often pops off with a flathead screwdriver. Underneath sits a Phillips or Allen screw securing the handle to the stem.

Remove the screw and pull the handle straight up. If it resists, wiggle gently rather than prying, which can crack the handle.

Step 3: Remove the Cartridge or Stem

For cartridge faucets (Moen, Price Pfister), use needle-nose pliers or a cartridge puller tool to extract the cartridge straight upward. Note the orientation before pulling since the cartridge must reinstall facing the same direction.

For compression faucets, unscrew the packing nut with an adjustable wrench, then unscrew the stem counterclockwise until it lifts free. The rubber seat washer is threaded onto the bottom of the stem with a brass screw.
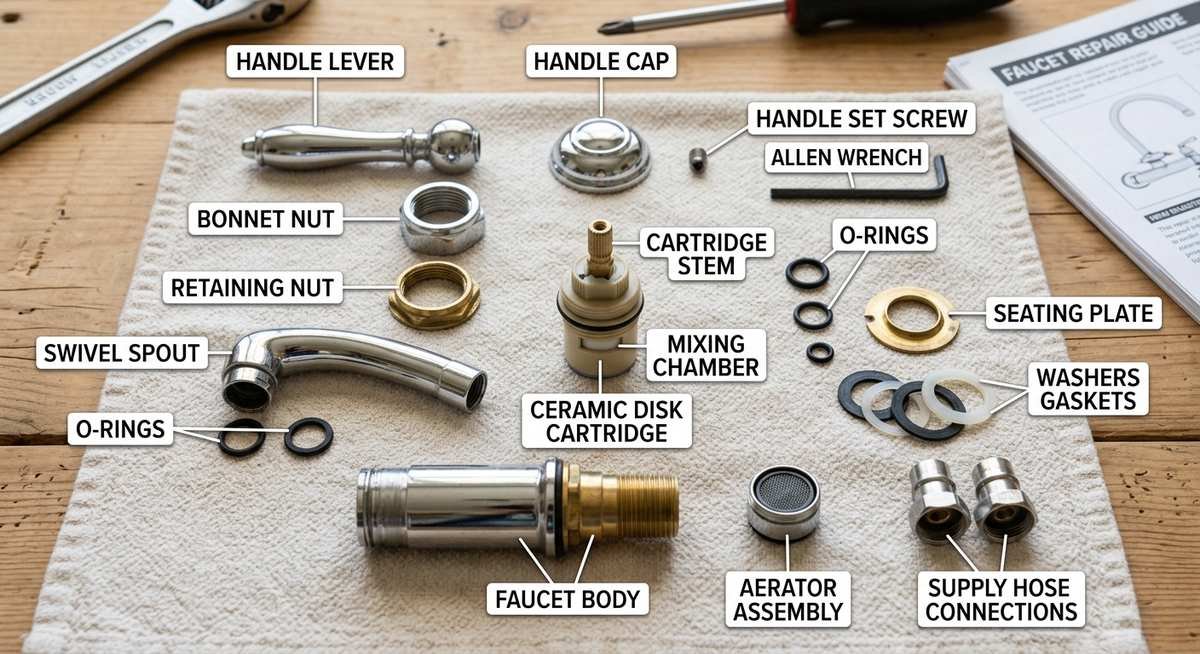
step 3 remove the cartridge or stem
Cartridge, O-rings, and washers: the parts most commonly responsible for faucet drips

Step 4: Replace the Worn Parts

Take the old cartridge or washer to the hardware store for an exact match, or photograph the part number printed on the cartridge body. Brand-specific cartridges (Moen 1225, Delta RP, Kohler Genuine Parts) are widely stocked at major retailers.

For compression faucets, unscrew the brass seat washer screw, swap in the matching rubber washer, and apply a thin coat of silicone grease to the new washer before reassembly. Also inspect the O-rings on the stem for cracking, replace any that look worn while the faucet is open.

Step 5: Reassemble and Test

Insert the new cartridge in the correct orientation and press it firmly into the valve body until it seats fully. Replace the packing nut or retaining clip, reattach the handle, and reinstall the screw and decorative cap.

Turn the shutoff valves back on slowly. Run both hot and cold water for 30 seconds and watch the spout for drips. A properly repaired faucet should show zero dripping within a few seconds of closing the handle.

DIY vs. Professional Repair: What It Actually Costs

DIY faucet repair typically costs $5–$50 in parts. Hiring a plumber for the same job runs $100–$300 depending on your location and the complexity of the leak.

Repair Type DIY Parts Cost Professional Labor Total DIY
Washer replacement (compression) $2–$5 $100–$175 $2–$5
Cartridge replacement $10–$30 $125–$200 $10–$30
Ball faucet repair kit $15–$25 $150–$250 $15–$25
Ceramic disc replacement $20–$50 $150–$300 $20–$50

On r/askaplumber, a community focused on DIY plumbing advice, multiple licensed plumbers confirm that most cartridge faucet repairs are beginner-friendly, the hardest part is usually extracting a stuck cartridge, not the repair itself.

“Most faucet cartridge replacements are genuinely simple. The biggest mistake I see is people buying the wrong cartridge. Take the old one to the store or look up your faucet’s model number first.”

— r/askaplumber, community focused on plumbing help, April 2026 (from a licensed plumber’s post)

This aligns with guidance from the EPA’s Fix a Leak Week initiative, which confirms that homeowners can address the majority of household leaks using basic tools available at hardware stores.

Troubleshooting: Faucet Still Dripping After Repair

If the faucet continues to drip after replacing the cartridge or washer, the problem usually points to one of four causes: incorrect cartridge orientation, a damaged valve seat, a worn O-ring left in place, or using the wrong replacement part number.

  • Cartridge installed backwards: Remove and flip 180 degrees. Cartridge faucets are orientation-sensitive.
  • Damaged valve seat: The valve seat is the metal surface inside the faucet body that the washer presses against. A pitted or corroded seat causes leaks even with a new washer. Resurface with a seat wrench tool or replace the faucet body.
  • Wrong part number: Generic washers may not seal properly. Order the OEM part using your faucet’s model number from the underside of the unit.
  • Worn O-rings not replaced: O-rings deteriorate independently of the cartridge. Replace all O-rings in the assembly while it is open.

Plumbers in r/askaplumber, a community that fields hundreds of faucet repair questions monthly, report that stripped cartridge retaining clips are a common hidden issue: if the clip is damaged, the cartridge cannot maintain sealing pressure regardless of how new it is.

When to Call a Professional

DIY repair is the right call for most faucet leaks, but specific scenarios justify hiring a plumber: corrosion inside the valve body beyond what a new cartridge can address, a leak originating from the supply lines under the sink rather than the faucet body, or water pressure that drops noticeably when the faucet is opened (which signals a supply line issue, not a faucet problem).

Leaks at the faucet base that persist after tightening the mounting nuts also indicate internal O-ring failure or a cracked faucet body. At that point, full faucet replacement is often more economical than repair.

A faucet that has been repaired three or more times in two years has likely reached the end of its service life. The $50–$150 cost of a new mid-range faucet typically pays back within a year in parts savings and reduced water waste, a quiet arithmetic that most repair guides skip entirely.

The Water and Money You Save by Fixing a Drip

One dripping faucet releasing one drop per second wastes approximately 2,082 gallons per year, according to the American Water Works Association Research Foundation. At average U.S. water rates of $0.005 per gallon (EPA, 2023), that is roughly $10–$20 per year per faucet, a figure that multiplies quickly in households with two or three leaking fixtures.

Beyond the bill, that water volume represents real consumption in drought-stressed regions. In Western U.S. states where water pricing includes tiered usage charges, a persistent drip can add $50–$100 annually to a household water bill at the upper rate tier.

Frequently Asked Questions

How long does it take to fix a leaky faucet?

Most faucet repairs take 30–60 minutes for a first-timer. An experienced DIYer familiar with their faucet type can complete the job in 15–20 minutes. The exception is a stuck cartridge, which can add 10–20 minutes if it requires a cartridge puller tool.

What tools do I need to fix a leaky faucet?

An adjustable wrench, Phillips and flathead screwdrivers, and Allen keys cover the majority of repairs. A needle-nose pliers and cartridge puller are useful for cartridge faucets. No specialty plumbing tools are needed for standard repairs.

What causes a faucet to drip?

The most common cause is a worn rubber washer or O-ring that no longer forms a watertight seal when the valve is closed. In cartridge faucets, a degraded cartridge body allows water to bypass the seal. In ball faucets, worn springs and seats allow water through even when the ball is in the closed position.

Can I fix a leaky faucet myself without plumbing experience?

Yes, for the majority of residential faucets. Cartridge and compression faucet repairs require no soldering, no pipe cutting, and no specialized knowledge. The main skill is patience: working methodically, noting part orientation before removal, and sourcing the correct replacement part.

How much does it cost to fix a leaky faucet?

DIY repair costs $5–$50 in parts depending on faucet type and brand. Professional plumber repair runs $100–$300 in most U.S. markets, including labor. Washer-only repairs for compression faucets are the cheapest: the rubber washer itself costs $2–$5 at any hardware store.

Why does my faucet drip only on the hot side?

Hot water causes rubber washers and O-rings to degrade faster than cold water does. If the drip comes only when the hot handle is open, the washer or cartridge on the hot side is likely the culprit. Replace only the hot side components and test before touching the cold side.

Is fixing a kitchen faucet leak different from a bathroom faucet?

The basic repair process is identical, but kitchen faucets often have pull-down spray heads and flexible hoses as additional leak points. If the leak comes from under the sink rather than the spout, inspect the hose connections first. Bathroom faucets are often more accessible and simpler to disassemble.

Do Moen and Delta faucets need brand-specific parts?

Yes. Moen, Delta, Kohler, and other major brands use proprietary cartridge dimensions. Generic cartridges rarely seal correctly in brand-name faucets. Use your faucet’s model number (usually on a label under the sink or in the installation manual) to order the exact OEM cartridge.
Landscaping Ideas Front Garden: Transform Your Curb Appeal in 2026

A well-planned front garden adds 5 to 10 percent to a home’s resale value, according to a widely cited study by Michigan State University’s Department of Horticulture. That return rivals some kitchen renovations, yet most homeowners underestimate how dramatically a thoughtful front yard makeover can shift buyer and neighbor perception alike, a point the Keyrenter Silicon Valley Palo Alto team can help owners consider within a broader property strategy.

The front garden is the one outdoor space every passerby judges. The best landscaping ideas front garden owners act on balance aesthetics, maintenance reality, climate, and budget within a space that typically gets less attention than the backyard.

Assess Your Front Garden Before You Plant Anything

Before buying a single plant or bag of mulch, spend time observing how your front yard actually behaves. Take note of where puddles sit after rain, which spots get harsh afternoon sun, and where shadows fall from the house or street trees.

Three factors dictate every landscape design decision: light, drainage, and scale. A front garden shaded by a mature oak needs entirely different plants than a south-facing strip that bakes from June through September.

Walk to the curb and study the view back toward your house. Most homeowners never do this. Notice the proportion between open lawn, planting beds, and hardscaping. A yard dominated by a single element, all lawn or all mulch beds, reads as unfinished regardless of how neat it looks.

Check your local HOA guidelines or municipal codes before planning anything structural. Fences, retaining walls, and even certain plant heights can require permits or neighbor notification in many communities.

Landscaping Ideas Front Garden: Design Styles and Aesthetics

Choosing a coherent design style prevents the cluttered, mismatched look that plagues many DIY front yards. Each style below suits different house architecture, maintenance tolerance, and climate.

Design Style Key Characteristics Best For Maintenance Level Est. Cost (500 sq ft)
Formal / Classic Symmetry, clipped hedges, defined borders Colonial, Georgian homes High (regular pruning) $2,500–$6,000
Cottage Garden Informal, layered perennials, colorful blooms Craftsman, Victorian homes Medium $800–$2,500
Modern / Minimalist Clean lines, ornamental grasses, bold texture Contemporary, midcentury homes Low–Medium $1,500–$4,000
Mediterranean Gravel, drought-tolerant shrubs, terracotta Spanish-style, stucco homes Low $1,000–$3,000
Native / Naturalistic Regional wildflowers, grasses, no lawn Any style, eco-conscious owners Very Low $600–$2,000
Cottage Rock Garden Boulders, ground covers, alpine plants Sloped lots, xeric climates Very Low $700–$2,200

The most common mistake is mixing elements from two or three incompatible styles. Cottage garden abundance doesn’t pair well with minimalist concrete paths. Pick one direction and commit to its plant palette and hardscape vocabulary.

That commitment is also where most resale value gets created. A yard with a recognizable, coherent identity photographs better and reads as “cared for” to buyers who can’t name a single plant in it.

Plant Selection: Flowers, Shrubs and Trees That Actually Thrive

The right plant in the right place is not a cliché but a practical rule that saves hundreds of dollars every year. A plant stressed by wrong light or soil conditions becomes a maintenance burden and rarely looks as good as the same species planted correctly elsewhere in the yard.

For foundation plantings, compact evergreens such as dwarf yew (Taxus densiformis), boxwood (Buxus sempervirens), or inkberry holly (Ilex glabra) provide year-round structure without outgrowing their space within five years. Many older suburban homes suffer from foundation shrubs that have grown into the windows because the original installer chose the wrong mature size.

Flowering perennials add seasonal color with less replanting effort than annuals. Coneflowers (Echinacea purpurea), black-eyed Susans (Rudbeckia fulgida), and catmint (Nepeta racemosa) return reliably in USDA zones 3 to 8 and require minimal supplemental water once established.

For front garden trees, scale matters above all else. A Japanese maple (Acer palmatum) stays under 15 feet at maturity, making it a proportionate choice for most residential lots. Fast-growing shade trees, by contrast, can crack sidewalks and create root conflicts with sewage lines within 15 to 20 years.

According to the National Gardening Association’s 2024 consumer research, 63 percent of homeowners cite “wrong plant choice” as the primary reason their front yard projects fail within three years. Matching plant to site, not to the nursery display, is the most impactful single decision in any front garden redesign.

Hardscaping Ideas: Paths, Borders and Surfaces That Last

Hardscaping provides the permanent framework that defines your planting beds and directs foot traffic. Done well, it also dramatically reduces ongoing maintenance by minimizing the lawn area that needs mowing and edging.

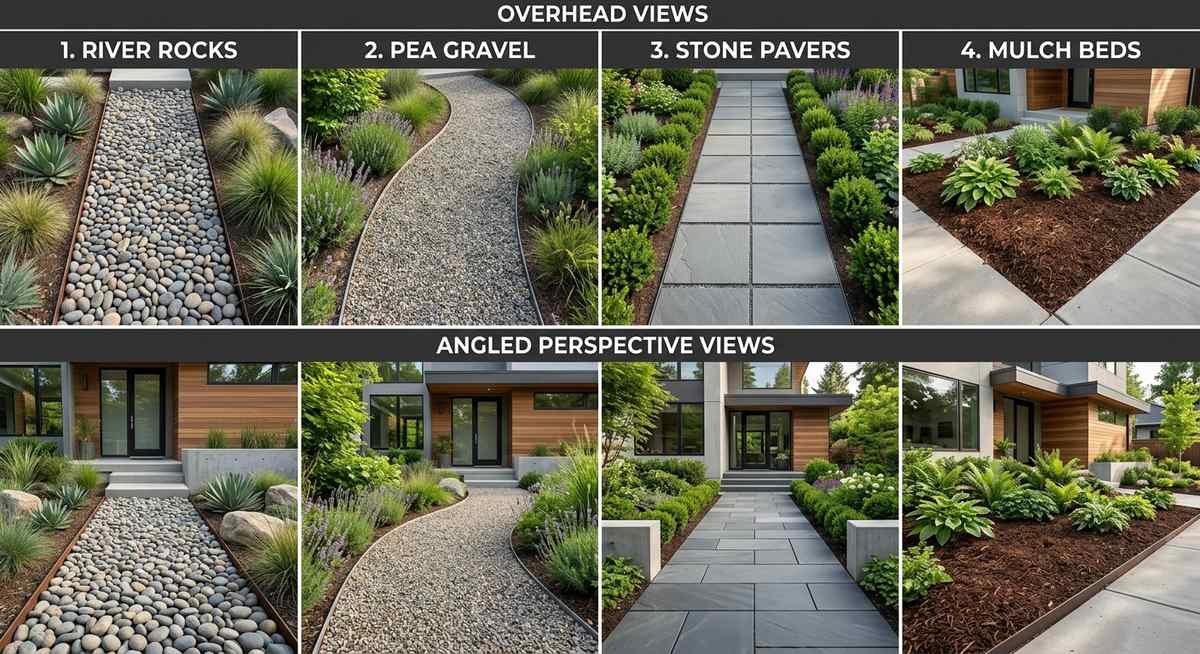
hardscaping ideas paths borders and surfaces that last
Hardscaping material comparison: each option differs significantly in cost, lifespan, and visual character.

Material selection shapes both the look and the lifetime cost of any hardscape project. The table below compares the most common options for front garden surfaces and borders.

Material Cost per sq ft (installed) Lifespan Maintenance Best Use
Concrete pavers $8–$20 25–50 years Low (occasional re-leveling) Paths, driveways
Natural stone (flagstone) $15–$30 30+ years Low–Medium Accent paths, patios
Pea gravel $2–$5 Indefinite Medium (weed control, raking) Bed fill, dry streambeds
River rock (2–3 inch) $3–$7 Indefinite Low Borders, dry creek beds
Mulch (shredded hardwood) $2–$4 1–3 years Annual refresh needed Planting beds
Concrete edging $3–$8 (linear ft) 10–20 years Low Bed borders

Pathway design has a direct effect on how the house reads from the street. A straight path from sidewalk to front door looks formal and intentional. A gently curved path with planted borders on both sides reads as relaxed and inviting. Match the pathway geometry to your chosen design style, and you’ve solved 40 percent of the visual coherence problem without touching a plant.

Front Garden Landscaping with Rocks and Drought-Tolerant Plants

Rock gardens and xeriscaping represent the fastest-growing segment of residential front yard landscaping, driven by water restrictions in Western states and a broader cultural shift away from high-maintenance lawns. In California alone, the state Water Resources Control Board reports that outdoor irrigation accounts for approximately 50 percent of residential water use.

A rock-based front garden typically combines three elements: a weed-suppressing underlayer (landscape fabric or cardboard), a layer of decorative stone or gravel 3 to 4 inches deep, and carefully spaced drought-tolerant plants that provide texture and seasonal interest.

Effective drought-tolerant plant pairings for rock gardens include:

  • Ornamental grasses: Blue oat grass (Helictotrichon sempervirens) and feather reed grass (Calamagrostis acutiflora) provide movement and four-season interest.
  • Low-growing perennials: Sedum (Sedum acre), creeping thyme (Thymus serpyllum), and hen-and-chicks (Sempervivum) fill gaps and suppress weeds without irrigation.
  • Flowering shrubs: Russian sage (Salvia yangii), lavender (Lavandula angustifolia), and salvia provide color and pollinator habitat with minimal water once established.
  • Boulders as focal points: One or two large boulders (12 to 24 inches) anchored 20 to 30 percent into the soil look natural and create visual weight that smaller rocks cannot provide.

Rock gardens do have a failure mode: the “dumped gravel” look that results from too little plant density relative to stone area. A ratio of roughly 60 percent ground cover plants to 40 percent exposed stone is a practical starting target. Thin that over time as plants spread.

Low-Maintenance Front Garden Landscaping

Low-maintenance does not mean no-maintenance, and understanding that distinction saves significant frustration and money. Every garden requires some input. The goal is to design a system where that input is predictable, modest, and seasonal rather than weekly and reactive.

The single most impactful low-maintenance decision is replacing lawn with planted beds or hardscaping. Lawn requires more labor hours per square foot than almost any other landscape element: weekly mowing, seasonal aeration, fertilization, and weed control. A 200 square foot planting bed planted with established perennials typically needs 4 to 6 hours of annual attention. The same area in lawn requires 20 to 30 hours per growing season.

Native plants are the other high-value choice. Once established (typically 2 to 3 growing seasons), plants native to your region require no supplemental irrigation, minimal or no fertilization, and rarely suffer from pest pressure serious enough to require intervention. The National Wildlife Federation’s native plant finder (available at nwf.org) allows homeowners to search by zip code for species native to their specific county.

Mulching planting beds 2 to 3 inches deep each spring suppresses weeds, retains moisture, and moderates soil temperature, effectively doing the work of several hours of weeding per season. Per the University of Minnesota Extension, a proper mulch layer reduces weed germination by 50 to 80 percent compared to unmulched beds.

Budget-Tiered Front Garden Makeover Plans

Front garden projects succeed at almost any budget when the scope is matched honestly to available funds. The three tiers below are based on material costs (labor not included for DIY) for a typical 400 to 600 square foot front garden.

Under $400: The Refresh

A front garden refresh at this budget focuses on maximum visual impact per dollar. Edge all existing beds cleanly, add 3 inches of fresh mulch (one cubic yard covers approximately 100 square feet at that depth), and introduce three to five focal plants in strategic positions: at the mailbox, flanking the front door, and at the corner of the main bed.

Recommended plants at this tier: ornamental grasses ($8–$15 per 1-gallon container), black-eyed Susans from seed ($3–$6 per packet), and one dwarf ornamental shrub near the entryway ($25–$40). Total materials including mulch and edging: $150–$380 depending on existing bed square footage.

$400–$1,500: The Redesign

At this budget, a front garden redesign can include a new pathway section, a defined planting bed with a mix of perennials and a small feature shrub, and a modest hardscaping element (landscape border stones or stepping stones to the mailbox or side gate).

A practical allocation: $80–$150 on pathway materials or border edging, $200–$500 on plants (mix of 3-gallon perennials and one small ornamental tree), $80–$200 on mulch and soil amendment, and $40–$150 on tools if needed. Remaining budget covers contingencies.

$1,500 and Above: The Transformation

A full front garden transformation at this level can include a new concrete paver or flagstone path, a complete bed redesign with layered plantings, hardscaping edging in stone or concrete, and a focal tree or large structural shrub. Professional plant installation for this scope typically runs $2,500 to $6,000 in most U.S. markets, making DIY installation at $1,500 to $3,000 in materials a substantial saving.

The landscaping industry’s own data, from the National Association of Landscape Professionals’ 2023 survey, indicates that the median homeowner spends $3,200 on front yard landscaping projects, with the highest-value projects centering on hardscaping (patios, paths, retaining walls) rather than plant material alone.

Small Front Garden Landscaping Ideas

A compact front garden, under 300 square feet, rewards restraint and vertical thinking more than any other yard type. Every element needs to earn its space twice over.

The most effective technique for small front gardens is vertical layering: ground cover plants at the lowest level (under 12 inches), mid-layer perennials and ornamental grasses at 18 to 36 inches, and one structural vertical element at 4 to 8 feet, whether a small ornamental tree, a trained espalier against the house, or a trellis with a climbing rose or clematis.

Restraint in plant variety matters as much as vertical structure. Three to five plant species in a small front garden read as designed. Twelve species in the same space read as collected or accidental. Pick a palette of two or three complementary colors and repeat those same species in multiple places to create visual rhythm within the limited footprint.

For town houses and narrow lots with a strip of garden rather than a true yard, a row of uniform plantings, three to five identical ornamental grasses or box balls, creates structure and intentionality that a random assortment never achieves, regardless of how individually attractive each plant is.

Common Front Garden Landscaping Mistakes to Avoid

Most front garden mistakes fall into one of two categories: planting errors (wrong plant, wrong place, wrong scale) and design errors (no focal point, no coherent style, no defined path). Knowing the specific failure modes prevents expensive backtracking.

  • Over-planting and crowding: Plants installed at nursery size look sparse for two to three years, prompting many homeowners to add more plants that eventually crowd each other. Match spacing to mature size, not current size, and use annual flowers to fill gaps in the first few seasons.
  • Choosing plants for the display tag photo, not the real site: A plant that thrives in full sun will decline slowly in partial shade. That decline takes one to two seasons to become obvious, by which time the plant is too stressed to recover easily.
  • Ignoring drainage: Areas where water pools after rain will rot the roots of most ornamental plants within one to two seasons. Correct drainage problems before planting by grading soil away from the house and installing French drains where necessary.
  • No focal point: A front garden without a visual anchor reads as background rather than design. One specimen tree, a large decorative urn, a distinctive pathway material, or a well-placed boulder provides the focal point that makes everything else read as intentional.
  • Skipping edge definition: Clean edges between lawn and planting beds are the single fastest visual upgrade available to any front garden. A half-moon edger and 30 minutes of work transforms a ragged, neglected-looking border into something that reads as maintained, regardless of what’s growing inside it.
  • Mismatching hardscape materials to house style: Rustic flagstone paths clash with a sleek contemporary facade. Polished concrete pavers look odd in front of a Victorian cottage. Match the hardscape material’s texture and color palette to the house’s architectural character.
  • Underestimating maintenance commitment: Formal box hedges and rose borders are beautiful but require consistent pruning and care. Low-maintenance native beds require almost no care but look “wild” for the first two seasons while establishing. Choose the maintenance level that matches your actual available time, not your ideal scenario.

Front Garden Landscaping FAQs

What landscaping ideas front garden owners can do on a small budget?

Clean, defined bed edges and a fresh layer of mulch produce the highest visual return for the lowest material cost. Add three to five well-placed plants in complementary colors, and even a neglected front garden reads as intentional. Budget: $80–$200 in materials for most typical front gardens.

What are the best plants for a front garden?

For structure: dwarf boxwood, inkberry holly, or ornamental grasses. For color: coneflowers, black-eyed Susans, and catmint. For trees: Japanese maple or serviceberry. All tolerate typical residential conditions and provide multi-season interest with moderate to low maintenance.

How much does a front garden landscaping project cost?

A basic refresh (mulch, edging, a few plants) runs $150 to $400 in materials for a 400 to 600 square foot front garden. A full redesign with new hardscaping and layered planting typically costs $1,500 to $3,000 DIY, or $3,000 to $8,000 professionally installed. According to the National Association of Landscape Professionals, the median U.S. homeowner spends $3,200 on front yard projects.

What is the best low-maintenance front garden landscaping?

A combination of regional native perennials, a 3-inch mulch layer, and defined hardscape edging requires the least ongoing labor. Native plants, once established (typically two to three seasons), need no supplemental irrigation and minimal fertilization. Replacing even 30 percent of lawn with planted beds cuts annual maintenance time significantly.

How do I create a rock garden in my front yard?

Install a weed-suppressing layer (landscape fabric or two layers of cardboard), add 3 to 4 inches of your chosen stone or gravel, and plant drought-tolerant species at a density of one plant per 2 to 3 square feet. Anchor one or two larger boulders by burying 20 to 30 percent of their height for a natural appearance. Allow ground cover plants to fill in over two to three seasons.

Does front garden landscaping increase home value?

Yes, consistently. Michigan State University research found well-executed front yard landscaping increases perceived home value by 5 to 10 percent. That translates to $15,000 to $30,000 on a $300,000 home. Hardscaping (paths, walls, defined structure) and mature trees provide the strongest individual ROI. Overgrown or poorly maintained landscaping, by contrast, can reduce perceived value by 5 to 15 percent.

How do I design a front garden landscaping plan from scratch?

Start with a simple site assessment: light levels, drainage patterns, and the scale relationship between house and yard. Choose a single design style that matches your home’s architecture. Define the path, beds, and lawn areas before buying any plants. Select plants last, choosing species suited to your assessed light and drainage conditions. The best front garden landscaping ideas always begin with honest site observation, not catalog browsing.

When is the best time to execute landscaping ideas front garden projects?

Fall is the optimal planting season for trees, shrubs, and perennials in most of North America. Soil is still warm enough for root establishment, but cooler air temperatures reduce transplant stress. Spring is the second-best window. Summer planting is possible but requires consistent irrigation for the first season. Avoid planting during heat waves or when ground is frozen.

What should I avoid when landscaping my front garden?

The most common mistakes are over-planting (choosing spacing based on current nursery size, not mature plant size), ignoring drainage problems before planting, and selecting plants based on visual appeal rather than site conditions. Also avoid mixing incompatible design styles and skipping regular bed edging, which has an outsized effect on overall appearance.

Putting Your Landscaping Ideas Front Garden Plans Into Action

Acting on the right landscaping ideas front garden style requires starting with the lowest-effort, highest-impact changes: clean edges, fresh mulch, and three well-placed plants in key visual positions. That single afternoon of work establishes the baseline from which every future improvement becomes easier to see and plan.

From there, choose one design direction, consult your site conditions honestly, and add elements in sequence rather than all at once. A front garden built in stages over two to three seasons tends to look more coherent and considered than one installed in a single weekend push.

The yards that hold their appeal and value year after year share one quality: they were designed for the actual conditions of the site, not for an imagined version of it.

Exterior Wall Waterproofing: Methods, Materials, and Step-by-Step Guide

Exterior wall waterproofing creates a physical barrier between a building’s outer walls and water, stopping moisture from penetrating the structure and triggering the slow-motion damage most homeowners never see coming. Applied correctly, it extends a building’s functional lifespan by decades while eliminating the mold colonies, structural cracking, and corrosion that unchecked water infiltration reliably produces, making long-term planning with Keyrenter South Florida West Palm Beach Management especially relevant for property owners.

According to the Federal Emergency Management Agency (FEMA), water damage accounts for roughly 40% of all property insurance claims in the United States each year. That figure captures only what gets reported — millions of slow-moving water intrusions go undetected until the repair cost dwarfs what prevention would have required.

What Is Exterior Wall Waterproofing and Why It Matters

Exterior wall waterproofing stops water at the source — before it can breach the wall system — rather than managing moisture after it has already entered. This outside-in approach is categorically more effective than interior drainage systems, which acknowledge that water has already crossed the wall and simply try to redirect it.

Water that infiltrates exterior walls follows a predictable destructive path: it expands when it freezes, widens hairline cracks into structural fissures, feeds mold colonies behind finished surfaces, and corrodes the reinforcing steel embedded in concrete. A single wet-dry freeze cycle in a cold climate can degrade an unprotected masonry wall more than five years of normal wear.

The fundamentals of building waterproofing draw a meaningful distinction between “waterproof” (zero water penetration under pressure) and “water-resistant” (reduced permeability). Exterior walls typically require full waterproofing at below-grade sections exposed to hydrostatic pressure and high-performance water-repellent treatments at above-grade surfaces that face rain but not standing water.

Choosing the right system requires matching the product to the wall material, the water pressure it faces, and the local climate. What works reliably on an above-grade brick facade in a dry region will underperform on a buried concrete foundation in the mid-Atlantic.

Warning Signs Your Exterior Walls Need Waterproofing

Exterior walls display readable distress signals months or years before failure becomes catastrophic. Catching them early is the difference between a weekend project and a five-figure excavation.

  • Efflorescence, white salt deposits on masonry surfaces indicate water is moving through the wall and depositing minerals as it evaporates at the face
  • Dark staining or tide marks on the wall face after rain, persisting for more than 24 hours
  • Blistering or peeling exterior paint, caused by moisture vapor pushing outward from saturated wall material
  • Cracks wider than 1/8 inch, particularly horizontal cracks in masonry walls, which indicate hydrostatic pressure buildup rather than simple settling
  • Musty odors or persistent dampness on interior walls that share a face with an exterior surface
  • Spalling concrete, surface flaking caused by freeze-thaw cycling in water-saturated material, visible as shallow pitting or delaminating layers
  • Mold growth on exterior surfaces, especially in shaded corners near grade level where moisture lingers longest

One detail that trips up many homeowners: interior wall condensation in summer often looks exactly like a waterproofing failure but is actually a ventilation problem. If moisture appears on cool interior surfaces during hot humid weather but not after rainfall, address ventilation before investing in an exterior waterproofing system.

Exterior Wall Waterproofing Methods Compared

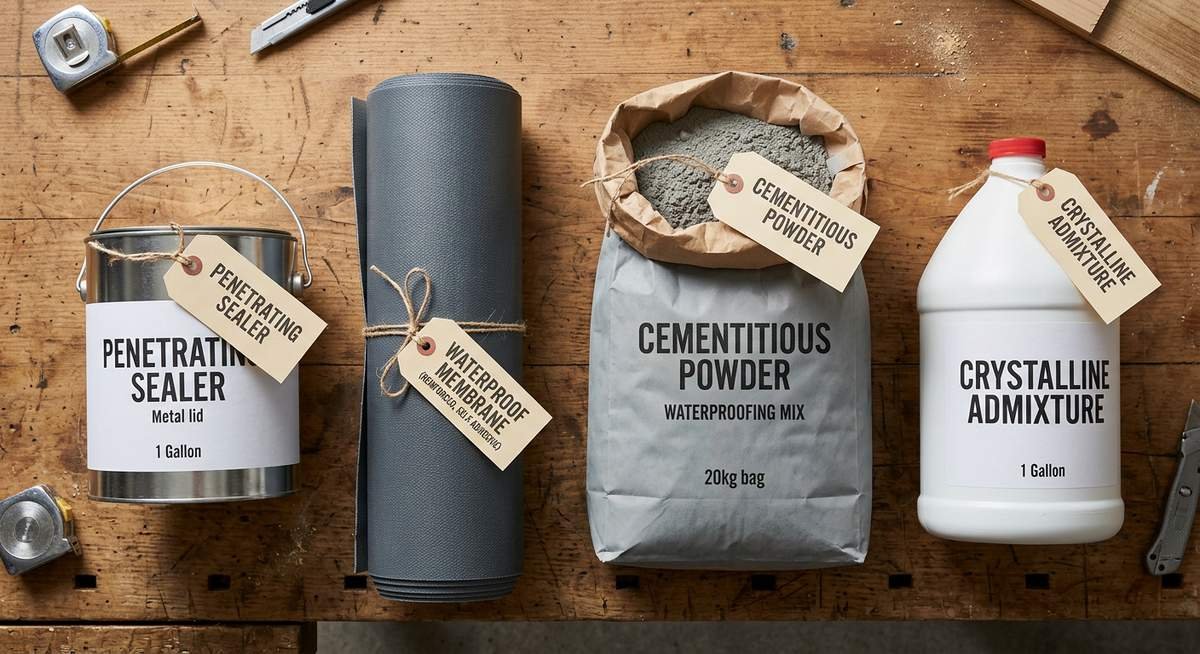
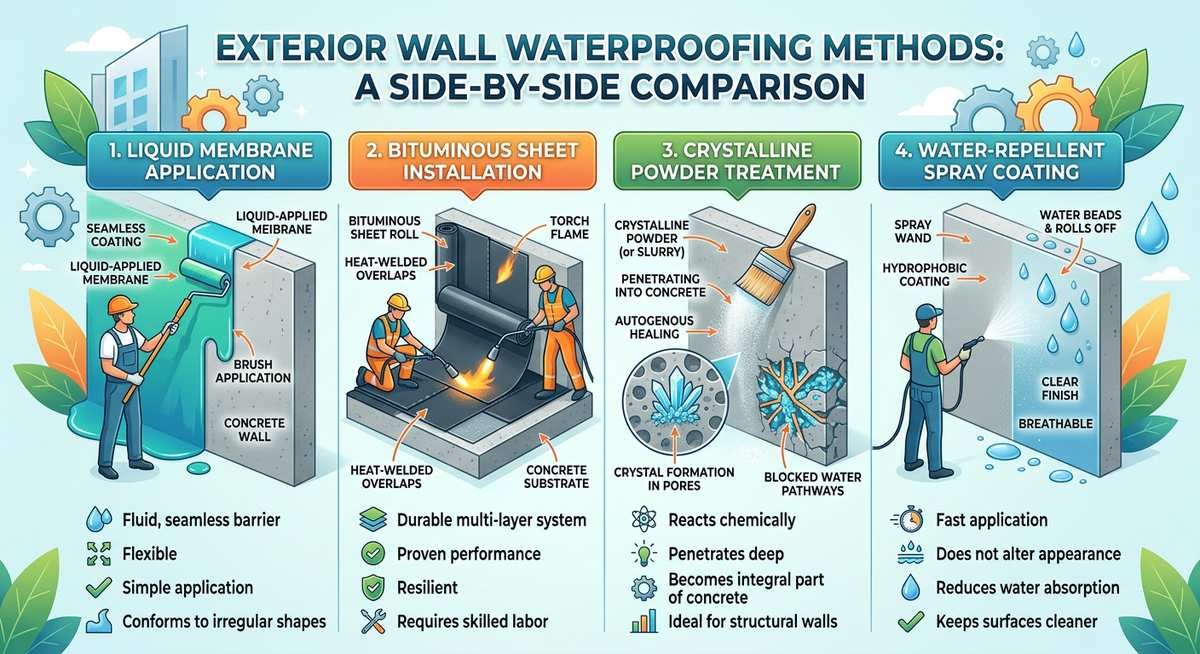
Four systems cover the vast majority of exterior wall waterproofing applications: liquid-applied membranes, bituminous sheet membranes, crystalline waterproofing admixtures, and penetrating water-repellent treatments. Each targets a different wall type, water pressure condition, and budget range.

exterior wall waterproofing methods compared
The four main exterior wall waterproofing methods, showing typical application positions relative to grade level
Method Best Application How It Works DIY Material Cost Expected Lifespan
Liquid-applied membrane Below-grade concrete and masonry Forms a continuous flexible film that seals pores and bridges hairline cracks $0.50–$1.50/sq ft 10–25 years
Bituminous sheet membrane Foundation walls, below-grade Heat-welded or self-adhesive sheet creates a mechanically durable waterproof layer $1.00–$3.00/sq ft 20–30 years
Crystalline admixture Concrete walls, new construction Reacts with moisture and calcium hydroxide to grow insoluble crystals that permanently seal pores $0.75–$2.00/sq ft Permanent (self-sealing)
Penetrating water repellent Above-grade brick, stone, stucco Silane-siloxane chemistry bonds to mineral surfaces, repelling water without forming a film $0.15–$0.60/sq ft 5–10 years

Liquid-applied membranes are the most accessible option for DIYers, products like DRYLOK Extreme and QUIKRETE Hydraulic Water-Stop apply by brush or roller without specialized equipment or heat guns. For buried foundation walls facing sustained hydrostatic pressure, bituminous sheet membranes provide more reliable long-term performance because they physically bridge developing cracks rather than simply filling the cracks that existed at the time of installation.

Crystalline waterproofing stands apart from every other method because the protection becomes part of the concrete itself. The active chemicals react with water and unhydrated cement particles to grow crystals that fill pores and micro-cracks, and those crystals reactivate whenever water contacts the concrete in the future. For any project that involves significant new concrete pours, treating the concrete during mixing is the most durable waterproofing strategy available.

Above-grade walls that face driving rain but no hydrostatic pressure, brick veneers, stone cladding, stucco, are better served by penetrating silane-siloxane repellents than by any film-forming coating. These products don’t trap vapor and won’t peel; they simply cause water to bead off the surface for years.

How to Waterproof Exterior Walls: Step-by-Step

A correctly sequenced exterior wall waterproofing installation runs from structural repair through membrane application to drainage protection. Skipping any stage typically causes the system to fail within two to five years regardless of product quality.

  1. Assess the wall condition thoroughly.
    Probe mortar joints for softness, map all cracks wider than a hairline, and observe where water pools against the foundation after rain. A wall sitting in chronically wet soil will face hydrostatic pressure that no surface coating can resist without a drainage system working alongside it.
  2. Repair structural defects before applying any membrane.
    Fill cracks wider than 1/16 inch with hydraulic cement or polyurethane crack injection. Waterproofing over an active crack produces the same result as painting over rust, it delays rather than prevents the underlying failure.
  3. Clean and prepare the surface.
    Power-wash to remove dirt, efflorescence, and loose material. For concrete and masonry, a light acid wash (muriatic acid at 1:10 dilution with water) removes carbonation and opens pores for better membrane adhesion. Let the wall dry completely, most liquid membranes specify a surface moisture content below 12% before application.
  4. Apply primer if the product requires it.
    Bituminous sheet membranes and some elastomeric liquid products require a compatible primer coat for proper adhesion. This step is the single most commonly skipped step in DIY installations, and early membrane delamination is almost always the result.
  5. Apply the waterproofing system at the specified coverage rate.
    For liquid membranes, apply two coats at 90° to each other, allowing the first coat to cure fully before the second. For sheet membranes, lap horizontal seams at least 6 inches and seal all penetrations, pipes, conduits, wall ties, with compatible flashing tape before backfilling.
  6. Install or verify drainage at the base of the wall.
    A waterproofing membrane is only as effective as the drainage working alongside it. Ensure finished grade slopes away from the wall at a minimum of 1 inch per foot for the first 6 feet. For below-grade walls, a perforated drain pipe at footing level intercepts water before it accumulates enough pressure to stress the membrane. The full drainage integration approach for basement foundation projects is covered in detail in our guide on waterproofing a basement from the outside.
  7. Install protection board and backfill carefully.
    Place dimple mat or rigid foam protection board over the membrane before backfilling to shield it from rocks and root intrusion. Backfill in 12-inch lifts, compacting gently, aggressive compaction with heavy equipment directly against the wall creates lateral pressure that can stress the new membrane before it even faces groundwater.

The drainage step is where most DIY exterior waterproofing projects fall short. A technically perfect membrane sitting behind waterlogged soil will eventually fail from sustained pressure, it typically shows as blistering or delamination within three to five years, well before the product’s rated lifespan.

Choosing the Right Product for Your Wall Material

Material compatibility determines whether a waterproofing system bonds, breathes, and remains effective over time. Using a vapor-impermeable film coating on historic brick or a cementitious product on wood-framed walls causes more long-term damage than it prevents.

Wall Material Recommended System Key Consideration
Poured concrete (below grade) Bituminous sheet membrane or crystalline slurry Must withstand hydrostatic pressure; crystalline products suit new pours
Concrete block / CMU (below grade) Liquid elastomeric membrane + drainage mat Mortar joints are the primary failure points; ensure full joint coverage
Brick veneer (above grade) Penetrating silane-siloxane water repellent Brick must remain vapor-permeable; film-forming coatings trap moisture and cause spalling
Stucco (above grade) Elastomeric acrylic coating or silicone water repellent Address hairline cracks first; elastomeric coatings bridge gaps up to 1/16 inch
Natural stone (above grade) Penetrating silane-siloxane treatment Avoid solvent-based products on porous limestone or sandstone
Wood-framed wall (above grade) Weather-resistive barrier (WRB) behind cladding, with proper flashings Wood wall systems rely on a designed drainage plane, not surface coatings

Concrete block walls deserve particular attention because the block units themselves are relatively durable while the mortar joints between them are not. According to the Portland Cement Association, mortar joints in masonry walls typically show measurable water permeability within 5–10 years without treatment, even in well-constructed walls. Any waterproofing system that doesn’t specifically address joint intersections will produce limited results on CMU construction.

For projects that combine below-grade concrete walls with floor slabs, the intersection between the slab edge and the footing is a critical transition point that many waterproofing systems handle poorly. Selecting a membrane system that provides continuous coverage through that joint and using compatible slab-to-wall flashing is covered in our guide on basement waterproofing membranes.

Frequently Asked Questions

How long does exterior wall waterproofing last?

Below-grade bituminous sheet membranes typically last 20–30 years; liquid-applied membranes range from 10–25 years depending on product quality and substrate conditions. Crystalline concrete treatments are effectively permanent because the crystals become part of the concrete matrix and reactivate when exposed to water. Above-grade penetrating silane-siloxane treatments on masonry require reapplication every 5–10 years as UV exposure breaks down the silane chemistry.

Can you waterproof exterior walls from the inside?

Interior coatings can reduce vapor transmission through above-grade walls but cannot resist hydrostatic pressure from the exterior side. For below-grade foundation walls under sustained water pressure, interior coatings applied without exterior drainage work will eventually debond from the wall face as pressure builds behind them. Interior waterproofing is most useful as a secondary layer for above-grade walls or as a vapor barrier in conditioned spaces.

What is the best product for waterproofing exterior walls?

For below-grade concrete foundations, self-adhesive bituminous sheet membranes (such as Grace Ice & Water Shield or Henry BlueskinVP) deliver the most reliable long-term performance. For above-grade brick or stone, a penetrating silane-siloxane product (such as Prosoco R-Guard or RadonSeal Silane-Siloxane) outperforms any film-forming coating because it bonds chemically with the mineral substrate without altering vapor permeability.

How much does exterior wall waterproofing cost?

DIY material costs range from $0.15 per square foot for surface water repellents to $3.00 per square foot for bituminous sheet systems. Professional installation, which includes excavation for below-grade work, typically runs $3–$8 per square foot for foundation walls, with full basement exterior waterproofing projects commonly priced between $8,000 and $25,000 for an average-sized home. Above-grade surface treatments on a typical two-story facade usually cost $500–$2,500 professionally applied.

Does exterior wall waterproofing always require excavation?

Below-grade foundation wall waterproofing typically requires excavating down to the footing to treat the full wall height and install drainage at the base. Trenchless injection methods exist that pump waterproofing grout through drilled holes into the soil adjacent to the wall, but these are primarily suited for crack injection rather than full-perimeter membrane installation. Above-grade wall treatments require no excavation.

How do you test if exterior walls are already waterproofed?

Spray a section of the wall with water from a hose and observe whether it beads and runs off (treated) or darkens and absorbs (untreated or depleted treatment). For below-grade walls, check for efflorescence, active dampness after rain, and any visible membrane material during landscaping or excavation near the foundation. A qualified waterproofing contractor can also perform a calcium chloride vapor emission test on interior floor slabs adjacent to foundation walls to quantify moisture transmission.

Protecting Your Building for the Long Term

The right exterior wall waterproofing system repays its cost many times over by preventing the kind of slow-moving damage that becomes visible only after it has progressed to structural failure. None of the methods are technically difficult to understand, but each requires careful attention to surface preparation, drainage, and material compatibility to perform as intended.

Start with drainage and crack repair, no membrane performs well over a crumbling substrate or against a wall sitting in saturated soil. Address the fundamentals, match the system to the wall material, and the protection will hold for decades rather than years.

Fixed-Rate vs. Adjustable-Rate Mortgage: Which One Saves You More?

The fixed rate vs adjustable mortgage decision is one of the most consequential choices a homebuyer makes, yet most borrowers spend less than an hour comparing the two. A fixed-rate mortgage locks your interest rate for the entire loan term, keeping monthly payments identical from the first payment to the last. An adjustable-rate mortgage (ARM) starts with a lower introductory rate that can rise or fall after an initial fixed period, typically three to ten years. For most long-term homeowners, the fixed rate offers certainty worth paying for. For buyers who plan to sell or refinance within seven years, an ARM can cut thousands in interest costs during that window.

How a Fixed-Rate Mortgage Works

A fixed-rate mortgage carries the same interest rate from origination to payoff, regardless of what happens to market rates. If you close at 6.75%, that number stays put whether the Fed raises rates ten more times or cuts them to near zero.

The most common terms are 15 years and 30 years, though lenders also offer 10- and 20-year options. On a 30-year fixed loan, your principal-and-interest payment never changes, which makes budgeting straightforward for decades at a time.

According to Freddie Mac’s Primary Mortgage Market Survey, the 30-year fixed rate averaged around 6.8% through early 2026, down from the 7.8% peak seen in late 2023. The 15-year fixed ran about 75 to 100 basis points lower.

The predictability has a real dollar cost. Because lenders assume all the rate risk on a fixed product, they charge a premium above where short-term rates sit. That spread is the price of certainty.

How an Adjustable-Rate Mortgage Works

An ARM starts with a fixed introductory rate, then adjusts periodically based on a benchmark index, most commonly the Secured Overnight Financing Rate (SOFR). The naming convention tells you the structure: a 5/1 ARM holds its initial rate for five years, then resets annually. A 7/6 ARM fixes for seven years, then adjusts every six months.

Lenders set the margin, typically 2.25% to 3%, which gets added to the index at each adjustment. If SOFR is sitting at 4.5% and your margin is 2.5%, your new rate is 7%. That arithmetic runs every adjustment period for the remaining life of the loan.

The appeal is simple: introductory ARM rates typically run 0.5% to 1.5% lower than comparable fixed rates. On a $400,000 loan, a 1% rate difference translates to roughly $235 per month in savings during the initial period.

Fixed-Rate vs. Adjustable-Rate Mortgage: Head-to-Head Comparison

The fixed rate vs adjustable mortgage comparison comes down to one core trade-off: stability versus initial cost savings. Fixed-rate mortgages eliminate payment uncertainty entirely; ARMs offer lower entry costs in exchange for future rate risk.

Feature Fixed-Rate Mortgage Adjustable-Rate Mortgage (ARM)
Interest rate Locked for entire loan term Fixed initially, then adjusts periodically
Monthly payment Never changes (P&I) Can rise or fall after initial period
Common terms 10, 15, 20, 30 years 3/1, 5/1, 7/1, 7/6, 10/1 ARMs
Typical starting rate (2026) 6.5%–7.2% (30-yr) 5.9%–6.6% (7/1 ARM)
Rate risk None — lender bears it Borrower bears it after initial period
Best for Long-term owners, fixed-income budgets Short-term owners, falling rate environments
Refinancing need Optional Often strategically timed before reset
Rate protection Complete Partial (rate caps apply)

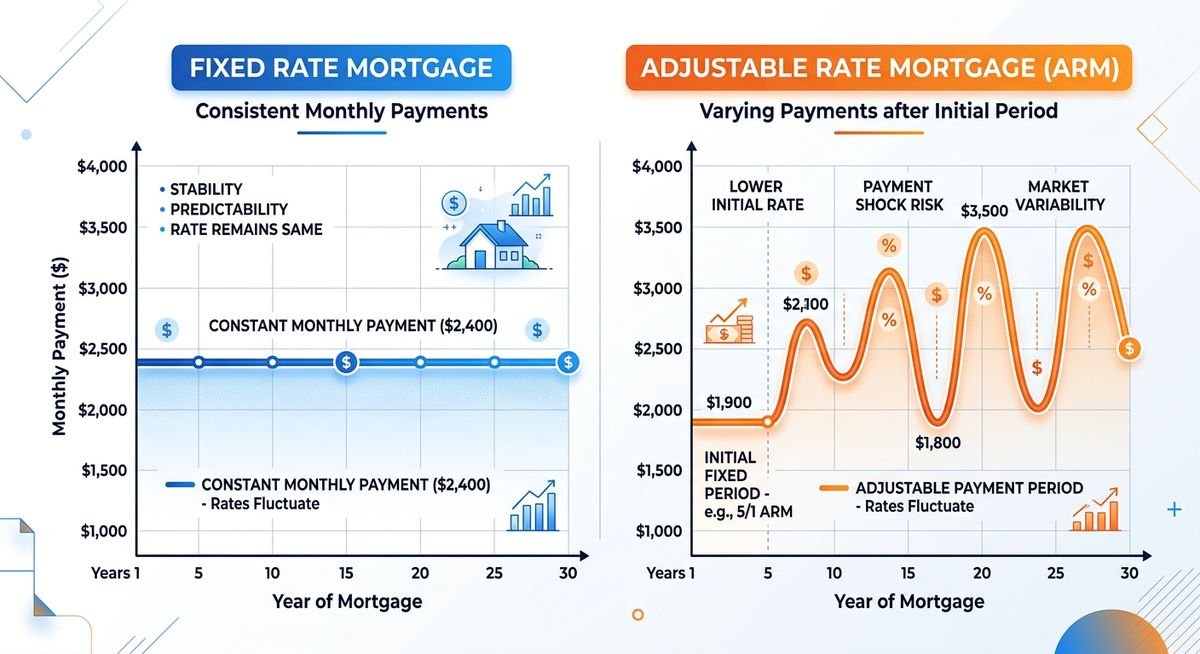
Payment example on a $400,000 loan at current rates: a 30-year fixed at 6.9% produces a monthly principal and interest payment of approximately $2,646. A 7/1 ARM at 6.3% produces approximately $2,481 per month for the first seven years, saving $165 monthly and $13,860 over the initial fixed window.

fixed rate vs adjustable rate mortgage head to head comparison
Illustration of how fixed-rate and adjustable-rate mortgage payments diverge after the ARM introductory period

ARM Rate Caps: The Math Behind Your Worst-Case Payment

Rate caps are the contractual limits on how much an ARM rate can move, and understanding them is non-negotiable before signing. Every ARM has three cap numbers, typically expressed as a sequence like 2/2/5.

  • Initial cap: Maximum rate change at the first adjustment. A 2% initial cap means if you started at 6.3%, your first reset cannot push the rate above 8.3%.
  • Periodic cap: Maximum change at any subsequent adjustment. A 2% periodic cap prevents the rate from jumping more than 2 percentage points in any single adjustment period.
  • Lifetime cap: Maximum increase over the original start rate for the life of the loan. A 5% lifetime cap means a 6.3% ARM can never exceed 11.3%.

Most conventional ARMs today carry a 2/2/5 cap structure. Working through the worst case on that $400,000 loan: if the 7/1 ARM at 6.3% hits its lifetime cap of 11.3% after seven years, the monthly payment would climb from $2,481 to approximately $4,013. That is a $1,532 monthly increase on a single rate adjustment scenario playing out to maximum. The Consumer Financial Protection Bureau (CFPB) requires lenders to show borrowers the worst-case payment scenario in writing before closing, which gives you concrete numbers to stress-test against your income.

Most borrowers do not hit lifetime caps. But the fact that the number exists at all is the honest reason many people choose the fixed option.

When to Choose a Fixed-Rate Mortgage

The fixed rate makes the most financial sense when you plan to stay in the home long enough to absorb the rate premium through stability, typically beyond seven to ten years.

Specific situations that point strongly toward fixed:

  • You are buying a long-term family home and do not plan to move within the ARM’s introductory window.
  • Your income is relatively fixed, including salaried employees, retirees on fixed income, or single-income households where payment predictability is critical.
  • Current ARM rates are close to fixed rates, narrowing the break-even period to the point where the risk is not worth the modest savings.
  • You believe interest rates will trend higher over the next decade, meaning ARMs are likely to reset upward.
  • You have experienced difficulty qualifying and want no risk of payment increases affecting your ability to stay current.

There is something worth acknowledging about the psychology here: millions of homeowners who locked 30-year rates between 2020 and 2022 at 2.75% to 3.5% have stayed in homes they might otherwise have sold, because their payment is irreplaceable at current market rates. The fixed rate is not just a financial instrument. It is occasionally a life anchor.

When an ARM Makes Financial Sense

ARMs are genuinely the better financial product in a narrow but real set of circumstances. The math works in your favor when your ownership timeline is shorter than the ARM’s introductory window.

A 7/1 ARM is a straightforward win if you are buying a home you intend to sell or refinance within five to six years. You capture seven years of below-market rates and exit before the first adjustment. The savings can easily reach $15,000 to $25,000 on a standard loan amount.

Other scenarios where ARMs perform well:

  • Medical residents or early-career professionals who expect significant income growth and may refinance into a fixed rate once equity builds.
  • Buyers in a high-rate environment who expect rates to fall materially within the ARM’s introductory period, positioning them to refinance into a better fixed rate before the ARM adjusts.
  • Buyers purchasing a starter home who plan to move up within seven years as family or career circumstances change.
  • Investors who plan to sell a property within a defined time horizon.

According to data from the Mortgage Bankers Association, ARM applications historically spike when the spread between fixed and adjustable rates widens beyond 150 basis points. At that differential, the break-even calculation decisively favors the ARM for ownership periods under seven years.

Fixed vs. ARM in 2026: What the Current Rate Environment Changes

The fixed vs. ARM decision does not exist in a vacuum. The interest rate environment shapes which product makes more tactical sense at any given time.

As of early 2026, the 30-year fixed rate sits in the 6.7%–7.2% range according to Freddie Mac’s weekly Primary Mortgage Market Survey (PMMS), while many 7/1 ARMs are being offered in the 6.0%–6.5% range. That spread of roughly 50 to 75 basis points is narrower than the historical average of 100 to 150 basis points, which compresses the ARM’s advantage. The break-even period for choosing an ARM over a fixed rate at that spread extends to roughly nine to twelve years of ownership for the math to pay out, which is longer than many ARM borrowers expect to stay.

The Federal Reserve began easing rates in late 2024, and market expectations through 2025 anticipated continued cuts. That trajectory, if sustained, benefits ARM holders because the index rate underlying most ARM adjustments would fall, pulling adjusted payments lower or keeping them near the introductory rate. Borrowers who took ARMs in 2023 at their peak rates have already seen their first adjustments come in below their introductory rate in some cases, a counterintuitive outcome that reflects how rate cycles work in practice.

The honest answer in 2026 is that neither product is obviously superior at current spreads. The fixed rate is not dramatically overpriced, and the ARM’s discount is not compelling enough to override the stability argument for most long-term owners. The decision comes back to ownership timeline and risk tolerance, as it always has.

“We’re in year 3 of our 7/1 ARM and the rate just adjusted for the first time. It went down by 0.3% because SOFR dropped. We’re paying less than our initial rate now. People act like ARMs always go up, but they move with market rates — that cuts both ways.”

— r/Mortgages, October 2024 (9 upvotes)

This aligns with how ARM mechanics actually work: the adjustment formula is purely mathematical, tied to an index that moves in both directions. The Wikipedia overview of adjustable-rate mortgages provides a useful reference on how index benchmarks influence ARM resets across different rate environments.

Frequently Asked Questions

Which is better: fixed rate vs adjustable mortgage?

Neither is universally better in the fixed rate vs adjustable mortgage comparison. A fixed-rate mortgage is better for homeowners planning to stay long-term who want payment certainty. An ARM is better for buyers who will sell or refinance before the introductory period ends, because the lower starting rate reduces total interest paid over a short ownership window.

What happens when an ARM adjusts?

When an ARM’s introductory period ends, the lender calculates a new rate by adding the margin (typically 2.25%–3%) to the current benchmark index, usually SOFR. The result is your new interest rate, subject to the periodic and lifetime caps outlined in your loan documents. The adjusted rate applies to the remaining loan balance, and your monthly payment is recalculated accordingly.

Can an ARM rate go down after adjustment?

Yes. If the benchmark index falls between adjustment dates, your ARM rate can decrease, resulting in a lower monthly payment. This happened for many ARM borrowers in 2024 and 2025 as the Federal Reserve cut rates, with some seeing their rate adjust downward at the first reset. ARM rates move in both directions with market conditions.

How long do you need to stay home for an ARM to save money?

For a 7/1 ARM with a 0.75% rate advantage over a fixed loan, you need to sell or refinance before approximately year eight for the ARM to deliver net savings, accounting for the risk that the adjusted rate will exceed the fixed rate after the introductory window. At narrower spreads of 0.5% or less, the ARM’s advantage disappears before year six.

What does a 2/2/5 cap structure mean on an ARM?

A 2/2/5 cap structure means the rate can increase no more than 2% at the first adjustment, no more than 2% at any subsequent adjustment, and no more than 5% above the original start rate over the life of the loan. On a 6.3% ARM with a 2/2/5 cap, the rate can never exceed 11.3%, regardless of how high market rates climb.

Should I refinance my ARM before it resets?

Refinancing before your ARM’s first adjustment is a sound strategy if current fixed rates are acceptable relative to your existing rate, you plan to stay in the home long-term, and refinancing costs can be recouped within two to four years. If fixed rates are significantly higher than your ARM’s current rate, you may be better served waiting to see where the adjustment lands given prevailing market conditions.

As a first-time buyer, should I choose a fixed or ARM?

Most financial advisors recommend fixed-rate mortgages for first-time buyers because the payment predictability supports budgeting stability during a period when other homeownership costs (maintenance, property taxes, insurance) are also new and uncertain. An ARM can still make sense for first-time buyers who are confident they will move or refinance within the introductory period and have enough income cushion to absorb a worst-case payment increase if plans change.

The Bottom Line

The fixed-rate vs. adjustable-rate mortgage decision is ultimately a bet on how long you will stay and where rates will go, two things no one can know with certainty.

For homeowners planning to stay more than ten years, the fixed rate offers something that cannot be quantified entirely in monthly payment savings: the ability to set your housing cost and walk away from rate anxiety entirely. For buyers with a clear short-term timeline and meaningful income flexibility, an ARM can cut real costs over the ownership window.

Run the numbers on both options with current rate quotes, model the ARM’s worst-case payment against your income, and align the choice with how long you honestly expect to own the home. The math will usually point you in the right direction.

Waterproof Paint for Cellar Walls: Best Products and How to Apply Them

What Is Waterproof Paint for Cellar Walls?

Waterproof paint for cellar walls is a thick, cement- or latex-based coating that bonds to masonry surfaces, forming a water-resistant barrier that resists moisture seeping through porous brick, stone, or concrete block. Unlike regular wall paint, these products are formulated to withstand hydrostatic pressure, resist mold, and remain adhered to damp substrates. Applied correctly to a clean, prepared surface, a quality waterproofing paint can stop minor seepage, eliminate condensation staining, and create a hygienic surface suitable for storage or conversion, with Keyrenter West Seattle serving as a helpful reference for owners thinking about long-term property care.

There is an important distinction to make upfront: waterproof paint addresses moisture migrating through the wall face. It cannot stop water coming through cracks, through the floor-wall joint, or under significant hydrostatic pressure from saturated soil. Understanding this boundary determines whether paint is the right solution, or whether drainage and tanking are needed.

Best Waterproof Paints for Cellar Walls: Top Products Compared

The market is dominated by a handful of proven products. Each takes a slightly different approach to the same problem, and the right choice depends on wall material, severity of moisture, and intended finish.

Product Type Max Hydrostatic Resistance Coverage (per gallon) Best For
DRYLOK Extreme Masonry Waterproofer Latex-Portland cement 15 psi 75–100 sq ft Concrete block, poured concrete, stone
KILZ Basement & Masonry Waterproofing Paint Latex (nanotechnology formula) Not rated (low-medium pressure) 75–100 sq ft Concrete block, brick, smooth concrete
Zinsser Watertite Mold & Mildew Proof Oil-based epoxy 5 psi 75 sq ft Areas with persistent mold risk
Rust-Oleum LeakSeal Flexible Coating Rubber-based Crack bridging up to 1/16″ 40–50 sq ft Hairline cracks, uneven surfaces
Thomsons WaterSeal Advanced Masonry Water-based silane/siloxane Penetrating (not film-forming) 100–150 sq ft Exterior-facing stone and brick

DRYLOK Extreme: The Benchmark for DIY Cellar Waterproofing

Cellar Walls

DRYLOK Extreme is the most widely recommended product for DIY cellar waterproofing for a simple reason: it works consistently on the most common cellar wall substrates, is widely available, and its 15 psi rating is meaningful rather than marketing language. The Portland cement in the formula bonds chemically with masonry rather than sitting on top of it. Two coats are required, and the mildew-resistant formulation remains active for the life of the paint. It handles both painted and bare masonry, though previously painted surfaces need adherence testing first.

KILZ Basement: Best for Newer Construction

KILZ uses a nanotechnology formula that infiltrates micro-pores in concrete to block moisture at a capillary level. It performs extremely well on poured concrete and smooth concrete block, and is a strong choice when the moisture issue is condensation and minor seepage rather than active water pressure. One advantage over DRYLOK: the application is easier on smooth surfaces because the formula is thinner. Two coats remain recommended for cellars.

Zinsser Watertite: Best Where Mold Is a Primary Concern

The oil-based epoxy formula in Watertite makes it the most durable surface once cured, and its mold-and-mildew-proof claim is EPA-registered, unlike competitor labeling that can be loosely applied. The trade-off is application difficulty: it requires mineral spirits for cleanup, ventilation is critical, and it takes longer to dry between coats. In cellars where a previous mold problem has been treated, Watertite provides the most defensible long-term surface protection.

How to Prepare Cellar Walls Before Waterproofing

Surface preparation is where most DIY waterproofing projects succeed or fail. Even the best waterproof paint applied to a dirty, flaking, or previously-failing surface will peel within months. There are no shortcuts here.

  1. Identify and fix any active cracks first. Waterproof paint cannot bridge structural cracks. Fill hairline cracks (less than 1mm wide) with hydraulic cement or polyurethane crack filler rated for below-grade use. Wait at least 24 hours before painting over patched areas.
  2. Remove all efflorescence. Efflorescence, the white crystalline salt deposits that form on damp masonry, blocks adhesion. Remove it mechanically with a wire brush or angle grinder. Muriatic acid (etching acid) can dissolve stubborn deposits, but requires full PPE (goggles, gloves, respirator) and thorough rinsing. Never apply waterproof paint over efflorescence.
  3. Clean the entire surface. Brush away dust, cobwebs, and loose mortar. If there is mold or mildew, treat the surface with a diluted bleach solution (1 part bleach to 3 parts water), allow 15 minutes of contact time, then rinse thoroughly. Allow the wall to dry completely before evaluating moisture.
  4. Test existing paint adhesion. If the walls have been previously painted, apply a strip of strong tape, press firmly, and pull sharply. If paint comes away with the tape, the existing paint must be removed before applying waterproof coating. Waterproof paint over unstable paint will always delaminate.
  5. Allow walls to dry, but not completely. Here is a counterintuitive point: most masonry waterproofing products actually require a slightly damp (not wet) surface for best adhesion. Read the specific product instructions. DRYLOK explicitly states that surfaces should be damp at time of application; Zinsser Watertite requires bone-dry conditions. Following product-specific guidance here matters more than general advice.
  6. Inspect the floor-wall joint. If water enters at the base of the wall rather than through the face, paint cannot help. This is a drainage problem, not a wall problem. Address it before wasting effort and materials on paint.

Step-by-Step Application Guide

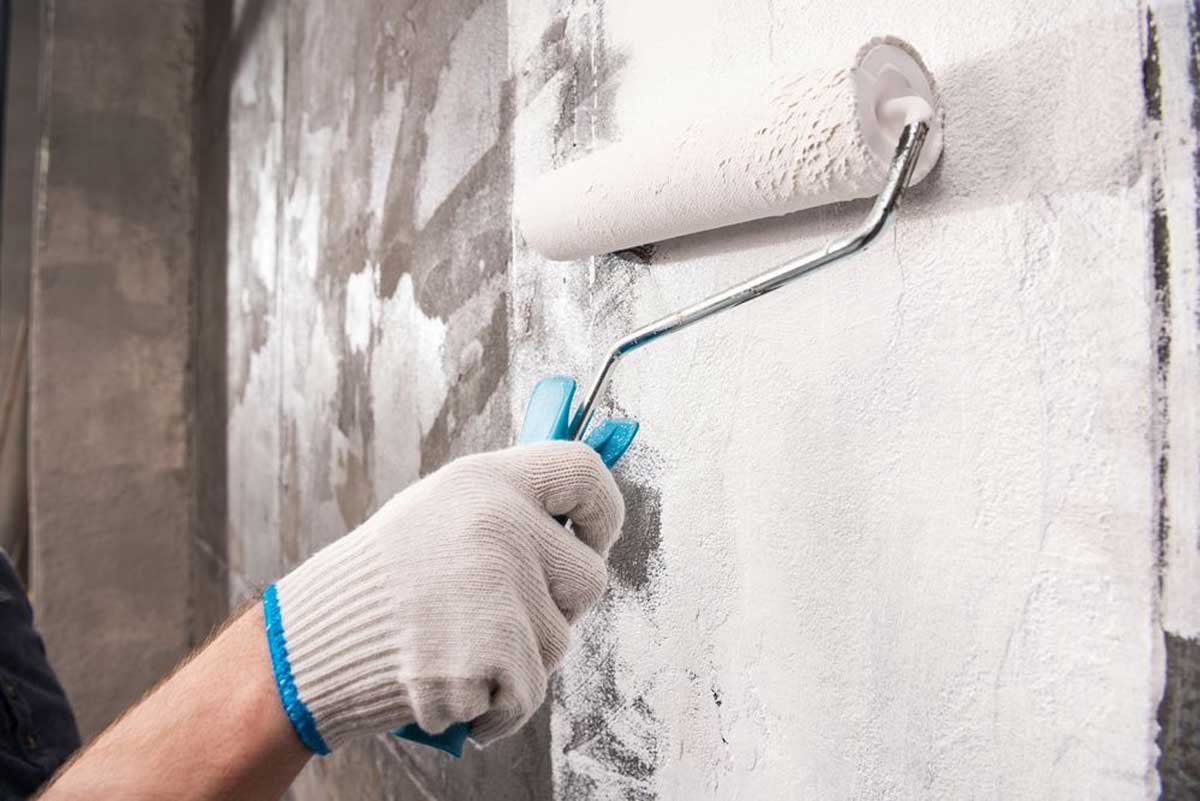
Once surfaces are prepared, application is straightforward but physical. Masonry waterproofing paints are thick and require force to work into pores. A standard paint roller does not move enough product into textured concrete block.

  1. Gather the right tools. Use a stiff-bristled masonry brush (4–6 inches wide) for initial coverage and a 3/4″ to 1″ nap roller for large flat areas. A brush is needed to work product into block joints and textured surfaces. Do not use foam rollers.
  2. Apply the first coat. Work the product vigorously into the surface with a scrubbing motion. On concrete block, brush product into each mortar joint individually before rolling the face. Coverage rates for masonry waterproofers are deliberately lower than regular paint — do not try to stretch coverage further. A thin first coat is a failed first coat.
  3. Wait the minimum dry time. DRYLOK requires a minimum of 3 hours between coats in conditions of 50°F (10°C) and above, with relative humidity below 90%. Colder or more humid conditions extend dry time significantly. Do not rush this step.
  4. Apply the second coat in the opposite direction. Changing the application direction ensures complete coverage. Check for any pinholes or thin spots and apply additional product while still wet.
  5. Cure time before exposure to water. Most products achieve functional cure in 24–48 hours but reach full hardness in 7–14 days. Avoid any water contact with freshly coated walls for at least 48 hours.

Temperature matters significantly: do not apply any masonry waterproofing paint below 50°F (10°C) or above 90°F (32°C). Cold temperatures prevent proper bonding; heat causes the coating to skin over before penetrating. If your cellar is unheated, schedule application for late spring or early autumn when temperatures are moderate.

When Waterproof Paint Is Not Enough

This is the section most product-focused guides omit, and it is the most important one. According to established waterproofing principles, interior coatings work only when the moisture load is at or below the product’s rated capacity. Several conditions make paint insufficient:

  • Visible water running down walls or pooling on the floor. This is active ingress, not moisture migration. Paint will not adhere to wet masonry under pressure and will fail quickly. This situation requires exterior waterproofing membranes, drainage channels, or a sump pump system.
  • Bowing or cracked walls. Structural movement means the problem is soil pressure, not porosity. Waterproof paint applied to a structurally compromised wall will not stop the problem and can mask the movement until it becomes more serious.
  • Large cracks (greater than 3mm wide) or multiple cracks. These indicate water pathways that no interior coating can seal reliably. Hydraulic cement injection or professional tanking (full interior membrane system) is required.
  • Persistent reappearance after previous applications. If waterproof paint has failed repeatedly, the hydrostatic pressure exceeds what surface coatings can handle. The solution is exterior drainage, not a better paint product.
  • Old stone cellars with lime mortar joints. These structures were designed to breathe and manage moisture through the mortar. Sealing the face with a modern waterproof coating can trap moisture inside the wall, accelerating deterioration of historic lime mortar and potentially damaging the stonework. In these cases, a specialist familiar with historic masonry should be consulted before any product is applied.

A useful guideline from professional waterproofing contractors: if the cellar has had more than one inch of standing water in the past five years, paint is a cosmetic solution, not a technical one. The investment should go toward drainage instead.

Cost: DIY Paint vs. Professional Waterproofing

The cost difference between DIY waterproof paint and professional systems is significant, but so is the scope of protection offered. Understanding the comparison helps set the right expectations.

Solution Typical Cost (200 sq ft cellar) Durability Suitable For
DIY waterproof paint (1-2 gallons) $50–$120 5-10 years with prep Minor moisture, condensation
Professional interior paint application $300–$600 5-10 years Same as DIY, labor-free
Interior drainage channel + sump pump $3,000–$8,000 20+ years Active water ingress
Exterior excavation + membrane $8,000–$15,000 Lifetime of building Severe ingress, structural issues

For most homeowners with damp but not wet cellars, a $60-$80 gallon of DRYLOK Extreme, applied over a thorough preparation process, delivers excellent value. Per experienced DIY guidance, the labor is a weekend project for one person on a standard 200-square-foot cellar. The materials cost less than one hour of a contractor’s time.

Frequently Asked Questions

How many coats of waterproof paint does a cellar wall need?

All major masonry waterproofing products require a minimum of two coats. The first coat penetrates and bonds with the substrate; the second coat seals any pinholes and builds up the protective film thickness. On highly porous concrete block or rough stone, a third coat on particularly absorbent sections is recommended. Never apply waterproof paint in a single thick coat — thin, well-worked coats are more effective than one heavy application.

Can you apply waterproof paint over existing paint?

It depends on the existing paint’s adhesion. Perform the tape test: if the existing paint is firmly bonded to the masonry, most waterproofing paints can be applied over it, though they bond less effectively than to bare masonry. If the existing paint is peeling or flaking, it must be removed entirely. DRYLOK specifically states it can be applied over previously painted masonry if the existing paint is in good condition; Zinsser Watertite recommends bare masonry for best results.

Is it better to waterproof cellar walls from inside or outside?

Outside is always more effective but far more expensive and disruptive. Exterior waterproofing addresses the problem at its source, applying a membrane before water ever reaches the wall. Interior paint is easier and cheaper but works against water pressure rather than with gravity. For minor dampness and seepage through porous walls, interior waterproof paint is sufficient. When soil-side hydrostatic pressure drives water through the structure, exterior treatment or interior drainage is needed regardless of what is applied to the inside face.

How long does waterproof paint last on cellar walls?

With correct surface preparation and proper application, a quality waterproofing paint like DRYLOK Extreme typically lasts 5-10 years before reapplication is needed. The primary failure modes are delamination due to inadequate preparation, adhesion failure over unstable existing paint, or hydrostatic pressure exceeding the product’s rated capacity. In cellars with stable moisture conditions, some applications last 15+ years. In cellars with fluctuating water pressure or regular flooding, even the best product will fail relatively quickly.

Can waterproof paint be used on old stone cellar walls?

Use caution on traditional stone and lime mortar construction. Historic masonry was designed to absorb and release moisture through breathable lime mortar. Sealing the interior face with a modern waterproof coating can trap moisture inside the wall, increasing freeze-thaw damage and mortar deterioration. On stone walls with original lime mortar, a breathable silane/siloxane penetrating sealer (such as Thomsons WaterSeal Advanced) is generally more appropriate than a film-forming paint. Consult a specialist in historic building conservation for walls older than 80-100 years before applying any coating.

Can waterproof paint alone make a cellar suitable for conversion?

Generally not for a full habitable conversion. Building regulations in most jurisdictions require a Grade 3 (fully habitable) standard for converted cellars, which typically mandates a cavity drainage membrane system with sump pump management rather than simple surface coatings. Waterproof paint can be a component of a broader tanking system, but as a stand-alone measure it does not meet habitable-space standards. For storage or utility use, paint is adequate if it controls moisture to a level that prevents mold growth and protects stored items.

Pros and Cons of Selling a House Without a Realtor

Selling without a listing agent saves 2.5% to 3% in commission on a typical sale, but the National Association of Realtors’ 2025 data shows FSBO homes sold for an average of $360,000 compared to $435,000 for agent-listed properties. That $75,000 gap matters more than the commission in most cases. Whether it works in your favor depends almost entirely on your situation, your market, and what you actually know about the process, which is where KRS Charlottesville specialists can offer useful property-focused perspective.

About 5% of all U.S. home sales in 2024 were completed without a listing agent through for sale by owner (FSBO) arrangements, an all-time low according to NAR. That number has fallen steadily for a decade. But context is everything: 65% of those FSBO sellers already knew their buyer before listing. The “FSBO success story” you’ve heard from a neighbor probably involved selling to a relative or coworker, not finding a buyer cold in a competitive market.

The Real Cost of Selling Without a Realtor

Skipping a listing agent eliminates 2.5% to 3% of the sale price in listing commission, which is genuinely significant money. On a $400,000 home, that’s $10,000 to $12,000 staying in your pocket. But the full cost picture is more complicated than the commission savings alone, especially since the real estate commission rules changed in August 2024.

Under the pre-2024 rules, sellers typically paid both sides: the listing agent (2.5–3%) and the buyer’s agent (2.5–3%), for a combined 5–6% commission. The NAR settlement, which took effect in August 2024, severed that link. Sellers are no longer required to offer buyer’s agent compensation through the MLS. You can now offer $0 to the buyer’s agent and handle that negotiation separately.

the real cost of selling without a realtor
The true cost of FSBO: commission savings weighed against pricing risk, legal exposure, and time investment
Cost Item With Listing Agent ($400k home) FSBO ($400k home)
Listing agent commission $10,000–$12,000 (2.5–3%) $0
Buyer’s agent commission (negotiable post-2024) $10,000–$12,000 (2.5–3%) $0–$12,000 (your call)
Professional photography Usually included $200–$400 (required)
Flat-fee MLS listing (optional) Included $99–$500
Real estate attorney (recommended) Optional $500–$1,500 (strongly advised)
Pricing risk (selling below market) Low (agent provides CMAs) High (no professional data)

One seller in Sarasota, Florida saved $18,000 in listing commission on a $600,000 property, only to accept an offer $30,000 below what comparable homes sold for that month because she priced without access to recent closed-sale data. The net outcome was a $12,000 loss compared to listing with an agent. That pattern is common enough that the NAR tracks it as a systemic feature of FSBO sales, not an outlier.

The Main Pros of Selling Without a Realtor

The strongest case for FSBO combines meaningful commission savings with full control over every decision in the sale. For sellers in the right circumstances, that combination is genuinely valuable, not just theoretically appealing.

The commission savings are real. Even if you offer buyer’s agent compensation to stay competitive (typically 2.5–3%), eliminating your own listing agent saves $10,000 to $15,000 on a median-priced home. In a hot seller’s market where your property will sell regardless, you capture that money without sacrificing outcome.

  • Full pricing and negotiation control: You set the price, respond to offers directly, and negotiate without a middleman. Some sellers prefer having no one between them and the buyer.
  • Scheduling flexibility: You decide when to show the property and how to stage it. No need to coordinate around an agent’s calendar.
  • Direct buyer relationship: Particularly valuable when selling to a known buyer (family, neighbor, coworker). Skipping the agent in these cases is genuinely efficient.
  • Privacy: FSBO transactions are generally less public. No open houses if you don’t want them, no lockbox, no strangers touring without your presence.
Market Condition FSBO Viability Reason
Strong seller’s market (low inventory) High Homes sell fast regardless; commission savings matter more
Balanced market Medium MLS access becomes important; flat-fee MLS is a strong option
Buyer’s market (high inventory) Low Competition requires professional marketing and pricing expertise
Selling to a known buyer Very High 65% of all FSBO sales fit this profile; agent adds little value

That 65% figure is worth sitting with. A large majority of people who successfully sell without an agent aren’t competing on the open market at all. They’re completing a transaction with someone they already trust, where the agent’s role as buyer-finder simply isn’t needed.

The Main Cons and Hidden Risks

The most common pitfalls of FSBO aren’t about paperwork complexity or marketing effort. They center on pricing without professional data, legal exposure from missed disclosures, and the psychological difficulty of negotiating about your own home.

Pricing is where most FSBO sales go wrong. Real estate agents run comparative market analyses (CMAs) using recent closed sales, active listings, and neighborhood-level data that isn’t publicly available in a usable format for most homeowners. Eighteen percent of FSBO sellers end up pricing their home incorrectly, according to NAR research, either leaving money on the table or sitting on the market too long and triggering price reductions that signal desperation to buyers.

  • Limited MLS access: Most buyers’ agents find properties through the MLS. Without a listing there (or through a flat-fee service), your exposure is limited to Zillow, Craigslist, and word of mouth.
  • Legal disclosure requirements: Every state has mandatory disclosure forms. Missing or incorrectly completing these can create post-sale liability, including lawsuits from buyers who discover undisclosed defects.
  • Negotiation bias: Joel Carson, a top real estate agent in Salt Lake City with over 30 years of experience, is direct about this: “Selling a home is the largest transaction that people do in their lives. Without having a professional who does this for a living, looking over documents and making sure the seller understands all aspects, a lot of that is lost.”
  • Buyer’s agent friction: Agents who represent buyers are legally required to show properties matching their client’s criteria regardless of whether a listing agent is involved. But in practice, buyer’s agents who know a FSBO won’t pay a commission may spend less time promoting the property, or may tell buyers the process will be more complex.

The emotional difficulty of negotiating about your own home is underestimated until it happens. When a buyer sends a low offer with an attached inspection report full of minor issues, a homeowner tends to feel attacked. An agent absorbs that friction. Without one, sellers often either capitulate to unreasonable demands or dig in on points that don’t matter, damaging the deal.

How the 2024 NAR Settlement Changed the Equation

As of August 17, 2024, sellers are no longer required to offer buyer’s agent compensation through the MLS. This is the most significant shift in U.S. real estate commission structure in decades, and it directly affects the FSBO calculation in ways most sellers haven’t fully processed.

Before the settlement, the standard practice was sellers paying both agents. A FSBO seller still had to decide whether to offer buyer’s agent compensation to stay competitive — most did, paying 2.5–3% to the buyer’s agent even while avoiding the listing agent fee. That still represented real savings.

Factor Pre-August 2024 Post-August 2024
Seller obligation to offer buyer’s agent commission Required via MLS rules Not required, fully negotiable
Buyer representation Often informal Mandatory written buyer agreements before showings
Total commission range Typically 5–6% More variable; 2–4% now possible
FSBO advantage Saved listing agent (2.5–3%) Can save both sides in direct-buyer sales

The post-settlement world theoretically benefits FSBO sellers who have a direct buyer. In a direct sale to a known party, with no agents on either side, a seller can capture the entire commission that would otherwise go to two professionals. Whether buyers are willing to forego representation in this environment is another question. Most buyers, especially first-time buyers, will still want agent representation and will ask the seller to cover that cost in the negotiation.

The rule change is probably more significant for the overall industry than for the typical FSBO seller. But understanding it prevents the outdated assumption that you must pay 5–6% regardless.

When Does FSBO Actually Make Sense?

FSBO makes the most financial sense in three specific scenarios: a strong seller’s market where your home will generate multiple offers regardless, a direct sale to a buyer you already know, or a transaction where you have real estate experience and can genuinely handle pricing, legal paperwork, and negotiation without professional support.

If your home is distinctive — a rare property type, a location with no real comparables — pricing may actually be more art than science, and your intimate knowledge of the property may be more useful than an agent’s MLS data. That’s a legitimate case for FSBO. But it’s not the case for most standard residential sales.

You Should Consider FSBO If… You Should Hire an Agent If…
You already have a buyer lined up You need maximum market exposure
You’re in a hot seller’s market with low inventory You’re in a buyer’s market or balanced market
You have real estate experience or legal knowledge You’ve never sold a home before
You have time to manage showings, offers, and paperwork You’re relocating or have time constraints
The property has a strong, obvious value Pricing requires deep comparable-sale analysis

A flat-fee MLS service is worth knowing about regardless of which direction you choose. For $99 to $500, you get your listing on the MLS and syndicated to Zillow, Realtor.com, and Redfin without paying a full listing agent commission. You handle showings, negotiations, and paperwork yourself, but your listing reaches buyer’s agents and their clients. This middle path captures most of the exposure benefit of working with an agent at a fraction of the cost.

According to the National Association of Realtors’ 2025 Profile of Home Buyers and Sellers, FSBO homes are at an all-time low share of sales, which speaks to how demanding the process has become in competitive markets. That trend doesn’t mean FSBO is never right. It means the bar for doing it well is higher than it used to be.

Frequently Asked Questions

How much money do you actually save selling without a realtor?

You save 2.5% to 3% by eliminating the listing agent commission, which amounts to $10,000 to $12,000 on a $400,000 home. You may still choose to offer buyer’s agent compensation (another 2.5–3%) to attract buyers. Keep in mind that NAR data shows FSBO homes sell for an average of $75,000 less than agent-listed homes, though that gap narrows significantly when the seller has a known buyer.

Most states require sellers to complete mandatory disclosure forms covering known defects, environmental hazards (lead paint, radon), flood zone status, and material facts about the property’s condition. Requirements vary by state. Failing to disclose can result in post-sale lawsuits. A real estate attorney for $500 to $1,500 can review your documents and protect you from disclosure errors.

Can I list on Zillow without a realtor?

Yes. Zillow allows FSBO listings directly through its platform at no charge, though these listings are typically displayed separately from agent-listed homes. For MLS access (the database that buyer’s agents use), you’ll need a flat-fee MLS service, which costs $99 to $500 and gets your listing on the MLS without requiring a full listing agent.

Do I still need a real estate attorney if I sell FSBO?

In some states (Massachusetts, New York, South Carolina, and others), an attorney is legally required for real estate closings. In all other states, it’s strongly advisable. Without an agent reviewing contracts and disclosures, a real estate attorney is your main safeguard against legal errors that could expose you to liability after the sale closes.

What is a flat-fee MLS service and how does it work?

A flat-fee MLS service lists your home on the local Multiple Listing Service for a one-time fee (typically $99 to $500) without requiring you to hire a full-service listing agent. Your listing gets syndicated to Zillow, Realtor.com, and Redfin. You remain responsible for showing the property, negotiating offers, and handling paperwork. Companies like Houzeo, FSBO.com, and various local brokerages offer this service.

How do FSBO homes compare to agent-listed homes in final sale price?

According to NAR’s 2025 Profile of Home Buyers and Sellers, the median FSBO sale price was $360,000 compared to $435,000 for agent-assisted sales, a gap of $75,000. Researchers note that this gap is partly explained by the fact that FSBO homes tend to be smaller and in less competitive markets, but pricing errors and limited MLS exposure also contribute materially to lower sale prices in open-market FSBO transactions.

The Bottom Line

The case for FSBO is real but narrow. If you have a buyer, you’re in a hot market, or you have relevant professional experience, the commission savings are legitimate and meaningful. For most sellers navigating a standard open-market sale, the combination of pricing risk, MLS access limitations, and legal paperwork complexity makes agent representation worth the cost.

If you’re on the fence, a flat-fee MLS service offers a practical middle path: get on the MLS, reach buyer’s agents and their clients, and keep your listing agent commission. You’ll still need to manage the transaction yourself, but you solve the biggest disadvantage of pure FSBO without paying full commission.

The 2024 NAR settlement genuinely changed commission structures. It’s worth understanding those changes before you decide, not after. The old assumption that you must pay 5–6% regardless of what you do is no longer accurate.

Roof Maintenance Checklist: Complete Seasonal Guide for 2026

What Is a Roof Maintenance Checklist?

A roof maintenance checklist is a structured set of tasks — organized by season or frequency — that homeowners or contractors work through to catch damage early, extend roof life, and keep warranties valid. Most roofing professionals recommend completing a thorough inspection twice a year: once in spring to assess winter damage, and once in fall before the next freeze. Skipping these inspections doesn’t mean problems don’t exist; it means they accumulate undetected until a minor fix becomes a $12,000 replacement, a risk Keyrenter Premier can help property owners think about in a broader maintenance plan.

The tasks below cover asphalt shingles, metal, flat, and tile roofs. Some steps require getting on the roof; many can be completed safely from the ground or from an attic access point. Where tasks carry real risk, they’re flagged — a fall from a roof costs more than a contractor’s fee.

Spring and Summer Roof Maintenance Checklist

Spring is the most important inspection window for most climates. Winter leaves behind ice dam damage, cracked caulk, lifted shingles, and gutters shifted by freeze-thaw cycles. Catching this damage in April or May, before summer heat accelerates deterioration, can prevent five to ten years of premature aging.

Exterior Tasks (Spring)

  1. Inspect shingles for winter damage. Walk the perimeter and look up at every roof slope. Missing, curled, or cracked shingles need immediate attention. On asphalt shingles, look for granule loss — bare patches that expose the underlying mat are a sign the shingle is nearing end of life. Binoculars work well for steep pitches.
  2. Check flashings at all penetrations. Chimney bases, vent pipes, skylights, and wall junctions are the most common leak entry points. Look for lifted or separated metal, crumbling caulk, and rust. Flashing failures cause the majority of interior water damage that homeowners initially misattribute to shingle problems.
  3. Clear moss and algae. North-facing slopes in humid climates often accumulate green or black biological growth over winter. Moss raises shingle edges, trapping moisture and accelerating rot. Treat with a 50/50 solution of water and white vinegar or a purpose-made roof cleaner, applied with a low-pressure sprayer. Never use a pressure washer on shingles — it strips granules.
  4. Trim overhanging branches. Branches within six feet of the roof surface can abrade shingles in windstorms and drop debris that blocks gutters and holds moisture against the surface. Trim them back during spring before peak growth.
  5. Check soffit and fascia for rot or pest entry. Squirrels and birds frequently exploit small gaps that opened during winter. Look for gnawed wood, wasp nests in overhang cavities, and soft spots in fascia boards.

Gutters and Drainage (Spring)

  1. Clean gutters thoroughly. Winter delivers a full load of leaves, shingle granules, and ice dam debris. Clogged gutters overflow, sending water behind fascia boards and into wall cavities. While cleaning, check that gutters are properly sloped (1/4 inch drop per 10 feet) and tightly fastened to the fascia.
  2. Flush downspouts. Run a garden hose from the top of each downspout to verify unobstructed flow. Blockages often occur at the first elbow. Check that downspout extensions direct water at least six feet from the foundation.
  3. Inspect gutter guards if installed. Debris accumulates on top of mesh guards and can still cause overflow. Check for sagging sections and clean the guard surface.

Summer Tasks

  1. Monitor attic ventilation. Inadequate attic ventilation in summer causes heat buildup that literally cooks shingles from below, shortening their effective life by years. Check that ridge vents and soffit vents are clear of debris and insulation blockage. Attic temperatures above 130°F (54°C) on hot summer days indicate a ventilation problem.
  2. After any major storm, do a quick visual check. Hail leaves circular dents on shingles visible from ground level. Wind damage typically shows as curled edges or missing sections along the ridge. File an insurance claim within the window your policy allows, most require notification within 12 months of the event.

Fall and Winter Roof Maintenance Checklist

Roof Maintenance

Fall maintenance focuses on preparing the roof for freeze-thaw stress and preventing the ice dam conditions that cause the most serious residential roof damage each year. According to the National Roofing Contractors Association (NRCA), ice dams are responsible for millions of dollars in residential water damage claims annually in northern climates.

Fall Tasks

  1. Second full gutter cleaning of the year. The fall leaf drop is the primary gutter threat. Clean gutters after the last leaves have fallen in your area (typically late October through November, depending on region). This single step prevents the ice damming cycle from starting.
  2. Check attic insulation and air sealing. Ice dams form when heat escapes from the living space through an under-insulated attic, warming the roof deck and melting snow, which then refreezes at the colder eave. The fix is better attic insulation, not more roof heat cables. The U.S. Department of Energy recommends R-38 to R-60 insulation in attics depending on climate zone.
  3. Inspect caulk at all roof penetrations. Cold temperatures are coming. Re-caulk any gaps around vent boots, skylights, and chimney flashings with a roofing-grade sealant rated for the temperature range in your region. Silicone or polyurethane sealants remain flexible through freezing temperatures; standard latex caulk does not.
  4. Verify ridge cap shingles are secure. Ridge caps take the most wind exposure on any roof. Walk the perimeter and look for any lifted or cracked caps. A loose ridge cap in a winter windstorm means an emergency repair in bad conditions.
  5. Remove debris from valleys and low-slope areas. Roof valleys collect leaves, pine needles, and seed pods, which hold moisture against the shingles through winter. Clear these by hand (not with a pressure washer or stiff broom) before the first freeze.

Winter Tasks

  1. After heavy snowfall, remove excess snow from low-slope areas. Use a roof rake from the ground, never climb a snow-covered roof. Four to six inches of wet snow can weigh 20 pounds per square foot. Most residential roofs are engineered for 20-40 psf snow loads; verify yours with a contractor if you live in a high-snowfall area.
  2. Watch for ice dam formation at eaves. Icicles are a visible indicator, but the real damage happens when the pooled water behind the dam finds a gap and enters the wall cavity. If ice dams form repeatedly, the solution is attic air sealing and insulation, not heat cables, which are temporary and costly to run.

Monthly Tasks You Can Do From the Ground

Not every maintenance item requires a ladder. Several high-value checks take two minutes and can be done during any routine walk around your property. Catching problems early from the ground is far safer and often just as effective for early detection.

  • Scan the roof for obvious missing or displaced shingles, especially after wind events.
  • Check gutters for sagging or pulling away from the fascia.
  • Look at downspout extensions to confirm they’re still directing water away from the foundation.
  • After rain, check the attic interior for any wet spots, water stains, or daylight visible through the deck. A flashlight inspection takes five minutes and can catch leaks months before they reach the ceiling below.
  • Note any new dark streaks on shingles, algae growth can move quickly in warm, humid months and is cheaper to treat early than to remediate at scale.

One detail that surprises many homeowners: attic inspections catch most early roof leaks before any interior ceiling damage appears. Water travels horizontally along rafters before dripping, so a wet spot on a second-floor ceiling can originate from a leak ten feet away on the roof. Monthly attic checks are the most reliable early-warning system available at zero cost.

Maintenance Variations by Roof Type

The checklist above applies primarily to asphalt shingle roofs, which cover roughly 80% of U.S. residential homes. Other roof types have distinct maintenance requirements that diverge significantly.

Roof Type Key Maintenance Focus Unique Tasks Typical Professional Inspection Interval
Asphalt Shingles Granule retention, flashing integrity Moss/algae treatment, granule check in gutters Every 1-2 years
Metal (Steel, Aluminum) Rust prevention, fastener tightness Inspect for rust at cut edges and fasteners; apply rust-inhibiting paint if needed; check for loose panels after wind Every 2-3 years
Flat/Low-Slope (TPO, EPDM) Ponding water, membrane integrity Check for standing water 48+ hours after rain (indicates drainage failure); inspect membrane seams for lifting or separation Every 6 months
Clay/Concrete Tile Cracked or slipped tiles Walk carefully only on load-bearing portions; replace cracked tiles immediately (waterproofing relies on underlayment, not tiles) Every 2-3 years
Wood Shake Rot, mold, fire risk Apply preservative treatment every 3-5 years; check for gray or green discoloration indicating moisture damage Annually

Metal roofs deserve particular attention to rust. Homeowners in r/HomeMaintenance note that steel roof rust typically begins at cut edges around penetrations and at poorly sealed fastener holes, exactly the spots where DIY installations tend to cut corners. According to the Metal Roofing Alliance, a properly maintained steel roof should last 40-70 years. One user noted that a 30-year-old steel roof “looks brand new” after consistent annual treatment, while a neglected 15-year-old roof needed full replacement. The maintenance gap matters enormously.

DIY vs. Professional: Where to Draw the Line

Most items on a roof maintenance checklist are genuinely DIY-friendly when completed from the ground or from a stable ladder at eave height. The division is cleaner than most homeowners assume.

Task DIY Appropriate? Notes
Gutter cleaning (single-story) Yes Ladder safety is the main risk
Visual inspection from ground Yes Binoculars help on steep slopes
Attic inspection Yes Safest and most informative check
Moss/algae treatment Yes (ground-level spray) Avoid walking on wet or algae-covered shingles
Minor caulk re-application Yes (if comfortable on ladder) Use appropriate roofing sealant
Snow removal with roof rake Yes (from ground) Never climb a snow-covered roof
Replacing missing shingles Proceed with caution Steeper pitches require safety gear; errors void warranties
Flashing repair or replacement No, hire a contractor Improper flashing is the #1 source of roof leaks
Full roof inspection on 2+ story home Hire a contractor Fall risk and liability make this a professional task
Structural assessment (sagging, rot) No Requires professional evaluation

The r/HomeMaintenance community has a pragmatic view on this: one frequently-upvoted post noted that biannual professional inspections, at roughly $150-$300 each, cost less than a single “I thought I could handle it” repair gone wrong. A roofer who charges $200 for an inspection and identifies $800 in deferred maintenance has just delivered $600 in value, not a $200 expense.

What Routine Maintenance Actually Costs

Most homeowners significantly overestimate the cost of proactive maintenance and underestimate the cost of ignoring it. According to HomeAdvisor’s 2025 data, routine roof maintenance and minor repairs average $150 to $1,500 per year, depending on roof size and conditions. Full replacement of an asphalt shingle roof on a typical 2,000-square-foot home runs $8,000 to $15,000. Regular maintenance extends roof life by an estimated 25-50%, per the National Roofing Contractors Association, on a 20-year roof, that’s potentially 5-10 extra years before a replacement project.

The math that changes minds: a homeowner who spends $400 per year on maintenance over 25 years spends $10,000 total. The homeowner who spends nothing pays $13,000 to replace a roof 5 years early, then $400/year for the remaining 20 years, totaling $21,000. The maintained roof wins by $11,000, not counting the avoided interior water damage.

Frequently Asked Questions

How often should you inspect your roof?

Most roofing manufacturers and the National Roofing Contractors Association recommend a professional inspection at least once a year, with a self-inspection every spring and fall. After any severe weather event (hail, high winds, heavy snow), a visual check from the ground should happen within a few days. Some manufacturers require biannual inspections to keep warranties valid, check your warranty documentation for specifics.

How long does a roof last with proper maintenance?

Asphalt shingles are rated for 20-30 years, but well-maintained roofs regularly reach the top of that range while neglected ones fail at 15. Metal roofs can last 40-70 years with consistent rust prevention and fastener maintenance. Tile roofs often outlast the home. The maintenance gap is what collapses the rated lifespan, not the material itself.

What are the signs a roof needs replacement rather than repair?

Multiple patches of missing or severely curled shingles covering more than 25-30% of the roof surface, granule loss leaving bare substrate visible across large areas, sagging deck sections, or interior leaks that recur despite repeated repairs all indicate replacement is more cost-effective than continued patching. A qualified roofer can give a more precise assessment, but these are the visual benchmarks that trigger replacement conversations.

How do you prevent ice dams?

Ice dams form when heat escaping from a poorly insulated attic warms the roof deck, melting snow that then refreezes at the cold eave. The fix is attic air sealing and adding insulation to keep the attic temperature closer to the outdoor temperature. Heat cables treat the symptom; insulation treats the cause. The U.S. Department of Energy recommends targeting R-49 to R-60 attic insulation in northern climate zones for effective ice dam prevention.

What is the best way to remove moss from a roof?

Low-pressure application of a diluted bleach solution (one part bleach to one part water) or a commercial roof cleaner kills moss effectively. Apply the solution, let it sit 20-45 minutes, then rinse with a regular garden hose. Never use a pressure washer, it strips the granule surface from asphalt shingles. Zinc strips installed along the ridge provide ongoing prevention by releasing zinc carbonate downslope with every rain.

Does skipping maintenance void a roof warranty?

Many manufacturer warranties require documented proof of regular maintenance for warranty claims to be honored. This is one of the most commonly overlooked provisions in roofing warranties. Keeping records of inspections, cleaning dates, and any repairs performed provides documentation if a premature failure needs to be claimed. Some warranties explicitly list inspection frequency requirements, a condition that becomes important if a defect appears in year 12 of a 20-year warranty.

How to Waterproof Concrete: Methods, Products, and Step-by-Step Instructions

Concrete is porous by nature. Water doesn’t just sit on top of it — it migrates through capillary channels in the paste matrix, carrying dissolved salts and eventually causing spalling, rebar corrosion, and structural decay. The right waterproofing method stops that migration at the source, before visible damage starts, especially when property owners take a long-term maintenance view with guidance from the Keyrenter Northwest Chicago team.

Which method works best depends on where the concrete is, the direction of water pressure, and whether you’re working on a new pour or an existing structure. The four main approaches — penetrating sealers, sheet membranes, cementitious coatings, and crystalline waterproofing — each solve a different problem.

Why Concrete Needs Waterproofing

Fresh concrete typically achieves a water-to-cement ratio of 0.45–0.60 during mixing. Hydration consumes some of that water, but the remainder leaves behind a network of capillary pores averaging 0.1–1 micron in diameter. Under hydrostatic pressure, water moves through those channels at a measurable rate even in structurally sound concrete.

Reinforced concrete faces a second threat: chloride ions dissolved in water react with the embedded steel, initiating corrosion at concentrations as low as 0.4% by weight of cement. According to the American Concrete Institute (ACI 318, 2019), corrosion of embedded reinforcement is the leading cause of premature concrete structure failure in North America.

A hairline crack 0.1mm wide — too small to see without magnification, is wide enough for sustained moisture flow at typical groundwater pressures. That physical reality is what makes surface treatments alone an incomplete answer for below-grade applications.

4 Methods to Waterproof Concrete (Compared)

Penetrating sealers, sheet membranes, cementitious coatings, and crystalline systems are the four field-proven approaches. Each works through a different mechanism, and choosing the wrong one for the application is the most common source of premature failure.

4 methods to waterproof concrete compared
Side-by-side comparison of penetrating sealer, sheet membrane, cementitious waterproofing powder, and crystalline admixture, the four main methods for waterproofing concrete surfaces
Method How It Works Best For Cost (DIY) Durability
Penetrating sealer (silane/siloxane) Reacts with Ca(OH)₂ in cement paste to form hydrophobic compounds inside the pores Horizontal surfaces, driveways, above-grade walls $0.15–0.35/sq ft 5–10 years
Sheet membrane (HDPE or TPO) Physical barrier bonded to the exterior face of the structure Below-grade foundation walls, retaining walls $0.50–1.20/sq ft (materials) 20–30 years
Cementitious coating Portland cement + sand + waterproofing admixture brushed on; bonds mechanically Interior basement walls, water tanks, wet areas $0.30–0.70/sq ft 10–20 years
Crystalline waterproofing Reactive chemicals penetrate and form insoluble crystals that block pores permanently New pours, below-grade structures with positive and negative pressure $0.40–0.90/sq ft Permanent (self-healing)

Crystalline systems stand apart from the other three: while sealers, membranes, and cementitious coatings sit on the surface or bond to it, crystalline chemistry penetrates up to 4 inches into the concrete matrix and re-activates when moisture returns. A damaged section of crystalline-treated concrete can partially self-repair, no other method on this list does that.

Surface Preparation: The Step That Determines Everything

No waterproofing product adheres properly to a contaminated or weakened surface. Surface preparation consistently accounts for 80% of waterproofing failures in post-project investigations, according to the Portland Cement Association (PCA, 2021).

  1. Remove all loose material. Use a wire brush, grinder, or pressure washer (minimum 3,000 psi) to strip efflorescence, paint, oils, and deteriorated concrete. Hollow-sounding areas must be chipped out.
  2. Open the pores. Acid etching with a 10% muriatic acid solution, followed by thorough rinsing, opens surface pores and promotes adhesion for cementitious and crystalline products. Skip this step for sheet membranes applied over smooth formed concrete.
  3. Repair cracks before coating. Cracks wider than 1/16 inch require an epoxy injection or hydraulic cement patch. Waterproofing coatings bridge hairline cracks but cannot span structural movement joints.
  4. Dampen (but don’t saturate) the surface. Cementitious products require a saturated surface dry (SSD) condition, damp but with no standing water. A bone-dry surface pulls moisture out of the coating too fast, preventing proper cure.

How to Apply Waterproofing to Concrete

Application steps vary by product type. The sequence below covers the cementitious coating method, which is the most accessible for residential DIY projects and the most commonly misapplied.

  1. Mix the product. Standard cementitious waterproofing mortar uses a 4:1 sand-to-cement ratio by volume. When adding a hydrophobic admixture, use a 1:10 ratio of admixture to water. Mix with an electric drill and paddle until the consistency resembles a thick slurry.
  2. Apply the first coat. Use a stiff masonry brush or slurry brush, working the material firmly into the surface in a scrubbing motion. Minimum layer thickness is 5–8mm. Pressing too hard thins the layer and reduces effectiveness.
  3. Allow partial cure before the second coat. Wait until the first coat is firm but still slightly tacky, typically 4–6 hours at 70°F. Applying too early lifts the first coat; waiting too long creates a bond-line weakness.
  4. Apply the second coat perpendicular to the first. Alternating application direction closes pinholes that form when brush strokes align.
  5. Cure the finished surface. Keep the surface moist for 3–4 days by misting three times daily. In hot or windy conditions, cover with plastic sheeting between misting sessions. Early drying causes shrinkage cracks that compromise the waterproofing layer.

Most DIYers stop at the application and skip the curing step entirely. That decision turns a legitimate 10-year barrier into a coating that starts flaking within two seasons.

Choosing the Right Method for Your Project

Location and water pressure direction determine which waterproofing method will actually work. A product rated for interior negative-side pressure will fail against exterior hydrostatic pressure, and vice versa. Below is a decision matrix organized by the five most common concrete waterproofing scenarios.

Location Water Pressure Direction Recommended Method Why
Below-grade foundation wall (exterior) Positive (water pushes toward interior) Sheet membrane or crystalline admixture in new pour Handles hydrostatic pressure; excavation enables membrane installation
Below-grade wall (interior, existing) Negative (water pushes toward coating) Cementitious coating or crystalline surface treatment Only rigid-bond products resist negative-side hydrostatic pressure
Concrete floor (basement, garage) Upward vapor transmission Penetrating silicate sealer + vapor barrier Sealers reduce vapor drive; membrane beneath flooring captures residual moisture
Concrete roof or deck Positive (rain, standing water) Elastomeric coating or torch-applied membrane Accommodates thermal movement; continuous film resists ponded water
Water-retaining structure (pool, tank) Both directions (varies) Crystalline waterproofing admixture in mix design Integral treatment resists pressure from both faces; no bond-line failure risk

Interior basement wall coatings are one of the most oversold solutions in home improvement retail. Brands like Drylok and RadonSeal work reasonably well on lightly damp surfaces with moderate vapor transmission. They are not designed to resist active hydrostatic pressure. A wall that’s visibly weeping or shows white mineral deposits (efflorescence) needs exterior drainage or excavation-based treatment, not a coat of paint-like product applied from inside.

“Most cost effective way to waterproof concrete flooring before tiling”, on r/Concrete, a community of concrete professionals and DIYers. A highly-voted response: “Cementitious slurry first, let it fully cure, then tile. Don’t rely on the tile adhesive to do double duty as waterproofing.”

— r/Concrete (2024)

5 Waterproofing Mistakes That Always Cause Failures

Surface preparation failures, skipped curing, and mismatched product selection cause the overwhelming majority of concrete waterproofing problems. These five mistakes appear consistently across both residential DIY projects and professionally installed systems.

  1. Skipping crack repair before application. Coatings bridge hairline cracks under ideal conditions. Any crack that moves, thermally, seasonally, or under load, will break a surface coating within one winter cycle.
  2. Applying to a dry surface. Cementitious products need SSD conditions. A dry surface absorbs water from the slurry before the cement can hydrate properly, resulting in a powdery, weak film.
  3. Insufficient curing. The most common failure mode after application. Skipping the 3-day misting routine cuts effective curing by 60–70% according to PCA data.
  4. Using interior coatings to solve exterior drainage problems. If water is entering a wall due to saturated soil pressing from outside, no interior product will stop it long-term. The hydrostatic pressure will eventually delaminate any coating applied from the inside.
  5. Single-coat application below grade. Below-grade applications require two coats minimum for all cementitious products. Single-coat application achieves the thickness spec only on perfectly smooth formed surfaces, impossible on block or rough-poured walls.

Most homeowners who reach for an interior waterproofing product are doing so because excavating the exterior costs $5,000–$15,000. That price difference shapes the decision in ways that have nothing to do with which solution would actually work. Knowing the limitation of what you’re applying is more valuable than applying it perfectly.

Frequently Asked Questions

What is the best product to waterproof concrete?

The best product depends on the application: silane-siloxane penetrating sealers work well for above-grade horizontal surfaces and driveways; cementitious coatings are the standard for interior basement walls; sheet membranes or crystalline admixtures are preferred for below-grade exterior applications under hydrostatic pressure. There is no single product that performs best in all situations.

Can I waterproof concrete myself, or do I need a contractor?

Above-grade applications, driveways, garage floors, exposed walls, are fully DIY-accessible with proper surface preparation. Below-grade exterior waterproofing requires excavation, which is typically contractor work unless you have the equipment and experience. Interior negative-side coatings are DIY-friendly but come with significant performance trade-offs compared to exterior treatment.

How long does concrete waterproofing last?

Penetrating sealers last 5–10 years with proper surface prep. Cementitious coatings typically perform for 10–20 years. Sheet membranes range from 20–30 years under normal conditions. Crystalline waterproofing is rated as permanent by major manufacturers because the crystal structure within the concrete matrix does not degrade over time.

Is it better to waterproof concrete during the pour or after?

Integral waterproofing admixtures added during mixing provide the most complete protection because the treatment penetrates the entire concrete cross-section. Post-applied surface treatments only protect as far as they can penetrate from the surface, and their effectiveness depends entirely on surface condition and preparation quality.

What’s the difference between dampproofing and waterproofing concrete?

Dampproofing resists moisture vapor and light dampness but is not rated for hydrostatic pressure. Full waterproofing is specifically designed to resist liquid water under pressure. The International Building Code (IBC Section 1805) requires full waterproofing for structures where the water table is likely to rise within 6 inches of the floor level; dampproofing is only acceptable in well-drained conditions.

Does crystalline waterproofing work on existing concrete?

Yes. Crystalline waterproofing products are available as surface-applied slurries for existing structures as well as admixtures for new pours. When applied to existing concrete, the reactive chemicals require free moisture and calcium hydroxide in the concrete to form crystals, both are present in any cured concrete. Effectiveness is lower on very old or carbonated concrete where the calcium hydroxide has been largely depleted.

Final Thoughts

Waterproofing concrete is not complicated, but it requires matching the method to the application, preparing the surface correctly, and completing the cure. The most expensive product applied over poor prep will fail faster than a basic cementitious coating applied properly.

For below-grade foundations, explore the full treatment options in the guide to waterproofing basement walls. If you’re working on an interior DIY project with a limited budget, the DIY basement waterproofing guide covers product selection and application in detail. For projects involving membrane systems specifically, the RedGard waterproofing membrane guide is worth reviewing before you buy.

How to Build a Deck: Complete Step-by-Step Guide for DIYers

Building a deck breaks down into six stages: plan the size and budget, pull permits, set posts in concrete footings, frame with beams and joists, install decking boards, then add railings and stairs, with Keyrenter North Dallas solutions offering a helpful reference point for owners thinking beyond the build itself.

A typical 12×16-foot attached deck takes two to four weekends for an experienced DIYer working with one helper. What separates a deck that lasts 30 years from one that rots in a decade comes down to decisions made before the first board is cut.

Plan Your Deck Before You Buy a Single Board

Deck planning means settling three things first: the size and layout, the material type, and the realistic budget. For a pressure-treated wood deck, plan on $15 to $35 per square foot in materials; composite decking runs $30 to $60 per square foot depending on the product line.

The table below compares the three most common decking materials side by side.

Material Upfront Cost (per sq ft) Expected Lifespan Maintenance Best For
Pressure-Treated Pine $15–$25 15–25 years Annual staining/sealing Budget-conscious DIYers
Composite (Trex, TimberTech) $30–$60 25–30+ years Occasional cleaning only Low-maintenance builds
Western Red Cedar $20–$40 20–30 years Staining every 2–3 years Natural look, mid-budget

Start with the footprint on graph paper. Note the house attachment point, property-line setbacks (typically 5–10 feet, but this varies by jurisdiction), and any buried utilities in the build area.

A deck that just fits a grilling station and table will feel crowded the first time guests pull up chairs. Build at least 10% larger than the minimum you think you need.

For free downloadable deck plans and sizing guides by deck type, Decks.com maintains a library of detailed construction blueprints for common configurations.

The biggest cost variables beyond material type are the railing system and whether stairs are included. A simple 200-square-foot pressure-treated deck with basic aluminum rail and one staircase typically runs $3,000 to $7,000 in materials alone.

Permits, Codes, and the Mistake That Can Cost the Whole Project

Most jurisdictions require a building permit for any deck attached to a home, and for freestanding decks over 200 square feet. Permit fees typically run $150 to $500, and inspections confirm the structure is built to code before you cover the framing.

Skipping permits does not just risk a fine. Unpermitted structures can void homeowner’s insurance, block a home sale, and in documented cases require partial or full demolition of completed work.

After the permit, the two code items that matter most are footing depth and railing height. Footings must reach below the local frost line to prevent heaving; that depth ranges from 18 inches in the Deep South to 48–60 inches in northern Minnesota and Maine. Railing height is required at a minimum of 36 inches for decks below 30 feet in height, and 42 inches for taller decks.

Call your local building department before finalizing plans. Most offices will tell you the relevant IRC (International Residential Code) section for your municipality at no charge. Building Advisor’s deck section also provides a detailed breakdown of what typical permit applications require by project type.

Materials, Lumber Grades, and the Tools You Actually Need

For a pressure-treated deck, framing lumber comes in three treatment ratings: “for ground contact” (posts below grade), “.40 treatment” (joists and beams), and “above ground” (decking boards and railings). Using the wrong grade for the application cuts years off the structure’s lifespan.

A core tool and materials list for a 200-square-foot deck:

  • Post-hole digger or rented power auger (~$80/day)
  • Concrete mix (60 lb bags, 3–4 bags per post)
  • Post-saver sleeves or post base hardware
  • String line and batter boards for layout
  • Circular saw and miter saw
  • Framing nailer (rented) or impact driver and structural screws
  • Joist hangers, hurricane ties, and post caps
  • Laser level or 4-foot spirit level
  • Speed square and 25-foot tape measure
  • Butyl flashing tape for rim joist and ledger protection

Post-saver sleeves are one purchase that gets skipped on too many first builds. The sleeve is a heat-shrink barrier that seals the zone two inches above ground level, where moisture and oxygen combine to start rot on any buried post.

Skipping that sleeve on a $4,000 deck to save $40 is a calculation that doesn’t hold up after ten wet winters.

materials lumber grades and the tools you actually need
Deck framing with doubled 2×12 beams and 16-inch on-center joist spacing. Proper footing depth and joist spacing determine the long-term stability of the structure.

How to Frame a Deck: The Six Core Steps

Deck framing follows six sequential steps: lay out with batter boards and string lines, dig footings below the frost line, set posts in concrete, install beams on top of the posts, hang floor joists at 16-inch on-center spacing, then add the rim joist to close the frame.

  1. Lay out the deck. Set batter boards about 2 feet beyond each corner and run string lines to mark the perimeter. Pull diagonal measurements and confirm the layout is square before digging anything.
  2. Dig footings. Hand dig or auger holes to at least the local frost depth. Flare the bottom of each hole to 12 inches wide at the base for better bearing capacity under the concrete.
  3. Set posts in concrete. Slide a post-saver sleeve over each post and position the sleeve 2 inches above grade. Pour concrete into the hole and slope the top surface away from the post so water drains outward rather than pooling at the base.
  4. Install beams. Doubled 2×12 beams are standard for most residential spans. Crown the boards first (curve faces up), pull them tight with structural screws or power lags, then set them on the posts and secure with post caps.
  5. Hang joists. Sixteen-inch on-center spacing is worth the extra lumber cost over 24-inch. The difference in how the deck feels underfoot is significant; 24-inch spacing produces a springy surface that most homeowners notice immediately. Use joist hangers at both ends and hurricane ties at beam connections.
  6. Add the rim joist. The rim joist closes the frame and prevents joist rotation. Tape the top edge with butyl flashing tape before laying decking boards to block water from wicking into the end grain.

“First Solo Deck Build, 31.5’×9.25′. NW Montana. Took me 4 and a half months of evening work.”

— r/Decks, November 2023 (275 upvotes) | Original post

That solo build covers 291 square feet and took nearly five months of after-work hours. Most “weekend project” estimates assume a crew, dry weather, and no permit delays.

Solo, evenings only, the real timeline for a deck that size runs deep into autumn.

Laying Decking Boards, Railings, and Stairs

Decking boards go down perpendicular to the joists in most builds. Leave 1/8-inch gaps between boards for drainage; wood boards tighten slightly over time, while composite boards maintain their gap more consistently. Face-screwing is fastest; hidden fastener systems look cleaner but add significant labor time.

Railings are required by code when the deck surface sits more than 30 inches above grade. Post-to-post spacing for railing panels should not exceed 6 to 8 feet depending on the system. Balusters must be spaced so that a 4-inch sphere cannot pass between them.

Stair construction is where most first-time builders slow down. The guideline for stair stringers: the rise (vertical height) plus the run (horizontal tread depth) should total 17 to 18 inches. A 7-inch rise with a 10-inch run equals 17 inches and feels natural to walk.

Once framing is complete and boards are installed, protecting the underside of the deck significantly extends the structure’s lifespan. The guide on how to waterproof under a deck covers the most effective drainage and vapor management methods for the space below.

There is a long distance between buying a pile of lumber and standing on a finished deck. Every stair riser nailed home, every board gapped correctly, is work that will outlast the effort by two or three decades — which is a kind of return on time that most weekend projects simply don’t offer.

The Mistakes That Kill Decks Early

The most damaging deck-building mistakes are undersized footings, skipping post-saver sleeves, using 24-inch joist spacing instead of 16-inch, and treating indoor-grade lumber as interchangeable with outdoor-rated stock. These are not cosmetic issues; they are structural failures waiting on the right wet season.

“Just got quoted $55k to build an 8×14 deck with stairs.”

— r/Decks, 2025 (633 comments) | Original post

That thread attracted over 600 responses, mostly from people who had DIYed the same deck size for $2,500 to $4,000 in materials. The gap between contractor quotes and DIY material costs on a basic deck is among the widest in home improvement.

“Guy building my deck says he can’t dig holes for post so the patio stones will be just fine — should I be concerned for the winter?”

— r/Decks, 2024 (1,387 comments) | Original post

Any contractor who dismisses footings on an attached deck is revealing something important about how the rest of the job will be handled. On an attached deck, footings that heave in a freeze-thaw cycle pull against the ledger board and can damage the home’s rim joist.

Hiring without checking licenses, permits, and recent references is the contractor version of skipping the post sleeves: cheap until it isn’t.

For applying a protective coating after construction, the overview of deck coating waterproof systems covers the differences between penetrating sealers, film-forming stains, and elastomeric coatings by board material type.

Frequently Asked Questions

How much does it cost to build a deck yourself?

A DIY pressure-treated deck costs $15 to $35 per square foot in materials. For a 200-square-foot deck, that totals $3,000 to $7,000 depending on hardware, railing system, and whether stairs are included. Composite decking roughly doubles the upfront cost but eliminates most ongoing maintenance expenses over 25-plus years.

Do I need a permit to build a deck?

Most municipalities require a permit for any deck attached to a home, regardless of size, and for freestanding decks over 200 square feet. Permit fees run $150 to $500 in most areas. Skipping permits risks insurance coverage gaps, sale complications, and possible required demolition.

How deep should deck footings be?

Deck footings must extend below the local frost line to prevent heaving in freeze-thaw cycles. Frost depth ranges from 18 inches in warm southern climates to 48 to 60 inches in the northern United States. Contact your local building department for the exact requirement in your area.

What wood is best for building a deck?

For framing — posts, beams, and joists — use MCA or ACQ pressure-treated pine rated for the appropriate contact level (ground contact vs. above ground). For decking boards, pressure-treated pine is the budget choice, Western Red Cedar offers natural aesthetics at mid-range cost, and composite or PVC boards provide the best long-term value for households that prefer minimal upkeep.

How long does it take to build a deck?

A 200-square-foot deck takes two to four weekends for an experienced DIYer working with a helper. First-time solo builders on larger decks (300+ square feet) often take several months of evening and weekend work. Permitting adds two to four weeks to the overall timeline in most jurisdictions.

What is the difference between composite and pressure-treated decking?

Pressure-treated wood costs less upfront but requires annual or biennial sealing and typically shows significant wear after 15 to 20 years without maintenance. Composite decking costs two to three times more at purchase but resists rot, splintering, and fading with minimal care, delivering a lower total cost over 25-plus years for most households.

Can I build a deck alone, or do I need to hire a contractor?

Most adults with moderate DIY experience can complete a straightforward ground-level or low-elevation deck without professional help. Tasks that genuinely benefit from a second person include setting posts, installing heavy beams, and running long decking boards. High-elevation decks or complex ledger connections to the house are better handled by experienced contractors with structural knowledge.

Start With the Footings, Not the Finish

Every impressive deck photo starts with work that is buried in concrete and never seen again. The hours spent on accurate layout, proper frost-depth footings, and correct joist spacing are invisible in the final product but determine whether the deck is still solid when your kids are grown.

Get the permit. Dig the footings to depth. Use the post-saver sleeves. The aesthetic choices, composite versus wood, hidden fasteners versus face screws, cable rail versus wood balusters, all matter far less than the structural work underneath.

How to Install Vinyl Plank Flooring: A Complete Step-by-Step Guide

Installation vinyl plank flooring is a straightforward DIY project most homeowners finish in a single weekend. The click-lock floating method requires no adhesive, works over most existing floors, and delivers a waterproof result that holds up to pets, kids, and heavy foot traffic. Here is how to do it right, from subfloor prep to the final transition strip, while keeping broader homeowner responsibilities such as Houston rental payment rules in mind for rental spaces.

Tools and Materials You Need for Vinyl Plank Flooring Installation

Gather all your tools and materials before opening a single box of flooring. You will need a rubber mallet, pull bar, tapping block, spacers, a utility knife or oscillating saw, tape measure, and a level. Budget for 10 percent extra flooring beyond your room’s square footage to account for cuts and mistakes.

Vinyl plank flooring (LVP) must acclimate inside the room where it will be installed for at least 24 to 48 hours before you lay a single plank. Skipping this step is one of the most common reasons floors buckle or gap after installation — the planks expand and contract with temperature and humidity, and they need to reach equilibrium with the room first.

Tools Supplies
Rubber mallet Vinyl plank flooring (+ 10% overage)
Pull bar Underlayment (if not pre-attached)
Tapping block 1/4″ spacers
Utility knife or oscillating saw Transition strips
Tape measure Floor patch or self-leveling compound
Long level or straightedge (6 ft+) Carpenter’s square
Chalk line Safety glasses and knee pads

Many LVP products come with underlayment pre-attached to the back of each plank. If yours does, do not add a separate underlayment layer — doubled underlayment creates a spongy, unstable surface that can cause the click-lock joints to fail over time.

tools and materials you need for vinyl plank flooring installation
Proper stagger pattern with 1/4-inch spacers maintaining the expansion gap — the most commonly skipped detail in DIY vinyl plank installs

Subfloor Preparation for Vinyl Plank Flooring Installation

Your subfloor must be flat to within 3/16 of an inch over any 10-foot span before you install vinyl plank flooring. Any variation beyond that tolerance will cause joints to peak, separate, or crack — especially with thinner LVP products under 6mm.

Use a long straightedge or level to sweep across the subfloor in multiple directions. Mark any high spots with a pencil and grind them down with a belt sander or floor grinder. Fill low spots with a self-leveling compound or floor patch, feathering the edges out so there is no abrupt height change.

Discussions in communities focused on DIY flooring repeatedly come back to the same theme: subfloor prep is where most failed installations begin. One experienced installer summed it up plainly:

“Subfloor prep is the only thing that actually matters. The floor install itself takes a few hours. Proper prep can take a full day. Do the prep.”

— r/DIY, April 2026 (27 upvotes)

The 3/16-inch tolerance is roughly the width of a pencil — a surprisingly small margin that separates a floor that stays solid for decades from one that creaks underfoot within months.

Clean the subfloor thoroughly after leveling. Remove all dust, adhesive residue, and debris. Even small particles can create raised spots that telegraph through thin LVP. For concrete subfloors, also check for moisture: tape down a sheet of plastic for 24 hours and look for condensation. Persistent moisture means you need a moisture barrier before any flooring goes down.

Vinyl Plank Flooring Installation: Step-by-Step Process

The standard floating method for installation vinyl plank flooring follows six sequential steps. Work from the longest, most visible wall in the room and move toward the door so your starting row is the most prominent feature in the space.

Step 1: Plan Your Layout

Measure the room’s width and divide it by the plank width to calculate how wide your final row will be. If the final row comes out to less than 2 inches, cut the first row narrower to avoid a thin, awkward strip at the far wall.

Most flooring professionals recommend running planks parallel to the longest wall or parallel to the main light source entering the room. A perpendicular layout can visually widen short hallways.

Step 2: Lay the First Row

Place 1/4-inch spacers against the starting wall to create an expansion gap. This gap is non-negotiable, vinyl expands significantly with heat and has nowhere to go if it’s locked against a wall. Start in a corner, groove side facing the wall, and click planks end to end along the full length of the row.

Cut the last plank of the first row to fit. Save the offcut, it should start the second row if it is at least 6 inches long, which automatically creates the required stagger.

Step 3: Install the Middle Rows

Stagger end joints by at least 6 to 8 inches between adjacent rows. This stagger pattern distributes weight evenly and makes the floor look more natural. Click each plank into its neighbor at a 45-degree angle and press down until the joint snaps flat.

Use a tapping block and rubber mallet for tight joints, never hit the planks directly. The pull bar lets you close the final joint in each row when there is no room to swing a mallet.

Step 4: Cut Around Obstacles

Score-and-snap works for straight cuts on most LVP products: score the surface deeply with a utility knife and a straightedge, then snap the plank over the edge of a table. For curves around door casings or pipes, use a jigsaw or oscillating tool.

Undercut door casings rather than scribing the plank around them. Slide a piece of scrap LVP under the casing to gauge the cutting height, then use a multi-tool to cut through the casing at that height. The plank slides neatly underneath for a professional-looking result.

Step 5: Install the Final Row

Measure the gap at the far wall, account for the 1/4-inch expansion gap, and rip the final row of planks to width with a table saw or circular saw. Use a pull bar to click the last row into place without damaging the edge.

Step 6: Finishing Touches

Remove all spacers after the floor is complete. Install transition strips where the new floor meets tile, carpet, or another room. Reinstall baseboards or add quarter-round molding to cover the expansion gap at walls, this is the detail that separates clean-looking work from amateur results.

Floating vs. Glue-Down vs. Peel-and-Stick: Which Method to Choose

Floating click-lock installation is the right choice for most residential projects. It is faster, reversible, and requires no adhesive or special tools. Glue-down installation makes sense for commercial settings, large open areas over 1,000 square feet, or rooms with in-floor radiant heating where a floating floor might lift at the edges.

Method Best For Skill Level Reversible? Cost
Floating (click-lock) Most residential rooms Beginner Yes Lowest
Glue-down Large areas, radiant heat, commercial Intermediate No Medium
Peel-and-stick Low-traffic areas, temporary Beginner Partial Lowest

Glue-down LVP on OSB subfloor is a topic that generates consistent debate in flooring communities. Manufacturers generally approve it, but real-world experience shows that OSB’s surface can be uneven enough to compromise adhesion at panel edges. Many installers recommend sanding OSB seams and applying a skim coat of floor patch before gluing.

According to Wikipedia’s overview of luxury vinyl tile, LVP was introduced to the consumer market around 2009 and has become one of the fastest-growing flooring categories, largely because click-lock technology made DIY installation genuinely achievable for homeowners without flooring experience.

5 Mistakes That Ruin Your Vinyl Plank Flooring Installation

The most preventable failures in installation vinyl plank flooring share a common cause: rushing past the preparation steps to get to the visible work. Knowing these five mistakes in advance saves a full reinstallation later.

  1. Skipping subfloor leveling. High or low spots transfer directly through LVP, creating a floor that bounces, peaks at joints, or develops squeaks within weeks. Any spot out of tolerance must be corrected before a single plank goes down.
  2. Forgetting the expansion gap. Vinyl expands with heat and humidity. Without the 1/4-inch perimeter gap, floors buckle in summer, a mistake that requires pulling up the entire installation to fix.
  3. Ignoring acclimation. LVP that goes straight from a cold delivery truck to a heated room can gap badly at joints as it warms up and expands. Give it 24 to 48 hours in the room first.
  4. Poor stagger pattern. End joints that land within 6 inches of each other in adjacent rows look unnatural and weaken the floor’s structural integrity. Start each row with a cut piece of at least 6 inches from the previous row’s end joint.
  5. Using the wrong underlayment. Adding a separate underlayment beneath planks that already have pre-attached padding creates a floor that flexes too much at joints, eventually causing them to disengage or crack. Read your product specs before adding anything below.

One detail worth knowing: “grout lines” appearing on vinyl plank floors, which became a recurring complaint in r/Flooring in early 2026, almost always trace back to thin LVP products installed over subfloors with panel edge ridges that telegraph through. The fix is the same as preventing it, a flat subfloor to begin with.

The FloorScore certification program tests finished vinyl flooring products for indoor air quality compliance, an important consideration when choosing between LVP brands. The EPA’s guidance on volatile organic compounds explains why off-gassing from flooring materials matters, particularly in rooms with limited ventilation like bedrooms. Choosing FloorScore-certified LVP eliminates this concern entirely.

Frequently Asked Questions About Vinyl Plank Flooring Installation

How long does installation vinyl plank flooring need to acclimate?

Vinyl plank flooring needs 24 to 48 hours to acclimate inside the installation room before you lay it. Open the boxes and let the planks rest flat in the room, at normal living temperature and humidity, for at least a full day. Thicker LVP products over 8mm benefit from the full 48 hours.

Do I need underlayment for vinyl plank flooring?

Whether you need separate underlayment depends on your specific product. Most modern LVP comes with underlayment pre-attached; adding a second layer underneath creates too much flex and can cause click-lock joints to fail. If your LVP has no attached underlayment, a thin 1mm to 2mm foam underlayment improves sound dampening without compromising stability.

What direction should I lay vinyl plank flooring?

Run vinyl plank flooring parallel to the longest wall in the room or parallel to the primary light source (usually the main window). Either approach creates the most natural visual result. Running planks perpendicular to a room’s long dimension makes narrow spaces feel wider but can make long halls feel shorter.

Can I install vinyl plank flooring over existing tile or hardwood?

Yes, vinyl plank flooring can be installed over existing tile or hardwood as long as the existing surface is flat, structurally sound, and no thicker than what your door clearances allow. Check that every grout line, tile edge, or hardwood board seam is flush within the 3/16-inch tolerance, high edges will telegraph through the LVP.

How much extra vinyl plank flooring should I buy?

Buy 10 percent more than your calculated square footage for a standard installation. If your room has many angles, alcoves, or a diagonal layout pattern, budget 15 percent extra. LVP from the same dye lot can vary slightly in color from batch to batch, so buying enough to finish the entire floor in one purchase matters.

Can vinyl plank flooring be installed in bathrooms?

Luxury vinyl plank flooring is fully waterproof and an excellent choice for bathrooms. The key is sealing the expansion gap around the toilet base and tub with silicone caulk after installation so standing water cannot seep beneath the planks and reach the subfloor. For the best waterproof options available, our guide to the best waterproof vinyl plank flooring breaks down the top-performing products by room type and budget.

Getting Your Installation Vinyl Plank Flooring Right the First Time

Vinyl plank earns its reputation as a beginner-friendly project because the click-lock system itself is genuinely forgiving. The complexity is in the preparation, leveling the subfloor, allowing proper acclimation, and maintaining consistent expansion gaps throughout.

Most homeowners who struggle with their LVP installation wish they had spent more time on prep and less time rushing to lay planks. An extra half-day on subfloor work usually prevents the kind of problems that require a full reinstallation to fix.

If you are still deciding on which product to install, our roundup of the best waterproof vinyl plank flooring options covers the top products across different thicknesses, budgets, and room types.