Aqviz

Nashville Basement Waterproofing: Costs, Methods, and What to Expect

Nashville homeowners deal with one of the most water-prone environments in the country. The city receives roughly 47 inches of rain each year, according to the National Weather Service’s Nashville office, and Middle Tennessee’s clay-heavy soils hold that moisture directly against foundation walls for weeks at a time.

That combination, clay soil plus heavy seasonal rainfall, is the core reason basement water intrusion is so common in the Nashville metro. Addressing it early, before water compromises structural materials or triggers mold growth, is almost always significantly cheaper than waiting.

Why Nashville Basements Are Especially Vulnerable

Nashville basements leak more frequently than those in drier regions because of three intersecting factors: annual rainfall above the national average, clay-dominated soils that drain poorly, and an underlying limestone karst geology that creates unpredictable water migration pathways beneath homes.

Clay soil expands when wet and contracts when dry, cycling through this process dozens of times each year. That expansion pushes against basement walls with what engineers call hydrostatic pressure, forcing water through hairline cracks and porous concrete block at a rate that accelerates over time.

Limestone karst, which underlies significant portions of Davidson and the surrounding counties, adds a second variable. Water moves through dissolved channels in the bedrock, occasionally surfacing beneath a slab without any visible surface indication of where it originated.

The humid climate compounds both problems. The National Weather Service Nashville office reports that Nashville’s average annual precipitation has trended slightly upward over the past two decades, with spring rain events becoming more intense. A basement that handled moisture fine for 20 years can begin showing problems after a single abnormally wet season, not because the waterproofing failed, but because the volume of water finally exceeded what the original drainage design anticipated.

6 Warning Signs Your Nashville Basement Needs Attention

The most reliable early warnings of basement water intrusion are efflorescence (white chalky deposits on walls), visible damp spots or tide lines, a persistent musty smell, and any active mold growth. Catching these signals before they escalate is the difference between a drainage installation and a structural repair bill.

Most Nashville homeowners notice problems in spring, when the ground saturates from March through May. Here are the six signs worth taking seriously:

Warning Sign What It Indicates Urgency
Efflorescence (white powder on walls) Water moving through concrete, carrying salts to the surface Moderate — address within one season
Damp spots or water stains Intermittent or active seepage through walls or floor Moderate to high
Musty odor Elevated humidity or hidden mold growth Moderate — mold can spread quickly
Visible mold or mildew Sustained moisture above 60% relative humidity High — health risk
Cracks in walls or floor Hydrostatic pressure, settling, or freeze-thaw cycles Variable — horizontal cracks are urgent
Standing water or pooling after rain Active drainage failure or foundation breach High, address immediately

Horizontal cracks in block or poured concrete walls deserve particular attention. Vertical cracks typically indicate shrinkage or minor settling; horizontal ones signal lateral pressure from saturated soil, which is a structural concern separate from waterproofing.

According to the U.S. Environmental Protection Agency, mold can begin colonizing damp surfaces within 24 to 48 hours of a water event. A damp Nashville basement that smells fine today can have active mold behind a finished wall within days of a significant rain event.

4 Waterproofing Methods That Work in Middle Tennessee

For most Nashville homes, interior drainage systems paired with a sump pump represent the most practical and cost-effective solution. Exterior waterproofing addresses the problem at the wall surface but requires excavation, and crack injection addresses isolated entry points without solving broader drainage problems. Choosing the right method depends on where the water is entering and how much pressure is involved.
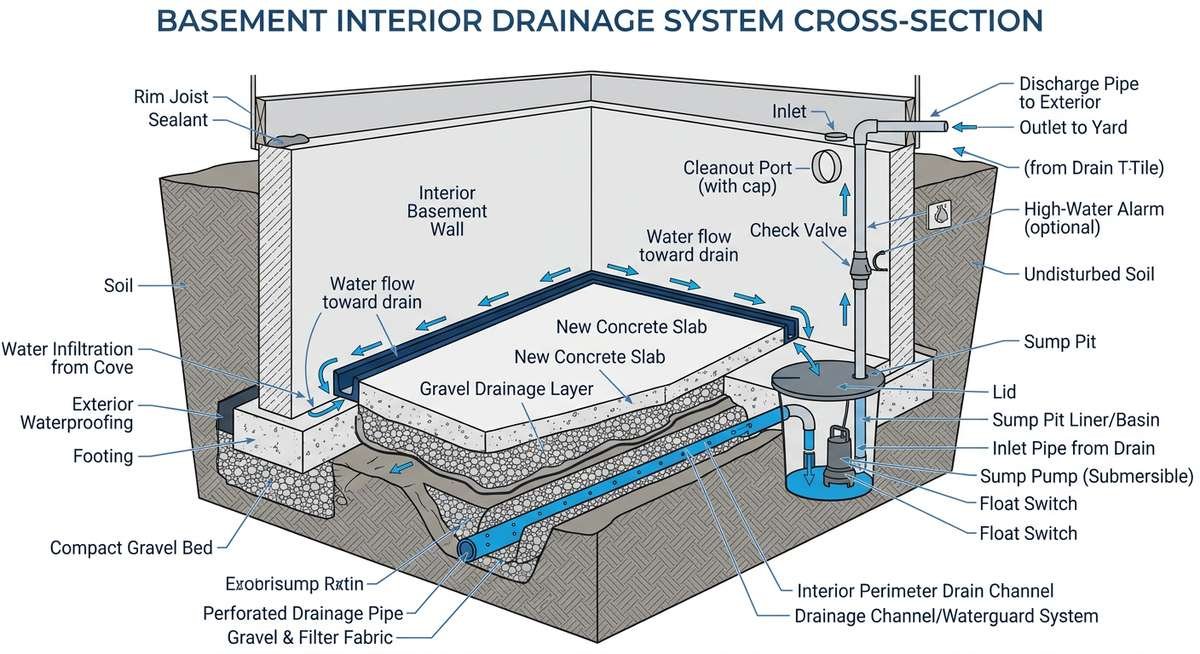
4 waterproofing methods that work in middle tennessee
How an interior perimeter drainage system channels groundwater from foundation walls to a sump pit, the most common Nashville basement waterproofing solution.
Method How It Works Best For Typical Cost Range
Interior drainage system Perimeter channel installed at floor-wall joint directs water to a sump pit Seepage through walls or floor; hydrostatic pressure $3,000–$12,000
Exterior waterproofing Excavation, waterproof membrane applied to exterior wall, drainage board installed Active cracks; new construction; severe hydrostatic pressure $10,000–$30,000+
Sump pump system Collects water from drainage system or floor; pumps it away from foundation Any home with interior drainage; flood-prone areas $1,200–$5,000
Crack injection (polyurethane or epoxy) Fills hairline cracks in poured concrete walls from the interior Isolated cracks in poured concrete (not block walls) $300–$2,500 per crack

Interior drainage is by far the most common approach in Nashville for an important reason: excavating exterior walls in clay soil is expensive, disruptive, and sometimes requires permits. Interior systems handle the same water volume at a fraction of the cost and can be installed in a single day for most homes.

Sump pumps are nearly always part of the picture. Nashville’s storm intensity means that even a well-designed drainage channel can be overwhelmed without a pump to move accumulated water away from the foundation. A battery backup on the pump matters here, because Nashville loses power during the same storms that produce the highest basement water risk.

Crack injection works for poured concrete foundations with isolated hairline or step cracks but does not address block walls or widespread seepage. Many contractors offer it as a standalone service, and it is genuinely effective when the crack is the only entry point.

Nashville Basement Waterproofing Costs: What Homeowners Actually Pay

Most Nashville homeowners pay between $4,000 and $15,000 for a complete basement waterproofing project involving an interior drainage system, sump pump, and any necessary crack repair. Smaller jobs addressing a single seeping crack can run $500–$2,500; full exterior waterproofing on a larger home can exceed $35,000.

Several factors push costs higher in Middle Tennessee specifically:

  • Clay soil removal: Excavating clay for exterior work takes longer and requires more equipment than sandy soil.
  • Block vs. poured concrete: Block foundations are more porous and often require more extensive drainage than poured concrete walls.
  • Basement size: Interior drainage is priced per linear foot of perimeter, typically $75–$150 per foot in the Nashville market.
  • Battery backup system: Adds $500–$1,500 but is strongly recommended given Nashville’s storm patterns.
  • Permits: Davidson County requires permits for structural work; add $150–$500 depending on scope.

“Got quotes ranging from $7k to $30k for sump pump installation and basement waterproofing. The spread is insane.”

— r/basement (homeowner community thread on waterproofing quote variance; r/basement is a community focused on basement improvement and repair)

That price spread is real, and it reflects genuine differences in scope rather than contractor gouging. A quote at $7,000 might include a single sump pump and 40 linear feet of drainage. One at $28,000 might include full-perimeter interior drainage, a primary and backup sump system, wall crack repairs, and a dehumidifier installation.

The single most consistent piece of advice from experienced homeowners: get at least three written estimates from contractors who inspect the basement in person. Phone or website quotes for basement waterproofing are essentially meaningless without seeing the actual space.

Most Nashville waterproofing contractors offer financing, which is worth asking about. Payment is typically structured so the full amount is not due until after installation is complete.

How to Choose a Basement Waterproofing Contractor in Nashville

The most reliable Nashville basement waterproofing contractors carry an A or A+ Better Business Bureau rating, hold a Tennessee contractor’s license, offer a lifetime transferable warranty on drainage systems, and have documented local project history in Middle Tennessee. A transferable warranty adds measurable resale value to a home, making it one of the more financially significant selection criteria.

Several red flags are worth watching for:

  • High-pressure sales tactics: Any contractor who insists you sign a contract the same day they walk through your basement, especially citing a “one-day-only” discount, is worth avoiding.
  • No in-person inspection: Legitimate waterproofing proposals require seeing the actual basement, checking crack locations, testing wall moisture, and assessing drainage outlets.
  • No written warranty: Verbal lifetime warranties are not warranties. Get the terms in writing, and check whether the warranty transfers to a new buyer if you sell the home.
  • Waterproofing paint as the proposed solution: Paint-based sealants can slow minor condensation but do nothing against active water intrusion or hydrostatic pressure. When a quote leads with paint, the contractor either does not understand the problem or is not equipped to solve it.
  • No licensed subcontractors for electrical: Sump pump installations involve electrical work. Any contractor performing that work needs to use a licensed electrician or hold the license themselves.

Tennessee’s contractor licensing board (tn.gov) maintains a searchable database where you can verify that a contractor’s license is current before signing anything. Checking BBB complaints and Google Reviews for Nashville-specific projects (not just general reviews from across multiple states) gives a much better picture than star ratings alone.

Frequently Asked Questions

How much does basement waterproofing cost in Nashville?

Most Nashville homeowners pay $4,000–$15,000 for a full interior drainage system with a sump pump. Smaller jobs (isolated crack repair) run $500–$2,500, while full exterior waterproofing can reach $30,000 or more. Cost varies based on basement size, foundation type, and the drainage method required.

Is interior or exterior waterproofing better for Nashville homes?

Interior drainage systems are the practical choice for most Nashville homes because they cost significantly less and do not require excavating in clay soil. Exterior waterproofing provides a true barrier at the wall surface and is better for new construction or severe structural cracks, but the added cost is rarely justified for standard seepage problems.

How long does basement waterproofing last?

Professional interior drainage systems typically last 20–30 years when properly maintained, and many come with lifetime warranties. Sump pumps have a shorter service life, averaging 10–15 years, and should be tested annually. Exterior membrane waterproofing can last 20–30 years but may need inspection if significant soil movement occurs.

What causes basement flooding in Nashville?

The most common causes in Middle Tennessee are hydrostatic pressure from clay soil retaining rainwater, cracks in block or poured concrete walls, failed or overwhelmed sump pump systems, and poor grading that directs surface water toward the foundation. Clogged gutters and downspouts discharging too close to the house account for a significant percentage of water intrusion calls.

Can I waterproof my basement myself?

DIY options like waterproofing paint or hydraulic cement can address very minor moisture or pinhole leaks, but they cannot solve hydrostatic pressure, active cracks, or drainage failures. For anything more than surface condensation, professional installation is the only approach that actually resolves the underlying problem and comes with a warranty.

Does waterproofing a basement increase home value?

Yes. A dry, professionally waterproofed basement with a transferable lifetime warranty is a documented selling point in Nashville’s real estate market. Home inspectors flag water intrusion evidence as a material defect; eliminating that defect removes a negotiating point for buyers and can prevent a sale from falling through entirely during inspection contingency periods.

Getting Started with Nashville Basement Waterproofing

Nashville’s climate is not going to get drier. For homeowners noticing early warning signs, the calculation is straightforward: a $6,000 interior drainage system installed now costs far less than $20,000 in structural repairs three years from now.

The EPA’s mold guidance recommends addressing any moisture source within 24 to 48 hours to prevent colonization. In a Nashville basement that means not deferring an inspection after the first wet spring. Getting three in-person estimates from licensed local contractors, checking BBB ratings and Tennessee contractor license status, and asking specifically about transferable warranties covers the essential bases before signing anything.
Red Guard Waterproofing Membrane: Coverage Rates, Application Steps, and Mistakes to Avoid

The red guard waterproofing membrane from Custom Building Products is an IAPMO-listed, polymer-based liquid barrier that turns bright red when fully cured, giving installers a reliable visual cue before tiling. One gallon covers 55 square feet as a waterproof membrane, though coverage drops to 40 square feet in pan liner applications. Understanding those numbers upfront saves both material waste and costly callbacks.

What RedGard Waterproofing Membrane Actually Does

Red guard waterproofing membrane is a ready-to-use liquid that creates a seamless barrier under tile, bonding directly to cement board, concrete, masonry, and clean metal drain assemblies including PVC, stainless steel, and ABS components. It meets ANSI A118.10 (IAPMO shower pan liner standard) and ANSI A118.12 (crack isolation), and carries an extra heavy-duty rating for steam shower installations.

The product works by forming a flexible elastomeric film over the substrate. Where traditional PVC liner systems trap water and require perfect seam welding, RedGard creates a monolithic membrane with no seams except at corners, where fabric reinforcement fills the gap. Custom Building Products (a subsidiary of The QUIKRETE Companies) manufactures it for both residential and commercial tile and stone applications.

Applied over a slab-on-grade concrete floor, it also functions as a moisture vapor barrier under all types of floor coverings, which makes it a two-in-one solution for basement tile jobs. The product ships ready to use with no mixing required.

RedGard Coverage Rates Per Gallon

A 1-gallon pail covers different square footage depending on how the membrane is used. As a standard waterproof membrane, expect 55 square feet per gallon. For IAPMO-certified shower pan liner installation, that drops to 40 square feet per gallon due to the required film thickness. The crack prevention use case covers significantly more area at 100 square feet per gallon.

According to Custom Building Products’ published coverage chart, the complete breakdown is as follows:

Application Use Case 1 Gallon (3.78 L) 3.5 Gallon (13.2 L)
Crack Prevention Membrane 100 sq ft (9.3 m²) 350 sq ft (32.5 m²)
Crack Prevention (ANSI A118.12) 25 sq ft (2.3 m²) 88 sq ft (8.2 m²)
Waterproof Membrane 55 sq ft (5.1 m²) 192 sq ft (17.8 m²)
IAPMO Pan Liner (ANSI A118.10) 40 sq ft (3.7 m²) 140 sq ft (13 m²)

The spread between 25 and 100 square feet per gallon tells the real story. Crack prevention applications can stretch a gallon far because the film is thinner. Certified shower floor installations require multiple coats building up to the minimum dry film thickness, which consumes more product. Calculate your shower floor and wall areas separately using the appropriate row in the table.

One gallon runs roughly $50 at most tile supply houses. One failed shower rebuild, by contrast, runs several thousand dollars in labor, tile removal, substrate replacement, and re-installation. The math on buying an extra gallon is not complicated.

How to Apply RedGard: Step-by-Step

RedGard application follows six steps: surface preparation, fabric reinforcement at corners and seams, first coat, drying verification by color change, second coat, and final cure check before tiling. Skipping the fabric tape at inside corners is the single most common DIY mistake, and it is also the most common source of cracks and eventual moisture intrusion at those joints.

Step 1: Prepare the substrate. The surface must be clean, solid, and free of standing water, oil, paint, or form-release agents. Cement board seams should be taped with alkali-resistant fiberglass mesh tape and filled with thinset. Let the thinset cure before proceeding. On concrete, fill any cracks or voids first.

Step 2: Apply fabric membrane at critical joints. Before the first coat of RedGard, embed RedGard Fabric Membrane into the membrane at all inside corners (floor-to-wall joints), around drain flanges, and at any substrate transitions. Use a brush to work a thin layer of RedGard into the corner first, press the fabric into it, then brush over the top. This step cannot be skipped on shower floors.

Step 3: Apply the first coat. Pour RedGard onto the surface and spread with a 3/8-inch nap roller or a brush. Work in consistent, overlapping strokes to avoid thin spots. Cover the entire surface, including the base of walls where they meet the floor. The product starts as a bright pink liquid.

Step 4: Check the color before applying the second coat. Tile pros who do a hundred shower installations a year rely on one visual rule: uniform red color across the entire surface means the coat is dry. Any remaining pink spots mean moisture is still present in the film. Do not apply the second coat over pink areas. Depending on humidity and temperature, drying takes one to two hours per coat.

Step 5: Apply the second coat. Roll or brush the second coat perpendicular to the first for complete coverage. Two full coats are the minimum for any wet area application. Steam showers and shower floors may require a third coat to achieve the required film thickness for the ANSI A118.10 pan liner rating.

Step 6: Verify full cure before tiling. The entire surface must be uniformly deep red with no pink areas before any thinset or tile goes down. Setting tile on incompletely cured RedGard traps moisture in the film and compromises adhesion. In high-humidity conditions, run ventilation fans during curing.

Substrate Compatibility and System Mixing

RedGard bonds reliably to cement board (HardieBacker, Durock, and similar), concrete, masonry, plywood on floors rated for wet areas, and clean metal drain components. It does not bond reliably to painted surfaces, gypsum-based boards not rated for wet areas, or substrates with active efflorescence. Surface preparation determines whether the membrane holds long-term.

The more contentious compatibility question involves Schluter Systems Kerdi membrane. A significant volume of discussion in r/Tile and r/HomeImprovement centers on installers who have tried to use both systems together, either applying RedGard over a section of Kerdi or vice versa. The two products come from different waterproofing philosophies and are designed as complete, standalone systems.

Kerdi is a bonded sheet membrane; RedGard is a liquid-applied membrane. Their adhesive chemistries, movement tolerances, and substrate bonding characteristics differ. According to discussions in r/Tile following real shower leak investigations, mixing the two systems can create voids and delamination at transition points that neither system was designed to handle.

Custom Building Products’ technical documentation makes no provision for Kerdi integration. Using one system throughout a single installation is the correct approach.

“Help interpreting shower leak and mixed waterproofing system (Kerdi + RedGard + HardieBacker)”

r/Tile  ·  51 comments  ·  View thread

“Is my contractor applying red guard correctly? Pictures inside.”

r/HomeImprovement  ·  52 comments  ·  View thread

“Anyone ever used Red Guard for showers?”

r/HomeImprovement  ·  44 comments  ·  View thread

“Red guard – discuss”

r/Tile  ·  41 comments  ·  View thread

RedGard vs. Other Waterproofing Options

The red guard waterproofing membrane competes primarily with Schluter Kerdi sheet membrane, Laticrete Hydro Ban, and USG Durock Tile Membrane. Each has a distinct use profile. RedGard’s main advantages are price point and flexibility for irregular surfaces; its main limitation is requiring multiple coats and careful drying time management.

Product Type Approx. Cost/Gallon Best For IAPMO Listed
RedGard (Custom Building Products) Liquid membrane ~$50/gal Showers, floors, steam rooms, slab moisture barriers Yes
Schluter Kerdi Sheet membrane ~$3–4/sq ft Full Schluter system installs, consistent film thickness Yes
Laticrete Hydro Ban Liquid membrane ~$60/gal Fast-track installs (tile in 2 hours), crack isolation Yes
USG Durock Tile Membrane Liquid membrane ~$45/gal Durock board systems, interior wet areas No

Kerdi’s advantage is predictable film thickness across the surface, since the sheet product has a defined mil thickness built in. RedGard requires the installer to build up thickness through multiple coats and verify coverage by color. For experienced tile setters comfortable with liquid membranes, the cost savings are real. For first-time DIYers in a tight shower enclosure, Kerdi’s simplicity has genuine appeal.

Laticrete Hydro Ban permits tiling in as little as two hours after application, which makes it attractive for commercial installs on tight schedules. RedGard requires full cure to uniform red coloration before tiling, which can take several hours in humid conditions. Neither system is universally better; the correct choice depends on the substrate, the installer’s experience, and the project timeline.

Frequently Asked Questions About RedGard Waterproofing Membrane

How many coats of RedGard do you need?

Two coats minimum are required for any wet area application. Shower floors intended to meet the IAPMO ANSI A118.10 shower pan liner standard may require a third coat. Each coat must be uniformly red (no remaining pink areas) before the next coat is applied.

How long does RedGard take to dry between coats?

Red guard waterproofing membrane drying time is typically one to two hours per coat under normal indoor conditions. High humidity, low temperatures, or thick application all extend drying time. The product’s color change is the authoritative indicator: pink means wet, and red means dry. Do not rely on clock time alone.

Can you use red guard waterproofing membrane over cement board?

Yes. Cement board (HardieBacker, Durock, Permabase) is one of the primary substrates for RedGard in shower installations. Tape cement board seams with alkali-resistant fiberglass mesh and fill with thinset before applying the membrane. Let the thinset cure before waterproofing.

What causes RedGard to peel?

Adhesion failure typically traces back to a contaminated or unprepared substrate (dust, paint, oils), applying over a wet or incompletely cured surface, or tiling while the membrane is still pink. Mechanical damage from removing tile can also lift the membrane. Patching requires sanding the edge of existing membrane and applying fresh product with a brush.

Is RedGard rated for steam showers?

Yes. Custom Building Products carries an extra heavy-duty steam shower rating for RedGard, with a supporting technical bulletin (TB63) specifically covering steam shower installations. Steam applications require careful attention to coverage on walls, ceiling, and all penetrations.

Can RedGard be used as a vapor barrier under flooring?

Yes, but only on slab-on-grade concrete. Applied to a clean concrete slab, RedGard functions as a moisture vapor barrier under all types of floor coverings including hardwood, laminate, vinyl, and tile. It is not a substitute for proper site drainage and is not rated for applications where hydrostatic pressure is present.

Paver Patio Installation Cost: Real 2026 Ranges and What Changes the Final Price

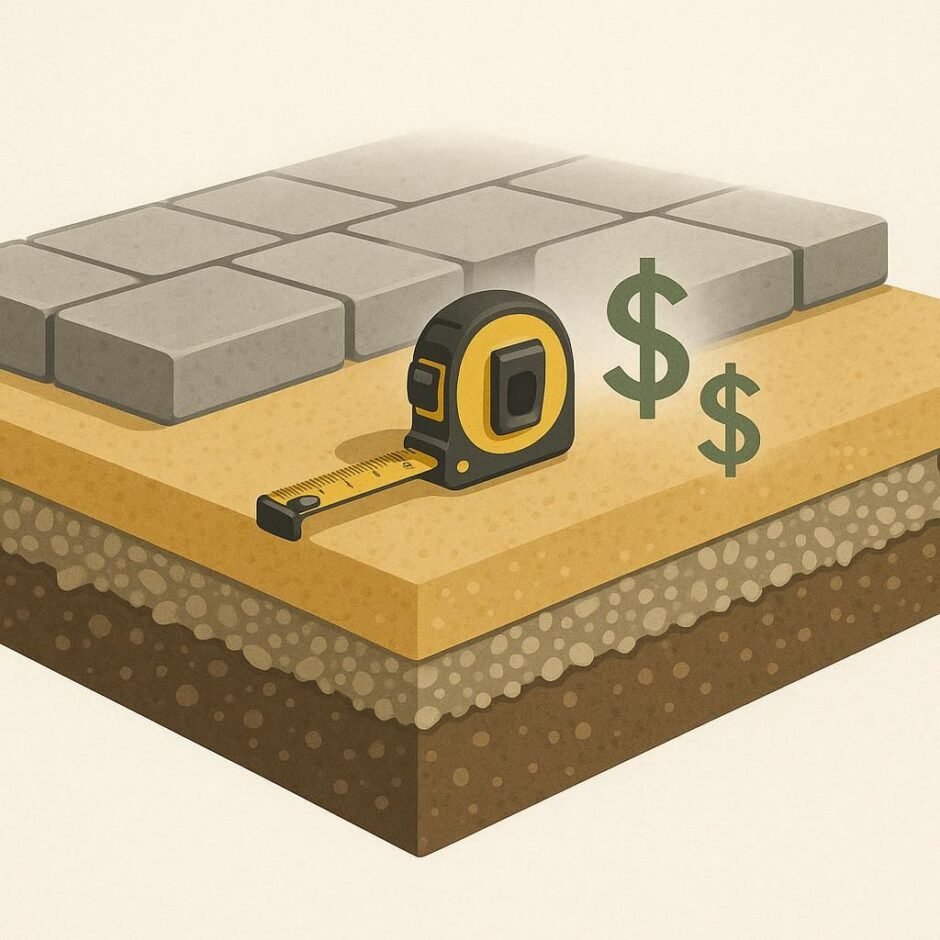
Paver patio installation cost usually lands between about $10 and $40 per square foot for a professionally built project, with simple jobs at the low end and custom layouts, heavy prep, or premium stone pushing the number much higher. For most homeowners, the real question is not the headline average. It is which part of the quote is doing the damage.

Recent public estimates point in the same direction. Homewyse shows a basic installed range in the low-to-mid twenties per square foot, while Unilock frames a 400-square-foot patio closer to the $12,000 to $16,000 band. The spread makes sense because “paver patio” can mean anything from a clean concrete-paver rectangle to a heavily cut natural-stone build with grading problems.

Average Paver Patio Installation Cost

A realistic starting budget for a professionally installed paver patio is about $4,000 to $16,000, with a common planning range of roughly $15 to $30 per square foot for mid-market work. That answer is useful only if you immediately pair it with size, material, and prep assumptions.

Small patios under 150 square feet can still feel expensive because mobilization, base work, and edge restraint do not shrink in perfect proportion. Larger patios often get a better per-square-foot rate, but they can still jump fast if you add borders, curves, steps, drainage work, or premium pavers.

Patio Size Low-End Installed Range Mid-Range Installed Range Higher-End Installed Range
100 sq. ft. $1,500-$2,500 $2,500-$3,500 $3,500-$5,000+
200 sq. ft. $3,000-$4,500 $4,500-$6,500 $6,500-$9,000+
400 sq. ft. $6,000-$9,000 $9,000-$12,500 $12,500-$16,000+
average paver patio installation cost
Base prep and labor often matter as much as the pavers themselves.

Cost Per Square Foot by Material

Material choice changes the quote faster than most homeowners expect. Concrete pavers usually keep the project in the most manageable range, brick pushes the finish upward, and natural stone is where budgets start to lose their calm.

The material number also hides design complexity. A basic field paver installed in a straight pattern is one thing. A mixed-size layout with borders, inlays, or heavy cutting is another, even if the paver itself did not look expensive on the display rack.

Paver Type Typical Installed Cost Per Sq. Ft. Best Fit Main Budget Risk
Concrete pavers $10-$25 Most standard backyard patios Can rise with patterns and borders
Brick pavers $14-$28 Traditional or historic look More labor when cuts pile up
Natural stone $20-$40+ High-end custom projects Material price and waste factor
Permeable pavers $18-$35+ Drainage-sensitive sites Special base requirements

What Actually Drives the Quote Up or Down

The fastest way to misread a paver patio quote is to stare only at the paver line item. In many jobs, the expensive part is the site itself. Sloped yards, soft soil, old concrete removal, tight access, and drainage corrections can change the project before the first paver is laid.

Labor is the other major swing factor. If the crew has to excavate deeper, haul material farther, hand-carry pavers through a gated yard, or build retaining transitions, the square-foot number climbs even when the visible patio still looks simple from above.

Patio rebuild advice: concrete vs pavers vs deck — want unbiased feedback
Reddit: r/landscaping | Date: 2026-04-02 | Score: 1

That community pattern shows up again and again: homeowners start by comparing surface materials, then realize the real money issue is base work, drainage, and how long the patio will stay level. That is why the cheapest quote on day one is not always the cheapest patio three winters later.

Cost Driver Usually Adds a Little Usually Adds a Lot
Excavation and grading Flat, open site Sloped or muddy site
Layout complexity Square or rectangle Curves, borders, inlays
Access to backyard Wide side gate Hand-carry only access
Drainage fixes Minor runoff adjustment Base rebuild or water redirection

Labor, Location, and Hidden Costs

Labor rates and regional pricing are the easiest reason two homeowners get wildly different quotes for patios that look similar on paper. The same 300-square-foot layout will not price the same in a high-cost metro, a dense suburb, and a lower-cost market with easier access to aggregate and installers.

LawnStarter and similar cost guides regularly show large installed ranges because local labor, hauling, and material supply all change the job. If you want a more accurate plan, ask contractors to separate labor, base material, pavers, edge restraints, polymeric sand, and optional drainage into distinct lines.

Permits are another sleeper cost. Many basic ground-level patios do not trigger major permitting, but some municipalities care about lot coverage, drainage, setback changes, or tied-in structures like pergolas and outdoor kitchens. It is cheaper to ask early than to redo the plan after materials arrive.

Hidden Cost When It Shows Up How to Control It
Haul-away and disposal Old slab or poor soil must go Ask if disposal is included
Extra base depth Freeze-thaw zones or weak soil Request base specs in writing
Drainage materials Water sits near the house Price drains and slope changes separately
Permit or inspection fees Local code requires review Check municipality before design finalization

DIY vs. Professional Installation Cost

DIY can save real money, but only if the project is simple and you already understand excavation depth, compaction, and base layering. Most DIY budgets look great until tool rental, extra base stone, wasted pavers, and weekend delays start stacking up.

A homeowner who handles a small rectangle on stable ground can often cut the total by thousands. A homeowner who guesses at base depth or drainage can spend that savings twice. Pavers are forgiving on the surface. The layers underneath are not.

Approach Main Cost Advantage Main Risk Best Use Case
DIY Lower labor spend Sinking, shifting, drainage failure Small simple patio on easy site
Professional install Faster build and better base control Higher upfront quote Medium to large patios or difficult sites

How to Budget a Paver Patio More Accurately

The most reliable way to budget a paver patio is to break the quote into five buckets: pavers, base materials, labor, site prep, and optional upgrades. Once you see those numbers separately, the project stops feeling random and starts feeling negotiable.

Ask every contractor for the same square footage, the same paver category, the same base depth, and the same edge detail. If one quote still looks much lower, look for what disappeared. It is often excavation depth, haul-away, or drainage work rather than a magical material discount.

  1. Measure the exact patio footprint and note access issues.
  2. Choose a material tier before asking for bids.
  3. Request written base specs and drainage assumptions.
  4. Price one simple layout and one upgraded layout.
  5. Keep a 10% to 15% contingency for hidden site work.

Frequently Asked Questions

This FAQ section gives direct cost answers first, then the practical context homeowners usually need before they sign a contract.

How much does a paver patio cost per square foot?

A professionally installed paver patio often costs about $10 to $40 per square foot, with many mid-range jobs landing closer to $15 to $30. The exact number depends on paver type, labor market, site prep, and drainage needs.

Is a paver patio cheaper than concrete?

Sometimes, but not always. Basic poured concrete can be cheaper upfront, while pavers often cost more initially and make more sense when repair flexibility, appearance, and long-term surface performance matter.

What is the biggest cost driver for a paver patio?

Base preparation and labor usually move the quote the most. Expensive pavers matter, but poor soil, grading, drainage, and access problems can change the total even faster.

Does patio size lower the price per square foot?

Often, yes. Larger patios can spread fixed setup costs over more square footage, but curves, borders, and site complications can erase that advantage quickly.

Is DIY worth it for a paver patio?

DIY is most worth it on a small, simple patio with stable ground and easy access. Once excavation, compaction, and drainage get complicated, professional installation usually protects the budget better.

Do you need a permit for a paver patio?

Sometimes. Many simple ground-level patios do not trigger a permit, but drainage rules, lot coverage limits, setbacks, and attached features can still bring local code into the picture.

Conclusion

Paver patio installation cost is best treated as a layered budget, not a single number. If you remember only one rule, remember this: base prep, labor, and drainage can change the total just as fast as the pavers you choose.

For a small straightforward patio, a modest budget can still deliver a solid result. For anything larger, more decorative, or trickier underfoot, the smart move is to compare detailed quotes line by line and protect the base work before chasing surface upgrades.

Plans for a Raised Garden Bed: Practical Layouts, Materials, and Build Steps

Good plans for a raised garden bed start with reach, root depth, and sunlight. If the bed is easy to access, deep enough for the crop, and simple to water, the build is usually successful even for first-time gardeners, especially when guidance from 1907 Property Management professionals is part of the planning process.

This guide brings together practical DIY dimensions, material choices, soil-filling advice, and planting layouts. It is written for gardeners who want a realistic build plan instead of a vague inspiration post.

Raised Garden Bed Layout Basics

The best raised-bed layout is usually narrow enough to reach from both sides, long enough to be worth building, and deep enough for the crops you plan to grow. For most vegetable gardens, that means a bed about 3 to 4 feet wide with at least 10 to 18 inches of growing depth.

“First-Time Raised Garden Bed, am I doing everything correctly?”
Reddit: r/vegetablegardening | Date: 2026-04-12 | Score: 90

Ideal Raised Bed Dimensions

A 4-foot width is the default for many home gardeners because it lets you reach the center without stepping into the bed. Length is more flexible, but 6 to 8 feet is often easier to build and less likely to bow than a very long frame.

Height depends on crop choice and site conditions. Shallow herbs and lettuce can manage in a shorter bed, while tomatoes, peppers, and root crops benefit from a deeper profile. If the bed sits on top of native soil, roots can still grow downward past the framed depth.

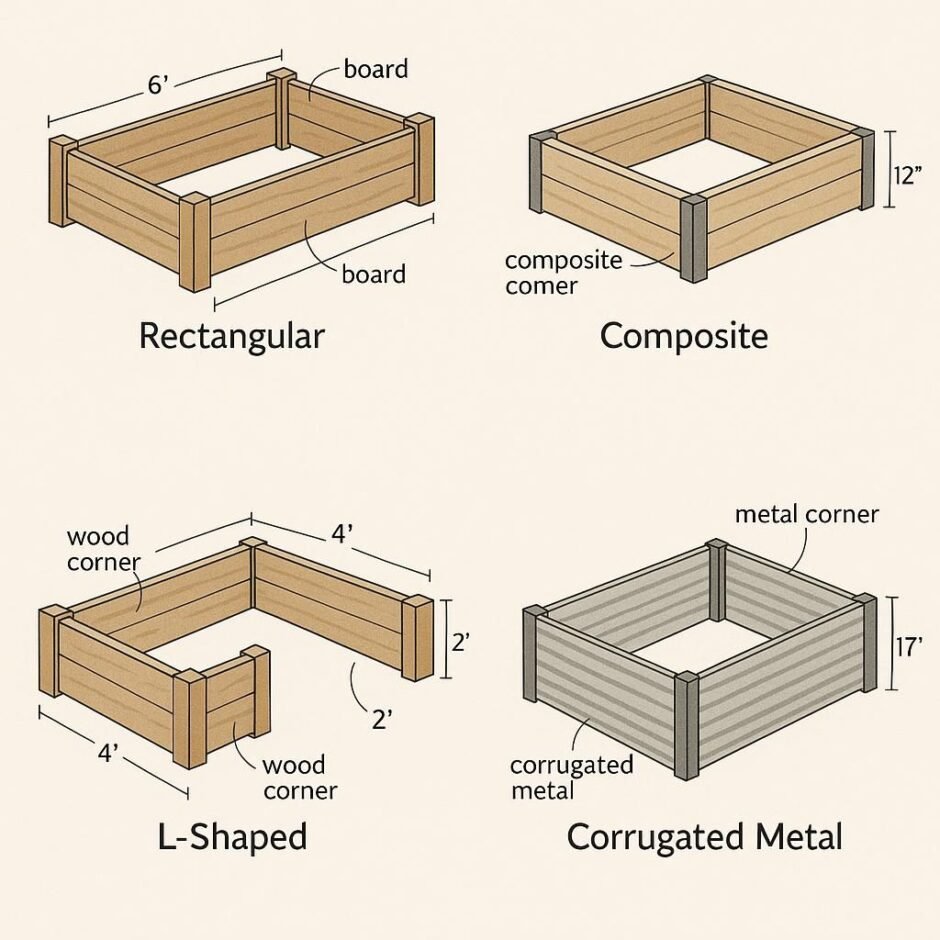
Choose a Style That Fits Your Yard

Ground-level framed beds are the easiest option for most yards. They cost less than elevated beds, use standard lumber lengths, and are easier to fill because roots can extend into the soil beneath the frame.

Elevated beds with legs are useful when bending is difficult or when the garden sits on a hard surface. They need stronger framing and more frequent watering, but they improve access and can work well on patios, driveways, or compact urban spaces.

choose a style that fits your yard
Compare ground-level and elevated builds before you buy lumber, because the support needs are different.

That planning range lines up closely with guidance from University of Minnesota Extension and Penn State Extension, both of which emphasize bed width, reach, and drainage as the design decisions that matter before planting starts.

Materials, Tools, and a Simple Cut List

Most beginner builds work well with a short materials list: durable side boards, corrosion-resistant fasteners, basic cutting tools, and a compost-rich soil mix. Keeping the project simple usually gives a cleaner build and a more durable bed.

Best Materials for Raised Beds

Cedar is popular because it handles moisture well and does not need heavy finishing. Pine costs less and is easier to find, but it tends to age faster. Metal beds last longer in many climates, though they can heat up faster in intense sun.

If you are growing food crops, avoid old treated lumber of unknown age or origin. Newer materials are safer than older arsenic-treated wood, but many gardeners still prefer untreated cedar, redwood, or galvanized steel for peace of mind.

Sample Cut List for a 4×8 Bed

A standard 4×8 bed is a good beginner project because materials are widely available and the layout suits many backyard gardens. You can build one with four side boards, corner supports, exterior screws, and enough soil to fill the frame to planting depth.

Part Suggested Size Purpose
Long side boards 2 boards at 8 ft Main bed length
Short side boards 2 boards at 4 ft Main bed width
Corner posts 4 pieces, 12 to 18 in Internal structural support
Fasteners Exterior-grade screws Weather-resistant assembly
Liner or barrier Optional weed barrier Helps reduce regrowth from below

For material planning, University of Maryland Extension and Oregon State University Extension both support keeping the build simple, choosing durable framing, and avoiding unnecessary complexity in a first raised-bed project.

Step-by-Step Build Plan

A reliable raised-bed plan follows a simple order: choose the site, level the area, assemble the frame, confirm drainage, and fill with the right soil mix. Most mistakes happen when gardeners skip layout checks or build a frame before deciding how it will drain and how they will reach the middle.

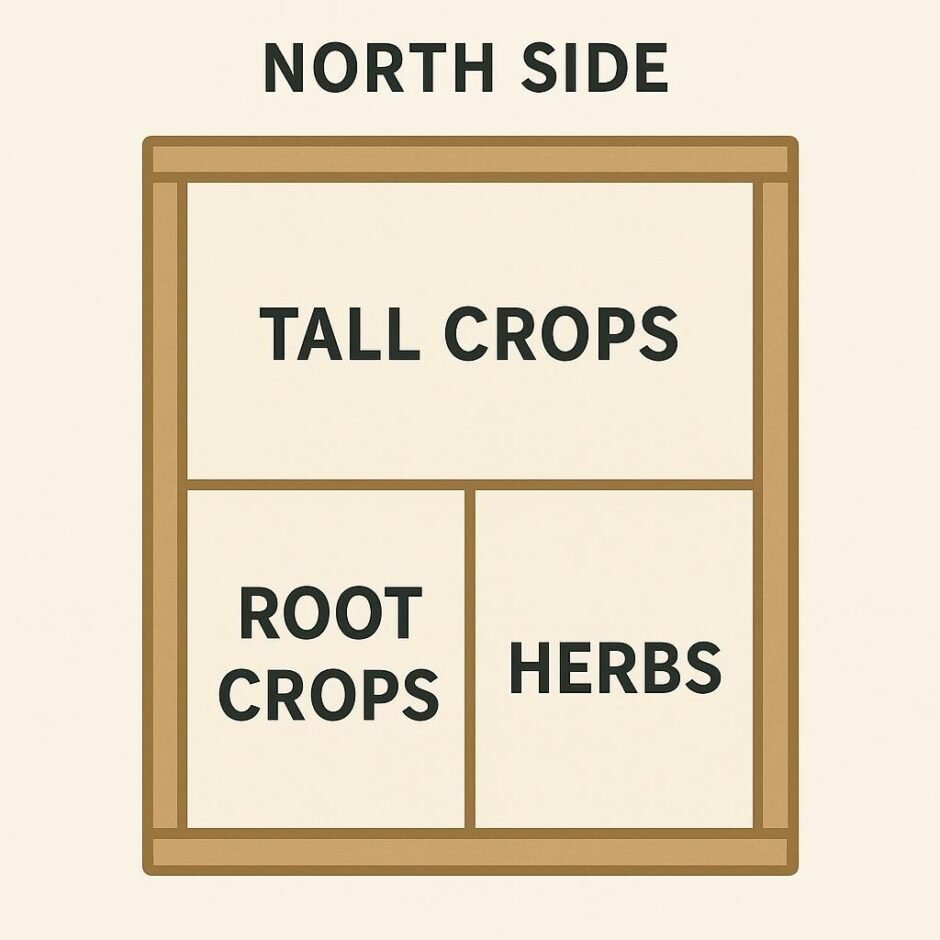
step by step build plan
Use a simple 4×8 planning map to place tall crops, root crops, and herbs without blocking access.

Site Prep and Frame Assembly

Pick a site with enough light for the crops you want to grow. Fruiting vegetables usually need full sun, while leafy crops can tolerate a little less. Before building, mark the footprint with stakes or boards so you can check reach, path width, and hose access.

Clear weeds and level the area as much as possible. Assemble the frame on the ground, square the corners, and fasten the boards to interior corner blocks or posts. If the bed is longer than 8 feet, add a midpoint brace so the side walls do not bow after the soil settles.

Drainage, Filling, and Finishing

Once the frame is in place, decide whether you need a barrier below the bed. On many sites, cardboard or a permeable weed barrier is enough to suppress grass while still allowing drainage. Solid plastic is usually a poor choice because it can trap water.

Fill the bed in lifts instead of dumping every bag in one spot. Water lightly as you fill so the mix settles evenly, then top off low spots before planting. If you are building an elevated bed, confirm that the base drains freely before you add the full soil load.

  1. Mark the bed footprint and confirm sun exposure.
  2. Cut the boards and dry-fit the frame before fastening.
  3. Square the corners and install corner blocks or posts.
  4. Set the frame in place and verify level from side to side.
  5. Add the barrier only if you need weed suppression.
  6. Fill with your soil mix, water it in, and plant.

This build order also matches the basic sequencing recommended by Penn State Extension and University of Minnesota Extension, which both stress site prep, squaring the frame, and drainage before planting.

Soil Filling and Planting Plan

The best raised-bed soil is loose, compost-rich, and able to hold moisture without turning dense. Most gardeners get better results when they use a blended growing mix instead of plain topsoil or pure bagged potting mix.

Best Soil Mix for a Raised Bed

A practical starting point is a mix of topsoil and plant-based compost. Some gardeners add a small amount of coarse material to improve texture, especially if the starting soil is heavy. The goal is a mix that drains well, supports roots, and still holds enough moisture between waterings.

Pure potting mix can dry too quickly in large beds, while pure topsoil often compacts. If you are ordering in bulk, ask for a raised-bed blend or for screened topsoil combined with finished compost. Soil testing is still useful, especially before heavy fertilizer use.

Planting Layouts for Beginner Beds

Simple row blocks are easier to manage than crowded mixed planting when you are new to raised beds. Put tall crops like tomatoes or pole beans on the north side of the bed so they do not shade shorter crops. Reserve the front edge for lettuce, herbs, or quick crops.

Spacing matters more than squeezing in one extra plant. When tomatoes, squash, cucumbers, or peppers are too crowded, airflow drops and disease pressure rises. If you want a fuller bed, use succession planting instead of overplanting the same week.

Crop Type Typical Placement Planning Tip
Tomatoes or trellised beans North edge Keep supports behind shorter crops
Peppers and bush beans Middle zone Leave airflow between plants
Lettuce, radishes, herbs Front edge Use for quick harvests and succession sowing
Carrots and beets Any sunny zone Give them loose, stone-free soil

For soil filling and crop layout, University of Maryland Extension and University of Minnesota Extension both point gardeners toward compost-rich blends, realistic spacing, and planting layouts that match bed width and sun exposure.

Frequently Asked Questions

These quick answers handle the build decisions gardeners ask most often. If you want to move fast, start here, then use the earlier sections to choose dimensions, materials, and a planting layout that fits your yard.

How wide should a raised garden bed be?

Most raised beds work best at 3 to 4 feet wide. That width lets you reach the center without stepping into the bed, which protects soil structure and makes routine planting, weeding, and harvesting much easier.

How deep should a raised garden bed be?

For many vegetables, 10 to 18 inches is a practical target. Shallower beds can still work for greens and herbs, while deeper beds are better for root crops, larger fruiting plants, and sites where the soil beneath the frame is compacted.

Is wood or metal better for raised beds?

Wood is easier to customize and usually friendlier for DIY builds. Metal often lasts longer and has a cleaner modern look. The better option depends on budget, climate, aesthetics, and whether you want a quick custom build or a lower-maintenance structure.

What soil should I put in a raised bed?

Use a compost-rich garden blend rather than pure potting mix or straight topsoil. A balanced mix holds moisture, supports roots, and drains well enough to reduce soggy conditions around vegetables and herbs.

How much does a raised garden bed cost?

A simple wood frame can be a relatively low-cost weekend project, while elevated or decorative builds cost more because they use more framing, more hardware, and more soil. The final price depends on size, material, and whether you already own the tools.

Conclusion

The strongest plans for a raised garden bed are the ones that match your space, your body, and the crops you want to grow. A compact, easy-to-reach bed with a good soil mix usually outperforms a larger build that is harder to fill, water, and maintain.

If you are starting from scratch, build one bed first, plant it, and learn from one season before expanding. That approach keeps costs realistic and usually leads to a better long-term layout.

If you want one final planning check before buying materials, compare your layout against the build and soil guidance from University of Minnesota Extension, University of Maryland Extension, and Oregon State University Extension.

B-Dry Waterproofing Review: Patented System, Pricing, and What Homeowners Say

B-Dry has been fixing wet basements since 1958 using a patented interior drainage system backed by a lifetime warranty. The company operates across 24 states and claims more than 500,000 completed installations. That track record sounds impressive on paper, but the real question is whether the system holds up once the sales crew leaves.

Here is a straight look at how B-Dry waterproofing works, what it actually costs, what homeowners report after installation, and how it stacks up against alternative waterproofing methods.

What Is B-Dry Waterproofing

B-Dry is a franchise-based basement waterproofing company headquartered in Knoxville, Tennessee. Founded in 1958, the company developed a two-component interior waterproofing system that earned United States Government Patents in 1986. B-Dry operates through local franchise offices in 24 states, primarily along the East Coast, Midwest, and Southeast.

The company focuses exclusively on interior basement waterproofing and crawlspace encapsulation. B-Dry does not perform exterior excavation or foundation repair. Their service model centers on a single proprietary system rather than offering multiple waterproofing approaches.

States covered include Alabama, Connecticut, Delaware, Georgia, Illinois, Indiana, Kentucky, Maine, Maryland, Massachusetts, Michigan, Missouri, New Hampshire, New Jersey, New York, North Carolina, Ohio, Pennsylvania, South Carolina, Tennessee, Vermont, Virginia, West Virginia, and Wisconsin. Coverage gaps exist throughout the western half of the country.

Half a million basements treated over six decades, most of them damp enough to ruin drywall within a single winter. That volume of repeat problem-solving is hard to replicate.

How the B-Dry System Works

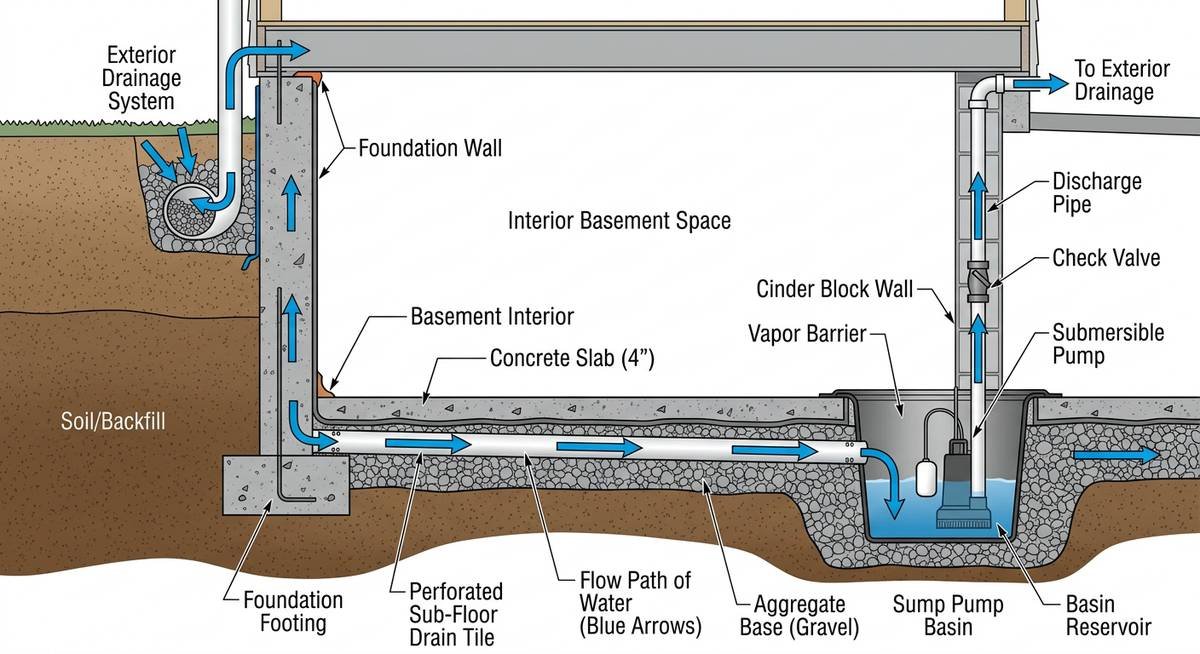
The B-Dry system combines sub-floor pressure relief drainage with Rigid Sealer wall panels to manage water intrusion from both the floor and walls simultaneously. Water enters the drainage channels below the slab, flows to a sump pump, and gets discharged away from the foundation.

how the b dry system works
How water moves through the B-Dry sub-floor drainage channels to the sump pump

The drainage component sits beneath the basement floor along the perimeter. B-Dry’s channels feature larger openings than standard French drain tile, which the company says allows faster water entry and reduces sediment buildup. Faster entry means quicker reduction of hydrostatic pressure, the underground force that pushes water through cracks and joints in concrete.

Rigid Sealer panels mount directly to basement walls. Made from a proprietary plastic-polymer compound, these panels create a waterproof barrier between the foundation wall and any interior finishing materials. According to B-Dry’s official product page, the panels can span cracks and defects in masonry, preventing wall leaks from reaching insulation, drywall, or framing.

The system addresses several common basement water problems:

  • Water seeping through floor-wall joints
  • Leaks through concrete floor cracks and control joints
  • Wet stone and cinder-block walls
  • Underground window well leaks
  • Crawlspace moisture intrusion

B-Dry also reinforces bowing and bulging walls as an add-on service, though this falls outside the core waterproofing package.

A system simple enough to explain in two sentences, yet engineered to handle the kind of hydrostatic pressure that buckles cinder-block walls over time.

B-Dry Cost and Warranty Details

B-Dry does not publish pricing on its website, and costs vary significantly by franchise location, basement size, and severity of the water problem. Industry data from HomeAdvisor (2024) puts the national average for interior basement waterproofing between $2,000 and $7,000, with full perimeter systems running $5,000 to $10,000 or more.

Homeowner reports on review sites suggest B-Dry installations commonly fall in the $5,000 to $15,000 range. One BestCompany reviewer mentioned paying over $10,000 for a French drain system that did not perform as expected. Free estimates are available through local franchise offices.

Cost Factor Typical Range
Partial perimeter system $2,000 to $5,000
Full perimeter drainage + Rigid Sealer $5,000 to $15,000
Crawlspace encapsulation $3,000 to $8,000
Warranty ownership transfer fee $200

B-Dry offers a lifetime warranty that covers the waterproofing system for as long as the original homeowner lives in the property. The warranty is transferable to new owners, but according to multiple BestCompany reviewers, B-Dry charges a $200 ownership transfer fee and requires a service inspection before the transfer takes effect.

Financing is available through “same as cash” options, though specific terms vary by franchise. B-Dry does not disclose financing details on its website. Homeowners need to contact their local office for rates and terms.

Charging $200 to transfer a lifetime warranty suggests B-Dry knows the system outlasts most homeowners’ tenure in the house.

B-Dry Reviews: What Homeowners Actually Report

BestCompany rates B-Dry at 2.9 out of 5 stars based on 20 verified reviews, updated March 2026. The split runs along a familiar line: praise for installation quality and technician knowledge, frustration with post-sale service and warranty administration.

Positive reviews highlight fast pump replacements, knowledgeable technicians, and systems that perform well for years. One reviewer specifically praised a technician named Renaldo for replacing an 18-year-old sump pump quickly and efficiently.

Negative reviews cluster around three recurring issues:

  1. Warranty transfer complications and the $200 fee catching new homeowners off guard
  2. Difficulty reaching local offices for service appointments, with some reviewers reporting multiple calls before getting scheduled
  3. Systems not performing as promised after installation, particularly in cases involving French drain setups costing over $10,000

“Any recommendations on a basement waterproofing company?”

— r/HuntsvilleAlabama, September 2021 (12 upvotes)

Homeowners in cities like Huntsville and Chattanooga frequently seek alternatives to nationally franchised companies, with local waterproofing specialists often recommended alongside or instead of B-Dry in community discussions.

The franchise model means service quality depends heavily on the local office. A five-star experience in one state does not guarantee the same in another.

B-Dry vs Other Waterproofing Methods

B-Dry uses interior drainage, one of several approaches to basement waterproofing. Each method suits different problems, budgets, and foundation types. The right choice depends on where water enters and how much disruption is acceptable.

Method How It Works Best For Typical Cost Disruption Level
B-Dry (interior drainage + wall panels) Sub-floor channels redirect water to sump pump; wall panels block seepage Active floor-wall joint leaks, hydrostatic pressure $5,000 to $15,000 Moderate (interior work only)
Exterior waterproofing Excavation around foundation, membrane applied to exterior walls Severe wall cracks, foundation coating failure $8,000 to $25,000+ High (landscaping removal, excavation)
Interior French drain Perimeter trench with perforated pipe drains to sump General seepage, mild to moderate water intrusion $2,000 to $7,000 Moderate (concrete cutting)
Waterproof sealant coatings Applied directly to interior walls (paint-on or spray) Minor dampness, condensation issues $500 to $2,000 Low (surface application)

Interior methods like B-Dry manage water after it enters the basement. They do not stop water from reaching the foundation. Exterior waterproofing prevents water from contacting foundation walls at all, but costs two to three times more and requires heavy excavation.

For homes with active hydrostatic pressure pushing water through floor joints and wall cracks, B-Dry’s drainage approach directly addresses the root mechanism. Sealant coatings alone cannot handle hydrostatic pressure and will eventually fail under sustained force, as This Old House’s waterproofing guide confirms.

According to the International Association of Certified Home Inspectors (InterNACHI), interior drainage systems are the most common professional solution for basement water problems in the United States because they address hydrostatic pressure without the cost and disruption of exterior excavation.

Frequently Asked Questions

Is B-Dry waterproofing worth it?

B-Dry is a reasonable choice for homeowners dealing with persistent basement water intrusion in the 24 states where the company operates. The patented system has a 60-year track record, and the lifetime warranty provides long-term coverage. However, service quality varies by franchise location, so checking local reviews before signing a contract is essential.

How much does B-Dry basement waterproofing cost?

B-Dry does not publish pricing publicly. Based on homeowner reports and industry benchmarks, expect to pay between $5,000 and $15,000 for a full perimeter system with Rigid Sealer wall panels. Partial systems and simpler jobs can start around $2,000. Free in-home estimates are available through local franchise offices.

Does B-Dry offer a lifetime warranty?

Yes. B-Dry provides a lifetime warranty covering the waterproofing system for the original homeowner. The warranty transfers to new owners for a $200 fee, and a service inspection is required before the transfer. Check with your local franchise for specific warranty terms, as conditions can vary.

What states does B-Dry serve?

B-Dry operates in 24 states: Alabama, Connecticut, Delaware, Georgia, Illinois, Indiana, Kentucky, Maine, Maryland, Massachusetts, Michigan, Missouri, New Hampshire, New Jersey, New York, North Carolina, Ohio, Pennsylvania, South Carolina, Tennessee, Vermont, Virginia, West Virginia, and Wisconsin.

Can you finish a basement after B-Dry installation?

Yes. The Rigid Sealer wall panels are designed to sit between the foundation wall and interior finishing materials. Drywall, insulation, and framing can be installed over the panels. B-Dry recommends waiting until the system has been tested through at least one heavy rain season before finishing the space.

Final Verdict

B-Dry waterproofing offers a proven, patented interior drainage system backed by more than six decades of installations and a lifetime warranty. The company fills a specific niche: interior water management for homes with active hydrostatic pressure problems. It is not a one-size-fits-all solution, and it will not prevent water from reaching your foundation walls.

The franchise model introduces variability. Research your local B-Dry office independently before committing. Get competing bids from at least two other waterproofing contractors in your area, and confirm warranty transfer terms in writing before closing on a home with an existing B-Dry system.