Aqviz

Luxury Kitchen Design Ideas for Modern Homes

Luxury kitchens blend functionality with refined aesthetics, creating inviting spaces that support everyday living and special occasions alike. Modern design emphasizes simplicity, craftsmanship, and innovative materials that elevate the room’s overall character.

Balancing Form and Function

A successful luxury kitchen design merges beauty with practicality. Every surface, appliance, and fixture should serve a purpose while contributing to a cohesive style, points out the RPM Sailfish Coast team. Smooth cabinet lines, seamless countertops, and discreet storage solutions keep the space efficient and comfortable.

Professional guidance from experienced kitchen designers in Toronto can help homeowners achieve this balance. These specialists understand how to integrate layout, lighting, and finishes to create a space that reflects both taste and lifestyle.

Material Selections That Define Sophistication

Premium materials play a key role in shaping a luxurious atmosphere. Natural stone, high-quality wood, and brushed metals provide depth and texture. Choosing durable finishes ensures that elegance lasts through daily use.

  • Stone countertops, such as marble or quartz, add timeless appeal.
  • Custom cabinetry crafted from solid woods enhances warmth and dimension.
  • Metal accents in faucets or handles introduce subtle contrast.

Modern luxury often favors neutral palettes, allowing the natural beauty of materials to stand out. Soft whites, grays, and earthy tones create a calm and spacious feeling while reflecting natural light.

Lighting as a Design Feature

Layered lighting transforms a kitchen from purely functional to beautifully atmospheric. Task lighting under cabinets ensures practical workspace illumination, while pendant or recessed lights highlight architectural elements and textures.

For high-end appeal, consider statement fixtures that act as art pieces. A well-placed chandelier or sculptural pendant can become the focal point of the room, reinforcing the luxury aesthetic without overpowering it.

Smart Layouts and Seamless Storage

Modern homes benefit from open layouts that encourage social interaction. Islands with integrated seating bridge the gap between cooking and entertaining spaces. Ample storage keeps surfaces clutter-free, maintaining the minimalist appeal associated with luxury design.

Hidden drawers, built-in organizers, and tall pantry units make everyday use more convenient. These thoughtful features allow the kitchen to remain both functional and visually pleasing.

Cabinetry That Defines the Space

Cabinet design is central to the overall look. Clean lines and custom proportions create a polished appearance that feels tailored to the home’s architecture. Homeowners exploring options like kitchen cabinets in Barrie often find that bespoke cabinetry maximizes storage while maintaining a refined aesthetic.

Soft-close hinges, integrated lighting, and textured finishes elevate cabinetry from simple storage to a design statement. Quality craftsmanship ensures longevity and style consistency across the entire space.

Integrating Technology and Sustainability

Luxury kitchens today often incorporate advanced technology that enhances comfort and efficiency. Smart appliances, touchless faucets, and energy-saving lighting contribute to a modern lifestyle that values both convenience and environmental responsibility.

Eco-conscious materials and efficient layouts further reduce waste and energy consumption. By combining technology with sustainable choices, homeowners achieve a space that is both forward-thinking and timeless.

Creating a Space That Reflects Personal Style

Ultimately, a luxury kitchen should express individuality through thoughtful details. Whether it’s a custom backsplash, unique lighting composition, or statement island, each element contributes to the story of the home.

By focusing on quality, proportion, and harmony, homeowners can design kitchens that are elegant, efficient, and enduring. The result is a refined environment that enhances daily living while adding lasting value to the home.

Defending Residential Foundations from Environmental Moisture

The Strategic Importance of a Complete Waterproofing System

To keep the living space dry and structurally sound, a continuous, multi-layered defense strategy targeting vulnerable entry points throughout the building envelope is required. Most property owners concentrate their maintenance efforts on roofing systems and foundational drainage, often neglecting the crucial part that exterior openings play in moisture management. When heavy rain or rapid snow melt stress a house, the places where walls connect to structural openings are under high hydrostatic pressure and receive wind-driven water. Advanced, professionally integrated sealing strategies protect the interior framework from structural rot, costly moisture remediation projects, and offer peace of mind for years to come.

When it comes to the property audit for potential vulnerabilities, homeowners can select advanced, precision-engineered products to keep heavy precipitation completely outside the living environment by partnering with Canadian Choice Windows & Doors, Calgary windows and doors supplier. Take a look at modern-day external fixtures. They shouldn’t be using your regular caulking methods. Instead, they should be using integrated drainage tracks, heavy-duty weatherstripping configurations, and fusion-welded frame design. A good upgrade plan ensures any high-risk areas are equipped with materials that divert water away from structural components, preventing slow, hidden leaks from damaging interior drywall or compromising insulation performance.

Engineering Advanced Materials for Complete Moisture Protection

Today, much of exterior hardware manufacturing is focused on creating impenetrable barriers to withstand long-term exposure to driving rain and ponding water. Over time, moisture can soak into traditional wood or poorly insulated frames, causing the material to swell, paint to peel and eventually warp the structure and ruin the airtight seal of the opening. Modern multi-chamber vinyl and specialty composite frames, however, are 100 percent non-porous, so they will not absorb water at all and will maintain their precise shape regardless of what the humidity is. These engineered frames have sloped sills and hidden weep holes that safely drain external moisture outward to prevent pooling in heavy rains.

In addition, it is totally reliant on the accuracy of flashing and installation procedures in the field for total prevention of water infiltration. Elite installation practices dictate that the rough opening must be sealed with heavy-duty, self-adhering flashing membranes before the structural unit is anchored in place. The multi-layer barrier system prevents wind-driven rain from getting behind the exterior siding or brickwork, directing any moisture down to the building’s drainage mat. Ensuring it’s a perfect compression-sealed fit eliminates tiny micro-gaps that air currents use to push water deep into the wall cavities, protecting the home from mold development.

Improved Asset Protection & Structural Value

High-performance exterior upgrades are an excellent investment in a residential property that significantly increases its market value while developing a highly resilient defense system. Smart buyers prioritize homes with updated, low-maintenance structural components. This eliminates the immediate risk of hidden water damage and expensive structural repairs after moving in. Plus, by keeping moisture from building up inside, you’re maintaining a healthy balance of humidity within your home, protecting expensive hardwood flooring, custom cabinetry, and electronic systems from warping or premature failure.

When all is said and done, working with experienced local professionals to create a comprehensive home safety strategy allows homeowners to deal with environmental risks in a smooth and productive way. Using data to choose materials means that each new exterior installation will be perfectly suited to regional building codes and extreme weather challenges. Combine manufacturing standards with expert weatherproofing craftsmanship and you get a highly secure, beautifully insulated property that shrugs off the elements for decades.

How Calgary Homeowners Can Improve Energy Efficiency With New Windows

In a city where temperatures can shift quickly, older windows often struggle to keep indoor air stable. Drafts, condensation, and cold glass are common signs that a home is losing energy where it shouldn’t.

Why Windows Matter For Energy Efficiency

Windows affect how much heat leaves your home in winter and how much outdoor warmth enters during summer. When windows are old, damaged, or poorly sealed, your heating and cooling systems have to work harder.

That extra strain can lead to higher energy use and uneven room temperatures. You may notice one room feels chilly while another feels warm, even when the thermostat stays the same.

Common Signs Your Windows Are Wasting Energy

Not every window problem is obvious at first. Some issues show up slowly over time, especially in older homes in Calgary.

Watch for signs such as:

Cold air is coming through closed windows

Fog or moisture between glass panes

Difficulty opening or closing windows

Higher energy bills without a clear reason

Faded flooring or furniture near sunny windows

Ice buildup around frames in winter

If these problems keep returning, repairs may only offer a short-term fix.

How New Windows Help Keep Heat Inside

Modern windows are designed to slow heat transfer. Features like double or triple-pane glass, insulated frames, and low-emissivity coatings help reduce the amount of warm air that escapes.

For Calgary homeowners, this can make a noticeable difference during long heating seasons. Rooms may feel more comfortable, and the furnace may not need to cycle as often.

Homeowners who plan to replace windows in Calgary often look for options that match local weather conditions rather than choosing based on appearance alone.

Choosing Window Styles That Fit Your Home

Energy efficiency also depends on window style. Some designs seal more tightly than others when closed.

Casement and awning windows, for example, tend to close firmly against the frame. Sliding windows can still perform well, but they need quality weatherstripping and proper installation.

The best choice depends on the room, airflow needs, sunlight exposure, and the age of the home.

Installation Matters More Than Many People Realize

Even a high-quality window can underperform if it is not installed correctly. Small gaps around the frame can allow air and moisture to enter.

Professional installation helps ensure the window is level, sealed, insulated, and fitted to the opening. This is especially important in Calgary, where freeze-thaw cycles can affect building materials over time.

When searching for window replacement near me, homeowners should look for experience with local homes and climate conditions.

Other Ways To Improve Window Performance

New windows work best when paired with simple home habits. You can improve comfort by using curtains at night, opening blinds on sunny winter days, and checking caulking around frames.

It also helps to keep vents clear so warm air can circulate near windows. These small steps support the performance of your new windows and help your home feel more balanced year-round.

How Seasonal Weather Affects Garage Door Performance in Ottawa 

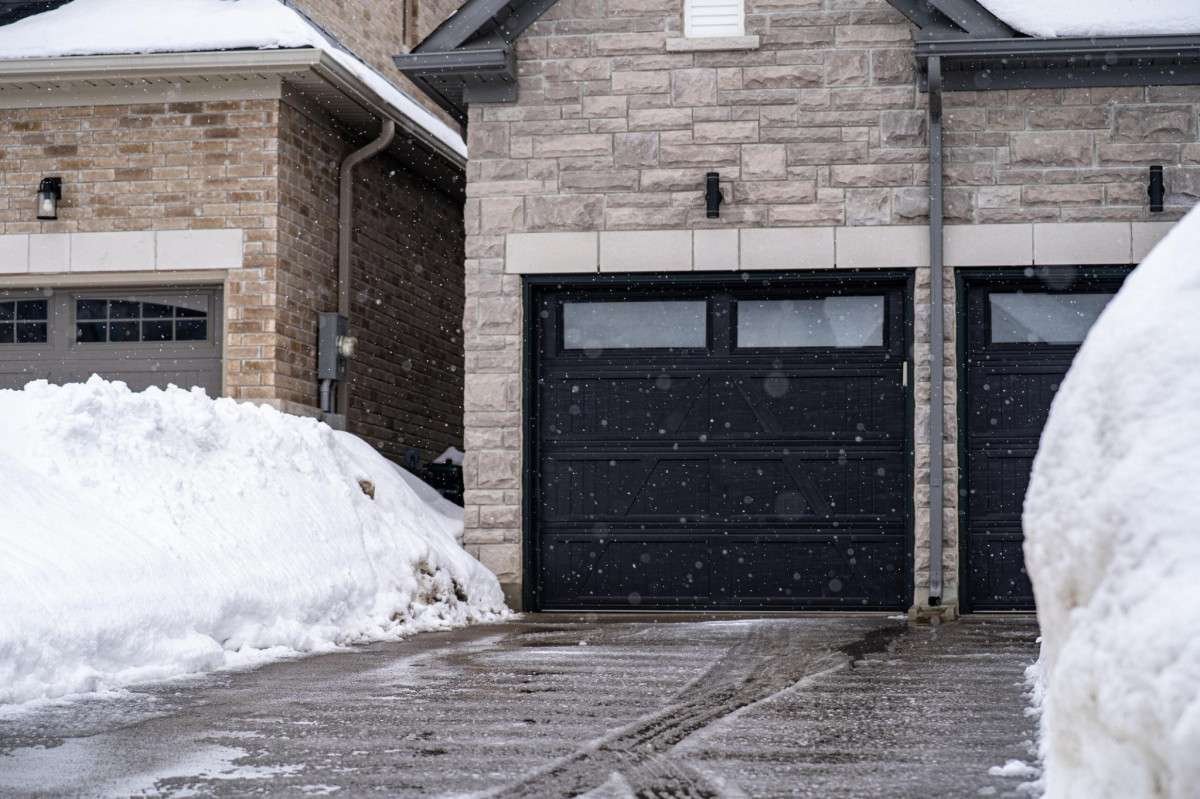
how-seasonal-weather-affects-garage-door-performan-1

From freezing winter mornings to humid summer afternoons, your garage door endures far more than daily use. Temperature swings, moisture, ice, and wind can all affect the door’s parts, movement, and overall reliability.

For homeowners, noticing these changes early can help prevent bigger issues. A door that sounds louder than usual, moves unevenly, or struggles to close may be showing signs of weather-related wear.

Cold Weather Can Make Parts Stiff

Winter is one of the hardest seasons for garage doors in Ottawa. Cold temperatures can cause metal parts to contract, making springs, tracks, rollers, and hinges work harder than usual.

Lubrication can also thicken in freezing weather. When that happens, the door may move slowly or make grinding and squeaking noises. In some cases, the opener may seem weak even though the real issue is extra resistance in the moving parts.

Ice buildup near the bottom seal can also stop the door from opening properly. If the door is frozen to the ground, forcing it open can damage the opener or pull parts out of alignment.

Snow And Ice Can Affect Door Balance

Heavy snow around the garage entrance can put pressure on the lower part of the door. Over time, this can affect how the door sits when closed.

Ice can also collect around tracks, weatherstripping, and seals. When the door cannot move freely, it may shake, stop halfway, or reverse unexpectedly.

Common winter issues include:

Frozen bottom seals

Stiff rollers or hinges

Misaligned tracks

Broken or weakened springs

Extra strain on the opener

When these problems keep coming back, it may be time to schedule garage door repair in Ottawa before the issue gets worse.

Spring Moisture Can Lead To Rust

As snow melts and rain becomes more frequent, moisture can accumulate around garage door components. Metal components such as springs, cables, brackets, and tracks may rust if not protected.

Rust does more than affect appearance. It can weaken parts and make movement less smooth. A rusty spring or cable may not perform safely, especially under the weight of a heavy garage door.

Spring is a good time to check for water damage, worn seals, and any strange noises that may have developed during winter.

Summer Heat Can Expand Materials

Warm weather can also affect garage door performance. Heat may cause some materials to expand slightly, especially metal doors and tracks.

This can lead to rubbing, sticking, or uneven movement. High humidity can also affect wooden garage doors, causing swelling or warping if the door is not properly sealed.

During the summer, homeowners may also use their garage more often. More frequent opening and closing can place extra wear on rollers, springs, and the opener.

Regular Care Helps Prevent Seasonal Problems

A little attention throughout the year can make a big difference. Simple garage door maintenance helps keep the system moving smoothly and reduces the chance of sudden breakdowns.

Homeowners can watch for loose hardware, worn weatherstripping, unusual sounds, and slow movement. Keeping the area around the door clear of snow, leaves, and debris also helps prevent damage.

Professional service is helpful when the door feels heavy, moves unevenly, or shows signs of worn springs or cables. These parts are under tension and should not be adjusted without the right tools and experience.

How Heat, Fatigue, and PPE Burden Affect Crews Working at Height

Working at height gets less forgiving when heat, fatigue, and equipment load build at the same time. Crews may slow down, lose precision, or make weaker decisions before anyone shows clear signs of heat illness. These changes matter more when the task involves climbing, edges, or repeated transitions.

Most elevated jobs already involve physical load from tools and protective systems. Workers may be wearing a high-quality safety harness while managing heat, movement, and task demands at the same time. This article looks at how those factors affect planning, pacing, and performance. It is not a product guide or a medical reference.

What These Three Stressors Actually Mean

Heat Stress Is More Than Hot Weather

Heat stress is the total heat load on the body. It comes from the environment, the physical work being done, and clothing or protective equipment. Even moderate heat can affect thinking, coordination, and endurance.

Fatigue Is Physical and Cognitive

Fatigue is reduced capacity. It can come from long shifts, heavy work, awkward posture, repetition, poor recovery, or heat. It affects both the body and the mind. At height, that can change how people move, focus, and make decisions.

PPE Burden Changes How Work Feels and Moves

PPE Burden Includes More Than Weight: Harnesses, connectors, helmets, protective clothing, and tethered tools add bulk, restrict movement, and retain heat.

Movement Changes With a Self-Retracting Lifeline: A tested and respected self-retracting lifeline (SRL) supports movement, but it can add drag or resistance during climbing and positioning.

Fall Protection Equipment Adds to Total System Load: Reliable fall protection equipment is essential, but it still affects effort, balance, and pacing over a full shift.

Why These Conditions Matter More at Height

Small Performance Changes Matter More Above Ground

Work at height leaves less room for error. Slower reactions, weaker grip, or reduced balance can have larger consequences. Tasks like climbing, repositioning, or managing tie-offs depend on steady movement and clear attention.

Awkward postures and narrow supports increase the effort needed to stay stable. Ladders, scaffolds, and elevated platforms call for constant adjustment. Heat and fatigue raise the effort required for the same task.

The First Signs Are Often Subtle

These stressors usually show up as small changes in how work gets done.

Workers may pause more often or move more slowly.

Foot placement, tool handling, and positioning may become less precise.

Attention may narrow to the immediate task, with less scanning for hazards.

These shifts do not always look dramatic. On the ground, they may be manageable. At height, they reduce the margin for recovery.

How It Shows Up on Real Jobsites

Different Trades Feel the Combined Load Differently

The effect of heat, fatigue, and equipment load depends on the work environment. Task duration, access type, and carried equipment shape how these pressures show up.

Examples From Common Elevated Work Environments

Roofing Work Adds Surface Heat and Exposure: Dark surfaces and direct sun increase heat load. Repeated movement and harnessed work can make routine tasks more tiring over time.

Steel and Utility Work Add Climbing and Repositioning Demands: Frequent climbing and transitions increase effort. Full fall-arrest systems add weight and affect movement.

Indoor Elevated Work Can Still Build Heat and Fatigue: Manufacturing platforms and mezzanines may have limited airflow. Protective clothing and tools add to the load.

The Same Task Changes Under Combined Load: A task that feels manageable in mild conditions can become slower and more demanding when heat, duration, and equipment burden stack together.

What Better Planning Looks Like

Planning Should Change Before Performance Slips

Heat, fatigue, and equipment load should be part of the job plan. They are not background conditions. They affect how long crews can stay effective at height and how tasks should be sequenced.

Planning includes schedule, duration, hydration, and task type. It also includes how crews access elevated areas and how often they need to reposition.

Guidance for working in outdoor and indoor heat environments highlights the need to adjust schedules, manage exposure, and provide access to water and rest. CDC heat-stress workplace recommendations likewise emphasize hydration, acclimatization, and monitoring as part of routine work planning.

Controls That Support Better Elevated Work Decisions

Schedule the most precision-dependent elevated tasks during cooler parts of the day when possible.

Build hydration, acclimatization, and work-rest planning into the job instead of leaving them to worker discretion.

Watch for early signs such as slower climbing, extra pauses, rough positioning, or more tool handling errors.

Treat rescue readiness as part of the plan, especially when heat and fatigue may reduce worker capacity.

These controls support better decisions without relying on crews to push through difficult conditions.

Why Gear Load Should Be Part of the Job Plan

Equipment Load Affects Endurance, Not Just Comfort

Harnesses, lifelines, connectors, helmets, and protective clothing affect more than comfort. They change how the body moves and how much effort is required to stay balanced and controlled.

Added weight and restricted movement can increase muscle fatigue. Heat-retaining clothing can raise thermal load. Over a full shift, these effects build.

Planning Questions Matter More Than Product Claims

The key question is how the total system affects the task. That includes movement, effort, and time spent at height. It is not only about what equipment is used.

Planning should consider how gear, tools, and clothing interact with heat and workload. This helps set realistic pacing and exposure limits without assuming one setup works in every situation.

The Real Issue Is the Combined Load

Elevated work becomes harder when stressors stack up. Heat, fatigue, and PPE burden rarely appear alone. They build together over time and affect how people move, think, and pace their work.

At height, the challenge is maintaining control as those pressures increase. Better planning starts by treating environmental conditions, physical demand, and equipment load as one job condition, not separate issues.

Best Materials And Options For Flat Roof

This guide covers the best materials and options for flat roof — from TPO to EPDM. The best material for a flat roof on a residential home is TPO — thermoplastic polyolefin — a white, reflective single-ply membrane that is heat-welded at the seams to create a chemical bond stronger than the membrane itself. TPO costs $5 to $9 per square foot installed — $5,000 to $18,000 for a 1,000- to 2,000-square-foot roof. It lasts 20 to 30 years. It reflects sunlight — the white surface reduces the roof temperature by 50 to 70 degrees compared to a black EPDM roof, lowering cooling costs in summer. The seams are heat-welded with a robotic welder or a hand welder — the membrane melts and fuses together, creating a seam that will not separate. The seam is the most common failure point on any flat roof. The TPO seam is the strongest seam available. The TPO seam is the reason TPO is the most popular flat roof membrane in commercial construction and increasingly in residential applications. The seam is the security. The security is the welded bond. The welded bond will not peel apart. The glued seam will eventually peel apart. The welded seam is the TPO advantage.

Flat roofs, technically low-slope roofs with a pitch of 2:12 or less, require a continuous waterproof membrane. There are no shingles to shed water. The membrane must be flawless. A flaw of any size, a pinhole, a separated seam, a failed flashing, allows water to enter and pool on the structural deck. The water that enters a flat roof cannot drain. It sits. It saturates the insulation. It rots the deck. It drips through the ceiling below. The membrane is the only defense. The membrane material determines the cost, the lifespan, the maintenance, and the repair requirements, observes RPM Blue Sky professionals. Here are the materials and the options.

Flat Roof Materials, Complete Comparison

Material Cost Per Sq Ft (Installed) Lifespan Seam Type Best For
TPO (thermoplastic) $5 – $9 20 – 30 years Heat-welded, permanent bond Most residential flat roofs, hot climates
EPDM (rubber) $4 – $8 20 – 30 years Adhesive or taped, can separate Budget option, cooler climates
PVC $6 – $10 25 – 35 years Heat-welded, permanent bond Restaurant roofs, chemical exposure
Modified Bitumen $4 – $8 20 – 25 years Torch-down or self-adhered High-traffic roofs, cold climates
Built-Up Roofing (BUR) $5 – $10 15 – 25 years Hot-mopped asphalt, layers Commercial buildings, heavy-duty
Spray Polyurethane Foam $6 – $12 15 – 25 years (recoat every 10) Seamless, sprayed in place Irregular roof shapes, skylight-heavy

TPO, the Default Best Choice for Residential Flat Roofs

TPO is a single-ply membrane made from polypropylene and ethylene-propylene rubber. The top layer is white, highly reflective, bouncing solar radiation back into the atmosphere and reducing the roof surface temperature. The bottom layer is typically gray or black, a reinforcing scrim layer sandwiched between the top and bottom layers provides tear resistance and dimensional stability. The membrane is installed in large sheets, typically 10 to 12 feet wide, that are mechanically fastened or adhered to the insulation or the roof deck. The seams between the sheets are heat-welded, a hot-air welder melts the top surface of the overlapping sheets, and a pressure roller fuses them together as the plastic cools. The weld is a chemical bond. The two sheets become one. The seam is the strongest part of the roof. The field of the membrane is the weakest part. The seam is the reinforcement.

TPO is the best flat roof membrane for hot climates because of its reflectivity. The white surface reflects solar radiation. The reflected radiation is energy that does not enter the building. The cooling load is reduced. The air conditioning runs less. The energy bill is lower. The roof surface temperature is 50 to 70 degrees cooler than a black EPDM roof under the same sun. The cooler roof surface degrades more slowly, UV damage is a function of temperature and exposure. The cooler surface lasts longer. The longer life is the return on the TPO premium. The TPO premium is $1 to $2 per square foot over EPDM. The return is lower cooling bills and a longer-lasting roof. The return is realized every summer for 20 to 30 years. The TPO premium is paid once. The return is annual. The annual return exceeds the premium.

The National Roofing Contractors Association (NRCA) provides guidance on single-ply roof membrane selection. TPO and PVC membranes are noted for their heat-welded seams, which are generally stronger and more durable than the adhesive seams used with EPDM. The seam strength is the critical differentiator. The seam is where flat roofs fail. The TPO seam does not fail. The welded seam is the investment. The investment is the TPO. The TPO is the default choice.

EPDM, the Budget-Friendly Rubber Roof

EPDM is a synthetic rubber membrane, ethylene propylene diene monomer, that has been used on flat roofs since the 1960s. It is the most installed flat roof membrane in North America overall, though TPO has surpassed it in new residential construction. EPDM costs $4 to $8 per square foot installed, $4,000 to $16,000 for a 1,000- to 2,000-square-foot roof. It is black, the color of the rubber, and absorbs solar radiation. The black EPDM roof heats up in the sun. The heat is transferred into the building or radiated back into the atmosphere. The black color is the disadvantage in hot climates and the advantage in cold climates, the absorbed heat reduces heating costs in winter. The cold-climate advantage is the reason EPDM remains a viable choice in northern regions where cooling is a minor expense and heating is the dominant cost. The black roof in Minnesota is an asset. The black roof in Arizona is a liability. The climate determines whether EPDM is the right choice. The climate is the decision-maker.

The seams of EPDM are joined with adhesive or with seam tape, not heat-welded. The adhesive bond is mechanical, not chemical. The adhesive can separate over time, 15 to 20 years into the roof’s life, as the adhesive ages and loses flexibility. The separated seam is the most common EPDM failure mode. The seam can be re-glued. The re-gluing is a repair. The repair is a maintenance item. The maintenance is the cost of the EPDM choice. The TPO seam does not require re-gluing. The EPDM seam may. The seam maintenance is the difference. The difference is the adhesive versus the weld. The weld is permanent. The adhesive is long-lasting but not permanent. The adhesive is the trade-off. The trade-off is the $1 to $2 per square foot savings. The savings are the EPDM. The savings cost seam maintenance at year 15. The maintenance costs $500 to $2,000. The savings may or may not exceed the maintenance. The maintenance is the variable. The variable is the seam.

PVC, the Premium Chemical-Resistant Membrane

PVC is the most expensive single-ply membrane and the most durable. PVC costs $6 to $10 per square foot installed, $6,000 to $20,000 for a 1,000- to 2,000-square-foot roof. It lasts 25 to 35 years. The seams are heat-welded, like TPO, creating a permanent chemical bond. PVC is inherently fire-resistant, it self-extinguishes when the flame source is removed, and is resistant to grease, oil, and chemicals. The chemical resistance makes PVC the preferred choice for restaurant roofs where kitchen exhaust deposits grease on the roof surface. The grease degrades TPO and EPDM over time. The grease does not degrade PVC. The chemical resistance is the PVC advantage. The advantage is relevant to a small percentage of residential flat roofs, primarily those with rooftop HVAC equipment that discharges oil or refrigerant, or those in urban environments with airborne chemical pollutants. For most residential flat roofs, TPO provides equivalent performance at a lower cost. The PVC premium is $1 to $2 per square foot over TPO. The premium is justified by the chemical resistance. If the roof is not exposed to chemicals, the premium is not justified. The TPO is the better value for the standard residential flat roof. The PVC is the better choice for the roof with chemical exposure.

Frequently Asked Questions

What is the best flat roof material for a residential home?

TPO is the best flat roof material for most residential homes. It costs $5 to $9 per square foot installed, lasts 20 to 30 years, has heat-welded seams that will not separate, and reflects sunlight, reducing cooling costs in summer. EPDM is the budget option, $4 to $8 per square foot, and is the better choice in cold climates where the black surface absorbs solar heat.

How much does a flat roof replacement cost?

Flat roof replacement costs $4 to $10 per square foot installed depending on the membrane material. A 1,000-square-foot roof costs $4,000 to $10,000. A 2,000-square-foot roof costs $8,000 to $20,000. The cost includes the membrane, insulation, flashing, and labor. Tapered insulation to correct ponding water adds $3 to $5 per square foot, $3,000 to $10,000 additional.

How long does a flat roof membrane last?

A TPO or EPDM flat roof lasts 20 to 30 years. A PVC roof lasts 25 to 35 years. Modified bitumen lasts 20 to 25 years. A spray foam roof with recoating every 10 years can last indefinitely, the recoat is the maintenance that extends the life. The lifespan depends on the material, the quality of the installation, and the maintenance, ponding water is the number one lifespan reducer for any flat roof membrane.

What is the difference between TPO and EPDM for a flat roof?

TPO is white, reflective, and has heat-welded seams that form a permanent chemical bond. EPDM is black, absorbs heat, and has adhesive seams that can separate over time. TPO costs $1 to $2 more per square foot. TPO is the better choice in hot climates. EPDM is the better choice in cold climates, the black surface absorbs solar heat and reduces heating costs. TPO has stronger seams. EPDM has a longer track record, installed since the 1960s versus the 1990s for TPO.

Can a flat roof be repaired, or does it need full replacement?

A single puncture, seam separation, or flashing failure on an otherwise sound membrane can be repaired, the repair costs $500 to $2,000. Multiple failures, ponding water across more than 20% of the surface, or saturated insulation require full replacement. The membrane condition and the insulation condition determine the decision. A core sample, $300 to $800, confirms whether the insulation is dry or wet. Wet insulation requires replacement regardless of the membrane condition.

Does a flat roof require more maintenance than a pitched shingle roof?

Yes. A flat roof requires twice-per-year inspections, spring and fall, to check for ponding water, seam separations, and flashing failures. Debris must be removed, leaves and branches trap moisture and accelerate membrane degradation. The maintenance costs $200 to $500 per year for professional inspections and minor repairs. A pitched shingle roof requires annual gutter cleaning and occasional shingle replacement. The flat roof requires more attention because it is more vulnerable to standing water. The attention is the cost of the flat roof. The neglect is the cost of premature replacement.

The Membrane That Keeps the Water Out

TPO for most residential flat roofs, white, reflective, heat-welded seams, $5 to $9 per square foot, 20 to 30 years. EPDM for the budget-conscious in cold climates, black, heat-absorbing, adhesive seams, $4 to $8 per square foot, 20 to 30 years with maintenance at year 15 for the seams. PVC for the roof exposed to chemicals, grease-resistant, heat-welded seams, $6 to $10 per square foot, 25 to 35 years. Modified bitumen for the roof that is walked on frequently, tough, impact-resistant, $4 to $8 per square foot, 20 to 25 years. The material is the choice. The choice is driven by the climate, the budget, and the use of the roof.

The flat roof is a membrane stretched across the top of the house. The membrane is the only thing between the rain and the living room ceiling. The membrane must be continuous, flawless, and properly sloped to drain. The material determines the cost and the lifespan. The installation determines the performance. The installation that is rushed, performed by a crew unfamiliar with the material, or completed without a flood test at the seams is an installation that will leak. The material that is installed correctly, by a crew that specializes in that material, and flood-tested before the warranty is activated, is a material that will keep the water out for 20 to 30 years. The water is the test. The test is every rain. The rain falls on the roof for 20 years. The roof either keeps the water out or it does not. The TPO roof with heat-welded seams keeps the water out. The EPDM roof with adhesive seams keeps the water out, until the seams need re-gluing at year 15. The TPO roof keeps the water out without any seam maintenance. The seam is the difference. The welded seam is the investment. The investment is the TPO. The TPO is the answer. The answer is a white, reflective roof with seams that will never separate. The answer costs $7 per square foot. The answer lasts 25 years. The answer is TPO. Ever stood on a flat roof in August, the sun beating down, and felt the heat radiating off a black EPDM surface so intensely that you could not hold your hand against it for more than a few seconds? The black roof was absorbing the sun. The white TPO roof next door was reflecting it. The black roof was 160 degrees. The white roof was 100 degrees. The 60-degree difference was the reason the cooling bill in the EPDM house was $50 higher every month of summer. The $50 was the cost of the black roof. The $50 per month over 25 years was $15,000. The TPO roof cost $2,000 more to install. The $2,000 saved $15,000. The math is the white roof. The white roof is TPO. The TPO is the answer.

How to Protect Your Home Before the Next Big Storm Hits

Storms have a way of showing up fast.

One minute the sky looks a little gray, and the next, the wind is pushing against the windows, rain is hitting the siding, and you’re wondering if that loose branch out back is going to become a much bigger problem.

Most homeowners know they should prepare for bad weather. But honestly, it’s easy to put off. Life gets busy. The gutters can wait. That tiny leak near the window does not seem urgent. The patio chairs have survived plenty of storms before, right?

Then a serious storm rolls through, and small issues suddenly feel a lot bigger.

The good news is that protecting your home does not have to be complicated. You do not need to panic, spend a fortune, or turn your weekend into a full construction project. A few practical steps can make a real difference. They can help prevent damage, reduce stress, and give you a better sense of control when severe weather is on the way.

Here’s where to start.

Take a Slow Walk Around Your Property

Before storm season gets too close, take a walk around your home. Not a quick glance from the driveway. A real walkaround.

Look at your siding, windows, doors, gutters, fencing, deck, shed, and anything attached to the outside of your home. You’re looking for anything loose, cracked, leaning, sagging, or just not quite right.

Small problems are often easy to ignore when the weather is calm. A loose piece of siding might not seem like a big deal on a sunny day. But during strong winds, that loose piece can pull away even more. A cracked window seal can let in water during heavy rain. A weak fence panel can turn into debris if the wind hits it hard enough.

Pay close attention to the areas that already take a beating from the weather. Corners of the home, exposed trim, older windows, and spots near trees are all worth checking.

And do not forget to look up. If you notice missing shingles, sagging areas, or signs of leaks during your walkaround, it may be worth learning more about roofing in Columbus before the next storm puts those weak spots to the test.

You are not trying to find every possible flaw. You are simply giving your home a chance to tell you where it needs attention.

That matters.

Clear the Gutters Before Rain Finds Another Way In

Gutters are easy to forget about until they stop doing their job.

When gutters are packed with leaves, twigs, dirt, and roof grit, rainwater has nowhere to go. Instead of flowing through the downspouts and away from your home, it can spill over the sides, run down exterior walls, collect around the foundation, or sneak into places you definitely do not want it.

That is how water problems start.

A clogged gutter might lead to basement moisture. It can damage fascia boards. It can create pooling near your foundation. In colder months, trapped water can even contribute to ice issues.

So before a big storm hits, clean your gutters or hire someone to do it safely. Make sure water can move freely. Check that downspouts are connected and pointed away from your home. If water is draining too close to the foundation, add an extender to carry it farther out.

This is not glamorous work. Nobody gets excited about gutter sludge.

But it is one of those simple tasks that can save you from a much bigger headache later.

Trim Trees Before the Wind Does It for You

Trees are beautiful. They give shade, privacy, and character to a yard.

But during a storm, weak branches can become a serious threat.

Walk around your property and look for dead limbs, cracked branches, or trees that lean toward your house, garage, driveway, or power lines. Pay special attention to branches that hang over the roof or sit close to windows.

A branch does not have to be huge to cause damage. Even a medium-sized limb can break a window, dent siding, tear gutters, or damage outdoor structures if the wind brings it down the wrong way.

If the branches are small and easy to reach from the ground, you may be able to trim them yourself. But for anything large, high, or near power lines, call a professional. It is not worth risking your safety to save a little money.

Storm prep is about protecting your home, but it is also about protecting yourself.

Secure the Things Sitting Outside

Here’s a question worth asking before the weather turns ugly, what in your yard could become airborne?

Patio chairs. Planters. Trash bins. Garden tools. Kids’ toys. Grills. Umbrellas. Small tables. Yard signs. Loose decorations.

It does not take a tornado to move these things around. Strong wind can pick up ordinary outdoor items and throw them into windows, cars, siding, fences, or neighboring properties.

Before a storm arrives, bring smaller items indoors. Put cushions, toys, tools, and lightweight decor in the garage or shed. Move trash cans somewhere secure. Fold patio umbrellas. If you have larger items that cannot be brought inside, tie them down or move them close to a protected wall.

This step takes just a few minutes, but it can prevent a lot of damage.

It also gives you one less thing to worry about while the storm is happening. And when the wind is howling outside, one less worry is worth a lot.

Check Windows, Doors, and Seals

Water is sneaky.

It does not always pour in through some dramatic opening. Sometimes it slips through a tiny gap around a window. Sometimes it finds cracked caulk near a door frame. Sometimes wind-driven rain pushes into places that seemed perfectly fine during normal weather.

Take a few minutes to check your windows and doors. Look for cracked caulking, worn weatherstripping, loose frames, or gaps where daylight shows through. Make sure windows lock properly. Check that doors close tightly.

If you find small gaps, sealing them now can help keep rain and drafts out later. A simple tube of exterior caulk or new weatherstripping can go a long way.

For homes in areas that get frequent severe storms, storm shutters or temporary window coverings may also be worth considering. You do not need to overdo it. Just think about the areas of your home that feel most exposed.

The goal is simple. Keep wind and water outside where they belong.

Know Where Your Shut-Offs Are

This is one of those things people often do not think about until they really need it.

Do you know where your main water shut-off valve is?

What about your electrical panel?

Do you know how to shut off the gas if there is an emergency and it is safe to do so?

If the answer is no, you are not alone. Plenty of homeowners have never had to use these shut-offs, so they do not think about them. But during a storm, knowing where they are can save precious time.

If a pipe bursts, shutting off the water quickly can limit damage. If part of the home is flooded, knowing where the electrical panel is can help you make safer decisions. If you ever smell gas, leave the home and call the utility company or emergency services right away. Do not try to troubleshoot it yourself.

It is also smart to show other adults in the household where these shut-offs are. In an emergency, you might not be the one closest to the problem.

A little knowledge now can make a stressful moment feel more manageable later.

Put Together a Simple Emergency Kit

An emergency kit does not need to look like something from a survival show.

You just need the basics.

Flashlights. Extra batteries. Bottled water. Nonperishable food. A first-aid kit. Phone chargers. A power bank. Medications. Pet supplies if you have animals. Copies of important documents. A battery-powered radio can also be helpful if power and cell service are unreliable.

Keep everything in one easy-to-find place. A plastic storage bin works fine. The important thing is that you can grab it quickly if needed.

Think about your household’s real needs. Do you have young kids? Add comfort items, snacks, diapers, or formula. Do you have older family members at home? Make sure medications and medical supplies are included. Do you work from home? Keep backup power options in mind.

What would make the first 24 hours easier if the power went out?

That is the question to answer.

You do not need to prepare for every possible situation. Just start with the basics and build from there.

Review Your Insurance Before You Need It

Nobody wants to read their insurance policy after damage has already happened.

At that point, emotions are high. The house may be leaking. The yard may be a mess. You may be trying to figure out who to call first.

That is not the best time to learn what your policy does and does not cover.

Before storm season, take a look at your home insurance policy. Check your coverage for wind, hail, water damage, fallen trees, and temporary living expenses if the home becomes unsafe. Review your deductible. Make sure you know how to file a claim and what kind of documentation your insurance company may need.

It is also helpful to take photos or videos of your home before any damage happens. Walk through the inside and outside of the property. Capture major appliances, furniture, exterior features, and recent upgrades.

These records can help if you ever need to show what your home looked like before the storm.

It is not fun paperwork. But it can make the claims process less confusing.

Make a Post-Storm Plan Before the Storm Arrives

Once the storm passes, it can be tempting to rush outside and inspect everything right away.

Slow down.

Your safety comes first. Watch for downed power lines, broken glass, unstable branches, standing water, and damaged structures. Do not climb onto the roof. Do not walk under large hanging limbs. Do not enter flooded areas if there may be electrical danger.

Start with what you can see safely from the ground. Look for missing shingles, damaged gutters, broken windows, fallen branches, loose siding, and water pooling around the home. Inside, check ceilings, walls, attic spaces, and basements for stains, drips, damp spots, or strange odors.

Take photos of any damage before moving or repairing anything, unless you need to act quickly to prevent more harm. If there is active water coming in, do what you can safely do to reduce damage, then call a qualified professional.

Having a plan makes a difference because storms can leave you feeling scattered. When you already know the first few steps, you are less likely to freeze or make rushed decisions.

Do Not Wait for the Forecast to Get Serious

The best time to prepare for a storm is not when the warning alert hits your phone.

It is before that.

Storm prep works best when it becomes a normal part of caring for your home. Clean the gutters before they overflow. Trim the branches before they snap. Check the seals before the rain pushes through. Secure loose items before the wind starts throwing them around.

Small steps add up.

And here’s the thing, protecting your home is not only about avoiding repair bills. It is about feeling safer in the place where your family sleeps, eats, rests, and builds a life. It is about knowing you did what you could before the sky turned dark.

You cannot control the weather. None of us can.

But you can control how ready your home is when the next big storm hits.

Start with one task this week. Walk around the house. Clear one gutter. Move a weak branch onto your to-do list. Put flashlights where you can actually find them.

It does not have to be perfect.

It just has to begin.
Benefits of a VA Loan for Veterans

Per Astoria Charm Towson Management, the VA loan program, administered by the U.S. Department of Veterans Affairs, stands as one of the most impactful home financing tools available to eligible service members, Veterans, and their surviving spouses. Designed to make homeownership more attainable, VA loans are extended by private lenders but carry a government-backed guarantee. This guarantee reduces risk for lenders, enabling them to offer more favorable terms than conventional mortgage products.

Over the years, the VA loan program has grown tremendously in popularity and impact. In fiscal year 2025 alone, more than 525,000 VA loans were financed nationwide, with a combined loan volume exceeding $205 billion. These figures underscore the program’s widespread acceptance and effectiveness in addressing common financial challenges faced by veterans. Beyond the basic loan product, the VA provides additional protections and support services that help veterans navigate the complexities of home financing.

VA loans are remarkably versatile, offering options for purchase financing as well as refinancing, home improvements, and energy efficiency upgrades. The program’s flexible eligibility criteria, including adaptable credit and income standards, expand access to many borrowers who might otherwise struggle to secure traditional financing. Veterans benefit from a lifetime entitlement that can be utilized multiple times, including the possibility of holding concurrent VA loans under specific circumstances. This comprehensive approach highlights the VA loan’s role as a cornerstone in veteran homeownership support.

Key Benefits of VA Loans

VA loans provide an array of financial advantages that significantly lower the barriers to homeownership for those who have served. The elimination of a down payment requirement, the absence of private mortgage insurance, and competitive interest rates combine to facilitate more affordable monthly payments and reduce upfront costs. These aspects make VA loans a highly attractive alternative to conventional or FHA loans, especially for buyers who may have limited savings.

In addition to these primary benefits, VA loans offer more flexible credit standards, allowing many veterans to qualify despite imperfect credit histories. The program also limits closing costs and prohibits prepayment penalties, enabling borrowers to refinance or pay off their mortgages early without additional fees. These features, combined with the ability to use the entitlement multiple times during a lifetime, create a loan structure tailored to support veterans throughout their homeownership journey.

Another important benefit is the VA’s commitment to protecting veterans from predatory lending practices. The VA appraisal process ensures that homes meet minimum property standards, safeguarding borrowers from purchasing properties with significant defects. This protective measure helps maintain the long-term value and safety of the veteran’s investment. Additionally, VA loans are assumable under certain conditions, providing an advantage in resale markets when interest rates rise, as buyers can take over an existing favorable loan.

Comparison of VA Loans versus Conventional and FHA Loans

When compared with conventional and FHA loans, VA loans stand out in several key areas that impact cost and accessibility. Unlike conventional loans that typically require a 5% down payment or more, and FHA loans that mandate at least 3.5%, VA loans allow for 100% financing with no down payment. This feature alone can save veterans thousands of dollars upfront, making homeownership more immediately feasible.

Mortgage insurance requirements also differ significantly. Conventional loans require private mortgage insurance if the down payment is less than 20%, and FHA loans impose upfront and annual mortgage insurance premiums. VA loans, on the other hand, do not require monthly mortgage insurance, which can translate into monthly savings of over $100 on a $250,000 loan compared to other loan types. Interest rates for VA loans are typically lower as well, often ranging from 0.5% to 1% beneath conventional rates, which can result in tens of thousands of dollars saved over the life of the loan.

Credit requirements under VA loans are generally more lenient, accommodating veterans who might not meet the more stringent standards of conventional loans. While FHA loans are also known for flexible credit guidelines, the VA program often offers even greater flexibility. Closing costs on VA loans are capped and may include seller concessions of up to 4%, reducing out-of-pocket expenses at settlement. Additionally, VA loans do not impose prepayment penalties, allowing veterans to refinance or pay down their mortgage without penalty, whereas conventional loans sometimes include such fees. Lastly, VA loans can be assumable by qualified buyers, which is uncommon in conventional and FHA loans, giving veterans a potential advantage when selling their homes.

Feature VA Loan Conventional Loan FHA Loan
Down Payment 0% (for eligible Veterans) [1, 2] Typically 5% or more; 20% to avoid PMI [2] Minimum 3.5% [2]
Mortgage Insurance No PMI required [2, 3] PMI required if down payment < 20% [2] Upfront and annual mortgage insurance required [2]
Interest Rates Often 0.5% to 1% lower than conventional [2] Market-driven, can be higher than VA [2] Generally competitive, but can be higher than VA [2]
Credit Requirements More flexible credit standards [2] Stricter, higher credit scores often required [2] More flexible than conventional, less than VA [2]
Closing Costs Limited by VA; seller concessions allowed up to 4% [2, 3] Negotiable, can be higher [2] Limited, but generally higher than VA [2]
Prepayment Penalty None [2, 3] Varies by lender and loan type None
Assumability Yes, under certain conditions [2] Generally not assumable Generally not assumable

Eligibility Requirements for VA Loans

To be eligible for a VA loan, applicants must obtain a Certificate of Eligibility (COE) that confirms their service meets the VA’s standards. Generally, this involves meeting minimum active-duty service durations, which vary depending on the period and branch of service. National Guard and Reserve members also qualify if they meet specific service thresholds. There are exceptions for those discharged due to hardship or service-connected disabilities, which can broaden eligibility for certain veterans.

Surviving spouses may also qualify for VA loans if they meet certain conditions, such as receiving Dependency and Indemnity Compensation or if their veteran spouse was Missing in Action or a Prisoner of War. Beyond the military service requirements, applicants must satisfy credit, income, and occupancy guidelines set by the VA and participating lenders to ensure they have the financial capacity to repay the loan. These comprehensive eligibility criteria help maintain the program’s integrity while providing access to those who served.

The process for obtaining the COE has been streamlined through online portals and direct lender access, allowing many veterans to receive their eligibility confirmation quickly. This ease of access helps expedite the loan approval process and reduces administrative hurdles. Additionally, the VA works closely with lenders to clarify eligibility questions and assist veterans in gathering necessary documentation, further facilitating access to the program.

benefits-of-a-va-loan-for-veterans-2
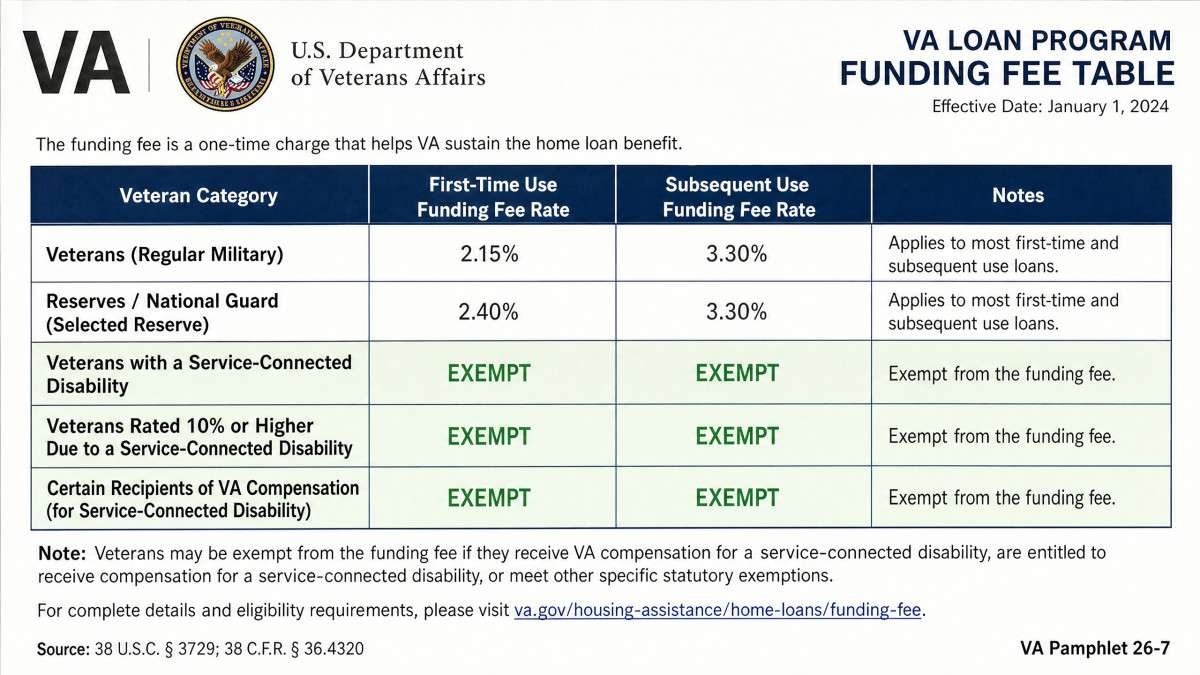
The VA funding fee — 2.15% for first-time regular military use and 2.40% for Reserves and National Guard — is waived entirely for veterans with a service-connected disability rating of 10% or higher, as established under 38 U.S.C. § 3729.

Additional VA Loan Features and Considerations

VA loans come with several unique features beyond competitive rates and favorable terms. One such feature is the prohibition of prepayment penalties, meaning veterans can pay off their loans early or refinance without incurring extra charges. This flexibility can lead to significant interest savings over time. The VA also offers foreclosure avoidance assistance, providing counseling and support for veterans facing financial difficulties, which helps reduce the risk of losing their homes.

The VA appraisal process is another critical aspect that protects borrowers by ensuring properties meet minimum safety and habitability standards. This helps prevent veterans from purchasing homes with significant defects or health hazards. The appraisal also helps determine the reasonable market value of the home, preventing overpaying and protecting both the borrower and lender.

Income calculations for VA loans consider military allowances such as Basic Allowance for Housing (BAH) and disability compensation, expanding the types of income that lenders accept. This broadened income recognition increases the chances that veterans with non-traditional income sources can qualify. The VA loan program includes a variety of loan types, such as purchase loans, cash-out and interest rate reduction refinance loans, renovation loans for home improvements, and energy-efficient mortgages that allow financing of energy-saving upgrades. This diversity enables veterans to use their VA benefit in ways that best fit their financial and housing needs.

Assumability is a notable feature allowing qualified buyers to assume the existing VA loan under certain conditions. This can be especially advantageous in markets with rising interest rates, as the assumable loan may carry a lower interest rate than current market offerings. This feature can enhance the resale value of the property and provide financial benefits to both sellers and buyers.

Frequently Asked Questions about VA Loans

Do I need a down payment for a VA loan?

Eligible veterans do not need to make a down payment when purchasing a home with a VA loan. This zero down payment benefit contrasts with conventional loans, which typically require at least 5% down, and FHA loans, which require a minimum of 3.5%. Eliminating the down payment requirement can save veterans thousands of dollars upfront, easing the financial burden of homeownership and making it accessible even for those with limited savings.

Is Private Mortgage Insurance (PMI) required with a VA loan?

VA loans do not require Private Mortgage Insurance (PMI), which is commonly mandated on conventional loans when the down payment is less than 20%, and FHA loans require upfront and annual mortgage insurance premiums. The absence of PMI on VA loans results in monthly savings estimated at around $100 or more on a $250,000 mortgage, reducing the overall cost of homeownership for veterans and making monthly payments more affordable.

Can I use my VA loan benefit more than once?

The VA loan benefit is a lifetime entitlement that veterans can use multiple times. After paying off a VA loan and selling the property, veterans can restore their entitlement for future home purchases. Additionally, if another eligible veteran assumes the loan, the original borrower’s entitlement may be restored. In certain circumstances, veterans may hold more than one VA loan simultaneously, increasing flexibility in managing multiple properties or relocations.

Are VA loan interest rates always lower than conventional loans?

VA loan interest rates are often 0.5% to 1% lower than conventional mortgage rates, which can translate into substantial savings over the loan term. However, interest rates vary with market conditions and individual borrower qualifications. While VA loans tend to offer more competitive rates, they are not guaranteed to always be the lowest, but their combination with other benefits makes them a compelling option for eligible borrowers.

What is the VA Funding Fee, and can it be waived?

The VA Funding Fee is a one-time charge paid by borrowers to help sustain the VA loan program, typically ranging from 2.15% to 3.3% of the loan amount depending on factors such as first-time or subsequent use and down payment size. Certain veterans are exempt from paying this fee, including those receiving VA disability compensation for service-connected disabilities, active-duty Purple Heart recipients, and eligible surviving spouses. Waiving the funding fee reduces the overall cost of the loan for these veterans.

Conclusion

The VA loan program provides veterans, active-duty service members, and their families with exceptional home financing opportunities. By eliminating down payment requirements and private mortgage insurance, offering competitive interest rates, and maintaining flexible credit standards, the program lowers both upfront and ongoing costs associated with homeownership. Additional protections such as limited closing costs, no prepayment penalties, and foreclosure counseling create a supportive environment for borrowers throughout the loan lifecycle.

These combined features establish VA loans as a uniquely advantageous option for eligible borrowers. The program’s broad range of loan types, including purchase, refinance, renovation, and energy-efficient mortgages, along with the VA’s appraisal and eligibility safeguards, further enhance its value. Veterans looking to purchase or refinance a home can benefit greatly by utilizing their VA loan entitlement to maximize affordability and access.

Choosing the Best Painters in Charlotte NC: A Homeowner’s Decision Guide

Choosing the right painter for your home in Charlotte can feel overwhelming, especially with so many options available. Whether you’re refreshing a single room or repainting your entire house, the quality of the work can make a noticeable difference in how your space looks and feels.

Homeowners often start with a simple goal: find someone reliable who delivers clean, lasting results. But knowing what to look for—and what to avoid—can save you time, money, and frustration.

What To Look For In A Professional Painter

Not all painters offer the same level of service. Before hiring, it helps to understand the basics that separate a dependable professional from someone less experienced.

Here are a few key things to check:

  • Experience: Look for painters who have worked on projects similar to yours
  • References: Ask for past client feedback or photos of completed jobs
  • Licensing and Insurance: This protects both you and the workers
  • Clear Estimates: A well-detailed estimate helps prevent unexpected expenses later on.

Taking a little time up front to review these details can prevent problems once the work begins.

Understanding Pricing And Estimates

Pricing can vary widely depending on the size of the project, the type of paint used, and the condition of your walls. A lower price might seem appealing, but it often comes with trade-offs in preparation or materials.

When comparing estimates, pay attention to what’s included:

  • Surface preparation (cleaning, sanding, repairs)
  • Number of paint coats
  • Type and brand of paint
  • Timeline for completion

Getting multiple quotes from providers like the best painters Charlotte NC can give you a better sense of what’s reasonable for your specific needs.

Interior Vs. Exterior Painting Differences

Painting inside your home is a different process than working on the exterior. Each requires specific materials and techniques.

Interior painting focuses more on detail and finish. Smooth walls, clean edges, and minimal disruption to your daily routine matter most.

Exterior painting, on the other hand, must withstand weather conditions. That means stronger paints, proper sealing, and more extensive surface prep.

Understanding this difference helps you ask the right questions when hiring a contractor.

Questions To Ask Before Hiring

Before making a final decision, have a quick conversation with your painter. A few simple questions can reveal a lot about their professionalism:

  • How do you handle surface preparation?
  • What kind of paint would you suggest, and what makes it a good choice?
  • Will you provide a written contract?
  • How do you handle cleanup after the job?

Clear answers show confidence and experience, while vague responses can be a red flag.

Timing And Project Planning

Scheduling your painting project at the right time can make a difference in both cost and quality. Spring and early fall are typically popular seasons, especially for exterior work.

Keep in mind:

  • The weather can delay outdoor projects
  • Busy seasons may mean longer wait times
  • Booking early can help secure better availability

If you’re flexible, you might even find better pricing during slower months.

Finding The Right Fit For Your Home

Every home is different, and so is every homeowner’s expectation. Some people prioritize speed, while others focus on detail and finish.

Working with experienced painters in Charlotte NC allows you to match your priorities with the right professional. Take your time reviewing options, ask questions, and trust your judgment.

A well-done paint job doesn’t just improve appearance—it adds comfort and value to your space.

How Caulking Impacts Long-Term Building Maintenance Costs

Caulking plays a bigger role in building maintenance costs than many property owners realize. It helps seal gaps around windows, doors, joints, panels, and other areas where air or moisture can enter.

When caulking is ignored, small openings can slowly turn into expensive problems. Water damage, air leaks, mold concerns, and premature material wear often cost far more to fix than routine sealing work.

Why Sealed Gaps Matter

Buildings naturally move over time. Temperature changes, moisture, wind, and daily use can cause materials to expand, contract, or shift slightly. Caulk helps fill the spaces where these materials meet.

When those seals stay in good condition, they help protect the building envelope. That means less outside air and water gets inside, which can reduce strain on heating, cooling, and repair budgets.

Lower Risk Of Water Damage

Water is one of the most common causes of costly building repairs. If rainwater enters through gaps around windows, walls, or exterior joints, it can damage drywall, insulation, framing, flooring, and finishes.

Regular exterior caulking helps prevent water from reaching hidden areas. This is especially important because moisture damage is not always visible right away. By the time stains, odors, or soft materials appear, the repair may already be more involved.

Better Energy Control

Open gaps allow conditioned air to escape and outdoor air to enter. This can make rooms feel drafty, uneven, or harder to keep comfortable. In larger buildings, even small air leaks can add up.

Good sealing supports better temperature control. It may help HVAC systems work more efficiently because they do not have to fight constant air loss around weak points in the building.

Fewer Emergency Repairs

Caulking is usually a planned maintenance task. Repairs due to failed seals are often unplanned. That difference matters for property managers and building owners.

A simple inspection may find cracked, loose, or missing caulk before it causes damage. Fixing those areas early can help avoid urgent calls, tenant complaints, and higher repair costs.

Common warning signs include:

  • Cracks or gaps in old caulk
  • Peeling or shrinking sealant
  • Water stains near windows or walls
  • Drafts around doors or frames
  • Mold or musty smells near sealed joints

Longer Life For Building Materials

Many building materials last longer when they are protected from moisture and air exposure. Wood, metal, masonry, insulation, and interior finishes can all suffer when seals fail.

Quality commercial caulking supports the life of these materials by reducing exposure to damaging conditions. This does not mean caulk solves every maintenance issue, but it does help protect vulnerable transition points.

Why Regular Inspections Help

Caulk does not last forever. Sun exposure, weather, movement, and age can cause it to break down. That is why regular inspections should be part of a maintenance plan.

For many properties, checking seals before harsh weather seasons is a practical habit. It gives owners and managers time to repair weak areas before rain, snow, heat, or cold creates bigger problems.

Choosing The Right Maintenance Approach

A good caulking plan focuses on prevention, not just repair. It looks at the areas most exposed to weather, movement, and daily wear. It also uses materials suited to the surface and location.

Property managers should keep records of inspections and repairs. This makes it easier to track recurring trouble spots and plan future maintenance budgets with fewer surprises.