Aqviz

Shower Waterproofing Membrane Tape: How the Seams Bond

Shower waterproofing membrane tape is the strip that turns separate pieces of membrane into one continuous surface, and Schluter’s own instruction sheet compresses the whole rule into a single line: every seam and every fastener takes a 2-inch (50 mm) overlap.

Sheeting a shower is the easy half. The joints are where the assembly fails. Water reaches the substrate at inside corners, at the drain flange, and at the valve cutout long before it finds a way through the field of a sheet, and those are precisely the places a band decides the outcome.

The name on the roll matters less than how it bonds. Two systems dominate residential work, and they join seams in opposite directions: one bonds dry, the other has to be bonded while the coating is still open.

What Counts as Membrane Tape, and What Does Not

Membrane tape is a strip of the same material as the sheet, sold in rolls, that bonds two sheets or two planes into one layer. A rubberized repair tape from a hardware aisle does not qualify, because it covers the face of the assembly and the seam under it stays untied.

Schluter sells its version as KERDI-BAND, a 4 mil waterproofing strip made for butt joints and floor-to-wall connections. The thickness is deliberate. Heavier material would leave a ridge beneath the tile, and the band folds tightly into inside and outside corners without rounding over the transition (Schluter).

Liquid systems use the same idea in a different form. Custom Building Products sells RedGard Fabric Membrane as a separate component of the RedGard family, and that fabric goes into the liquid rather than on top of it.

Three products share a shelf and only two belong under tile. Fleece-backed band bonds to a sheet system. Open-weave fabric bonds to a liquid system. The self-adhesive rubber roll bonds to a painted wall, which is a different job with a different failure mode.

Two Systems, Two Ways to Bond a Seam

Sheet membranes are joined dry to dry, with two pieces butted together and a band centered over the joint in thin-set mortar. Liquid membranes are joined wet to wet, with fabric pressed into the first coat while that coat is still open and a second coat burying it. The lap is 2 inches either way. The working window is not.

Sheet membrane: butt the sheets, center the band

Schluter specifies an unmodified thin-set mortar, or one of its own mortars, for bonding KERDI to a substrate and KERDI-BAND over a seam, mixed fluid enough to hold a notch and no stiffer. The chemistry behind that requirement explains more than a warranty clause does, because a modified mortar has to dry as well as cure, and a waterproof membrane on one side with porcelain tile on the other leaves almost nowhere for the water in the mix to go.

Forum member jadnashua, listed in his profile as a retired defense industry engineer, described the mechanic in a 2015 thread about thin-set choice:

“The Kerdi fabric’s seam waterproofing relies on there being fleece on the overlaps of both sheets…you won’t have that with AquaDefense on the wall. The small fibers from both sheets in intimate contact with the spaces filled with the thinset break up capillary action, creating the waterproofing.” (Terry Love Plumbing forum)

That description changes what the 2-inch rule measures.

The overlap is not a glued lap but a patch of contact area wide enough for two fleece faces to interlock through cured mortar, and the fibers are what stop water from creeping along the joint.

Liquid membrane: embed the fabric while the coat is wet

A fluid membrane hardens into a film, so the fabric has to be pressed into the first pass of material and stay there. The check is visual: after the top coat, no white fabric should show anywhere along the seam. Weave or a pale patch means the reinforcement was never fully encapsulated.

The mistake that costs a redo is a coat that has already skinned. Rolled-on material can look wet at a glance and still carry a skin the fabric cannot penetrate. Once that skin forms, the fabric floats on the surface and the joint only appears reinforced.

Fluid systems also hand thickness control to the installer instead of the factory. RedGard’s coverage chart shows how far one gallon goes in each role it is rated for: 25 sq ft as a crack prevention membrane meeting ANSI A118.12, 40 sq ft as a pan liner meeting ANSI A118.10, and 55 sq ft as a general waterproof membrane (Custom Building Products). The same pail covers less than half as much floor in the strictest role, and corners and seams eat material faster than flat runs do.

The Two-Inch Rule and Its One Exception

Two inches is the number Schluter repeats across its shower documentation, and its FAQ states the rule as a blanket requirement for the whole assembly. The same page carries the sentence outright: “All seams and fasteners must be treated with KERDI-BAND or KERDI, ensuring a 2″ (50 mm) overlap.”

That covers more ground than the word seam suggests. Fasteners count as well, so every screw holding cement board or a foam panel is treated like a joint, not just the butt lines between panels.

Two inches rather than one buys tolerance. The seal depends on fleece meeting fleece through cured mortar, so a narrow lap leaves little room for the placement errors that show up on a real job. Half an inch of slip on a one-inch lap consumes half the contact area. The same slip on a two-inch lap still leaves most of it.

The exception runs the other way and turns up during repairs. Schluter allows KERDI-FIX sealant for small punctures on walls above the curb height, or 2 inches above the floor in a curbless shower, where a full patch will not fit. Below that line, a piece of KERDI or KERDI-BAND with the overlap carried in all directions is the only repair its warranty recognizes (Schluter FAQ).

Every Seam a Shower Has

Count the joints before taping starts: the floor-to-wall transition, inside and outside corners, the curb, the drain flange, valve and showerhead penetrations, and the joints between backer or foam panels. Six families, and band goes on all of them.

  • Floor to wall. The one transition that runs unbroken around the enclosure, and the one that sits closest to standing water.
  • Inside and outside corners. Band folds into these without rounding, which is the reason it is thin. Pre-formed corner pieces do the same job faster.
  • The curb. Where the curb meets the side walls, and along the top where it caps the pan.
  • The drain flange. The joint between membrane and drain body, bonded with thin-set or the drain’s own clamping or bonding flange.
  • Valve and showerhead cutouts. Round holes in a rectangular field, closed with a collar or a banded patch.
  • Panel joints and fastener heads. Every screw in cement board or foam board, plus the seams between panels.

The drain flange is the seam that fails in public. A California homeowner posting as bronzefury ran two 24-hour water tests in August 2025 on a KERDI pan over a FloFX bond flange drain. The first test, filled below the membrane-to-flange seam, held its level. The second test, filled above that seam, did not:

“So, I filled the shower pan with water to a level above the seam where the kerdi membrane attaches to the bond flange. The result was a leak – the water level fell down to close to the level of the first test.” (Terry Love Plumbing forum)

The repair he planned was a membrane patch set with a two-inch lap over the cut section, which is the same geometry the original joint called for and did not get.

Why a Taped Seam Still Leaks

A banded joint leaks for one of four reasons: mortar too stiff or already skinned, air trapped under the band, a dusty substrate, or materials from two different systems meeting at the same seam.

Air is the failure you can watch happen. Press the band from the middle of the joint outward with the flat side of a trowel, and bubbles travel to the open edges where they can be worked out. Start at one end and the air has no exit.

Dust is the failure you cannot see. Thin-set bonds to a clean surface, and a membrane field left open overnight collects drywall dust, sawdust from a cut, and grit tracked in from a doorway. Wiping the joint before the band goes down costs seconds.

Mixing systems costs more. Liquid membrane laid over a sheet system does not tie into the sheet’s fleece, and jadnashua’s warning in the same thread deserves to be taken literally: “when you mix waterproofing systems, you essentially have no warranty from any of the companies involved.”

The check that catches all four is a peel.

Lift an edge of cured band with a putty knife. A sound bond shows mortar on the back of the band and mortar on the substrate beneath it, with no bare patches and no trowel ridges. Band that lifts clean is band that never bonded, and the same test works at a corner or around a valve collar.

For the corners and penetrations, the sequence that produces those results is worth keeping: a shower niche or recess is where the same rules get tested on four planes at once, and the cuts there are usually the first ones to leak.

Shower Waterproofing Membrane Tape: Common Questions

What kind of tape sticks to a shower wall?

Fleece-backed band bonded with thin-set mortar, or reinforcing fabric embedded in a wet liquid coat, is what sticks to a shower wall. A waterproof tape with its own adhesive does not, because it bonds to the tile face and leaves the joint between panels untreated.

How do you waterproof around a shower valve?

Cut the membrane or board tight to the valve body, then seal the opening with a banded patch or a pre-formed collar lapping 2 inches onto the surrounding membrane. The cut edge of the board is the weak point, and a ring of sealant by itself does not close it.

Is shower waterproofing membrane tape the same as a rubberized repair tape?

No. Membrane tape belongs to the waterproof layer and sits behind the tile, lapped onto both sides of a joint. A rubberized repair tape is a surface patch applied to a finished wall, and no part of a tile assembly depends on it.

Do you need tape if the membrane comes in one piece?

Yes, wherever the membrane stops. A single sheet still has to meet the drain flange, the valve, the curb, and every corner, and those terminations take band. One large sheet with no banding leaves four edges of untreated seam.

How long do you wait before flood testing a taped shower?

Long enough for the mortar to cure, then fill the pan to the top of the curb and leave it overnight. A level that drops points at a seam rather than at the field of the sheet, which is why the peel check at the drain flange runs first.

Pull a corner of cured band at the drain flange before the water goes in. That seam is the first one a flood test finds, and the only one nobody can inspect once the tile is set.
Red Guard Waterproofing Membrane: Coverage Rates, Application Steps, and Mistakes to Avoid

The red guard waterproofing membrane from Custom Building Products is an IAPMO-listed, polymer-based liquid barrier that turns bright red when fully cured, giving installers a reliable visual cue before tiling. One gallon covers 55 square feet as a waterproof membrane, though coverage drops to 40 square feet in pan liner applications. Understanding those numbers upfront saves both material waste and costly callbacks.

What RedGard Waterproofing Membrane Actually Does

Red guard waterproofing membrane is a ready-to-use liquid that creates a seamless barrier under tile, bonding directly to cement board, concrete, masonry, and clean metal drain assemblies including PVC, stainless steel, and ABS components. It meets ANSI A118.10 (IAPMO shower pan liner standard) and ANSI A118.12 (crack isolation), and carries an extra heavy-duty rating for steam shower installations.

The product works by forming a flexible elastomeric film over the substrate. Where traditional PVC liner systems trap water and require perfect seam welding, RedGard creates a monolithic membrane with no seams except at corners, where fabric reinforcement fills the gap. Custom Building Products (a subsidiary of The QUIKRETE Companies) manufactures it for both residential and commercial tile and stone applications.

Applied over a slab-on-grade concrete floor, it also functions as a moisture vapor barrier under all types of floor coverings, which makes it a two-in-one solution for basement tile jobs. The product ships ready to use with no mixing required.

RedGard Coverage Rates Per Gallon

A 1-gallon pail covers different square footage depending on how the membrane is used. As a standard waterproof membrane, expect 55 square feet per gallon. For IAPMO-certified shower pan liner installation, that drops to 40 square feet per gallon due to the required film thickness. The crack prevention use case covers significantly more area at 100 square feet per gallon.

According to Custom Building Products’ published coverage chart, the complete breakdown is as follows:

Application Use Case 1 Gallon (3.78 L) 3.5 Gallon (13.2 L)
Crack Prevention Membrane 100 sq ft (9.3 m²) 350 sq ft (32.5 m²)
Crack Prevention (ANSI A118.12) 25 sq ft (2.3 m²) 88 sq ft (8.2 m²)
Waterproof Membrane 55 sq ft (5.1 m²) 192 sq ft (17.8 m²)
IAPMO Pan Liner (ANSI A118.10) 40 sq ft (3.7 m²) 140 sq ft (13 m²)

The spread between 25 and 100 square feet per gallon tells the real story. Crack prevention applications can stretch a gallon far because the film is thinner. Certified shower floor installations require multiple coats building up to the minimum dry film thickness, which consumes more product. Calculate your shower floor and wall areas separately using the appropriate row in the table.

One gallon runs roughly $50 at most tile supply houses. One failed shower rebuild, by contrast, runs several thousand dollars in labor, tile removal, substrate replacement, and re-installation. The math on buying an extra gallon is not complicated.

How to Apply RedGard: Step-by-Step

RedGard application follows six steps: surface preparation, fabric reinforcement at corners and seams, first coat, drying verification by color change, second coat, and final cure check before tiling. Skipping the fabric tape at inside corners is the single most common DIY mistake, and it is also the most common source of cracks and eventual moisture intrusion at those joints.

Step 1: Prepare the substrate. The surface must be clean, solid, and free of standing water, oil, paint, or form-release agents. Cement board seams should be taped with alkali-resistant fiberglass mesh tape and filled with thinset. Let the thinset cure before proceeding. On concrete, fill any cracks or voids first.

Step 2: Apply fabric membrane at critical joints. Before the first coat of RedGard, embed RedGard Fabric Membrane into the membrane at all inside corners (floor-to-wall joints), around drain flanges, and at any substrate transitions. Use a brush to work a thin layer of RedGard into the corner first, press the fabric into it, then brush over the top. This step cannot be skipped on shower floors.

Step 3: Apply the first coat. Pour RedGard onto the surface and spread with a 3/8-inch nap roller or a brush. Work in consistent, overlapping strokes to avoid thin spots. Cover the entire surface, including the base of walls where they meet the floor. The product starts as a bright pink liquid.

Step 4: Check the color before applying the second coat. Tile pros who do a hundred shower installations a year rely on one visual rule: uniform red color across the entire surface means the coat is dry. Any remaining pink spots mean moisture is still present in the film. Do not apply the second coat over pink areas. Depending on humidity and temperature, drying takes one to two hours per coat.

Step 5: Apply the second coat. Roll or brush the second coat perpendicular to the first for complete coverage. Two full coats are the minimum for any wet area application. Steam showers and shower floors may require a third coat to achieve the required film thickness for the ANSI A118.10 pan liner rating.

Step 6: Verify full cure before tiling. The entire surface must be uniformly deep red with no pink areas before any thinset or tile goes down. Setting tile on incompletely cured RedGard traps moisture in the film and compromises adhesion. In high-humidity conditions, run ventilation fans during curing.

Substrate Compatibility and System Mixing

RedGard bonds reliably to cement board (HardieBacker, Durock, and similar), concrete, masonry, plywood on floors rated for wet areas, and clean metal drain components. It does not bond reliably to painted surfaces, gypsum-based boards not rated for wet areas, or substrates with active efflorescence. Surface preparation determines whether the membrane holds long-term.

The more contentious compatibility question involves Schluter Systems Kerdi membrane. A significant volume of discussion in r/Tile and r/HomeImprovement centers on installers who have tried to use both systems together, either applying RedGard over a section of Kerdi or vice versa. The two products come from different waterproofing philosophies and are designed as complete, standalone systems.

Kerdi is a bonded sheet membrane; RedGard is a liquid-applied membrane. Their adhesive chemistries, movement tolerances, and substrate bonding characteristics differ. According to discussions in r/Tile following real shower leak investigations, mixing the two systems can create voids and delamination at transition points that neither system was designed to handle.

Custom Building Products’ technical documentation makes no provision for Kerdi integration. Using one system throughout a single installation is the correct approach.

“Help interpreting shower leak and mixed waterproofing system (Kerdi + RedGard + HardieBacker)”

r/Tile  ·  51 comments  ·  View thread

“Is my contractor applying red guard correctly? Pictures inside.”

r/HomeImprovement  ·  52 comments  ·  View thread

“Anyone ever used Red Guard for showers?”

r/HomeImprovement  ·  44 comments  ·  View thread

“Red guard – discuss”

r/Tile  ·  41 comments  ·  View thread

RedGard vs. Other Waterproofing Options

The red guard waterproofing membrane competes primarily with Schluter Kerdi sheet membrane, Laticrete Hydro Ban, and USG Durock Tile Membrane. Each has a distinct use profile. RedGard’s main advantages are price point and flexibility for irregular surfaces; its main limitation is requiring multiple coats and careful drying time management.

Product Type Approx. Cost/Gallon Best For IAPMO Listed
RedGard (Custom Building Products) Liquid membrane ~$50/gal Showers, floors, steam rooms, slab moisture barriers Yes
Schluter Kerdi Sheet membrane ~$3–4/sq ft Full Schluter system installs, consistent film thickness Yes
Laticrete Hydro Ban Liquid membrane ~$60/gal Fast-track installs (tile in 2 hours), crack isolation Yes
USG Durock Tile Membrane Liquid membrane ~$45/gal Durock board systems, interior wet areas No

Kerdi’s advantage is predictable film thickness across the surface, since the sheet product has a defined mil thickness built in. RedGard requires the installer to build up thickness through multiple coats and verify coverage by color. For experienced tile setters comfortable with liquid membranes, the cost savings are real. For first-time DIYers in a tight shower enclosure, Kerdi’s simplicity has genuine appeal.

Laticrete Hydro Ban permits tiling in as little as two hours after application, which makes it attractive for commercial installs on tight schedules. RedGard requires full cure to uniform red coloration before tiling, which can take several hours in humid conditions. Neither system is universally better; the correct choice depends on the substrate, the installer’s experience, and the project timeline.

Frequently Asked Questions About RedGard Waterproofing Membrane

How many coats of RedGard do you need?

Two coats minimum are required for any wet area application. Shower floors intended to meet the IAPMO ANSI A118.10 shower pan liner standard may require a third coat. Each coat must be uniformly red (no remaining pink areas) before the next coat is applied.

How long does RedGard take to dry between coats?

Red guard waterproofing membrane drying time is typically one to two hours per coat under normal indoor conditions. High humidity, low temperatures, or thick application all extend drying time. The product’s color change is the authoritative indicator: pink means wet, and red means dry. Do not rely on clock time alone.

Can you use red guard waterproofing membrane over cement board?

Yes. Cement board (HardieBacker, Durock, Permabase) is one of the primary substrates for RedGard in shower installations. Tape cement board seams with alkali-resistant fiberglass mesh and fill with thinset before applying the membrane. Let the thinset cure before waterproofing.

What causes RedGard to peel?

Adhesion failure typically traces back to a contaminated or unprepared substrate (dust, paint, oils), applying over a wet or incompletely cured surface, or tiling while the membrane is still pink. Mechanical damage from removing tile can also lift the membrane. Patching requires sanding the edge of existing membrane and applying fresh product with a brush.

Is RedGard rated for steam showers?

Yes. Custom Building Products carries an extra heavy-duty steam shower rating for RedGard, with a supporting technical bulletin (TB63) specifically covering steam shower installations. Steam applications require careful attention to coverage on walls, ceiling, and all penetrations.

Can RedGard be used as a vapor barrier under flooring?

Yes, but only on slab-on-grade concrete. Applied to a clean concrete slab, RedGard functions as a moisture vapor barrier under all types of floor coverings including hardwood, laminate, vinyl, and tile. It is not a substitute for proper site drainage and is not rated for applications where hydrostatic pressure is present.

How to Waterproof a Bathroom Floor: A Complete Step-by-Step Guide

Waterproofing a bathroom floor requires cleaning and priming the subfloor, sealing all seams and gaps with silicone caulk, applying a liquid waterproofing membrane (one to two coats), embedding fabric mesh in corners, and allowing each layer to cure fully before tiling, explain Gebrael Property Management specialists. The entire process takes one to three days depending on drying times. Skipping even one step puts your subfloor at risk of rot, mold, and structural damage that costs far more to fix than doing it right the first time.

Why Bathroom Floor Waterproofing Matters

Water finds its way through grout lines, expansion gaps, and hairline cracks — even when tile looks perfectly sealed on the surface. According to the U.S. Environmental Protection Agency’s mold guidelines, mold begins to grow on wet building materials within 24 to 48 hours of moisture exposure. Over time, unprotected moisture saturates the subfloor, creating conditions for black mold, wood rot, and structural damage. Remediation costs for a failed subfloor that requires full demo and reconstruction routinely exceed $10,000, compared to roughly $120 in materials to waterproof it correctly the first time.

A proper waterproofing layer beneath tile acts as the last line of defense. It does not need to be visible or complicated, but it does need to be continuous — no gaps, no thin spots, no skipped corners.

The pattern shows up clearly across renovation communities: properly waterproofed bathrooms hold up for decades, while those where the membrane step was rushed or skipped tend to show tile lifting, grout cracking, and subfloor damage within five to ten years.

Tools and Materials You Need

A bathroom floor waterproofing project requires a liquid membrane (or sheet membrane), fabric mesh for corner reinforcement, 100% silicone caulk, a floor primer for porous substrates, a paint roller with 1/2-inch nap, and basic prep tools. Total material cost for a standard 50–80 sq ft bathroom runs $50–$120 for DIY, compared to $300–$600 for professional installation of the same area.

Gather everything before you start. Running out of primer mid-coat causes uneven adhesion, and a half-dried membrane edge is difficult to feather back in smoothly.

Item Purpose Notes
Liquid waterproofing membrane Primary moisture barrier Laticrete Hydroban, RedGard, or equivalent
Waterproofing fabric mesh / fleece tape Reinforces corners and seams Embedded in first membrane coat
Silicone caulk (100%) Seals floor-wall joints and cracks Use neutral-cure for tile applications
Concrete primer (optional) Improves membrane adhesion on porous slabs Required on bare concrete; skip on backer board
Paint roller (1/2″ nap) + brush Applies membrane to field areas and edges Foam rollers leave fewer air bubbles
Putty knife or margin trowel Presses mesh into membrane at corners —
Masking tape Creates clean termination line on walls Remove before fully dry to avoid tearing
Vacuum or broom Surface prep Dust-free surface is non-negotiable

Budget roughly $50–$120 in materials for a standard 50–80 sq ft bathroom floor. Professional waterproofing installation for the same space typically runs $300–$600, the DIY savings are real, but only if the process is followed correctly.

Step-by-Step: How to Waterproof a Bathroom Floor

Each step below builds directly on the one before it. Rushing the drying times is the single most common mistake DIYers make, a membrane applied too thick or tiled over before curing traps moisture rather than blocking it.

  1. Clean and vacuum the subfloor thoroughly. Remove all dust, debris, adhesive residue, and loose particles. Any contamination under the membrane creates a weak bond. For wood subfloors, check for soft spots, squeaks, or flex, fix those before waterproofing, not after.
  2. Fill cracks and fix uneven areas. Use floor-patching compound for cracks wider than 1/8 inch. A floor that moves or flexes will eventually crack the membrane above it. Allow patching compound to cure fully (typically 24 hours).
  3. Apply primer if required. Concrete and cement board are porous and will aggressively absorb your first membrane coat without primer. Apply a compatible floor primer in a thin, even coat using a roller. Work from the far corner toward the door. Allow to dry per manufacturer specs, usually 2–4 hours.
  4. Seal the floor-to-wall joints with silicone caulk. This is the most underestimated step. The joint where the floor meets the wall is the highest-movement area in any bathroom, it flexes constantly as the structure settles. Run a bead of 100% silicone caulk along the entire perimeter. Tool it smooth and allow a full 24-hour cure before applying membrane over it.
  5. Embed fabric mesh at all corners and seams. Cut the fleece tape or fabric mesh to length. Apply a thin coat of liquid membrane to the corner, press the mesh firmly into the wet membrane with a putty knife, and work out any bubbles. Let this tack up for 30–45 minutes before applying the full first coat over the top. This step is what separates a professional-quality waterproofing job from a coat of paint.
  6. Apply the first coat of liquid membrane to the field. Pour the membrane into a paint tray. Use a 1/2″ nap roller for the main floor area and a brush or small roller for tight spots. Work from the far corner toward the door. Apply to the walls as well, going up at least 6 inches (and up to the full height of the shower zone if waterproofing a shower floor). Let the first coat dry completely, typically 1–2 hours, though some membranes require 4 hours between coats. The membrane should change color as it dries; apply the second coat only once it has reached the manufacturer’s stated dry color.
  7. Apply the second coat in the opposite direction. Rolling perpendicular to the first coat ensures full coverage and fills any pinholes. Some manufacturers, including Laticrete, require a minimum of two coats to achieve the rated waterproof performance. Do not skip this step and assume one thick coat is equivalent. Allow the second coat to cure per product specs before tiling, this ranges from 4 hours (fast-dry products) to 24 hours for standard membranes.
  8. Test before tiling. The simplest test: tape a piece of plastic sheeting flat over a small section of the floor, seal the edges with tape, and leave it overnight. If condensation forms on the underside of the plastic, the membrane has not fully cured. Tile only when the membrane is dry to the touch, flexible, and fully cured throughout.
step by step how to waterproof a bathroom floor
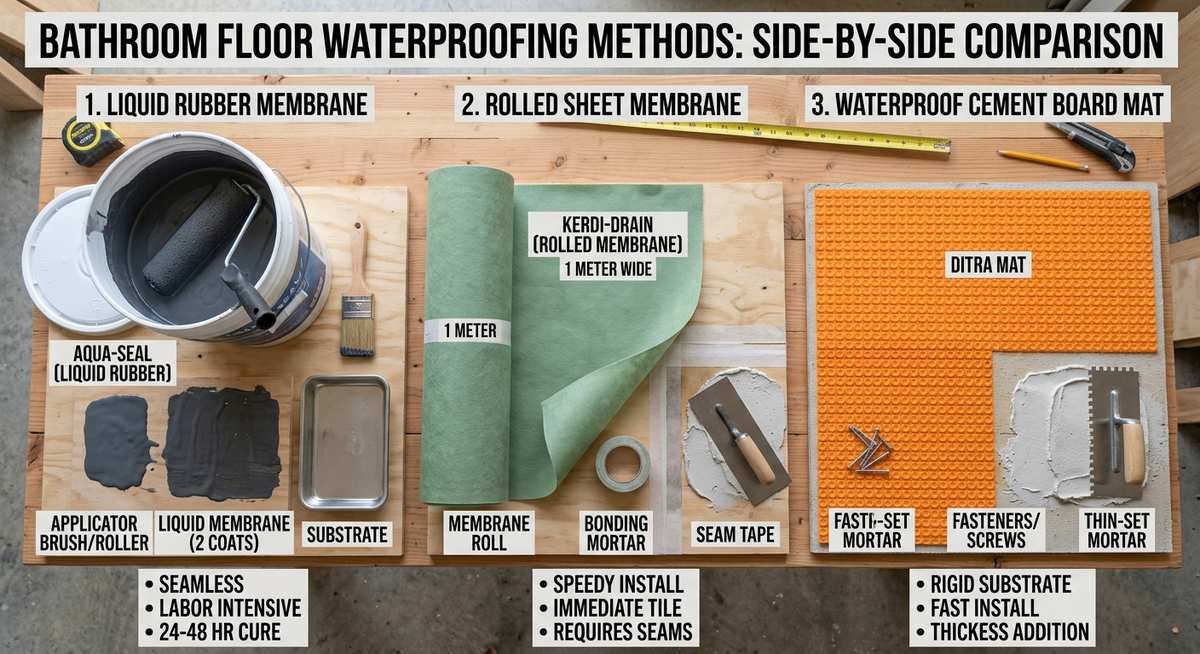
Three main waterproofing systems for bathroom floors: liquid membrane (left), bonded sheet membrane (center), and uncoupling mat system (right).

Waterproofing Methods Compared

The four main bathroom floor waterproofing systems are: liquid membrane (best for concrete slabs, $30–$50 per 50 sq ft), sheet membrane such as Schluter Kerdi (best for full new installs, $80–$150), foam tile backer boards like Wedi or GoBoard (best for wood subfloors, $100–$200), and uncoupling mats like Schluter Ditra (best for crack prevention over both substrate types, $80–$130). Subfloor material is the primary factor in choosing between them.

Not all waterproofing systems work the same way. The right choice depends on your subfloor type, tile selection, and how much flexibility you need at the joints.

Method Best For Application Approx. Cost (50 sq ft) Drying Time
Liquid membrane (RedGard, Hydroban) Concrete slabs, cement board Roller/brush, 2 coats $30–$50 1–4 hrs between coats
Sheet membrane (Schluter Kerdi) New builds, full system installs Thinset-bonded, seams overlapped $80–$150 24 hrs (thinset cure)
Foam tile backer (Wedi, GoBoard) Wood subfloors, second-story baths Screw-fastened, seams taped $100–$200 (material only) 0 (ready to tile immediately)
Waterproofing mat (Schluter Ditra) Uncoupling layer, crack prevention Thinset-bonded $80–$130 24 hrs (thinset cure)

Liquid membrane is the most accessible and DIY-friendly option. Sheet membranes like Schluter Kerdi require more precision at seams but are the go-to choice for certified tile setters because the system approach eliminates guesswork.

On r/Flooring, a community that fields dozens of bathroom tile questions per week, the split between liquid membrane and Schluter Ditra is a recurring debate. The practical consensus: use Ditra or a similar uncoupling mat over wood subfloors where movement is a concern, and liquid membrane over concrete where adhesion to the substrate is the priority.

“Roll on waterproofing before tile, on bathroom floor?”, the question from r/Flooring captures exactly what most DIYers are working out. The community answer is consistent: yes, but the membrane only works when you also seal the corners and joints, not just the open field. A painted floor with unsealed seams is not waterproofed.

— r/Flooring, 2025

This aligns with the installation guidelines from Laticrete’s official Hydro Ban product page, which specifies that fleece fabric must be fully embedded at all terminations, changes of plane, and penetrations for the system to carry its warranty.

Common Mistakes That Cause Waterproofing Failures

The five most common waterproofing failures are: skipping primer on concrete, applying one thick coat instead of two thin ones, skipping fabric mesh reinforcement at corners, tiling before the membrane has fully cured, and polished concrete left unsealed. Each of these mistakes allows moisture to reach the subfloor, where the EPA notes that mold can begin growing on wet building materials within 24 to 48 hours.

  • Skipping primer on concrete. Concrete pulls moisture out of the membrane before it can film-form properly, leaving a weak, porous layer instead of a continuous barrier. Primer is not optional on bare slabs.
  • Applying one thick coat instead of two thin ones. A thick single coat traps air bubbles and sags in low spots. Two thin coats with full drying between them produce a more uniform, stronger film than one heavy application.
  • Not reinforcing corners. Corners and seams are where tile assemblies flex and crack. Fabric mesh embedded at these points gives the membrane something to hold against movement. Without it, small cracks in the tile or grout eventually let water through to an unreinforced joint.
  • Tiling before full cure. Thinset and tile weight pressed onto a membrane that has not fully cured can compress or displace the film. The manufacturer’s stated cure time is the minimum, not a suggestion.
  • Polished concrete without sealing. A related question that surfaces often in r/HomeImprovement: polished concrete does not become waterproof just from polishing. It requires a penetrating sealer to close the surface pores, plus a cove base at the wall joint.

Frequently Asked Questions

Does tile waterproof a bathroom floor on its own?

No. Tile itself is not waterproof, grout lines and the joints between floor and wall allow water to penetrate to the subfloor over time. A dedicated waterproofing membrane applied beneath the tile is required to prevent moisture damage to the subfloor and framing below.

Can I waterproof over existing tile without removing it?

Not effectively. Waterproofing membranes need to bond to the substrate below the tile assembly, not on top of it. Surface sealers applied to existing tile grout can slow water absorption but will not provide the same protection as a properly installed sub-tile membrane. If the existing tile is sound and level, tiling over it with a new waterproofed assembly is an option, but it adds height to the floor.

How long does bathroom floor waterproofing last?

A properly installed liquid membrane or sheet membrane system lasts 10–20 years under normal bathroom use. The weak points are always at joints and corners, these benefit from recaulking every 5–7 years as part of regular bathroom maintenance, even when the underlying membrane remains intact.

Do I need to waterproof under vinyl plank flooring in a bathroom?

Vinyl plank flooring marketed as “waterproof” refers to the plank surface, not the subfloor protection. Water that gets beneath the planks through seams or around toilets can still damage the subfloor. For bathroom installations, sealing the subfloor perimeter and any penetrations adds meaningful protection, even if you are not applying a full membrane under the field area.

What is the best waterproofing product for a bathroom floor?

Laticrete Hydroban and Custom Building Products RedGard are the most widely used liquid membranes among professional tile setters. Schluter Kerdi is the preferred sheet membrane for complete system installs. For wood subfloors where movement is a factor, Schluter Ditra or a foam tile backer (Wedi, GoBoard) provides both waterproofing and uncoupling in one product.

How thick should the waterproofing membrane be?

Most liquid membranes require a minimum dry film thickness of 20–30 mils (0.020–0.030 inches) to provide rated waterproof performance. Two full coats with a 1/2″ nap roller typically achieve this. Check the product spec sheet for the specific dry film thickness and coverage rate, applying at the listed coverage rate per coat is more reliable than visual inspection alone.

Can I waterproof a bathroom floor myself?

Yes. Liquid membrane waterproofing is a straightforward DIY project. The tools are basic, the materials cost under $100 for a standard bathroom, and the process, clean, prime, caulk joints, embed mesh at corners, roll two coats, takes about a day of active work plus drying time. The most important factor is patience: allow each layer to cure fully before moving on.

For a related project, see the complete guide on how to waterproof a shower, which covers wall membrane installation, shower pan waterproofing, and curb details in the same step-by-step format.

Getting It Right the First Time

Waterproofing a bathroom floor is not the most dramatic part of a remodel. Nobody photographs the grey membrane coat or writes home about applying fleece tape to a corner. But it is the step that decides whether the beautiful tile job above it lasts 20 years or starts failing in five. Two coats, full corner reinforcement, sealed joints, and the patience to let it cure completely, that is the whole job. Everything that goes wrong in a bathroom floor usually skipped one of those four things.