Aqviz

How to Frame a Basement Window: A Practical Basement Guide

The basement window is a rectangular hole in the concrete foundation wall. It has been there since the house was built. A metal or vinyl window frame is set into the opening, and light comes through. When you finish the basement, the new framed wall running along the concrete will pass directly over this window. If the framing around the window is not done correctly, two things happen: the window becomes a recessed box that collects condensation, and the drywall around the window develops cracks where the framing meets the concrete, says Freshstart Property Management team.

Framing a basement window is a sub-project within the larger wall framing job. It consists of building a window buck, which is a wooden frame inside the concrete opening, and integrating the wall framing around it so the drywall has continuous support from the wall into the window well. This guide covers both parts.

The Window Buck: What It Is and Why It Matters

A window buck is a wooden frame built inside the concrete window opening. It serves three purposes. It provides a flat, square surface for attaching drywall or trim around the window, since the concrete opening is rarely perfectly square or smooth. It creates a thermal break between the cold concrete and the interior finish, reducing condensation on the window frame. And it provides a mounting surface for an interior window stool and casing, the same way a window in an above-ground wall is trimmed.

Without a buck, the drywall must be attached directly to the concrete around the window, which is impractical because concrete screws do not hold drywall reliably, and the concrete transmits cold directly to the drywall surface. The buck is not optional for a finished basement window.

Materials for the Window Buck

  • 1x lumber: 1×4, 1×6, or 1×8 boards, depending on the depth of the concrete wall. The board width must be wide enough to span from the inside face of the concrete to the inside face of the finished wall framing. For a typical 8-inch concrete wall with a 1/2-inch gap plus 3-1/2-inch framing, the total depth is roughly 12 inches. A 1×12 board or two narrower boards joined together span this depth.
  • 2×4 lumber: for framing around the window opening.
  • Construction adhesive: polyurethane-based, compatible with concrete and wood.
  • Tapcon screws or powder-actuated fasteners: for attaching the buck to the concrete.
  • Spray foam: low-expansion window and door foam for sealing the gap between the buck and the concrete.

Step 1: Build the Window Buck

Measure the concrete window opening on all four sides. The opening will not be perfectly square. The width at the top may differ from the width at the bottom by 1/4 inch or more. Measure both and use the smaller dimension for the buck width, so the buck fits inside the opening without forcing.

Cut four pieces of 1x lumber to form a rectangular frame that fits inside the concrete opening. The top and bottom pieces run the full width of the opening. The side pieces fit between them. Dry-fit the frame inside the opening. It should slide in with slight friction. If it is too tight, plane or sand the edges. If it is too loose, the gap will be filled with spray foam later, but the buck must be held in position while the foam cures. A gap of up to 1/4 inch on each side is acceptable and will be foamed.

Apply construction adhesive to the back edges of the buck frame where it contacts the concrete. Slide the buck into the opening. Position it so it projects into the room far enough to meet the face of the finished wall framing. For a standard 2×4 framed wall with a 1/2-inch gap behind the studs, the buck should extend roughly 4 inches past the interior face of the concrete.

Shim the buck in the opening until it is level and square. Measure the diagonals. If the two diagonal measurements are equal, the buck is square. Secure the buck to the concrete with Tapcon screws through the sides of the buck into the concrete. Two screws per side, top and bottom. The buck is now fixed in position.

Fill the gap between the buck and the concrete with low-expansion window and door spray foam. Low-expansion foam is critical. Standard spray foam expands with enough force to bow the buck inward. Apply the foam in a thin bead along the gap. It will expand to fill the space. Let it cure, then trim the excess flush with a utility knife.

Step 2: Frame the Wall Around the Window

The wall framing running along the concrete wall must accommodate the window opening. The window is an interruption in the stud layout. The framing around it must transfer the load of the drywall above the window down to the bottom plate without relying on the window buck for support.

The window opening in the wall framing is framed like a door opening. A header spans the width of the opening. King studs run from the bottom plate to the top plate on either side of the opening. Trimmer studs inside the king studs support the header. The header for a non-load-bearing interior wall can be a flat 2×4 laid on its face. Cripple studs fill the space between the header and the top plate above the window.

The rough opening in the framing should be 1/2 inch wider and taller than the window buck. This gap allows the buck to be shimmed into final alignment after the wall framing is complete. The gap is covered by the drywall that wraps into the window well.

Step 3: Insulate Around the Window

The gap between the window buck and the wall framing is a thermal weak point. Cold air from the concrete opening conducts through the buck and into the room if the gap is not sealed. Cut strips of rigid foam insulation to fit into the gaps between the framing and the buck. Spray foam any remaining small gaps. The goal is a continuous thermal break from the concrete to the interior.

If the window itself is old and single-pane, consider replacing it before building the buck. A new window installed into the concrete opening is a separate project from framing, but the framing is built around the window that is there. Replacing the window after the buck and drywall are installed is significantly more difficult. Replace it now if it needs replacing.

Step 4: Drywall and Trim the Window

Drywall extends from the wall surface into the window well, covering the window buck. Cut drywall pieces for the top, bottom, and sides of the window well. The drywall in the well butts against the window frame and meets the wall drywall at the outside corner. Install corner bead on the outside corners where the wall drywall meets the well drywall. Tape and mud the seams. The result is a smooth transition from the wall into the window well.

Install a window stool, which is the horizontal sill piece at the bottom of the window, and casing around the perimeter. The stool and casing cover the drywall-to-window-frame joint and provide a finished appearance. The trim is nailed to the window buck, not to the window frame itself.

Frequently Asked Questions

What if the basement window has a metal frame embedded in the concrete?

Do not remove the metal frame. It is part of the window assembly and is embedded in the concrete when the foundation is poured. Build the wood buck inside the metal frame, attaching the buck to the concrete, not to the metal. The wood buck sits inside the metal frame and extends past it into the room. The gap between the buck and the metal frame is filled with spray foam.

What if I need to enlarge the window for egress?

Enlarging a basement window for egress, which is required for any basement bedroom, involves cutting the concrete foundation wall. This is not a DIY framing project. It requires a concrete cutting contractor, a structural engineer to specify the lintel over the new larger opening, and a building permit. The framing around the new egress window is built as described in this guide, but the window installation itself is a separate, permitted project that must be completed before the framing begins.

The Window That Looks Finished

A framed and trimmed basement window brings natural light into a finished space and removes the last visual reminder that the room is below ground. The window buck squares the opening. The wall framing integrates the window into the room. The drywall wraps into the well. The trim finishes the transition. The window looks like any other window in the house. The concrete it sits in is invisible, which is the point of finishing a basement.
 

How to Grout Shower Tile: A Practical Bathroom Guide

The tile is on the wall. The thinset has cured for 24 hours. The spacers are still in place, little plastic crosses sticking out from between every tile. The shower looks almost finished, which is the most dangerous moment in the entire project because the grout is the difference between a shower that looks professional and one that looks like a first attempt. Grouting is not difficult. It is messy, timed, and unforgiving of delay. Once grout is mixed, the clock starts. Once grout is in the joints, the wiping window opens and closes. Miss the window and the grout hardens on the tile face, and removing it involves chemicals, scrubbing, and regret, observes Ridges property management.

This guide covers grouting shower tile from spacer removal to sealed joints. It focuses on the decisions that determine the result: sanded versus unsanded grout, mixing consistency, application technique, the critical wiping sequence, caulk versus grout in corners, and sealing.

Sanded vs. Unsanded Grout: Which to Use

Grout comes in two types. The choice depends entirely on the width of the grout joint.

  • Sanded grout: contains fine silica sand. The sand adds strength and prevents shrinkage cracking. Use sanded grout for joints 1/8 inch and wider. The sand fills the joint volume and reinforces the grout as it cures. Sanded grout is the standard choice for shower wall tile with 1/8-inch grout lines and for all floor tile.
  • Unsanded grout: contains no sand. It is smoother and stickier. Use unsanded grout for joints 1/16 inch or narrower. Unsanded grout is also used on polished tile, such as polished marble or glass, because the sand in sanded grout scratches the polished surface during application. Unsanded grout is more difficult to work into narrow joints because it is less flowable than sanded, but it is the only option that fits.

The joint width determines the grout type. If the gap between tiles fits a 1/8-inch spacer, use sanded grout. If the gap fits a 1/16-inch spacer or the tiles were set with no spacer at all, as is common with rectified tile, use unsanded grout. Using sanded grout in a 1/16-inch joint is like trying to push sand through a gap smaller than the sand grains. The grout will not fully pack the joint.

Preparation: Remove Spacers and Clean the Joints

Remove all tile spacers. Run a utility knife along each joint to remove any thinset that squeezed up between the tiles during installation. Thinset in the grout joint reduces the grout depth and creates a thin spot that cracks. The joints must be clean and open to a depth of at least two-thirds of the tile thickness.

Vacuum the joints and the tile surface. Wipe the tile with a damp sponge to remove dust. Dust in the joints prevents the grout from bonding to the tile edges. The shower should be clean and dry before grout is applied.

Mixing Grout

Grout is a cement-based powder mixed with water. The bag specifies the water-to-powder ratio. Add water to a clean bucket first, then add the powder slowly while mixing with a drill-mounted paddle. Mix until the grout has the consistency of creamy peanut butter. It should hold its shape on the float but spread easily. If it is too wet, the grout will shrink and crack as it dries. If it is too dry, it will not pack into the joints fully.

Let the mixed grout rest for 10 minutes. This is called slaking. The water fully absorbs into the cement particles. Remix for 30 seconds without adding more water. The grout is now ready.

Grout has a pot life of about 60 to 90 minutes. After that, it begins to set in the bucket and should not be used. Mix only what you can apply and wipe within an hour. For a standard shower surround, a single batch from a 10-pound box is usually enough. Mixing a second batch is better than throwing away half a bucket of hardened grout.

Applying Grout to the Wall

Scoop grout onto a rubber grout float. Press it into the joints at a 45-degree angle to the tile surface. Work the float diagonally across the joints to force grout into the gaps without the float edge digging into the joint and pulling grout back out. Fill the joints completely. There should be no voids, no low spots, and no air pockets.

Work in sections of about 3 square feet. After filling the joints in a section, hold the float at a 90-degree angle and scrape excess grout off the tile surface. This removes the bulk of the grout that is on the tile face, not in the joints. The tile will still have a haze. That is for the sponge to remove.

Continue working across the wall until all joints are filled. Do not stop midway through a wall. The grout in the first section will be firming up while you are still working on the last section. A single wall should be grouted in one continuous session.

The Wiping Sequence: When Timing Matters

Wait 15 to 20 minutes after filling the last joint for the grout to firm up. Test by pressing a fingertip gently into a joint. The grout should feel firm but not hard. If grout transfers to your finger, wait longer. If the grout is hard, you waited too long and the haze will be difficult to remove.

Fill a bucket with clean water. Submerge a grout sponge and wring it out until it is damp, not wet. A wet sponge drips water into the joints and weakens the grout. Start at the top of the wall and wipe the tile in a circular motion. Rinse the sponge after every few tiles, wringing it fully each time. The goal is to remove grout haze from the tile surface without pulling grout out of the joints. After the first pass, the tile will still have a faint haze. This is normal.

Wait another 30 minutes. Fill the bucket with fresh water. Wipe the tile again with a clean, damp sponge. This second pass removes the remaining haze. If the sponge drags and the haze resists, the grout has hardened too much for a sponge. Proceed to haze removal.

After the second wipe, let the grout cure for 24 hours. A white powdery film, called grout haze, may appear on the tile surface as the grout dries. This is cement residue. Buff it off with a dry microfiber cloth. If the haze is stubborn, a commercial grout haze remover dissolves it. Do not use vinegar. Vinegar etches the grout.

Caulk the Corners, Do Not Grout Them

The inside corners where two walls meet must be caulked, not grouted. Walls expand and contract with temperature and humidity changes. The two walls in a corner move independently. Grout is rigid and will crack along the corner line within months. The crack allows water behind the tile.

Fill the corners with 100 percent silicone caulk, color-matched to the grout. Most grout manufacturers sell matching silicone caulk in the same color palette. Apply a thin bead of caulk into the corner, smooth it with a wet fingertip, and let it cure. The caulk flexes with the walls. The grout in the field stays intact. This principle applies to all inside corners, the joint between the tile and the shower pan, and the joint around the shower valve trim plate.

Sealing the Grout

Grout is porous. Water penetrates unsealed grout and migrates through to the cement board and the framing behind it. A penetrating grout sealer fills the microscopic pores in the grout without changing its color or sheen. Apply the sealer 72 hours after grouting, once the grout is fully cured. The sealer is applied with a small foam brush along each grout line or sprayed over the entire surface and wiped off the tile. One coat is usually sufficient. If water no longer beads on the grout surface, typically after 2 to 3 years, reapply the sealer.

Frequently Asked Questions

Should I use epoxy grout instead of cement-based grout for a shower?

Epoxy grout is more waterproof and stain-resistant than cement-based grout. It also costs three times as much and is significantly harder to work with. Epoxy grout has a shorter pot life, requires a specific cleaning sequence using water and emulsifier pads, and cannot be re-emulsified once it sets. For a first-time tiler, cement-based grout with a penetrating sealer is the practical choice. For a professional or a homeowner who has grouted before, epoxy grout produces a more durable shower that never needs sealing.

How do I choose the right grout color?

Match the grout to the tile if you want a seamless look. Contrast the grout to the tile if you want the pattern to stand out. Light grout on a shower floor shows every stain. Dark grout hides dirt but shows hard water deposits as a white film. A mid-tone gray or warm beige is the most forgiving color for shower walls and floors. If you are unsure, test the grout color on a sample board made from spare tiles before committing to the entire shower.

Can I put new grout over old grout that is cracked?

No. New grout will not bond to old grout. The cracked grout must be removed to a depth of at least two-thirds of the tile thickness before new grout can be applied. A grout removal tool, which is a carbide-tipped scraper, or an oscillating multi-tool with a grout blade removes the old grout. Clean the joints, vacuum, and regrout. The new grout bonds to the tile edges, not to the old grout.

The Grout That Stays White

Grouting is the final skill phase of tiling a shower. The tile is already on the wall. The layout decisions are behind you. The grout fills the gaps, unifies the surface, and transforms individual tiles into a continuous wall. The application is physical. The wiping is timed. The sealing is the last step before the shower can be used.

Clean the sponge frequently. Caulk the corners. Seal the grout after 72 hours. The shower will look the way it looks on the day it is grouted for years if the grout is sealed and the corners are caulked. The only thing that degrades grout over time is water. The sealer keeps the water out of the grout. The caulk keeps the water out of the wall.


How to Replace a Flapper on a Toilet: A Practical Bathroom Guide

The toilet has been running intermittently for weeks. It stops when you jiggle the handle. It starts again at random intervals, usually when you are trying to fall asleep. You have been ignoring it because toilet repairs seem like the kind of thing that requires a plumber, or at minimum, a wrench and a bucket and a trip to the hardware store you do not have time for. Replacing a toilet flapper requires none of those things. The water stays on. The tank stays full. The repair takes ten minutes and the part costs six dollars, explains Allegiant Property Management experts.

A toilet flapper is a round rubber disk at the bottom of the tank, connected to the flush handle by a small chain. When you press the handle, the chain lifts the flapper, water rushes from the tank into the bowl, and the toilet flushes. The flapper drops back down, seals the opening, and the tank refills. When the flapper gets old, it warps, hardens, or develops mineral buildup that prevents it from sealing completely. Water seeps past it into the bowl. The fill valve detects the dropping water level and tops up the tank. This cycle repeats indefinitely. The sound you hear at night is the fill valve refilling the tank because the flapper is letting water escape. Fixing the flapper fixes the noise.

How to Know It Is the Flapper and Not Something Else

According to licensed plumber James Schuelke, co-owner of Twin Home Experts with over 32 years of plumbing experience, the flapper is the most common cause of a running toilet. The diagnosis is simple and does not require any tools:

  1. Remove the tank lid and set it aside on a towel on the floor. The lid is ceramic and will crack if it tips over.
  2. Watch the water level in the tank. If the water is not overflowing into the overflow tube, which is the open vertical pipe in the center of the tank, the fill valve is not the problem. The flapper is.
  3. Put a few drops of food coloring into the tank water. Do not flush. Wait 15 minutes. If colored water appears in the toilet bowl, the flapper is leaking. The dye travels from the tank, past the flapper seal, and into the bowl. Clear bowl water after 15 minutes means the flapper is sealing and the problem is elsewhere.

The food coloring test is definitive. If the bowl water changes color, replace the flapper. If it does not, and the toilet is still running, the fill valve or the overflow tube is the cause.

Buying the Right Replacement Flapper

Not all flappers are interchangeable. The wrong flapper will not seal, and a toilet that runs after a brand-new flapper is installed is almost always a toilet with the wrong flapper.

Flappers come in three sizes: 2-inch, 3-inch, and 4-inch. The size refers to the diameter of the flush valve opening at the bottom of the tank. The 2-inch flapper is the most common, found in standard toilets manufactured in the last 30 years. The 3-inch and 4-inch flappers are used in newer high-efficiency toilets that flush with less water by opening a larger valve.

The easiest way to get the right part is to take the old flapper with you to the hardware store. Unhook it from the overflow tube pegs, disconnect the chain from the handle arm, and drop it in a plastic bag. Match it to the replacement on the shelf. Universal flappers exist and work in most toilets, but if your toilet is from a specific brand like Kohler, Toto, or American Standard, the brand-specific flapper is more likely to seal correctly on the first try.

How to Replace the Flapper: Step by Step

Step 1: Remove the Old Flapper

You do not need to turn off the water supply. You do not need to drain the tank. The flapper sits above the water. Reach into the tank and unhook the chain from the flush handle arm. The chain is connected to the arm by a small clip. Unclip it.

The flapper is attached to the overflow tube by two small rubber ears that hook onto plastic pegs on either side of the tube. Slide the ears off the pegs. The old flapper is now free. Lift it out of the tank. Water will drip off it into the tank. This is fine. The tank is where water lives.

Step 2: Inspect the Flush Valve Seat

With the flapper removed, run your finger around the rim of the flush valve opening. This is the plastic ring the flapper seals against. If it feels rough, gritty, or has mineral deposits, clean it with a cloth or a piece of fine steel wool. A new flapper cannot seal against a dirty seat. If the seat is cracked or chipped, the flush valve itself needs replacement, which is a more involved repair. A cracked seat is rare. Mineral buildup is common.

Step 3: Install the New Flapper

Hook the rubber ears of the new flapper onto the pegs on the overflow tube. The flapper should sit centered over the flush valve opening. It should move freely up and down without binding.

Attach the chain to the flush handle arm. The chain should have about half an inch of slack when the flapper is closed and the handle is at rest. If the chain is too tight, it holds the flapper slightly open and the toilet runs continuously. If the chain is too loose, the handle has excessive free travel before the flapper lifts, and the chain can get caught under the flapper when it drops back down, holding it open. Adjust the chain by clipping it to a different link until the slack is correct.

Step 4: Test the Flush

Flush the toilet and watch the flapper operate. It should lift fully when the handle is pressed, allowing a strong flush, and drop back down immediately when the handle is released. The flapper should seat centered on the opening. Listen after the tank refills. Silence means the seal is good. If water is still running, check that the chain has slack and that the flapper is the correct size for the valve opening.

Adjustable Flappers: The Float Dial

Some replacement flappers have a small dial or float on the chain or on the flapper body itself. This dial controls how quickly the flapper drops back down after the flush, which determines how much water leaves the tank per flush. A flapper that drops too quickly produces a weak flush because the tank only partially empties. A flapper that floats too long wastes water by draining more of the tank than necessary.

Start with the float dial in the middle position. Flush and observe. If the flush is weak, move the dial to increase float time, keeping the flapper open longer. If the flush is strong but uses what seems like too much water, move the dial to decrease float time. The sweet spot is a flapper that stays open long enough for a complete flush but closes before the tank fully drains. For most standard toilets, the tank should not fully empty on a single flush. The last inch of water in the bottom of the tank is reserve volume for the bowl refill.

Chain Problems That Mimic a Bad Flapper

A chain that is the wrong length causes the same symptoms as a bad flapper. Before replacing the flapper, check the chain first. It takes ten seconds and costs nothing:

  • Chain too short: pulls the flapper slightly open even when the handle is at rest. The toilet runs constantly because water is always escaping. The fix is moving the chain clip to a link further from the handle.
  • Chain too long: has excess slack that can fall under the flapper as it drops. The flapper lands on the chain instead of on the valve seat. The toilet runs constantly. The fix is trimming the chain or moving the clip to a link closer to the handle.
  • Chain tangled: wrapped around the overflow tube or caught on a fill valve component. The flapper cannot close. Untangle it and the problem is solved.

If adjusting the chain does not stop the running, then proceed with flapper replacement. The part is the same one you would buy anyway. The diagnostic time is not wasted.

Flapper vs. Canister Flush Valves

Some modern toilets, particularly Kohler and Toto models, use a canister-style flush valve instead of a flapper. The canister is a vertical cylinder that lifts straight up when the flush lever is pressed. It seals with a flat silicone gasket at the bottom instead of a domed rubber flapper. If your toilet has a tower-shaped center assembly rather than a flat flapper, you have a canister valve. The seal is replaced the same way: twist and lift the canister out, remove the old seal, install the new seal, and reinsert the canister. The seal costs $8 to $15 and is brand-specific. Do not try to install a flapper on a canister valve. It will not fit and will not seal.

When Replacing the Flapper Is Not Enough

If the new flapper is the correct size, the chain is adjusted properly, the flush valve seat is clean, and the toilet still runs, the problem is the flush valve itself. The plastic seat may have a hairline crack, or the overflow tube may be cracked where it connects to the valve body. A cracked flush valve requires removing the tank from the bowl, replacing the flush valve assembly, and replacing the tank-to-bowl gasket. The parts cost $20 to $30, and the labor, including removing and reinstalling the tank, takes about an hour. This is a step beyond a simple flapper replacement but is still within reach of a homeowner with basic tools.

If the toilet is more than 20 years old and the flush valve is the original, consider replacing the fill valve at the same time as the flush valve. Both components have the same service life, and replacing both while the tank is off the bowl avoids a second repair in the near future.

Frequently Asked Questions

Will a universal flapper work in my toilet?

Universal flappers work in most standard 2-inch flush valve toilets. They use a flexible design that conforms to slight variations in the valve seat shape. However, they are less reliable than brand-specific flappers, particularly in Kohler and Toto toilets, which use proprietary flush valve designs. If a universal flapper does not stop the running toilet within the first few flushes, it is not going to. Return it and buy the manufacturer’s specific part.

How often should a toilet flapper be replaced?

A toilet flapper typically lasts 4 to 7 years. Hard water and chlorine-based toilet tank tablets shorten this lifespan to 2 to 4 years. The chlorine attacks the rubber, causing it to harden and warp prematurely. If you use drop-in tank tablets and your flappers fail frequently, switch to a bowl-based cleaner and replace the flapper. You will replace fewer flappers.

My new flapper has a rubber strap instead of a chain. How do I adjust it?

Some flappers use a perforated rubber strap instead of a metal or plastic chain. Adjustment is the same principle: the strap should have slight slack when the handle is at rest. If the strap is too tight, move the handle clip to a hole further from the flapper. If too loose, move to a hole closer to the flapper. The strap stretches slightly over time, so check the adjustment after the first week and readjust if needed.

The Six-Dollar Fix You Have Been Putting Off

Replacing a toilet flapper is the least expensive and least invasive toilet repair. The water stays on. No tools are required beyond your hands. The part costs five to ten dollars. The entire process from removing the tank lid to flushing the test flush takes ten minutes.

The flapper in your toilet is probably the original one that came with the house. It has been sealing and unsealing thousands of times a year since the day it was installed. Rubber ages. It hardens. It stops sealing. The running toilet is not a plumbing problem. It is a rubber expiry notification. Replace the flapper and the notification stops.


How to Unclog a Drain Vent: A Practical Homeowner Guide

Your kitchen sink gurgles every time the dishwasher drains. The toilet bubbles when you run the bathroom sink. The shower drains slow, then suddenly gulps and clears. You have snaked every trap under every fixture and the problem persists. None of the drains are individually clogged. The problem is above you, on the roof, notes Ace Property Management solutions.

A clogged plumbing vent, also called a vent stack or DWV (drain-waste-vent) pipe, produces symptoms that mimic a standard drain clog but refuse to respond to a plunger or snake. The vent pipe is the unsung hero of your plumbing system. It lets air into the drain lines so water flows smoothly and lets sewer gases escape safely above the roofline. When it plugs, your drains act like a straw with your thumb over the top: water struggles to move, glugs, and pulls air through the nearest available opening, usually a toilet bowl or a sink trap.

Unclogging a drain vent is not technically difficult. What makes it intimidating is the roof. This guide covers how to confirm the vent is the problem, how to clear it without calling a plumber, and when the smartest move is staying off the ladder.

How to Know It Is the Vent and Not the Drain

Before you climb onto the roof, rule out simpler causes. A vent clog produces a specific pattern that distinguishes it from a standard drain blockage.

Signs the vent is the problem:

  • Multiple fixtures on the same plumbing wall are slow or gurgling simultaneously. A single slow sink is a drain clog. Two sinks, a toilet, and a shower all acting strange on the same side of the house point to the vent.
  • Drains gurgle or bubble when another fixture runs. Run the bathroom sink and the toilet bowl ripples. This is air being pulled through the toilet trap because the vent cannot supply it from above.
  • The problem persists after you have snaked and plunged the individual drain. If a 25-foot auger came back clean and the drain is still slow, the blockage is not in the trap or the branch line.
  • You smell sewer gas near fixtures, especially when the wind blows from a certain direction. A blocked vent forces gases out through fixture traps instead of the roof vent.
  • Water in a rarely used toilet or floor drain has evaporated and the room smells. The trap dried out because air pressure in the vent is wrong, not because the trap itself is leaking.

If only one fixture is affected and the others on the same wall drain fine, the vent is probably clear. Snake that individual drain. If two or more fixtures are acting up and share a wall, the vent is the prime suspect.

What Clogs a Plumbing Vent

The vent pipe terminates on the roof, open to the sky. Nature takes advantage of this. The most common culprits, in rough order of frequency:

  • Leaves and debris. In fall, especially if trees overhang the roof. A few leaves are harmless. A wet mass compressed by rain and freeze-thaw cycles forms a plug that a garden hose will struggle to dislodge.
  • Bird nests. A 3-inch or 4-inch vent pipe is exactly the right diameter for a starling or sparrow to build inside. The nest can extend several feet down the pipe. You cannot see it from the ground.
  • Dead animals. Squirrels, rats, and birds fall in and cannot climb out. The smooth vertical pipe walls are not climbable. The smell from inside the house is the giveaway, though by that point the blockage is obvious.
  • Ice and snow. In freezing climates, the warm air rising from the sewer condenses at the cold pipe opening and freezes. Over days of sub-freezing temperatures, the ice cap can completely seal the vent.
  • Tennis balls and children’s toys. Kids throw things onto the roof. A tennis ball fits a 3-inch vent pipe almost perfectly. This is more common than plumbers like to admit.

Safety Before You Start: The Roof Is the Real Hazard

The plumbing work is straightforward. The roof access is where people get hurt. A ladder set up on uneven ground, a steep roof pitch, or a moment of distraction near the edge turns a $0 fix into an ambulance ride.

Use an extension ladder that extends at least 3 feet above the roofline. Set it on level ground at a 4:1 ratio: for every 4 feet of height, the base should be 1 foot from the wall. Have someone hold the ladder while you climb. Wear soft-soled shoes with grip. Do not go onto the roof in the rain, in the dark, or when you are the only person home.

If your roof pitch is steeper than 6:12 (rises 6 inches for every 12 inches of horizontal run), or if the roof is two stories up and you do not own a proper safety harness, call a plumber. The $150 to $300 service call costs less than an ER visit and is considerably less painful.

How to Clear the Vent: Step by Step

Step 1: Locate the Vent Pipe on the Roof

The plumbing vent is a pipe, usually 3 or 4 inches in diameter, protruding straight up through the roof. It may be black ABS, white PVC, or galvanized metal. Most homes have one main vent stack, often near the bathroom. Larger homes may have two or three. The pipe typically extends 6 to 12 inches above the roofline and has no cap, though some have a screen or vent cap to keep debris out.

From inside the house, you can approximate the vent location by identifying which wall the bathroom plumbing runs through, then picturing that wall extended upward to the roof. The vent is almost always directly above the main plumbing stack.

Step 2: Look Inside the Pipe

Shine a flashlight down the vent. If you see a mass of leaves, twigs, or a nest within arm’s reach, pull it out with a gloved hand or a pair of long pliers. If the pipe is dark and you cannot see the bottom, the blockage is deeper down. Do not stick your arm into a pipe you cannot see the bottom of. Dead animals carry disease, and a trapped live animal will bite.

Step 3: The Garden Hose Method

This clears roughly 70% of vent clogs and requires no special tools. Run a garden hose up to the roof. Have someone at the spigot ready to turn the water on full pressure on your signal. Feed the hose down the vent pipe as far as it will go. You will feel it hit the blockage.

Wrap a rag around the hose at the pipe opening to create a rough seal. This directs the water pressure downward instead of letting it spray back at you. Signal the person at the spigot to turn on the water full force. The combination of the hose physically breaking through and the water pressure flushing debris usually clears the clog.

If the water backs up and sprays out the top, the blockage is complete. Turn the water off, work the hose up and down like a plunger to break the clog mechanically, then try again. Listen for the sound of water draining freely down the pipe. That is the sound of success.

Step 4: The Plumber’s Snake (For Stubborn Blockages)

If the garden hose does not clear it, the blockage is either a compacted nest several feet down or a solid object like a ball. Feed a plumbing auger, also called a snake, down the vent pipe. A 25-foot hand-crank snake is sufficient for most single-story homes. For a two-story home, rent or borrow a 50-foot snake.

Push the snake down until you feel resistance. Tighten the lock screw on the snake and crank the handle clockwise while applying steady downward pressure. The tip will grind through a nest or grab a solid object. When you feel the resistance give way, pull the snake back up. Inspect the tip. If it comes back with nesting material, leaves, or fur, you found the problem. Flush the vent with the garden hose afterward to wash remaining debris down the stack and through the main sewer line.

Step 5: Verify the Fix from Inside the House

Run water in every fixture on the affected plumbing wall. Flush toilets. Run the washing machine if it is on the same stack. Listen for gurgling. The drains should flow silently and quickly. If symptoms persist, the blockage may be in the horizontal section of the vent line inside the attic rather than the vertical stack on the roof. Accessing the attic vent line involves crawling through the attic to find the vent pipe, cutting a section out, clearing the blockage, and coupling it back together. At that point, the plumber’s service call becomes the better path for most homeowners.

What It Costs: DIY vs. Plumber

Approach Cost Time
Garden hose (DIY, roof accessible) $0 30-60 minutes
Snake rental + DIY $25-50 (rental) 1-2 hours
Plumber — basic vent clearing $150-300 1 hour
Plumber — attic vent line repair $400-800 3-5 hours
Plumber — full vent replacement (cast iron stack) $1,500-3,500 1-2 days

The garden hose clears most residential vent clogs for free. The plumber is worth calling when the roof is too steep, too high, or the blockage is deeper than a DIY snake can reach. The cost of a plumber is not the service call. It is the peace of knowing that whoever is on the roof has insurance and experience.

Preventing the Next Vent Clog

Install a vent pipe screen or cap. A simple wire mesh cap, available at any hardware store for $8 to $15, prevents leaves, birds, and tennis balls from entering the pipe. The screen must be coarse enough to allow free airflow and prevent frost closure in winter. A mesh size around 1/4 inch is standard. Smaller mesh can clog with frost and recreate the problem you installed it to prevent.

If trees overhang the roof, trim branches back at least 6 feet from the roofline. This reduces leaf accumulation and discourages squirrels from using the roof as a highway to the vent pipe. Inspect the vent opening from the ground with binoculars once a year, ideally in late fall after the leaves have dropped and before the first freeze.

Frequently Asked Questions

How do I know if my plumbing vent is clogged or if it is a regular drain clog?

A vent clog affects multiple fixtures on the same plumbing wall simultaneously. If your bathroom sink gurgles, your toilet bubbles, and your shower drains slowly all at the same time, the vent is the likely cause. A standard drain clog affects a single fixture. Run the sink and watch the toilet bowl. If the water in the bowl ripples or bubbles while the sink drains, air is being pulled through the toilet trap instead of the vent. That is a vent problem.

Can a clogged plumbing vent cause sewer gas smell in the house?

Yes. When the vent is blocked, sewer gases that would normally escape through the roof are forced out through fixture traps instead. The water in a P-trap normally blocks gases, but a blocked vent can create negative pressure that siphons water out of the trap. A dry trap is an open path for sewer gas. If you smell rotten eggs near a sink or tub that is rarely used, the trap may have been sucked dry by vent pressure problems. Run water in the fixture to refill the trap and address the vent clog to prevent it from happening again.

Can I use a pressure washer to clear a clogged vent?

Do not use a pressure washer. A pressure washer operates at 1,500 to 3,000 PSI. Residential DWV pipe is not designed for that pressure. You can crack PVC fittings, blow apart old galvanized connections, or force water through the roof flashing and into the attic. A standard garden hose at full municipal pressure, typically 40 to 60 PSI, is sufficient. If the garden hose does not clear it, use a snake, not more pressure.

What if the vent is clogged with ice in winter?

Ice clogs in vent pipes occur when warm, moist sewer air freezes at the cold pipe opening. Pouring hot water down the vent from the roof can melt the ice cap. Do not use salt, which corrodes metal flashing and can damage roof materials. Do not use a torch or open flame near a vent pipe, especially an ABS or PVC one, for obvious reasons. If ice clogs recur every winter, the vent pipe may be undersized or poorly insulated where it passes through the attic. Adding insulation around the pipe in the attic reduces condensation and makes the air reaching the roof opening less moisture-laden.

Can I clear a clogged vent from inside the house instead of going on the roof?

Accessing the vent from inside is difficult. The vent pipe runs vertically through wall cavities and the attic. The only way to access it from inside is to go into the attic, locate the vent pipe, cut a section out, clear the blockage, and couple the pipe back together. This is more invasive than clearing from the roof and requires tools most homeowners do not own. If you cannot safely access the roof, calling a plumber costs less than an attic vent-pipe repair gone wrong.

When the Roof Says No

Not every vent clog is a DIY job. If your roof is two stories up, has a steep pitch, or is wet from recent rain, the risk is real. A fall from a single-story roof can break bones. A fall from a two-story roof can be fatal. The plumber’s $150 to $300 service call is the cost of keeping your feet on the ground. For a nest or debris plug near the top of the vent, a plumber will clear it in under an hour and you will wonder why you considered climbing up there yourself.

If the garden hose and snake both fail, the problem is likely in the attic section of the vent. That fix involves cutting and coupling pipe in a cramped, possibly hot attic. At that point, the plumber is not an expense. It is the right tool for the job.


Smart Ways to Reduce Water Usage Around Your Home

Water bills keep climbing, and the pressure to use less of it grows heavier with every passing season. Homeowners in Collier County, Florida, are paying closer attention to how much water flows through their pipes, fixtures, and outdoor systems each month. The good news is that meaningful reductions do not require major lifestyle changes or expensive renovations. Small habits, thoughtful upgrades, and a little routine maintenance can shave thousands of gallons off annual consumption. What follows is a practical look at where water tends to disappear inside and outside the home, along with steady ways to bring those numbers down without sacrificing comfort or convenience.

When Hidden Leaks Drain Your Yard

A cracked sprinkler line buried under the lawn can release water steadily for weeks before anyone notices the soggy patch above it. Left alone, that slow leak swells utility bills, drowns nearby roots, and erodes the soil around the broken section until the damage spreads further down the line. Calling a specialist for sprinkler repair in Collier County addresses the cracked line at the source, restores even pressure across the zone, and stops the silent waste before it becomes a much larger problem. A trained technician will pressure test the system, replace the damaged section, and verify that each head along the affected zone delivers the correct spray pattern once the repair is complete.

Rethink the Way You Use the Kitchen Sink

The kitchen sink quietly accounts for a surprising share of daily household water use. Rinsing dishes under a running tap, thawing frozen food beneath warm water, and washing produce in an open stream all add up faster than most people realize. Filling a basin instead of letting the faucet run can cut that usage dramatically, and a simple aerator screwed onto the tap reduces flow without weakening the pressure that makes rinsing easy. Keeping a pitcher of drinking water in the refrigerator removes the habit of running the tap until it turns cold, which alone saves several gallons a week in an average household.

Make the Bathroom Work Harder for Less

Bathrooms tend to be the thirstiest rooms in any home, with toilets, showers, and faucets all competing for the same supply line. Replacing older toilets with low-flow models cuts usage per flush by more than half, and modern designs handle waste just as effectively as their older, heavier counterparts. Showerheads rated for lower flow rates still deliver a satisfying spray thanks to improved nozzle engineering, and shaving even two minutes off a daily shower compounds into noticeable savings across a billing cycle. Turning off the tap while brushing teeth or shaving costs nothing and saves more water than almost any other single habit.

Run Appliances Only When They Are Full

Dishwashers and washing machines are designed to handle full loads efficiently, yet many households run them half empty out of convenience. A partial load uses nearly the same amount of water as a full one, which means every underfilled cycle wastes the difference. Waiting until the machine is properly loaded before starting it is the easiest behavioral change a homeowner can make. Newer high-efficiency models go a step further by automatically adjusting water levels based on load size, and pairing one of these machines with cold water cycles where possible, saves on the energy used to heat the water as well.

Insulate Pipes to Avoid Wasted WarmUp Time

Standing at the shower waiting for hot water to arrive is one of the most overlooked sources of household waste. Every second spent watching cold water swirl down the drain is water paid for but never used, and homes with long runs between the water heater and distant bathrooms lose the most. Wrapping exposed hot water pipes with foam insulation sleeves keeps the heat from escaping into crawl spaces, basements, and garages, which means warm water reaches the tap faster and stays warm longer between uses. The sleeves cost very little, install in minutes with no special tools, and pay for themselves quickly through reduced waste at every faucet and shower in the house.

Capture Rainwater for Household Tasks

Rain barrels positioned beneath downspouts collect water that would otherwise run off the roof and disappear into storm drains. That collected supply works well for rinsing patio furniture, washing the car, cleaning gardening tools, or topping off a backyard pond. Even a single barrel can hold fifty gallons or more after a moderate rainfall, and homes with multiple downspouts can link several containers together to expand storage capacity. Covered barrels prevent mosquito breeding and keep debris out of the supply, making the collected water cleaner and safer for use around the property.

Be Smart About Cleaning Hard Surfaces

Driveways, sidewalks, patios, and decks tempt many homeowners to reach for the garden hose and blast away grime with a steady stream. That approach wastes enormous amounts of water, often hundreds of gallons in a single cleaning session, and rarely delivers better results than smarter alternatives. Sweeping with a stiff-bristle broom clears most loose debris before any water touches the surface, and a bucket of soapy water paired with a scrub brush handles stuck-on dirt with a fraction of the volume. When a rinse is genuinely needed, a hose fitted with a shutoff nozzle gives precise control rather than letting the stream run continuously between passes.

Teach Everyone in the House to Pay Attention

Conservation works best when every member of the household understands why it matters and what their role looks like in practice. Children who learn early to turn off the tap, take shorter showers, and report dripping faucets carry those habits into adulthood. Posting a simple reminder near sinks or in the laundry room keeps the goal visible without feeling like nagging. Reviewing the monthly water bill together also turns an abstract number into a shared accomplishment when usage drops, which builds momentum for keeping the changes in place long after the initial enthusiasm fades.

Reducing water usage at home rewards patience more than perfection. A combination of smarter fixtures, mindful habits, insulated lines, and thoughtful cleaning routines delivers results that show up on every bill and last for years to come.

How to Put Tile in a Shower: A Practical Bathroom Guide

The shower is down to the studs. The old tile, the old drywall, and the old waterproofing that was not really waterproofing are all in a dumpster. The new cement board is screwed to the studs. The seams are taped and mudded with thinset. A bucket of waterproofing membrane and a roller are waiting. You are standing in the shower holding a trowel you bought this morning, staring at a stack of tile boxes, and the gap between where you are and a finished shower feels unbridgeable. It is not. Tiling a shower is a sequence of small, learnable steps. No single step requires exceptional skill. The skill is in doing every step, in order, without skipping the ones that are invisible when the shower is finished.

This guide covers putting tile in a shower from the waterproofing stage forward, with emphasis on the tools you actually need, the mistakes first-timers make, and the physical reality of spending a weekend on a ladder inside a 3-foot by 3-foot space with wet thinset on your hands.

Tools You Actually Need

You can tile a shower with a minimal set of tools. You do not need a $300 wet saw if you are willing to rent one for $40 a day. Here is the complete list:

  • Tile saw: rent a wet saw for ceramic or porcelain tile. A snap cutter works for smaller ceramic tile. An angle grinder with a diamond blade handles curves and notches around the shower valve. Do not try to cut shower tile with a manual score-and-snap cutter alone. The cuts around the valve are not straight lines.
  • Notched trowel: 1/4″ x 1/4″ square notch for tile up to 6 inches. 1/4″ x 3/8″ for larger tile. The trowel is $8. Buy the right size.
  • 4-foot level: for drawing the reference line and checking rows. A 2-foot level is not long enough to span multiple tiles.
  • Rubber grout float: for pressing grout into joints. Not a sponge. A float.
  • Tile spacers: a bag of 200 costs $5. Use them. Eyeballing grout lines produces wavy grout lines.
  • Margin trowel and mixing paddle: for mixing thinset in a 5-gallon bucket. A drill-mounted paddle saves your arm. Mixing thinset by hand is a forearm workout you do not need on top of the actual tiling.
  • Sponges, microfiber cloths, bucket, kneepads.

Waterproofing: The Step That Determines Whether the Shower Lasts

The tile and grout are not waterproof. Water penetrates grout. The actual waterproof barrier is the membrane behind the tile. Apply a liquid waterproofing membrane, such as RedGard or Hydro Ban, over the cement board with a paint roller and a brush. Roll two coats over the entire surface, including the screw heads and the taped seams. The first coat dries in about an hour and changes color when ready for the second coat. Apply the second coat perpendicular to the first. The total thickness should be roughly the thickness of a credit card. A wet-film thickness gauge costs $2 and tells you if the membrane is thick enough. Guessing leads to pinhole leaks.

The membrane must extend beyond the shower surround onto the adjacent drywall by at least 6 inches. The transition between the shower and the bathroom wall is a common failure point. Water migrates sideways through grout and attacks the edge of the tiled area.

Do not tile over the waterproofing until it has fully cured. The cure time is on the bucket. Usually 24 hours. Rushing this step means the thinset pulls the membrane off the wall as it dries. The membrane peels. The waterproofing is gone. The shower leaks. The ceiling below stains. The cycle repeats.

Mixing Thinset and Spreading It on the Wall

Thinset is a cement-based powder that you mix with water. The bag tells you the ratio. Add water to the bucket first, then powder. Mix with a drill paddle until smooth. Let it rest for 10 minutes. This is called slaking. Remix for 30 seconds. The thinset is now ready.

Thinset has a pot life of about 2 hours. After that, it begins to set in the bucket and should not be used. Mix only what you can apply in 90 minutes. For a first-timer tiling shower walls, that is about half of a standard 5-gallon bucket. Small batches, mixed fresh, bond better than a full bucket stretched past its working time.

Spread thinset on the wall with the flat side of the trowel first, pressing it into the cement board. Then comb it with the notched side at a 45-degree angle. The ridges should run horizontally. Cover about 3 square feet at a time. More than that, and the thinset skins over before you can set tile into it. If the thinset develops a dry surface film, scrape it off and apply fresh. Tile set into skinned-over thinset will fall off the wall.

Setting Tile on the Wall

Start at the bottom of the shower, but not on the shower pan. Snap a level horizontal line 1 tile height above the pan, minus the width of the grout line. Screw a straight ledger board into the wall along this line. The first row of full tiles rests on the ledger. After the thinset cures, remove the ledger, fill the screw holes with waterproofing, and cut the bottom row of tiles to fit.

Press each tile into the thinset with a slight twist. This collapses the ridges and embeds the tile fully. Insert spacers. The thinset will hold the tile in place, but gravity works against you on walls. Larger tiles stay put. Smaller tiles may slip. If a tile slides after you set it, the thinset is too wet. Add more powder to the next batch.

Check your work frequently. Level every third row. Plumb every other column. A tile that is 1/16 inch out of plumb on row three is 1/4 inch out of plumb by row ten. Correct drift while the thinset is still soft. A tile that is out of position after the thinset sets must be chiseled off, the thinset scraped, new thinset applied, and the tile reset. This is the penalty for not checking.

Making Cuts: The Part That Separates a Shower from a Backsplash

A kitchen backsplash has straight cuts at the ends and around outlets. A shower has all of those plus a large circular hole for the shower valve, a smaller hole for the showerhead pipe, cuts around a niche, and angled cuts at the ceiling if the ceiling is not level, which it is not. The wet saw handles straight and angled cuts. The angle grinder with a diamond blade handles curves and circles. For the shower valve opening, trace the valve’s plastic trim plate onto the tile with a pencil, cut inside the line with the grinder, and test-fit. The trim plate covers the cut edge by about half an inch, so the cut does not need to be perfect. It needs to be inside the trim plate’s coverage area.

Cut tiles one at a time as you reach the obstacle. Do not pre-cut all the tiles for the entire wall. The gap between the last full tile and the corner changes slightly from row to row. Measure each cut individually.

Grout, Caulk, and Seal

Wait 24 hours after setting the last tile. Remove all spacers. Mix grout and apply it with a rubber float, pressing it into the joints at a 45-degree angle. Wipe excess with the float at 90 degrees. After 15 to 20 minutes, when the grout has firmed up, wipe the tile surface with a damp sponge. Rinse the sponge every few passes. A sponge loaded with grout smears grout. A clean, damp sponge removes it.

Fill the corners where two walls meet and the joint between the tile and the shower pan with 100 percent silicone caulk, not grout. Grout in corners cracks because walls move. Caulk flexes. Color-match the caulk to the grout. The manufacturer of your grout sells matching caulk in the same colors.

After 72 hours, when the grout is fully cured, apply a penetrating grout sealer. The sealer soaks into the grout and prevents water absorption. It takes 10 minutes to apply with a foam brush. Repeat every 2 to 3 years.

Frequently Asked Questions

What is a ledger board and do I really need one?

A ledger board is a straight piece of wood screwed into the wall at the level line where your first full row of tile sits. The bottom row of tiles rests on it. It prevents the tiles from sliding down the wall while the thinset cures. You need one. Without a ledger, the first row of tiles will sag, the rows above will be wavy, and the shower will look like it was tiled during an earthquake. After the thinset cures, remove the board, fill the screw holes with waterproofing membrane, and cut the bottom row of tiles to fit.

How long does tiling a shower take for a first-timer?

Waterproofing takes 1 day including drying time. Tiling the walls takes 2 to 3 days working alone. Grouting takes half a day. Sealing takes 10 minutes plus 72 hours of waiting for the grout to cure. The total calendar time is about a week. The active working time is about 20 to 25 hours. The learning curve is steepest in the first hour of setting tile. By the third row, the rhythm clicks and the speed doubles.

Should I use paper-faced glass tile or ceramic tile for my first shower?

Ceramic or porcelain tile is far more forgiving than glass tile for a first shower project. Glass tile is translucent. The thinset ridges show through unless a special white thinset is used and the ridges are flattened with the flat side of the trowel. Glass tile also requires a different cutting technique and cracks more easily during installation. Start with ceramic or porcelain. Graduate to glass on the second shower.

The First Shower After the Last Tile

The grout is sealed. The caulk is cured. The showerhead has been reinstalled. The first shower in a shower you tiled yourself feels different from any other shower. The water hits the tile you set. The grout lines you filled are straight and uniform. The niche holds shampoo exactly where you planned it. The shower does not leak because the waterproofing behind the tile is continuous and unbroken. The work was methodical, not magical. Every step was learnable. The only thing you could not learn from a guide was the confidence to start, which you supplied by mixing the first batch of thinset and spreading it on the wall.


How to Remove Tile in a Shower: A Practical Homeowner Guide

The grout line in the corner of the shower has been cracked for at least a year. You caulked over it twice. Water got behind the tile anyway. Now the bottom row of wall tiles has a faint give when you press on them, and a tile near the soap dish popped off in your hand while you were cleaning. You are not retiling a shower because you want to. You are retiling because the alternative is the ceiling below the shower caving in, shares BHB Real Estate team.

Removing shower tile is noisy, dusty, and physically demanding. It is also the demolition phase of a shower renovation, which means what you find behind the tile determines the scope of the project. The tile removal itself follows a predictable sequence. Whether the wall behind it is still sound is the question that separates a weekend retile from a two-week gut renovation. This guide covers the removal process and the moment when you discover what you actually signed up for.

Before You Touch a Single Tile

Protect the Shower Pan or Tub

Falling tile shards will chip a fiberglass shower pan, scratch an acrylic tub, and crack a cast iron surface if a large piece lands corner-first. Cover the entire pan or tub with a heavy drop cloth, then lay a sheet of plywood or a piece of old carpet face-down on top. The plywood distributes the impact. The drop cloth catches the small shards that get past the wood. Tape the edges of the drop cloth to the walls so nothing slips underneath.

Cover the drain with duct tape. Tile chips and mortar dust will clog a drain faster than you think, and snaking a shower drain full of construction debris is a job you do not want to add to this project.

Contain the Dust

Hang plastic sheeting over the shower opening and any doorway to the bathroom. Tape it at the top and let it hang to the floor. Run a box fan in a window blowing outward to create negative pressure. The dust from removing wall tile is not as fine as concrete dust, but grout dust and mortar dust are both silica-based. Wear an N95 respirator, not a paper dust mask. Safety glasses are not optional. A shard of ceramic tile moving at hammer speed hits hard enough to blind.

According to wikiHow’s ceramic tile removal guide, co-authored by tile renovation specialist Art Fricke with over 10 years of bathroom and kitchen renovation experience, wearing thick work gloves, safety glasses, long sleeves, and long pants is the minimum safety requirement before striking any tile with a hammer.

Three Methods for Removing Shower Wall Tile

Method 1: By Hand with Chisel and Hammer

This is the slowest method and the most controlled. It preserves the substrate behind the tile if the substrate is still good, which is rarely the case in a shower with water damage. For a shower where only a few tiles need replacement and the wall behind them is solid, hand removal is the right call.

Start at the top of the wall and work down. Gravity is your assistant. If you start at the bottom, the tiles above lose support and come down unpredictably. Hold a cold chisel against the bottom edge of a tile at a 30 to 45-degree angle. Strike the chisel handle with a hammer. The tile will either pop free whole or break. If it breaks, reposition the chisel under the remaining piece and repeat. Work across the top row, then move down one row at a time.

Art Fricke recommends tapping from the center of the tile outward if the tile resists. Once a piece comes off, slide the chisel behind the remaining tile and tap sideways to shear it off the mortar. The tile-to-mortar bond is strong in compression but weak in shear. Sideways force breaks the bond without transferring as much impact to the substrate.

Method 2: Electric Hammer Chisel

For a full shower wall removal, rent an electric hammer chisel. It is a handheld demolition tool, similar to a small jackhammer, with a wide flat blade designed specifically for tile removal. Rental costs $50 to $60 per day. For a standard shower with three tiled walls, the hammer chisel turns a two-day hand-chiseling project into a two-hour job.

Hold the tool with both hands. Set the blade against the bottom edge of a tile at a shallow angle. Pull the trigger and let the tool do the work. Do not force it. The hammer action breaks the mortar bond through vibration. Pushing hard just dulls the blade and tires your arms. Work top to bottom, same as hand removal. Clear broken tiles off the floor frequently. A pile of ceramic shards underfoot is a slip hazard.

The hammer chisel will destroy the substrate behind the tile. This is usually the point. If you are removing all the tile, you are almost certainly replacing the cement board or drywall behind it. The hammer chisel removes both the tile and the damaged substrate in one pass, saving you the separate step of prying off backer board.

Method 3: Single Tile Replacement

If only one tile is cracked and the rest of the wall is sound, removing a single tile without damaging its neighbors requires a different approach. Cut out the grout surrounding the tile with a grout saw or an oscillating multi-tool with a grout-removal blade. Remove all grout down to the substrate. A tile surrounded by intact grout is mechanically locked in place even if the mortar bond has failed.

Once the grout is cleared, drill several holes through the tile with a carbide-tipped masonry bit. This relieves the internal stress in the tile so it can be removed in pieces rather than prying against neighbors. Tap the center of the tile with a hammer to crack it, then use a cold chisel to pry the pieces out from the center toward the edges. Scrape the old mortar off the substrate with a chisel until the surface is smooth enough for a replacement tile.

What You Will Find Behind the Tile

This is the part of shower tile removal that separates a straightforward retile from a full gut renovation. In order of best to worst:

Cement Board in Good Condition (Best Case)

The mortar comes off cleanly with some chisel work. The cement board is firm, with no soft spots, no discoloration, and no crumbling edges. The waterproofing behind it, either a plastic sheet or a surface-applied membrane, appears intact. You can scrape the remaining mortar, patch any gouges with thinset, and retile directly over the existing cement board. This happens in roughly one out of ten shower demolitions.

Wet Cement Board (Salvageable)

The cement board is intact but damp in the bottom 12 inches around the shower pan, and there is a faint musty smell. The board has been absorbing water through cracked grout for months. If the board is not crumbling or delaminating, it can be dried out with a fan for 48 hours and reused after the old mortar is scraped. But the waterproofing has been compromised. You must apply a liquid waterproofing membrane over the entire surface before retiling, because the original waterproofing layer was breached by the water that got in.

Drywall Behind Tile (Bad)

In homes built before the 1990s, and in many builder-grade homes built after, shower walls are sometimes tile directly over green board or even standard drywall. This was code-compliant at the time. It is not acceptable by modern standards. If you find drywall behind shower tile, and the drywall shows any sign of moisture damage, which it will, it all comes out. Drywall wicks water. The damage extends well beyond the visible soft spots. Remove all drywall from the shower area, replace it with cement board or a foam backer board, and apply a waterproofing system. This is not optional. Tiling over water-damaged drywall is how you end up redoing the shower again in three years.

Rotten Studs (Worst Case)

Water that got past the tile and the substrate has been soaking the wood framing for years. The studs are dark, soft, and you can push a screwdriver into them with thumb pressure. This is a structural repair, not a tile project. The rotten sections must be cut out and replaced with new lumber, sistered to the existing framing. The shower pan may also have been affected. At this point, the project has escalated from tile removal to a full shower rebuild. Call a contractor if you are not comfortable with framing and structural repair.

After the Tile Is Out: What Comes Next

With the tile removed, scrape all remaining mortar off the substrate with a chisel or a floor scraper. The surface must be smooth and flat for the next layer of tile. Any ridge of old mortar will cause the new tile to sit proud of its neighbors.

Vacuum every surface. Tile dust and mortar dust are alkaline and interfere with thinset adhesion. Wipe the walls with a damp sponge and let them dry completely before applying any waterproofing or setting new tile.

Inspect the shower valve, the shower head supply pipe, and any plumbing in the wall. You now have access that will not come again without another demolition. If the shower valve is original to the house and the house is more than 20 years old, replace it now. The valve costs $60 to $150. Replacing it after the new tile is installed costs ten times that in labor and tile repair.

What Shower Tile Removal Costs and How Long It Takes

Method Tools Cost Time (3 walls)
Hand chisel + hammer $15-30 (chisel set) 1-2 days
Electric hammer chisel (rental) $50-60/day 2-3 hours
Single tile replacement $10-20 (grout saw) 30-60 minutes
Professional demolition + disposal $300-600 4-6 hours

Disposal is the hidden cost. A full shower tile removal produces 100 to 200 pounds of broken tile and mortar. Most municipal trash services will not take construction debris. Rent a dumpster bag ($30 at home improvement stores, plus a collection fee of $100 to $150) or haul it to the landfill yourself. Tile debris is sharp. Double-bag it in contractor-grade trash bags.

Frequently Asked Questions

Can I just tile over the existing shower tile instead of removing it?

Technically yes, but in a shower, doing so introduces multiple failure points. The new tile bonds only as well as the old tile’s bond to the substrate. Any water that gets past the new grout, and grout is not waterproof, is trapped between two impermeable layers with no drainage path. The wall assembly cannot dry. The result is accelerated failure of the substrate and mold growth in the wall cavity. Tile-over-tile is acceptable on a dry floor or a backsplash. It is a bad idea in a wet area like a shower. Remove the old tile.

What if the shower was built before 1980 and might have asbestos in the drywall or mortar?

Shower wall assemblies built before the 1980s may contain asbestos in the drywall compound, the tile adhesive, or the grout. If your house was built before 1980 and you are removing shower tile, have a sample of the material tested before beginning demolition. Testing costs $25 to $50 at a local lab. If asbestos is present, hire a licensed abatement contractor. The cost is higher, but disturbing asbestos without containment spreads fibers through the house. Mesothelioma has no cure.

Can I leave the old cement board and just retile over it?

If the cement board is dry, firm, and the waterproofing layer behind or on it is intact, yes. Scrape the mortar smooth, patch any damage with thinset, and apply a liquid waterproofing membrane over the entire surface before setting new tile. The old waterproofing has screw holes, scrapes from chisel work, and years of thermal cycling. The new membrane ensures a continuous waterproof barrier. If any section of the cement board is soft or crumbling, that section comes out and is replaced.

How do I remove a built-in soap dish or corner shelf without damaging the surrounding tile?

Built-in soap dishes and corner shelves are set into the wall with mortar and often have a rim that overlaps the surrounding tile. Cut the grout around the perimeter with a grout saw or oscillating tool. Tap the center of the soap dish with a hammer to crack it. Pry the pieces out from the center with a chisel. Do not pry against the surrounding tiles. The rim of the soap dish sits on top of the tile. If you pry from the outside edge, you lever against the tile you are trying to save and will crack it. Work from the center outward until all pieces are free.

The Moment When You Know the Scope

Shower tile removal is the demolition that precedes the renovation. The work is satisfying in the way that breaking things with a hammer is always satisfying. The real decision comes when the tile is off and you are looking at the wall behind it. If it is cement board, dry, and the waterproofing held, you are in good shape. If it is drywall, wet, or rotten, the project just expanded. Accept it. The worst thing you can do at that moment is cover bad substrate with new tile and pretend the problem went away. It did not. It is just hidden behind tile that cost more than the first tile and will have to be removed again in a few years.


Why ground penetrating radar should be your first step before waterproofing

Water finds its way in. That’s the single truth every basement owner learns eventually. The question is whether you discover the path before you spend money on waterproofing or after.

Most waterproofing work happens blind. Contractors apply sealants, install drainage systems, and mount sump pumps without knowing what’s happening inside the concrete or beneath the slab. When that waterproofing fails six months later, the cause isn’t usually the product. It’s the condition the product was laid over. A hidden void. A crack that runs deep but looks shallow from the surface. Saturated soil behind a wall that looked dry.

Ground penetrating radar (GPR) changes this dynamic. It gives you a non-destructive way to inspect concrete and subsurface conditions before any work begins. For anyone planning basement waterproofing or foundation repairs, a GPR scan turns guesswork into measurement.

Why you should scan before you waterproof

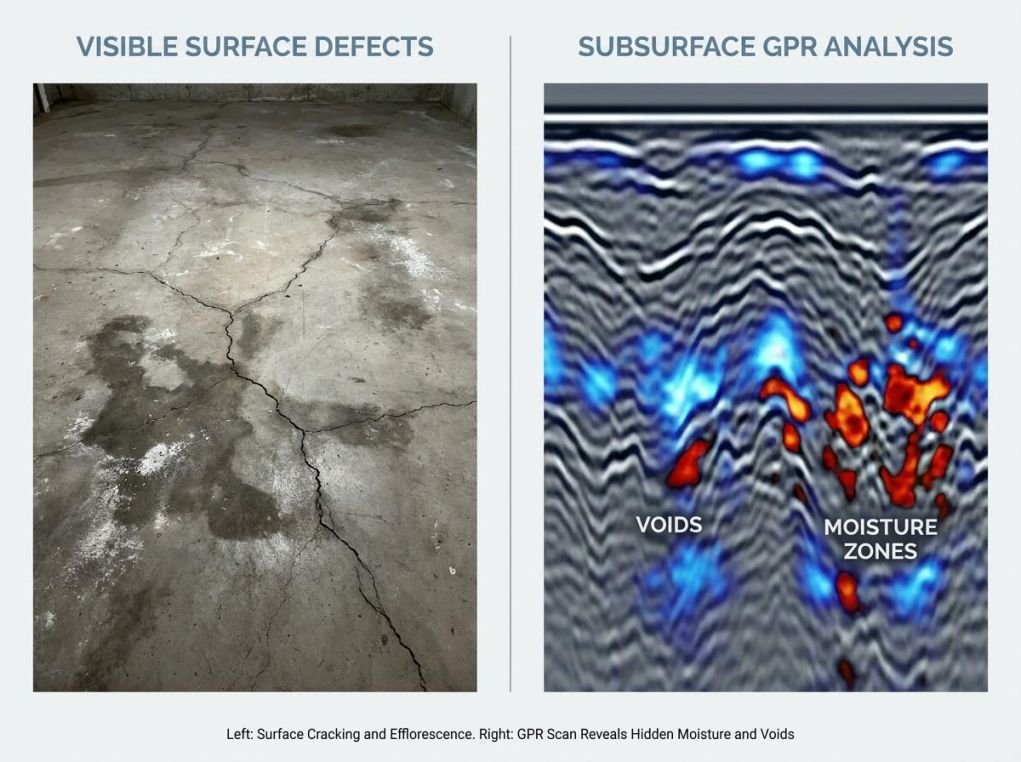
Ground-penetrating radar reveals what lies beneath your foundation before waterproofing begins. Voids, cracks, moisture zones, and embedded utilities all show up clearly in GPR scans.

Applying a waterproofing membrane over compromised concrete is like painting over rotten wood. It might look good for a week, but the failure underneath doesn’t go away. GPR is the only non-destructive method that gives you a full picture of subsurface conditions without coring or excavation.

Professional GPR services bring trained specialists and the latest-generation equipment to assess concrete slabs, foundations, and subsurface conditions with precision. They provide the data homeowners and contractors need before committing to waterproofing work. A 2025 study published in CivilEng found that structured image-based GPR interpretation achieves about 90% detection accuracy for voids, delamination, and corrosion in concrete slabs. That’s up from 70-80% with traditional manual interpretation.

The difference between guessing and knowing is the difference between one waterproofing job and two. Without a scan, you’re rolling dice on a five-figure investment.

What GPR can detect beneath your foundation

water-finds-its-way-in-thats-the-single-truth-ever-2

GPR detects moisture intrusion in concrete slabs by identifying dielectric contrast between dry concrete and water-saturated zones.

Ground penetrating radar sees through concrete and soil to identify several types of subsurface conditions that directly affect waterproofing success.

Subsurface voids and cavities are air pockets under slabs that can collapse under weight or channel water into your basement. Cracks and cold joints, internal fractures, and construction seams that aren’t visible from the surface act as highways for moisture over time. GPR differentiates between dry concrete and water-saturated zones, telling you exactly where a leak path starts.

The system also locates rebar, post-tension cables, and conduits embedded in concrete. That information is critical before you core, inject waterproofing materials, or cut into a slab. Hitting a live conduit or severing a post-tension cable turns a routine waterproofing job into an expensive repair.

North America holds the largest share of the global GPR market at 38.31%, according to a 2025 Fortune Business Insights report. The report values the global GPR market at USD 457.32 million in 2025 and projects it to reach USD 882.67 million by 2034 at a 7.58% CAGR. That growth reflects the construction industry’s increasing reliance on non-destructive testing for concrete evaluation.

For a broader overview of non-destructive testing techniques, the Inspectioneering Journal published a thorough review of NDT methods, including GPR, in early 2025.

How GPR saves money on waterproofing projects

Skipping the GPR scan to save a few hundred dollars is a false economy. Here’s why.

The biggest expense on any waterproofing job isn’t materials. It’s the discovery cost, finding what you didn’t know was there after the work is already underway. A void under the slab discovered after excavation means stopping work, reassessing the approach, and bringing in extra equipment. That kills timelines and inflates budgets.

GPR eliminates the guesswork. It pinpoints exactly where crack injection, void filling, or drainage work is needed. Instead of ripping up the entire slab to check, you target only the problem areas. The scan shows you where to focus and where you can leave well enough alone.

For homeowners comparing their interior and exterior foundation waterproofing options, having GPR data beforehand makes the decision clearer. If the scan shows significant moisture intrusion on the interior side of the foundation, exterior excavation is worth the investment. If the concrete is sound, interior solutions may be enough.

Adding a GPR scan before any basement work also helps you plan your basement floor drainage and water protection options with the right strategy from the start. You’re not guessing where the water is coming from, and you’re not designing a drainage system around symptoms you don’t fully understand.

GPR standards and best practices

Not all GPR scans deliver the same quality. Results depend on equipment quality, operator experience, and adherence to industry standards.

The American Concrete Institute’s ACI 228.2R and ASTM D6432 provide the framework for using GPR in concrete evaluation. These standards cover void detection, rebar location, member thickness measurement, and moisture assessment. A professional scan follows these protocols and includes grid-pattern data collection, depth calibration, and real-time interpretation by a trained technician.

When should you scan? Before any waterproofing work starts. Before coring into a slab for sump pump installation or drainage tie-ins. And before purchasing a property with known moisture issues. A pre-purchase GPR scan puts you in a stronger position: either the seller fixes what you find, or you adjust your offer accordingly.

Recent advances in GPR technology are making scans faster and more accurate. A 2025 study in Scientific Reports demonstrated that AI-enhanced GPR systems can detect defects in concrete structures in real time using attention-based deep learning. The technology, tested on UAV-mounted scanning systems, achieved high mean average precision for autonomous structural inspection.

The broader market supports this direction. Research and Markets projects the GPR for concrete market to grow steadily through 2030, driven by aging infrastructure inspection needs and expanding non-destructive testing requirements across residential and commercial sectors.

If you’re planning basement waterproofing solutions, a GPR scan should be on your checklist before you call the excavation crew. It’s a small investment that prevents big mistakes.

Conclusion

What you can’t see can still hurt your home. Ground penetrating radar makes the invisible visible, giving homeowners and contractors the data they need to make smart waterproofing decisions from day one.

Skipping the diagnostic step doesn’t save money. It just defers the cost. And deferred costs on foundation work have a way of adding up. A GPR scan before waterproofing isn’t an extra expense. It’s the most cost-effective decision you can make on any basement or foundation project.

Patch Lining vs Full Drain Replacement: Choosing the Right Repair

Got a cracked or damaged drain and not sure what to do next?

You are not alone. Thousands of homeowners across the UK have this problem every year and pay a lot more than necessary… simply because they choose the incorrect repair solution.

When something goes wrong underground, there are really only two paths forward:

  • Patch lining (the no-dig fix)
  • Full drain replacement (the dig-it-up fix)

Choosing wisely could save you thousands of pounds, weeks of disruption and your driveway.

Here’s the breakdown:

  1. Why Drain Repairs Are So Common
  2. What Is Patch Lining?
  3. What Is Full Drain Replacement?
  4. Patch Lining vs Full Replacement: Side By Side
  5. How To Pick The Right Repair

Why Drain Repairs Are So Common

Blocked drains are more common than most people realise. Older homes are susceptible as clay pipes and pitch fibre were used widely throughout the UK for years.

Most drain damage comes down to a few main culprits:

  • Tree roots — they’re sneaky and seek out moisture in tiny cracks
  • Ground movement — shifting soil cracks pipe joints over time
  • Wipes and grease — the modern enemy of UK sewers
  • Age — pipes simply wear out and lose their structural strength

The point at the bottom there is more important than you might think. According to a report from Water UK, baby wipes constitute 93% of fatbergs and cost the nation £100 million per annum. Small habits from homeowners can become huge structural issues in the future.

Which is why quick-acting drainage services are so important. The quicker you notice the problem, the less expensive and easier it will be to resolve. Not to mention that locating reputable drainage companies near me is the first REAL step towards correcting the issue correctly… before it escalates.

Now… onto the repair options.

What Is Patch Lining?

Patch lining is the no-dig, no-mess way to repair a damaged drain.

How it works: The fibreglass sleeve soaked in resin is inserted into the pipe, pushed to the location of the leak or defect and pressed against the pipe wall. The patch is left to cure and when hardened it becomes a permanent fixture of the pipe wall.

Pretty neat, right?

Patch lining is great because it:

  • Doesn’t need any excavation at all
  • Can be completed in a few hours
  • Lasts for decades when installed properly
  • Costs way less than a full replacement

When Does Patch Lining Work?

Patch lining isn’t always the right call. It works best when:

  • Damage is small and isolated (cracks, small holes, displaced joints)
  • The pipe still holds its overall shape
  • There’s no major collapse
  • The drain has been cleared and surveyed first

When Patch Lining Won’t Work

Have a pipe completely collapsed? Patch lining is useless. The resin has to have an existing pipe to adhere to. If the pipe has collapsed… then you are digging.

What Is Full Drain Replacement?

Full drain replacement is the heavy duty solution. This involves excavating the affected section of drain and replacing it with a new one. New pipes (HDPE or uPVC) are much stronger than the old pitch fibre and clay pipes.

Replacement is messy. It’s expensive. But sometimes it’s the only choice.

Full replacement is needed when:

  • The drain has totally collapsed
  • Pitch fibre pipes have deformed badly
  • Multiple sections are damaged at once
  • The pipe has shifted out of place
  • Tree roots have caused widespread destruction

The bad news? Expense and upheaval. Repair costs vary from several hundred pounds for a small patch through to several thousand pounds for a full excavation. And if the damaged pipe runs under your driveway or patio… then it’s only going to get more expensive.

Patch Lining vs Full Replacement: Side By Side

Here’s how the two stack up at a glance.

Cost

  • Patch lining: typically a few hundred pounds per patch
  • Full replacement: often into the thousands, especially with excavation

Speed

  • Patch lining: done in a few hours
  • Full replacement: days, sometimes a couple of weeks

Disruption

  • Patch lining: zero. No digging at all
  • Full replacement: massive. Driveway up, garden dug

Longevity

  • Patch lining: 25+ years when installed correctly
  • Full replacement: 50+ years with modern materials

Suitability

  • Patch lining: small, isolated damage
  • Full replacement: collapsed or severely deformed pipes

Patch lining makes sense as the primary solution for most drainage services. It’s quicker, cheaper, and much less invasive. However, it won’t work if your pipe isn’t structurally sound enough for it.

How To Pick The Right Repair

So how do you know which method is right for your property?

Want to know the answer? It begins with a CCTV drain survey. Don’t accept any contractor quoting for drain repair work that has not first surveyed with a camera. When surveyed properly, you will see:

  • Exactly where the damage is located
  • How extensive the damage actually is
  • Whether the pipe still holds its shape
  • Whether tree roots are involved

Once you’ve got that data… the choice becomes obvious.

Don’t Forget About Insurance

Check your home insurance policy before self-insuring. If drain cover isn’t standard in your buildings insurance, most insurers offer it as an optional add-on for about £20 – £40 per year. Cheaper than having to fork out for bills that could easily run into four figures.

But here’s the thing…

Insurers will typically cover only sudden accidental damage, NOT wear and tear. Having your drains surveyed and repaired before problems escalate is one of the wisest investments a homeowner can make.

TOP TIP: Always ask for a CCTV run after repairs have been made. This way you can be sure they’ve fixed the issue before signing off on payment.

Pulling It All Together

Choosing between patch lining and full drain replacement doesn’t have to feel confusing.

To quickly recap:

  • Patch lining — fast, cheap, no digging, ideal for small isolated damage
  • Full replacement — expensive, disruptive, only needed for collapsed or severely damaged pipes
  • CCTV survey first — always. Don’t accept a quote without one
  • Check your insurance — drain cover add-ons are cheap protection

For the majority of homeowners patch lining will suffice. The key is taking action early. Leave it too long and a small crack becomes a collapse… now you’re replacing the whole thing.

Noticed sluggish drains, foul odours or wet areas around your home? Don’t ignore the problem. Get a survey. Get the correct repair. Save yourself a fortune in the process.

How Long Does It Take to Remodel a Small Bathroom? A Practical Homeowner Guide

A small bathroom remodel, defined as a 5-foot by 8-foot hall bath or a similarly sized space, takes 3 to 6 weeks for a full gut renovation done by a general contractor, highlights Vineyard Property Management experts. A cosmetic refresh that replaces the vanity, toilet, mirror, lighting, and paint without moving plumbing or opening walls takes 1 to 2 weeks. A DIY full gut remodel done on weekends and evenings by a homeowner takes 2 to 4 months.

The timeline is driven by the work that must happen in sequence. You cannot tile until the backer board is up. You cannot install the backer board until the plumbing rough-in is inspected. You cannot schedule the inspection until the rough-in is complete. The critical path runs through the plumbing, the inspection, and the tile. Here is what happens each week and what slows it down.

Timeline by Remodel Scope

Scope Contractor DIY What It Includes
Cosmetic refresh 1–2 weeks 2–4 weekends Paint, vanity, toilet, mirror, light fixture, faucet
Full gut, no layout changes 3–4 weeks 2–3 months Demo, new tub/shower, tile, floor, vanity, toilet, paint
Full gut, moving plumbing 4–6 weeks 3–4 months Above plus moving toilet, sink, or shower drain locations

Week-by-Week for a Full Gut Remodel by a Contractor

Week 1: Demolition and rough-in. The old bathroom is stripped to the studs and subfloor. The plumbing rough-in is completed: new shower valve, new tub or shower pan, any drain relocations. The electrical rough-in is completed: new wiring for lighting, the exhaust fan, and receptacles. The rough plumbing and electrical inspections are scheduled. The inspections are the gate that must be passed before the walls are closed. A failed inspection adds days to a week. Demolition and rough-in are the fastest part of the project and set the pace for everything that follows.

Week 2: Drywall, backer board, and waterproofing. The walls and ceiling are drywalled. The shower walls receive cement backer board and waterproofing. The drywall is taped and mudded. The first coat of mud dries overnight. The second and third coats each take a day with drying time in between. The waterproofing membrane on the shower walls requires 24 hours to cure before tile can be installed. This week has the most curing and drying time baked into it. The work itself takes 2 to 3 days. The drying time fills the rest of the week.

Week 3: Tile, floor, and paint. The shower wall tile is installed over 2 to 3 days. The thinset cures for 24 hours. The grout is applied and cures. The floor tile or vinyl flooring is installed. The walls and ceiling are primed and painted. The tile and paint can proceed in parallel because they are in different parts of the room. The shower tile must be complete before the shower door can be measured, which is a separate appointment.

Week 4: Fixtures, trim, and finish. The vanity and countertop are installed. The toilet is set. The mirror, lighting, towel bars, and accessories are mounted. The shower door is installed. The plumbing fixtures are connected and tested. The exhaust fan is installed and vented. The room is cleaned. The final inspection is scheduled if permits were pulled. The project is complete.

This 4-week timeline assumes a general contractor with a crew of 2 to 3 people working full days, all materials on site before the start date, and no inspection failures or change orders. In practice, 4 to 6 weeks is a more realistic range. The extra 1 to 2 weeks are absorbed by material delays, inspection scheduling, and the inevitable discovery of a problem inside the wall that was not visible before demolition.

Why DIY Takes So Much Longer

A contractor works on the bathroom every day, 8 hours a day, with a crew. A homeowner works on the bathroom on weekends and maybe one or two evenings a week, alone. The same number of labor hours spread over 15 to 20 working days for a contractor is spread over 20 to 30 partial days for a homeowner. The work is the same. The calendar is different.

DIY also has learning time baked in. A contractor has tiled 100 showers. A homeowner has watched 10 YouTube videos. The first row of tile takes an hour. The second row takes 30 minutes. By the tenth row, a row takes 15 minutes. The learning curve costs time on every task the first time it is performed. The second bathroom remodel is twice as fast as the first. Most people only remodel one bathroom.

DIY scheduling is constrained by material runs. A contractor arrives with a truck full of materials. A homeowner runs out of thinset on Sunday at 3 p.m. and the hardware store closes at 5 p.m. The project stops until the next available time to go to the store. A single missing tube of caulk can delay the project by a full day or an entire weekend.

The Critical Path: What Cannot Be Done in Parallel

Several steps in a bathroom remodel must happen in strict sequence. No amount of extra labor speeds them up. Plumbing and electrical rough-in must be complete before the inspection. The inspection must pass before the walls are closed. The backer board and waterproofing must be complete before the tile starts. The thinset must cure before grouting. The grout must cure before sealing. The shower door must be measured after the tile is complete. The door is then ordered and takes 1 to 3 weeks to arrive. The door is installed last. These dependencies create a chain that determines the minimum possible timeline. The fastest a full gut bathroom remodel can be completed by a crew working efficiently is approximately 3 weeks. The realistic minimum is 4 weeks.

What Causes Delays

Inspection scheduling and failures are the most common delay outside the contractor’s control. The inspector may be booked a week out. A failed inspection for a missed nail plate or an improperly supported valve requires correction and a reinspection, adding a week. Moving plumbing drains is the largest time adder within the remodel itself. A toilet drain that needs to move 6 inches requires opening the floor, cutting joists in some cases, running new drain pipe with proper slope, and connecting to the existing vent stack. Moving a drain adds 2 to 5 days to a contractor-led project.

Custom or special-order materials with long lead times delay the finish stage. A custom vanity or a special-order tile that was supposed to arrive in week 2 but arrives in week 5 delays the entire finish sequence. The vanity must be installed before the countertop can be templated. The countertop must be installed before the sink and faucet can be connected. Order all materials before demolition begins. Store them in the garage. The project should never wait on a material that could have been ordered earlier.

Discovery of water damage, mold, or structural problems during demolition is the most expensive delay. The contractor opens a wall and finds rotted studs, a leaking pipe that has been dripping for years, or mold behind the old shower. The repair work must be completed before the remodel can proceed. This is the reason for the contingency line in a remodel budget, typically 10 to 20 percent of the total cost. The wall is open. The problem is visible. Fixing it now is far cheaper than closing the wall and pretending it does not exist.

Frequently Asked Questions

Can I live in the house during a bathroom remodel?

Yes, for a single bathroom remodel, as long as there is a second bathroom in the house. The water to the house remains on except during the plumbing rough-in, when it may be off for a few hours. The bathroom being remodeled is a construction site. It is dusty, noisy during the day, and unusable. If the house has only one bathroom, the remodel must be planned around access to another bathroom. A one-bathroom house remodel is a different project with different logistics.

What is the absolute fastest way to remodel a bathroom?

A cosmetic refresh that replaces the vanity, toilet, mirror, light fixture, and paint without touching the tile, the flooring, or the plumbing. This can be completed in 3 to 5 days by a handyman or 2 weekends by a homeowner. The bones of the bathroom stay the same. The surfaces change. The speed comes from not opening walls, not moving plumbing, and not installing tile. A full gut remodel cannot be accelerated past the curing and drying times of drywall mud, thinset, and grout regardless of how many people are working.

Does replacing the tub with a shower speed up or slow down the remodel?

Neutral to slightly faster. Replacing a tub with a shower pan eliminates the tub installation and tiling the tub apron. The shower pan is set in mortar on day one and is ready for tile the next day. A tub installation requires setting the tub, connecting the drain from above if access is limited, and tiling the front apron. The difference is minor. The tile work on the shower walls is the same square footage as a tub surround.