Aqviz

How to Keep Your Plumbing Systems Running Smoothly

Plumbing emergencies never suddenly happen. You’ll either hear, smell, or see something that generally means a pipe is about to burst or the bathroom is about to be flooded. In Dubai homes, where water systems work hard year-round, these small signs can turn into bigger trouble faster than expected.

You can prevent future disruptions in your home with a few proactive steps. Knowing how to handle early warnings and reduce risk helps avoid those stressful last-minute calls for emergency plumbing services.

What Qualifies as a Plumbing Emergency?

A burst pipe is one of the clearest emergencies in any Dubai home. Water can spread quickly through floors, walls and neighbouring units, especially in apartments. Sewage backing up into toilets or drains is another situation that needs immediate attention because of hygiene risks and contamination. Losing water completely also falls into this category since it affects basic daily use.

Other plumbing emergencies can create hazardous situations down the line. Some examples are:

A water heater that suddenly stops functioning

A leak hidden behind a wall

A recurring overflowing toilet

Preventive Actions Homeowners Can Take

You can slow down or completely avoid a lot of plumbing issues with some simple habits.

Start with small checks around the house. Look under sinks every so often. A faint damp patch or discolouration can point to a slow leak that’s just starting out.

Use drain strainers to catch debris and reduce clogging. Slow-sinking drains are common plumbing issues that seem minor. But this small problem can escalate into a clogged drain. Over time, the seemingly harmless small amounts of cooking oil and bits of food that go into your kitchen drain build up in pipes. The buildup eventually tightens the space through which water flows.

Water pressure is worth paying attention to as well. If it suddenly feels stronger or weaker than usual, it might point to something deeper within the system.

Get your water heater checked. Regular maintenance ensures you can use it year-round without incident. Check the temperature to ensure optimal performance. You can also flush the tank once a year to prevent sediment buildup.

Know where the main shut-off valve is located. When you’re dealing with a burst pipe or clogged toilet, you need to stop water flow quickly instead of waiting for damage to spread.

Schedule an annual plumbing inspection. Some issues are best handled by professionals, and the most cost-effective way to do so is with an annual home maintenance contract in Dubai. An annual maintenance contract typically covers plumbing inspections, which include checking for hidden leaks, water pressure issues, faulty fixtures and clogged drains.

Common Causes of Plumbing Emergencies in Dubai Homes

Most plumbing failures build up over time.

Hard water is a big contributor in many homes. Minerals slowly accumulate inside pipes, narrowing the space through which water flows. That extra pressure doesn’t stay invisible for long—it eventually shows up as leaks or bursts.

Another frequent issue is pipe blockage. Grease, hair, soap residue and small debris settle inside drains. At first, it’s just slower drainage. Left unchecked, a minor blockage can cause overflow.

In older properties, older pipe systems can lead to major repairs or cause hazardous situations. Seals weaken, joints loosen and corrosion develops quietly. Even small weaknesses can turn into sudden failures when pressure shifts.

These conditions are common enough that many households eventually need emergency plumbing services if nothing is done early.

What to Do Before an Emergency Plumber Arrives

Sometimes, plumbing emergencies may still occur. It helps to know what to do before professional help arrives. Your quick thinking helps reduce the extent of the damage.

For starters, provide the plumber with a detailed description of the problem. Complete information helps your plumber arrive well prepared, which speeds up the repair process.

Shut off the main water supply. This stops more water from feeding the problem. It’s often the single most effective step in limiting spread.

If the leak is near electrical appliances or outlets, turn off the power in that area, only if it’s safe to do so. If necessary, turn off the electricity supply from the main switchboard.

Try to contain the water as much as possible using towels, buckets, or anything absorbent nearby. It won’t fix the issue, but it slows down the mess.

Avoid using sinks, toilets, or appliances connected to the affected area until help arrives. Even small usage can add pressure to an already stressed system.

Most plumbing emergencies start as minor problems. They grow from small signs that were easy to miss or easy to postpone. Paying attention to those early signals, adjusting a few daily habits, and maintaining a routine can reduce future disruption. And ultimately, save you from costly repairs.

For many homes in Dubai, pairing awareness with an annual home maintenance contract creates a more stable setup and fewer unexpected surprises.

How Long Does a Typical Shingle Roof Last? The Honest Answer by Shingle Type

A typical shingle roof — meaning an architectural asphalt shingle roof, which is what roughly 80% of homes in the United States have — lasts 22 to 28 years in practice, regardless of what the warranty says. The shingle manufacturers print “30-year” or “lifetime” on the wrapper, but those numbers assume perfect installation, perfect attic ventilation, a moderate climate, and a roof that is never walked on, never hit by a tree branch, and never subjected to a hailstorm. In the real world, the roof reaches year 22 and the south-facing slope is showing its age. By year 28, the homeowner is getting quotes for a replacement.

A three-tab shingle roof — the older, flatter style with the three rectangular cutouts — lasts 15 to 20 years. These are the shingles on houses built before roughly 2005, and if your roof still has them and they are original, the roof is past its design life and should be replaced before it leaks. Three-tab shingles are still sold, but they are rarely installed on new roofs because architectural shingles cost only $1 to $2 more per square foot and last 5 to 10 years longer. The economics of three-tab shingles do not work for anyone who plans to own the house longer than a decade.

Asphalt Shingle Lifespan by Type


Shingle Type Marketing Lifespan Real-World Lifespan Installed Cost / sq ft Cost per Year


3-Tab 20-25 years 15-20 years $4-$5 $0.22-$0.30
Architectural (Dimensional) 30-year / Lifetime 22-28 years $5-$7 $0.20-$0.28
Designer / Luxury Lifetime / 50-year 30-40 years $8-$12 $0.23-$0.33

The gap between the marketing lifespan and the real-world lifespan is not a scam — it is the difference between laboratory conditions and the conditions on your roof. The ASTM testing that produces warranty ratings subjects shingles to controlled heat, UV, and moisture cycling. It does not account for the oak tree that drops branches on the north slope, the bathroom fan that vents into the attic instead of through the roof, the original installer who used three nails per shingle instead of four, or the 140°F attic that bakes the shingles from underneath every July afternoon. Every one of those real-world conditions shortens the roof’s life by a year or two. Cumulative, they shorten it by 5 to 8 years.

What Shortens the Life of a Typical Shingle Roof


Six factors separate a roof that lasts 28 years from one that fails at 18. None of them are the shingle brand. The shingle itself is a commodity product — a fiberglass mat coated in asphalt and covered in ceramic granules. The asphalt comes from the same refineries, and the granules come from the same quarries, regardless of whose name is on the wrapper. The installation, the ventilation, the climate, and the maintenance determine the lifespan.

  1. Attic ventilation. The single most overlooked factor — and the one that costs nothing to fix during a roof replacement. An attic that reaches 140°F in summer bakes the shingles from underneath. The asphalt softens, loses volatile oils faster, and the shingles curl and crack at the edges. A properly ventilated attic — ridge vent plus continuous soffit vents — stays within 10°F to 15°F of the outdoor temperature. That alone adds 5 to 8 years to the roof’s life. It also keeps the attic dry, preventing the roof deck from rotting from condensation.
  2. Installation quality. Shingles nailed too high (above the nail line), too low (through the seal strip), with too few nails (three instead of the code-required four or the wind-zone-required six), or over-driven (puncturing the mat) will fail years before the shingle material itself would. The installer is more important than the brand. A GAF Timberline shingle installed by a careless crew fails sooner than an off-brand shingle installed by a meticulous crew.
  3. Climate and sun exposure. The south-facing roof slope receives direct sun for the longest portion of the day and will show granule loss, curling, and cracking 5 to 7 years before the north-facing slope on the same roof. Homes in hot climates — Phoenix, Las Vegas, south Florida — get 18 to 22 years from an architectural roof that would last 25 to 28 years in a moderate climate. The sun, not the rain, is what kills asphalt shingles.
  4. Roof pitch. Steeper roofs last longer — the water runs off faster, the debris does not accumulate, and the shingles dry faster after rain. An architectural shingle on a 12:12 pitch in a moderate climate lasts 25 to 30 years. The same shingle on a 4:12 pitch in the same climate lasts 20 to 25 years. The low-slope roof holds water longer, holds debris longer, and the sun hits it at a more direct angle.
  5. Trees. Overhanging branches scrape the shingle surface in the wind, wearing through the granules in a linear pattern. Wet leaves that pile up in valleys and behind chimneys hold moisture against the shingles for weeks. Moss and algae colonies on shaded roof faces retain water and produce mild acids that attack the asphalt. Trimming branches and cleaning debris costs nothing and adds years.
  6. Walking on the roof. Every time someone walks on an asphalt shingle roof — the satellite dish installer, the chimney sweep, the homeowner hanging Christmas lights — they scuff granules off the shingle surface. Over 20 years, the accumulated foot traffic creates bald spots at the access points. The roof that has been walked on regularly will fail at those traffic paths first.


The “lifetime warranty” reality: A lifetime limited warranty on an architectural shingle covers manufacturing defects for as long as the original purchaser owns the home. It does not cover normal weathering, granule loss, curling, or cracking from age — which are the reasons shingle roofs are actually replaced. The warranty is prorated: after year 10, the manufacturer reimburses a declining percentage of the shingle cost only (not labor). By year 20, the warranty typically covers 20% to 30% of the shingle material cost, which is roughly $300 to $500 toward a $12,000 roof replacement. The warranty is a marketing document, not a lifespan promise.

How to Tell If a Typical Shingle Roof Needs Replacement


A shingle roof does not fail on a single Tuesday afternoon. It sends signals for years — signals that are visible from the ground or from a ladder at the eave. Recognizing those signals tells you how many years are left and whether you need to budget for replacement now or can wait.

  • Curling shingle edges: Year 18 to 22. The shingle tabs curl upward, away from the deck. Curling means the asphalt has lost its flexibility. A curled shingle catches wind and will tear off in the next storm.
  • Bald spots: Year 20 to 25. The granules are gone, the black asphalt coating is exposed, and UV radiation is attacking the underlying mat directly. A few bald spots are normal on an older roof. Bald spots across more than 25% of a roof face mean replacement.
  • Granules in the gutters: Year 15 onward, accelerating. Every asphalt roof sheds granules. Heavy accumulation — enough to form a layer of grit in the gutter — on a roof over 15 years old means the shingles are eroding rapidly.
  • Cracked shingles: Year 22 to 28. A shingle cracked through the mat is no longer waterproof. A few cracked shingles can be replaced. Cracked shingles across multiple faces mean the roof is failing systematically.
  • Missing shingles after routine wind: Any age, but more common after year 15. Shingles that blow off during a 30 mph gust had already lost their seal adhesion. The wind exposed a pre-existing condition.

Does Installing a Second Layer Affect Lifespan?


Installing a second layer of shingles over an existing layer — an overlay — reduces the new roof’s lifespan by 10% to 20%. The shingles cannot lie as flat over an uneven surface, the trapped heat between the two layers accelerates asphalt degradation, and the weight of the additional layer stresses the roof structure. A 30-year architectural shingle installed as an overlay will last 24 to 27 years instead of 27 to 30.

Building codes limit roofs to two layers of shingles. If your current roof is already a second layer, the next replacement requires a full tear-off — both layers come off down to the deck. The tear-off cost for two layers is roughly double the cost for one layer. The $2,000 to $4,000 saved by skipping the tear-off today becomes a $4,000 to $8,000 tear-off cost on the next replacement.

FAQ: Common Questions About Shingle Roof Lifespan


Do more expensive shingle brands last longer?

Not in a way that is statistically significant. A GAF Timberline HDZ, an Owens Corning Duration, and a CertainTeed Landmark are functionally identical products — laminated fiberglass-asphalt architectural shingles — manufactured to the same ASTM D3462 standard. The difference in lifespan between the three brands on the same house with the same installer is negligible. The price difference reflects marketing, distribution, and the warranty terms, not a measurable difference in product longevity.

Can I improve my attic ventilation now to get more years out of my existing roof?

Adding ventilation to an existing roof will slow further degradation but will not reverse the damage that has already been done. A 15-year-old roof that has been baking in a poorly ventilated attic has already lost a significant portion of its asphalt’s volatile oils to heat exposure. Adding a ridge vent and soffit vents now will extend the remaining life — perhaps by 2 to 4 years — but it will not restore the 5 to 8 years of life that were already lost. The ventilation upgrade is most effective when it is done during a roof replacement, so the new shingles start their life in a cool attic.

Budget for Replacement at Year 22, Not Year 30


The 30-year architectural shingle roof is a marketing concept. The 22- to 28-year roof is the reality on your house. If your roof is 20 years old and it was installed correctly over a well-ventilated attic, it has roughly 2 to 8 years left — less if the south-facing slope is showing its age, more if the house is shaded and the climate is mild.

Start budgeting for replacement at year 20. If the roof makes it to year 28, you have a pleasant surprise and a fully funded replacement account. If it fails at year 22 — which is what the real-world data says is typical — you are prepared instead of scrambling for financing while water drips through the ceiling.

How to Install High-Efficiency Furnace Venting: PVC Pipe Routing, Slopes, and Clearances

High-efficiency furnace venting is a PVC pipe system — one pipe to exhaust combustion gases outside and, in a sealed-combustion installation, a second pipe to bring outside air into the burner. The PVC venting replaces the metal flue or chimney that a conventional 80% furnace uses. The PVC is possible because condensing furnaces produce cool exhaust gases — roughly 100°F to 120°F — that PVC can handle without melting. The U.S. Department of Energy notes that “PVC pipe… is safely used in condensing furnaces” and that high-efficiency sealed-combustion units “produce an acidic exhaust gas that is not suitable for old, unlined chimneys, so the exhaust gas should either be vented through a new duct or the chimney should be lined” (energy.gov).

This is not a DIY installation guide. Installing or modifying a furnace vent system requires a licensed HVAC technician in most jurisdictions. The exhaust pipe carries carbon monoxide — the same gas that kills roughly 400 people per year in the United States from accidental poisoning. A vent pipe joint that is improperly glued, a slope that allows condensate to pool and freeze, a termination too close to a window — any of these creates a carbon monoxide risk inside the house. This article describes the correct installation method so that a homeowner can verify that a contractor’s installation meets code and manufacturer requirements. The homeowner’s role is inspection, not installation.

PVC Pipe Specifications: Schedule 40, Sized for the Furnace


The vent pipe must be solid-core Schedule 40 PVC or CPVC, not cellular-core PVC (the type used for drain-waste-vent plumbing inside walls). The pipe diameter is specified by the furnace manufacturer based on the furnace’s BTU input and the total equivalent length of the vent run. A typical residential condensing furnace with a 60,000 to 100,000 BTU input uses 2-inch or 3-inch PVC. The manufacturer’s installation manual provides a table that correlates pipe diameter to the maximum allowable vent length. Exceeding the maximum length — by adding elbows that increase the equivalent length, or by simply running the pipe too far — produces excessive backpressure that prevents the inducer fan from pushing combustion gases through the pipe.

Every 90-degree elbow adds the equivalent of 5 to 8 feet of straight pipe to the total equivalent length. A vent run with four elbows is effectively 20 to 32 feet longer than the same run with straight pipe. If the manufacturer’s table allows 50 feet of 2-inch PVC and the installer runs 40 feet of straight pipe with four elbows, the equivalent length is 60 to 72 feet — well past the allowable maximum. The pipe must be upsized to 3-inch PVC, which allows longer runs. The furnace’s inducer fan is sized for a specific maximum backpressure. If the vent pipe adds more pressure than the fan can overcome, the pressure switch will not close and the furnace will not run.

The Slope Requirement: 1/4 Inch Per Foot Back to the Furnace


This is the single most important venting detail and the one most commonly installed incorrectly. The exhaust pipe must slope back toward the furnace at a minimum of 1/4 inch per foot of horizontal run. The slope carries the acidic condensate that forms in the cool exhaust pipe back to the furnace, where it drains through the internal condensate trap into the household drain system. If the pipe slopes away from the furnace, or if it sags between supports, condensate pools in the low spot. The pool blocks the pipe. The inducer fan cannot push exhaust gases past the water, the pressure switch trips, and the furnace shuts down. In freezing weather, pooled condensate in a section of pipe that runs through an unconditioned attic or along an exterior wall can freeze, completely blocking the pipe.

The pipe must be supported every 4 feet on horizontal runs with pipe hangers or straps — not wire, which sags. Longer spans sag under their own weight and the weight of the condensate inside the pipe. The 1/4-inch-per-foot slope must be maintained across every horizontal section, verified with a bubble level. A section that looks “close enough” to the eye is often not close enough, and the first winter freeze-thaw cycle reveals the sag by shutting down the furnace.

Termination Clearances: Where the Pipes Exit the House


The exhaust and intake pipes must terminate at specific distances from building openings, property lines, and other mechanical equipment. The clearances are not guidelines — they are code requirements designed to prevent exhaust gases from re-entering the house through a window, a door, or a neighboring air intake. The following clearances are the minimums from the International Mechanical Code (IMC) and the National Fuel Gas Code (NFPA 54). The furnace manufacturer’s instructions may require greater clearances, and the manufacturer’s requirement overrides the code minimum.


Termination Clearance From Minimum Distance
Operable window or door 12 inches (4 feet below or to the side)
Forced-air intake (attic, crawlspace, combustion air) 3 feet above, 10 feet horizontally (exhaust only)
Gas meter, electric meter, or service regulator 3 feet (exhaust only)
Property line or public walkway 3 feet (exhaust only, varies by local code)
Grade or anticipated snow line 12 inches above grade, above anticipated snow

The exhaust and intake pipes must terminate in the same pressure zone — on the same wall, at the same height, within roughly 12 inches of each other — so that wind pressure affects both pipes equally. If the exhaust terminates on the north wall and the intake terminates on the south wall, wind can pressurize the intake and create a pressure differential across the furnace that trips the pressure switch or, in extreme cases, reverses the flow of combustion gases into the house. The two pipes should be on the same exterior surface, terminating within a foot of each other, with the exhaust pipe angled slightly downward (1/4 inch per foot away from the house, opposite the interior slope) to shed rain and condensate.


The concentric vent kit — one penetration instead of two: A concentric vent kit combines the exhaust and intake pipes into a single exterior penetration. The exhaust pipe runs through the center of a larger outer pipe, and the outer pipe serves as the combustion air intake. The concentric kit requires only one hole through the wall and guarantees that both pipes are in the same pressure zone. It costs $100 to $200 and is the preferred termination method for most residential installations.

Two-Pipe vs. One-Pipe System: Sealed Combustion vs. Room Air


A two-pipe system brings outside air directly into the sealed burner compartment through a dedicated PVC intake pipe. The DOE recommends sealed combustion because it “will bring outside air directly into the burner and exhaust flue gases directly to the outside, without the need for a draft hood or damper” and because “sealed-combustion units avoid [the] problem [of back-drafting] and also pose no risk of introducing dangerous combustion gases into your house” (energy.gov). A two-pipe system is the superior installation and is required by code in some jurisdictions for new construction.

A one-pipe system uses only a PVC exhaust pipe. The burner draws combustion air from the room the furnace sits in — typically the basement, utility closet, or attic. This is acceptable in most retrofit installations where running a second PVC pipe to the outside is not practical, but it has two disadvantages. First, the furnace burns conditioned air that the homeowner already paid to heat or cool, as the DOE notes: “furnaces and boilers that are not sealed-combustion units draw heated air into the unit for combustion and then send that air up the chimney, wasting the energy that was used to heat the air.” Second, if the room where the furnace sits is depressurized by a clothes dryer, range hood, or bathroom exhaust fan, combustion gases can back-draft into the room. A two-pipe system is immune to back-drafting because the burner is sealed from the room air.

The Four Most Common High-Efficiency Vent Installation Mistakes


  1. Slope the wrong direction. The exhaust pipe slopes away from the furnace instead of toward it. Condensate pools in the pipe, freezes in winter, blocks the pipe, and shuts down the furnace. This is the single most common installation error.
  2. Too many elbows, pipe not upsized. The installer does not count the equivalent length of elbows and runs 2-inch pipe at an equivalent length exceeding the manufacturer’s maximum. The furnace won’t run or short-cycles on the pressure switch.
  3. Intake and exhaust in different pressure zones. The exhaust terminates on the roof, the intake terminates on the side wall. Wind pressure differentials trip the pressure switch. The pipes must terminate on the same wall, at the same height.
  4. Exhaust termination too close to a window, door, or air intake. A 12-inch clearance that looks fine in summer becomes a 6-inch clearance after the window trim is replaced. Exhaust gas — carbon monoxide — enters the house through the window. This is a lethal mistake.

FAQ: Common Questions About High-Efficiency Furnace Venting


Can I vent a high-efficiency furnace through the attic to a roof termination?

Yes, provided the pipe running through the unconditioned attic is insulated with closed-cell pipe insulation to prevent the condensate inside the pipe from freezing in winter. The exhaust gas inside the PVC pipe is 100°F to 120°F, but when the furnace cycles off, the pipe cools to the attic temperature. If the attic temperature is below freezing, the residual condensate in the pipe freezes and blocks it. Closed-cell insulation — typically 1/2-inch to 1-inch thick, rated for exterior use — prevents freezing during furnace off-cycles.

Can I vent a high-efficiency furnace through an existing chimney?

Yes, using the chimney as a chase — a passageway for the PVC pipes. The PVC exhaust and intake pipes run inside the old chimney, which serves only as a structural enclosure. This is common when converting from an old natural-draft furnace that used the chimney for exhaust. The chimney must be properly sized for the PVC pipes, and the PVC must run continuously from the furnace to the termination at the chimney top — it cannot stop short of the top and rely on the chimney to carry the gases the rest of the way. The DOE specifically warns that “high-efficiency sealed-combustion units generally produce an acidic exhaust gas that is not suitable for old, unlined chimneys” — meaning the exhaust cannot contact the old masonry flue tiles.

PVC, Slope, Clearance, Pressure Zone — Get All Four Right


High-efficiency furnace venting is a PVC pipe system that must slope back to the furnace at 1/4 inch per foot, terminate at code-required clearances from building openings, and maintain the intake and exhaust pipes in the same pressure zone. A two-pipe sealed-combustion system is the superior design, and a concentric vent kit produces a cleaner exterior appearance with a single wall penetration.

This is not a DIY project. The penalty for a glued joint that leaks is carbon monoxide in the house. The penalty for a slope that sags is a furnace that shuts down on the coldest night of the year. Hire a licensed HVAC contractor for the installation. Use this article to verify that the contractor does it right.

Home Improvement Ideas When You Have an Infant in the House

Bringing an infant home changes daily routines in your household completely. Parents quickly notice how every corner of the home matters more. Safety and convenience become top priorities in ways they never were before. Even simple tasks like cooking or cleaning feel more sensitive and planned.

As seen on Sage Journals, at-home safety surrounding infants is a huge concern for parents. Hence, researchers are constantly trying to come up with safety programs aimed at parents. The goal of these programs is to limit infant injuries inside the house.

Many families begin to rethink how their living space supports newborn care. Small improvements often create big differences in daily comfort and peace. A well-organized home helps reduce stress during unpredictable infant schedules.

This article explores a few simple ideas that improve safety, organization, and comfort for new families.

Creating a Safe Sleeping Environment for the Baby

One of the most important upgrades involves creating a safer sleeping environment for your infant at home. According to Stanford Children’s Health, newborns need 16 to 17 hours of daily sleep during their first few months. Babies from 4 to 12 months require 12 to 16 hours of daily rest. Apart from proper sleep, infants also require a safe sleeping environment.

Parents should carefully choose a crib that meets modern safety standards and fits the available space. A firm mattress with a snug fit helps reduce unnecessary risks during sleep.

Keeping the crib free from pillows, toys, and loose fabrics is always recommended. Many families also use blackout curtains to support longer and more restful sleep cycles. Soft night lighting can make nighttime care easier without disturbing the baby too much.

Another helpful step is improving air circulation and temperature control in the nursery room. A stable room temperature helps babies sleep more comfortably throughout the night. Parents often use fans or air conditioners to maintain consistent airflow. Regular cleaning also reduces dust buildup that may affect breathing quality. A baby monitor adds extra reassurance when you are away from the room.

Also, as Gina Lowell, MD, MPH, notes, the responsibility of caring for an infant extends beyond parents and grandparents. It includes everyone, such as siblings, extended family, babysitters, and childcare providers. All of these individuals play crucial roles in ensuring that infants inside the house can rest and sleep in a calm and safe environment.

Dedicated Kitchen Cabinets for Formula Storage

Designing a dedicated kitchen storage area for infant formula can simplify your daily feeding routine significantly. Parents often benefit from assigning one cabinet solely for baby feeding supplies. This helps keep everything organized, clean, and easy to reach during busy moments.

Labeling shelves can further reduce confusion during night feeds. It also prevents mixing baby items with regular kitchen groceries. Over time, this system creates a smoother and more predictable feeding schedule for new parents managing infant care at home.

Speaking of formulas, parents should avoid buying products linked to serious safety concerns in infants. Concerns have been raised in necrotizing enterocolitis (NEC) toxic baby formula lawsuits involving infant nutrition products. This issue is part of the more widely known NEC baby formula lawsuit discussions.

Studies indicate that cow’s milk-based formulas, such as Enfamil, significantly increase the risk of NEC in premature infants. According to TorHoerman Law, manufacturers failed to adequately warn parents and medical providers of these life-threatening dangers.

These NEC cases show why careful product awareness matters when choosing infant feeding options. Staying informed helps parents make safer decisions for their baby’s health.

Baby Proofing High-Traffic Areas in Your Home

Baby proofing high-traffic areas in the home is essential once infants start moving around. Parents should focus on securing living rooms, hallways, and staircases carefully.

Safety gates help control access to dangerous zones. Covering electrical outlets prevents accidental contact with power sources. Furniture corners should be softened to avoid injuries during crawling or walking stages.

Keeping floors clear of clutter also reduces the risk of trips and falls. These adjustments make everyday movement safer for growing babies.

Creating a safer home also means thinking ahead about how quickly infants develop new mobility skills. Parents often underestimate how fast crawling and standing begin. Installing anchors for heavy furniture prevents tipping accidents during exploration phases.

Simple safety habits like closing doors and securing drawers add extra protection. Regular checks around the home help identify new hazards early. This ongoing attention ensures the environment stays safe as your baby grows and becomes more curious each day.

Setting Up a Comfortable Feeding and Bonding Area

Setting up a comfortable feeding and bonding space can make daily routines more enjoyable. Parents often benefit from choosing a quiet corner in the home for this purpose.

A supportive chair helps reduce strain during long feeding sessions. Soft cushions provide extra comfort for both parent and baby. Keeping feeding essentials nearby reduces unnecessary movement during feeding time. Good lighting ensures visibility during both day and night feeds. This small setup can greatly improve bonding moments.

Adding consistency in feeding spots helps babies recognize routine and feel more secure. Parents also find it easier to manage feeding schedules when everything stays in one place. A small table can hold bottles, wipes, and other essentials within reach. This reduces interruptions and keeps focus on the baby during feeding time.

Improving Indoor Air Quality for a Healthier Environment

As The Conversation reports, air pollution, including indoor exposure, reduces global life expectancy by increasing risks of serious health conditions. Household pollution consistently threatens well-being across all income levels worldwide. Global action is required to reduce these hazards and improve public health.

For parents with infants in the house, improving indoor air quality becomes very important. Babies are more sensitive to dust, smoke, and other airborne irritants. Using an air purifier can help keep the environment cleaner and healthier.

Regular vacuuming of carpets reduces allergen buildup over time. Avoiding strong chemical cleaners also helps maintain safer breathing conditions. Proper ventilation ensures fresh air continues circulating throughout the home. These steps create a healthier living space for infants.

FAQs

How do you protect infants from power outlets?

Protect infants from power outlets by installing safety covers and keeping furniture away from accessible electrical sockets indoors. Parents should regularly inspect damaged outlets, exposed wires, and loose plugs that could create dangerous situations nearby. Supervising crawling infants and using outlet protection devices greatly reduces the risk of electrical injuries at home.

Should you let your pets go near infants?

Pets can interact safely with infants when supervised carefully and introduced gradually in calm household environments consistently together. Parents should monitor behavior closely, maintain pet hygiene, and teach boundaries around sleeping or feeding areas properly. Never leave pets alone with infants because sudden reactions or accidental injuries can happen unexpectedly sometimes.

What to do when you are sick and have an infant in the house?

When sick with an infant at home, prioritize hygiene practices and limit close contact whenever possible during illness. Wash hands frequently, disinfect shared surfaces, and wear a mask if symptoms include coughing or sneezing regularly. Ask trusted family members for assistance so you can rest while ensuring proper infant care and safety.

In Numbers: Infant Sleep and Nutrition

Sleep needed by newborns during first few months 16 to 17 hours daily
Sleep needed by babies aged 4 to 12 months 12 to 16 hours daily
Increase in NEC risk linked to cow’s milk-based formulas like Enfamil Significantly increased risk
Age range of babies requiring 12–16 hours of sleep 4 to 12 months old

Rethinking your home after welcoming an infant is a natural and necessary process for parents. Every small adjustment can improve safety, comfort, and daily routines in meaningful ways.

From sleep spaces to feeding areas, each improvement supports smoother parenting experiences. Organization and cleanliness also reduce stress during busy days and nights. The goal is to create a home that feels calm and supportive for both baby and parents. Thoughtful planning makes everyday life easier during this important stage.

A well-prepared home does not need an expensive renovation to feel safer for infants. Simple and consistent improvements can make a lasting difference over time. Parents should focus on practical changes that support daily routines and comfort.

What is the Best Order to Clean a Property After a Structural Overhaul

Anyone who has walked through a house right after the builders leave knows the reality. It looks finished from the street, but inside, a layer of fine white plaster dust covers every single surface. Cleaning up after major structural work is completely different from a standard residential spring clean.

If you tackle the job in the wrong sequence, you will just push the dirt around, turn dust into mud, and end up doing the same work three times over. The handover phase requires a systematic approach.

The Initial Rough Clean and Debris Removal

Before anyone brings out a mop or a vacuum, the site needs to be cleared of large debris. Tradies are generally good at taking their primary tools and materials with them, but offcuts, loose screws, plastic wrapping, and random bits of timber almost always get left behind. You need to walk through the entire property with heavy duty garbage bags and a bucket. Pick up anything that could block a vacuum hose, puncture a bin bag, or scratch a new floorboard.

This physical clearing step is essential regardless of the scale of the project. Whether you are dealing with a minor rear extension or managing a complete knock down rebuild process, the first rule of site cleaning is to get the bulky hazards out of the way. Load up the skip bin before you even think about dealing with fine dust. Sorting out recycling from general waste at this point also saves headaches later.

Tackling the Airborne Dust Problem

Plaster dust is the absolute worst part of any structural renovation. It hangs in the air and settles for days. The biggest mistake people make here is introducing water too early in the process. If you wipe down dusty surfaces with a wet cloth, you just create a stubborn plaster mud that smears everywhere and hardens in the corners.

You need to dry clean first. Rent or buy a commercial vacuum with a proper HEPA filter. Standard domestic vacuums will simply blow the finest dust particles straight out the exhaust and back into the room. Go over the floors, window sills, and any flat surfaces to pick up the bulk of the loose particles. Open the windows to get some cross flow ventilation going. Don’t turn on ceiling fans or ducted air conditioning just yet. Running the HVAC system at this stage will suck plaster dust into your new filters and blow settled debris back into the air.

Washing Down the High Surfaces

Gravity dictates the sequence in a post construction clean. You always work from the ceiling down to the floor. Start with the light fittings, the tops of door frames, architraves, and ceiling fans. A microfibre cloth slightly dampened with warm water works best here to trap the dust rather than flicking it around.

Next, move to the walls. Freshly painted walls need a gentle touch. Use a flat mop with a dry clean microfibre pad to lightly sweep the walls from top to bottom. You’ll be surprised at how much fine dust clings to vertical surfaces, especially on textured paint finishes. Skirting boards catch a massive amount of debris too. Vacuum those thoroughly with a brush attachment before wiping them down with a damp cloth.

Dealing with Windows and Tracks

Windows take a heavy beating during structural work. They end up covered in mortar splashes, render dust, paint flecks, and silicone smudges. Don’t scrape dry glass with standard tools or you run a high risk of leaving permanent scratches on expensive new glazing. Use a professional glass scraper with a fresh, rust free blade for the stubborn bits, lubricating the glass with soapy water first.

Before you clean the actual glass panels, you must clean out the window tracks. People constantly step through sliding doors during the build, filling the tracks with mud, grit, and metal shavings. Suck it all out dry with the crevice tool on your vacuum. Then use a stiff nylon brush and a damp cloth to dig into the corners. Once the tracks are spotless, you can clean the glass without accidentally dragging dirty water back into the aluminium frames.

Cleaning Exterior Entertaining Spaces

Cleaning Exterior Entertaining Spaces

The mess is never contained just to the inside of the house. Bricklayers set up cutting stations on patios, and tilers often mix their materials out in the driveway. The outside areas require just as much attention before the property is truly ready to inhabit. Sweep away the heavy brick dust, sand, and metal shavings first.

When it comes to washing down outdoor surfaces, match your cleaning method to the material. Concrete paths and old brick pavers can usually handle a high pressure hose. However, if you have installed modern outdoor flooring, you need to exercise caution. Even the best composite decking available on the market demands a targeted and significantly gentler approach to cleaning. A soft bristle broom and warm soapy water are usually all you need to lift the grime without damaging the protective cap layer on the boards. Save the heavy duty pressure washer for the concrete driveway.

Wiping Down Joinery and Wet Areas

Kitchens and bathrooms demand a methodical, detail oriented approach. New cabinetry is normally delivered and installed with a protective plastic film over the doors and drawer fronts. Peel this film off only after the heavy dust in the surrounding room has been vacuumed up.

Wipe out every single drawer and cupboard internally. Construction dust finds its way inside closed doors very easily. Use a mild all purpose cleaner for stone benchtops and ceramic tiles. Grout haze is a very common issue in newly tiled bathrooms. If the floor or wall tiles look cloudy after a standard wipe down, you’ll likely need a specific grout haze remover chemical rather than a supermarket bathroom cleaner. Flush all the drains with plenty of water to ensure no plaster dust or tile glue was washed down the sinks during the final days of the build.

The Final Floor Polish and Handover

The floors are the absolute last thing you touch. By this stage, you have knocked all the remaining dust from the ceilings, walls, and benchtops onto the ground. Vacuum the entire property one final time, moving slowly to ensure you pick up grit that could scratch your flooring.

For hard floors like engineered timber or laminate, use a well wrung out mop. Too much standing water can warp new floorboards or damage the joints. For large format porcelain tiles, a steam mop often leaves the most streak free finish. If you have laid new carpet, a standard vacuum might not cut it for the handover. Booking a professional carpet steam clean is a smart investment to extract the deep construction dust that a standard vacuum leaves sitting at the base of the fibres.

Once the floors are done, lock the doors and let the remaining airborne dust settle overnight. You will probably find a few minor spots you missed the next day, but following this top to bottom sequence prevents you from doing the exact same job twice.

When Should You Hire Bathroom Renovation Specialists for Your Project?

A full bathroom renovation is a complex construction project that involves multiple technical stages: demolition, waterproofing, plumbing, electrical work, tiling, and installation. Because of this complexity, knowing when to hire bathroom renovation specialists can make a major difference to the quality, safety, and long-term durability of your finished space.

In Perth and across Western Australia, renovation standards are strict, and proper execution is essential to avoid structural issues, moisture damage, or compliance problems. Engaging experienced professionals at the right stage ensures your project runs smoothly from planning to completion.

When Your Project Involves a Full Bathroom Transformation

If your renovation goes beyond surface-level changes and involves a complete rebuild, it is essential to hire specialists from the beginning. Full bathroom renovations require detailed coordination between multiple trades and strict sequencing of construction stages.

Bathroom renovation specialists handle:

  • Complete demolition and site preparation
  • Structural layout planning
  • Plumbing and electrical redesign
  • Waterproofing to Australian standards
  • Full tiling and finishing work
  • Fixture installation and final detailing

Hiring experts early ensures the entire process is properly managed and reduces the risk of costly mistakes during construction.

Homeowners searching for bathroom renovation specialists often require end-to-end project execution rather than isolated trade services.

When You Need Layout Changes or Structural Adjustments

If your bathroom redesign involves moving key fixtures such as showers, toilets, or vanities, professional involvement becomes essential. These changes require plumbing modifications, drainage planning, and compliance with building codes.

Specialists can assess:

  • Feasibility of layout changes
  • Structural limitations
  • Plumbing rerouting requirements
  • Space optimisation opportunities

Attempting such changes without experienced guidance can result in inefficient layouts or compliance issues that are expensive to fix later.

When You Want Long-Term Durability and Compliance

Bathroom environments are exposed to constant moisture, making proper waterproofing and installation critical. Poor workmanship can lead to leaks, mould growth, and structural damage over time.

Hiring professionals ensures:

  • Correct waterproofing application
  • Use of compliant materials
  • Proper ventilation planning
  • Long-lasting construction quality

Experienced renovators follow Australian building standards, which is especially important for long-term durability and property value protection.

When Managing a Larger Home Improvement Project

If your bathroom renovation is part of a broader upgrade or renovation plan, professional coordination becomes even more important. Multiple areas of the home may be changing simultaneously, requiring structured project management.

In such cases, working with experienced teams helps ensure:

  • Coordinated scheduling across trades
  • Consistent design execution
  • Efficient material procurement
  • Reduced disruption during construction

This is especially relevant when working with the best home renovators for larger-scale property transformations.

When You Want a Stress-Free Renovation Process

Full bathroom renovations involve multiple moving parts, and managing them independently can become overwhelming for homeowners. From scheduling trades to ensuring compliance, the process requires technical knowledge and coordination.

Bathroom renovation specialists streamline the entire experience by:

  • Managing all trades and timelines
  • Providing clear project updates
  • Handling permits and compliance requirements
  • Ensuring quality control at every stage

This allows homeowners to focus on design decisions while professionals handle execution.

When You Want to Maximise Property Value

A well-executed bathroom renovation can significantly increase the value of a home. However, poor workmanship or design flaws can have the opposite effect.

Hiring specialists ensures:

  • Modern, functional design layouts
  • High-quality finishes
  • Market-appealing aesthetics
  • Durable, long-lasting construction

This makes professional involvement especially important for homeowners planning to sell or lease their property in the future.

Final Thoughts

Hiring bathroom renovation specialists is essential when your project involves structural changes, full renovations, compliance requirements, or long-term investment goals. Their expertise ensures that every stage of the renovation, from planning to completion, is executed with precision and professionalism.

By engaging experienced professionals at the right time, homeowners can achieve a high-quality bathroom that is functional, durable, and visually appealing, while avoiding common renovation risks and unnecessary stress.

What Are the Most Common Bathroom Leak Causes and How Do You Prevent Them?

Water will always find the easiest way out, and in a bathroom, there are plenty of escape routes. I have seen countless bathrooms where a tiny, ignored drip turned into a massive structural repair job. We are talking about ripping up floorboards, replacing rotted joists, and treating extensive mould.

Knowing what usually fails is half the battle when it comes to protecting your property. Let us look at the practical realities of bathroom plumbing and what actually goes wrong.

Waterproofing Membrane Failures

Waterproofing is supposed to be the invisible shield under your tiles. In Australia, the building standards for wet areas are strict, but older homes or rushed renovations often have compromised membranes. The tricky part is you rarely see the membrane failing until the damage is already done. You might notice lifting tiles, bubbling paint on the wall in the next room, or damp smells that just won’t go away.

Structural movement over time can crack the membrane. This is especially true in older timber-framed houses that shift with the seasons or soil moisture changes. Once that protective barrier is breached, water soaks straight into the subfloor every time someone takes a shower. The timber swells, and the problem accelerates.

The best prevention here requires attention during the build or renovation phase. Always ensure the waterproofing contractor provides a proper certificate of compliance. If you are buying an older place, getting a thermal moisture check during the building inspection is a highly recommended move. It takes the guesswork out of the purchase.

Degraded Silicone and Grout

Silicone sealant and grout are the first lines of defence in the wet areas of your bathroom. They take an absolute beating from hot water, soap, and harsh cleaning chemicals day in and day out. Over time, silicone shrinks, hardens, and peels away from the edges of the shower screen or the bathtub. Grout can crack or become porous, letting moisture seep directly behind the tiles.

Property managers and Real Estate Agents often flag worn silicone during routine rental inspections. They know exactly how quickly a simple seal failure can rot a skirting board or destroy adjacent carpet..Ignoring this area often results in expensive repairs and disagreements which is a common industry issue.

You can prevent these issues with basic visual checks.

  • Check the corners of your shower base regularly for gaps.
  • Look for black mould taking hold underneath the clear silicone.
  • Scrape out and replace degraded silicone every couple of years.
  • Re-grout areas where the old grout has worn down or washed away.

It takes an hour to strip and reseal a shower properly. That is significantly cheaper than replacing the waterlogged plasterboard behind it.

The Dreaded Flexi Hose

The Dreaded Flexi Hose

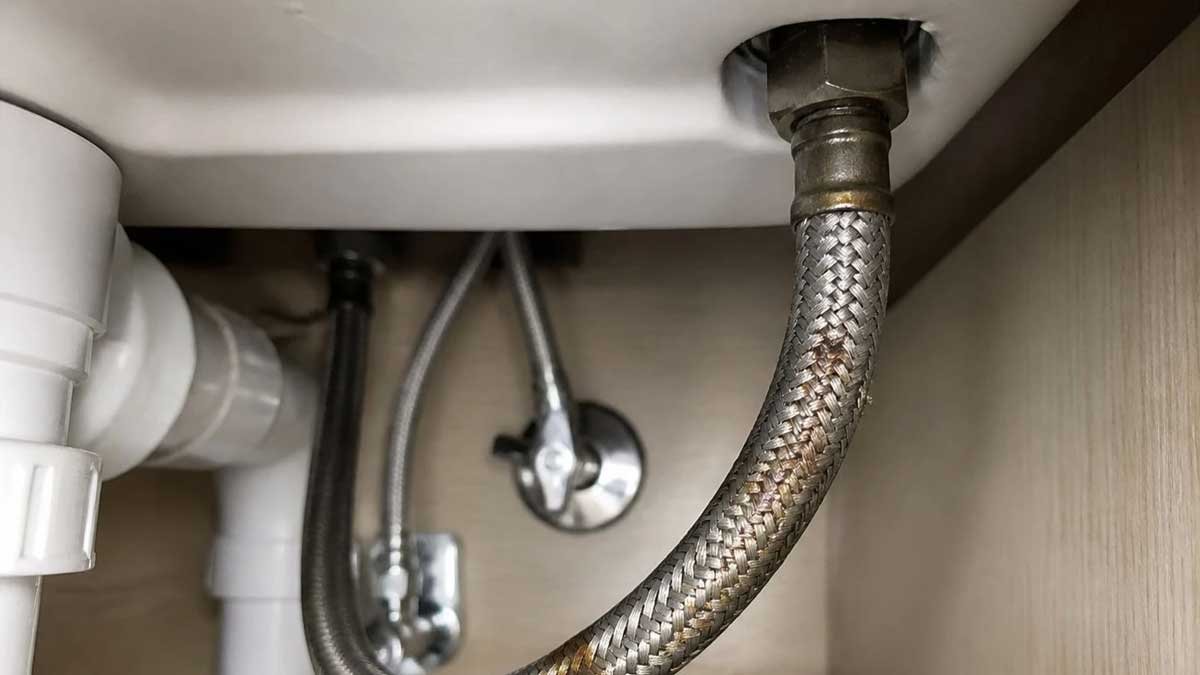
If you look underneath your bathroom vanity basin, you will probably see braided stainless steel hoses connecting the water supply to the tap. These are called flexi hoses. They are incredibly common because they are easy to install, but they are also a major cause of catastrophic indoor flooding. They have a strictly limited lifespan.

The inner rubber tube degrades over the years. Alternatively, the outer metal braiding rusts and snaps under pressure. When a flexi hose bursts, it does not just drip. It dumps mains pressure water straight into your bathroom until someone physically turns off the main valve at the property meter. This can destroy an entire house interior in a matter of hours if nobody is home.

To prevent this nightmare scenario, you need to inspect them visually every six months. Look for any signs of rust, fraying metal wires, or bulging on the braided casing. Most manufacturers recommend replacing them every five to ten years. If yours are getting on in age or look even slightly suspicious, swap them out immediately.

Dripping Taps and Leaking Spouts

A dripping tap seems harmless enough. It is easy to ignore or put off until the weekend. But a continuous drip wears down the brass seating inside the tap body. If you leave it too long, simply replacing the washer or the ceramic cartridge will not fix the issue anymore. The whole tap body might need to be removed and replaced.

Water constantly running down the drain also adds up on your quarterly water bill. More importantly, it creates a constant damp zone in the basin or bath that encourages mould growth and calcium buildup.

The prevention strategy is just prompt maintenance. Fix drips as soon as they start. If you are not confident isolating the water and dismantling the tapware yourself, call a professional. For those living in the southern suburbs, experienced plumbers bayside Melbourne can swap out worn cartridges and reseat taps quickly and correctly. Getting it sorted early saves water and protects the expensive tap hardware from permanent damage.

Blocked Floor Wastes and Drains

Hair, soap scum, and stray bits of shampoo packaging all wash down the shower grate. They eventually accumulate in the trap under the floor. When the floor waste blocks up, the water pools around your feet. If the puddle gets high enough, it can overflow the shower lip or bypass the puddle flange underneath the tiles.

This overflow pushes water into areas of the bathroom floor that might not be fully waterproofed. It is a common cause of mysterious ceiling stains in two-storey homes. The water finds a gap outside the designated shower zone and tracks down the pipes to the plaster below.

Prevention is as simple as cleaning out the grates regularly.

  • Pull the cover off the shower drain once a month.
  • Clear out the hair and gunk before it builds up into a solid mass.
  • Pour a kettle of boiling water down the drain to help dissolve soap fats.

Avoid relying heavily on harsh chemical drain cleaners. They can damage older PVC pipe glue joints if used excessively.

Leaking Toilet Connections

Leaking Toilet Connections

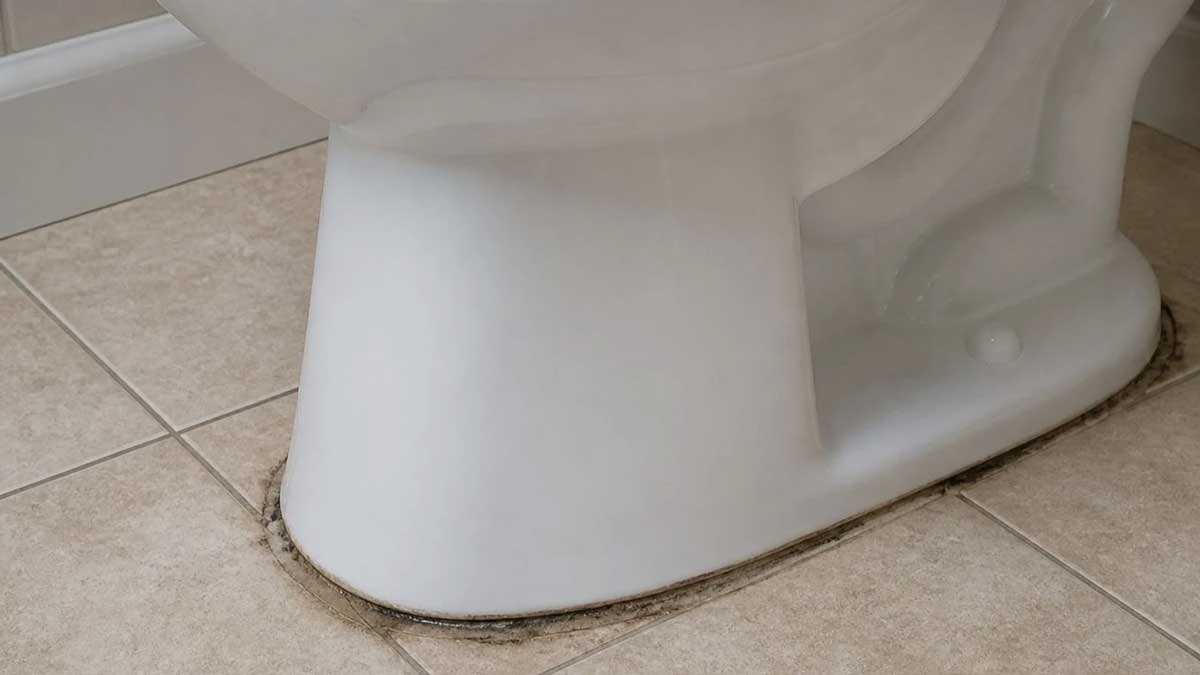
Toilets have several potential leak points that go unnoticed. The water inlet valve can leak slowly onto the floor. The rubber cone seal connecting the flush pipe to the pan can perish and crack. Or the pan collar at the base of the toilet might not be seated correctly onto the PVC drainage pipe.

A slow leak at the back of the toilet often escapes attention because it is hidden from view and happens in a dark corner. Check behind the toilet every few months. If the floor feels damp, or you notice discoloured water stains on the grout around the base, you have an active leak.

Don’t ignore a toilet that constantly runs into the bowl either. While it will not flood the floor, it wastes thousands of litres of water a year. It is a clear indicator that the internal cistern valves have failed and need replacing. Keep an eye on these components, and you will save yourself a lot of mess and money down the line.

Luxury Kitchen Design Ideas for Modern Homes

Luxury kitchens blend functionality with refined aesthetics, creating inviting spaces that support everyday living and special occasions alike. Modern design emphasizes simplicity, craftsmanship, and innovative materials that elevate the room’s overall character.

Balancing Form and Function

A successful luxury kitchen design merges beauty with practicality. Every surface, appliance, and fixture should serve a purpose while contributing to a cohesive style. Smooth cabinet lines, seamless countertops, and discreet storage solutions keep the space efficient and comfortable.

Professional guidance from experienced kitchen designers in Toronto can help homeowners achieve this balance. These specialists understand how to integrate layout, lighting, and finishes to create a space that reflects both taste and lifestyle.

Material Selections That Define Sophistication

Premium materials play a key role in shaping a luxurious atmosphere. Natural stone, high-quality wood, and brushed metals provide depth and texture. Choosing durable finishes ensures that elegance lasts through daily use.

  • Stone countertops, such as marble or quartz, add timeless appeal.
  • Custom cabinetry crafted from solid woods enhances warmth and dimension.
  • Metal accents in faucets or handles introduce subtle contrast.

Modern luxury often favors neutral palettes, allowing the natural beauty of materials to stand out. Soft whites, grays, and earthy tones create a calm and spacious feeling while reflecting natural light.

Lighting as a Design Feature

Layered lighting transforms a kitchen from purely functional to beautifully atmospheric. Task lighting under cabinets ensures practical workspace illumination, while pendant or recessed lights highlight architectural elements and textures.

For high-end appeal, consider statement fixtures that act as art pieces. A well-placed chandelier or sculptural pendant can become the focal point of the room, reinforcing the luxury aesthetic without overpowering it.

Smart Layouts and Seamless Storage

Modern homes benefit from open layouts that encourage social interaction. Islands with integrated seating bridge the gap between cooking and entertaining spaces. Ample storage keeps surfaces clutter-free, maintaining the minimalist appeal associated with luxury design.

Hidden drawers, built-in organizers, and tall pantry units make everyday use more convenient. These thoughtful features allow the kitchen to remain both functional and visually pleasing.

Cabinetry That Defines the Space

Cabinet design is central to the overall look. Clean lines and custom proportions create a polished appearance that feels tailored to the home’s architecture. Homeowners exploring options like kitchen cabinets in Barrie often find that bespoke cabinetry maximizes storage while maintaining a refined aesthetic.

Soft-close hinges, integrated lighting, and textured finishes elevate cabinetry from simple storage to a design statement. Quality craftsmanship ensures longevity and style consistency across the entire space.

Integrating Technology and Sustainability

Luxury kitchens today often incorporate advanced technology that enhances comfort and efficiency. Smart appliances, touchless faucets, and energy-saving lighting contribute to a modern lifestyle that values both convenience and environmental responsibility.

Eco-conscious materials and efficient layouts further reduce waste and energy consumption. By combining technology with sustainable choices, homeowners achieve a space that is both forward-thinking and timeless.

Creating a Space That Reflects Personal Style

Ultimately, a luxury kitchen should express individuality through thoughtful details. Whether it’s a custom backsplash, unique lighting composition, or statement island, each element contributes to the story of the home.

By focusing on quality, proportion, and harmony, homeowners can design kitchens that are elegant, efficient, and enduring. The result is a refined environment that enhances daily living while adding lasting value to the home.

Defending Residential Foundations from Environmental Moisture

The Strategic Importance of a Complete Waterproofing System

To keep the living space dry and structurally sound, a continuous, multi-layered defense strategy targeting vulnerable entry points throughout the building envelope is required. Most property owners concentrate their maintenance efforts on roofing systems and foundational drainage, often neglecting the crucial part that exterior openings play in moisture management. When heavy rain or rapid snow melt stress a house, the places where walls connect to structural openings are under high hydrostatic pressure and receive wind-driven water. Advanced, professionally integrated sealing strategies protect the interior framework from structural rot, costly moisture remediation projects, and offer peace of mind for years to come.

When it comes to the property audit for potential vulnerabilities, homeowners can select advanced, precision-engineered products to keep heavy precipitation completely outside the living environment by partnering with Canadian Choice Windows & Doors, Calgary windows and doors supplier. Take a look at modern-day external fixtures. They shouldn’t be using your regular caulking methods. Instead, they should be using integrated drainage tracks, heavy-duty weatherstripping configurations, and fusion-welded frame design. A good upgrade plan ensures any high-risk areas are equipped with materials that divert water away from structural components, preventing slow, hidden leaks from damaging interior drywall or compromising insulation performance.

Engineering Advanced Materials for Complete Moisture Protection

Today, much of exterior hardware manufacturing is focused on creating impenetrable barriers to withstand long-term exposure to driving rain and ponding water. Over time, moisture can soak into traditional wood or poorly insulated frames, causing the material to swell, paint to peel and eventually warp the structure and ruin the airtight seal of the opening. Modern multi-chamber vinyl and specialty composite frames, however, are 100 percent non-porous, so they will not absorb water at all and will maintain their precise shape regardless of what the humidity is. These engineered frames have sloped sills and hidden weep holes that safely drain external moisture outward to prevent pooling in heavy rains.

In addition, it is totally reliant on the accuracy of flashing and installation procedures in the field for total prevention of water infiltration. Elite installation practices dictate that the rough opening must be sealed with heavy-duty, self-adhering flashing membranes before the structural unit is anchored in place. The multi-layer barrier system prevents wind-driven rain from getting behind the exterior siding or brickwork, directing any moisture down to the building’s drainage mat. Ensuring it’s a perfect compression-sealed fit eliminates tiny micro-gaps that air currents use to push water deep into the wall cavities, protecting the home from mold development.

Improved Asset Protection & Structural Value

High-performance exterior upgrades are an excellent investment in a residential property that significantly increases its market value while developing a highly resilient defense system. Smart buyers prioritize homes with updated, low-maintenance structural components. This eliminates the immediate risk of hidden water damage and expensive structural repairs after moving in. Plus, by keeping moisture from building up inside, you’re maintaining a healthy balance of humidity within your home, protecting expensive hardwood flooring, custom cabinetry, and electronic systems from warping or premature failure.

When all is said and done, working with experienced local professionals to create a comprehensive home safety strategy allows homeowners to deal with environmental risks in a smooth and productive way. Using data to choose materials means that each new exterior installation will be perfectly suited to regional building codes and extreme weather challenges. Combine manufacturing standards with expert weatherproofing craftsmanship and you get a highly secure, beautifully insulated property that shrugs off the elements for decades.

How Calgary Homeowners Can Improve Energy Efficiency With New Windows

In a city where temperatures can shift quickly, older windows often struggle to keep indoor air stable. Drafts, condensation, and cold glass are common signs that a home is losing energy where it shouldn’t.

Why Windows Matter For Energy Efficiency

Windows affect how much heat leaves your home in winter and how much outdoor warmth enters during summer. When windows are old, damaged, or poorly sealed, your heating and cooling systems have to work harder.

That extra strain can lead to higher energy use and uneven room temperatures. You may notice one room feels chilly while another feels warm, even when the thermostat stays the same.

Common Signs Your Windows Are Wasting Energy

Not every window problem is obvious at first. Some issues show up slowly over time, especially in older homes in Calgary.

Watch for signs such as:

Cold air is coming through closed windows

Fog or moisture between glass panes

Difficulty opening or closing windows

Higher energy bills without a clear reason

Faded flooring or furniture near sunny windows

Ice buildup around frames in winter

If these problems keep returning, repairs may only offer a short-term fix.

How New Windows Help Keep Heat Inside

Modern windows are designed to slow heat transfer. Features like double or triple-pane glass, insulated frames, and low-emissivity coatings help reduce the amount of warm air that escapes.

For Calgary homeowners, this can make a noticeable difference during long heating seasons. Rooms may feel more comfortable, and the furnace may not need to cycle as often.

Homeowners who plan to replace windows in Calgary often look for options that match local weather conditions rather than choosing based on appearance alone.

Choosing Window Styles That Fit Your Home

Energy efficiency also depends on window style. Some designs seal more tightly than others when closed.

Casement and awning windows, for example, tend to close firmly against the frame. Sliding windows can still perform well, but they need quality weatherstripping and proper installation.

The best choice depends on the room, airflow needs, sunlight exposure, and the age of the home.

Installation Matters More Than Many People Realize

Even a high-quality window can underperform if it is not installed correctly. Small gaps around the frame can allow air and moisture to enter.

Professional installation helps ensure the window is level, sealed, insulated, and fitted to the opening. This is especially important in Calgary, where freeze-thaw cycles can affect building materials over time.

When searching for window replacement near me, homeowners should look for experience with local homes and climate conditions.

Other Ways To Improve Window Performance

New windows work best when paired with simple home habits. You can improve comfort by using curtains at night, opening blinds on sunny winter days, and checking caulking around frames.

It also helps to keep vents clear so warm air can circulate near windows. These small steps support the performance of your new windows and help your home feel more balanced year-round.