Aqviz

Garage Floor Coating: What Actually Decides If It Lasts

The slab decides whether a garage floor coating lasts, and it makes that call before anyone picks a product.

Most failures trace back to concrete that never passed a moisture test, or to a surface that was swept and wiped rather than ground open.

The resin is rarely the weak link.

Every garage floor coating on the market, from a one-part water-based paint to a sprayed polyaspartic build, can only grip what the slab hands it.

Testing a Garage Slab Before Any Coating Goes Down

Three tests are used on concrete before a garage floor coating goes on: the plastic sheet method (ASTM D4263), the calcium chloride test (ASTM F1869), and in-situ relative humidity probes (ASTM F2170). Only the last two produce a number a manufacturer will stand behind.

The plastic sheet method is the one a homeowner can run this weekend. Tape an 18 by 18 inch square of plastic to the slab, wait at least 24 hours, then lift a corner and check for darkening underneath.

What the Plastic Sheet Test Catches

Garon Products ships a version of this test inside its own garage coating kit instructions: a 4 by 4 foot sheet taped down and checked the next day.

If the concrete under the plastic is still dry, the slab is not showing the hydrostatic pressure that later breaks a bond.

Damp darkening is a stop sign.

The test earns its place because it costs nothing and takes a day, and it proves less than owners assume. It reads moisture only in the top layer of the slab, while the water that drives the failure lies lower, and it returns a yes or a no rather than a number.

Getting a Number Instead of a Yes or No

A calcium chloride test weighs a dish of desiccant before and after 24 hours under a sealed cover, and the weight gain converts to a moisture vapor emission rate. The in-situ method drills into the slab and reads a probe set at 40 percent of the concrete depth, where the moisture actually lives.

Tnemec, a coatings manufacturer that publishes its own testing guidance, puts the ceiling for conventional floor primers at 3 pounds of vapor per 1,000 square feet per 24 hours, or 75 to 80 percent relative humidity inside the slab. Primers built for wetter concrete handle up to 20 pounds and 99 percent RH.

Timing changes the reading.

Tnemec recommends running the building’s HVAC for at least 48 hours before the test, because a slab measured in a cold, closed garage in February reports a different figure than the same slab measured in July.

A slab above the limit needs a different product, a moisture-mitigating primer, or a membrane under the new surface.

Surface Profile: What CSP 3 to 5 Buys on a Garage Floor

Concrete surface profile grades how rough a slab is after preparation, on a scale running from CSP 1 to CSP 10. High-build garage floor coating systems are commonly specified in the CSP 3 to 5 band, and shot blasting can produce anything from CSP 2 to CSP 9.

The scale comes from ICRI Technical Guideline No. 310.2R, which grades profile by amplitude and ships physical chips so that a contractor and an inspector compare the same surface. CSP 1 and CSP 10 look nothing alike. CSP 2 and CSP 4 look identical without a chip beside them.

Epoxy and polyaspartic systems hold by mechanical grip, so the profile is the bond. Diamond grinding and shot blasting are the two methods that reliably reach the middle of the scale. Acid etching, the step printed on most boxed kits, opens the surface far less and leaves no profile to measure. An existing sealer, paint, or old coating comes off first anyway.

Nothing in this sequence works while a cured film still lies between the new coating and the concrete.

Prep work can be checked without instruments. Ground concrete feels like coarse sandpaper under a dry hand and looks uniformly lighter than a sealed surface. A slab that still feels slick has not been opened, and a coating sprayed onto it releases in sheets.

The Three Systems Most Garage Floors Actually Get

Boxed one-part epoxy paint, two-part epoxy at high solids, and a polyaspartic or polyurea topcoat cover nearly every residential garage.

  • One-part water-based epoxy paint. Sold by the gallon at hardware stores, it cures to a thin film and is the system most likely to lift under a hot tire. It fits a rental unit, a quick sale, or a floor nobody parks on.
  • Two-part epoxy at 100 percent solids or close to it. GARAGECOAT lists its kit at 93 percent solids and 30 pounds per unit, which builds film thickness in a single coat.
  • Polyaspartic and polyurea topcoats. A polyaspartic is a polyurea, not a polyurethane; it cures fast, resists ultraviolet yellowing, and normally serves as the clear layer over an epoxy base.

Material math separates the systems faster than a brochure does. Garon’s application sheet covers about 200 square feet per 1.5 gallon unit, so a 1,000 square foot garage takes roughly five units, or 7.5 gallons, for a single coat.

Color is a durability choice as much as a look.

A full flake broadcast hides joint lines, small spalls, and the first tire-path wear that a solid color shows immediately.

Coating It Yourself: What the Kit Leaves Out

A garage floor coating kit includes the resin, the roller, and the instructions, and it stops there.

Grinding is the step that decides whether the film stays, and no kit ships a diamond grinder. Rental yards carry single-head machines with a diamond cup wheel by the day, and a two-car slab takes most of one to open properly.

Acid etching appears in the instructions because it needs no equipment beyond a plastic watering can. It also leaves no measurable profile, which is why coating makers with a published data sheet ask for a grind or a blast.

The kit route can work on a tight, sound, dry slab where the owner accepts a shorter service life. On a slab that has never been tested, the savings on labor tend to come back in a couple of seasons as a peeling floor.

What the Coating Has to Survive

Heat from a parked tire, oil and brake fluid drips, and winter road salt take off more coatings than installation errors do.

Hot-tire pickup is the trade’s name for the black tire-shaped marks that show up in the first warm month. Rubber heats while you drive, and the coatings contractor Galaxy Concrete Coatings puts tire surface temperatures at 120 °F or more. Plasticizers in the tire compound migrate into the film at that temperature, soften it, and bond it to the tread. When the car rolls out, the coating goes with it.

Thick films tolerate that load better than thin ones, which is why a high-solids epoxy base under a polyaspartic topcoat gets specified for drive-over bays and a two-mil water-based paint does not.

Oil and brake fluid work more slowly. A puddle left over a weekend softens the film where it stands, and brake fluid reaches the concrete once the coating has lifted at the edge of a wheel position.

Moisture attacks from the other side. Vapor migrates up through the slab, builds pressure beneath a film that cannot breathe, and the coating blisters or releases in sheets. That is why the moisture test comes before the product choice, and why a slab poured without a vapor barrier under it deserves a closer look than one poured over polyethylene sheeting.

Road salt is the last exposure to show up. Chloride-heavy slush rests against the concrete for months, and where the film is thin or already lifting, the surface under it spalls.

Maintenance for all three is the same routine: sweep grit before it grinds underfoot, rinse salt off the slab after the last storm of the season, and skip acid washes on a coated floor.

Curing Times and When the Car Can Park on It

A typical two-part garage floor coating kit takes foot traffic at 12 to 16 hours and full cure at 2 to 7 days at 70 °F, while a polyaspartic system can return the garage to service in about a day.

Garon’s instructions put the pot life of a mixed batch at roughly 35 minutes. That figure sets the pace of the whole job: small batches, fast rolling, not one mix spread across an afternoon.

Garon’s sheet fixes the working window at 60 to 90 °F with relative humidity below 85 percent. Cold slows the reaction, and humid air traps bubbles in a film that is already starting to set.

Parking is where owners get impatient. Foot traffic at 12 hours is not vehicle traffic at 24. Epoxy takes days to reach full cure, and the weight of a car on a partly cured film presses the tread pattern into the surface.

Why does a floor that looked perfect in October lift the following June? The slab that lifts was never dry or never opened, and the first hot week of summer finishes the job.

What a Real Installer’s Bid Includes

A bid that names a resin and a price per square foot is missing the work that decides the result.

Every garage floor coating bid should carry four items: the moisture test and its number, the method used to open the concrete, the crack and joint treatment, and the film build in mils. Ask for each of them in writing.

Prep is visible on the day of the job. Grinding produces a uniform, lighter, sandpaper-rough slab, and shot blasting leaves a pattern of overlapping passes. A crew that arrives with a garden hose and a jug of acid is not going to remove a sealed skin.

Joints need their own answer. Control joints move with the slab, so a coating laid straight across one cracks in the same line the joint would have opened. The usual detail is a flexible filler in the joint before the base coat goes down.

Warranty scope matters more than warranty length. Vapor migration, standing water, and damage from parked tires fall outside many coating warranties, which is one more reason the moisture number belongs in writing before the first batch is mixed.

When Not to Coat a Garage Floor

A slab that keeps pushing water, salt, or loose concrete through its surface should be repaired or left bare, and no garage floor coating fixes that.

Efflorescence is the white bloom that returns after you scrub it. It marks concrete with moisture moving through it, and a coating on that surface traps the pressure underneath.

By the second winter, an untreated slab in a salt-belt garage shows two gray tire paths, a chalky line at the door sill, and a scatter of popped aggregate at the apron.

Spalled or hollow-sounding concrete comes out before anything else. Coating a loose top layer puts the bond on material that is already letting go.

A floor that holds water near the overhead door after rain has a grading problem. Coating it traps the puddle between the concrete and the film.

Garage Floor Coating Questions That Come Up Most

How do I coat my garage floor?

A garage floor coating goes down in four steps: grind or shot blast the slab, test it for moisture, fill the cracks and joints, then roll a two-part epoxy base with a clear or polyaspartic topcoat. The job runs on preparation hours; the resin is the smaller line item.

What does an epoxy floor look like after 5 years?

After five years, a well-prepped epoxy floor is intact but no longer uniform. The tire paths have lost their gloss, and light colors show traffic grime and a faint amber cast where sun reaches the door.

How much epoxy for 1000 sq ft?

A 1,000 square foot garage takes about 7.5 gallons of mixed epoxy for one coat, which works out to five of the 1.5-gallon kits Garon sells at roughly 200 square feet of coverage each. Flake broadcast and a separate topcoat add material on top of that figure.

Is epoxy or polyurethane better for garage floors?

For a home garage, the usual pairing is epoxy as the base coat with polyurethane or polyaspartic on top. A polyaspartic is a polyurea, and it resists the ultraviolet yellowing that a pure epoxy can develop where sun reaches the slab.

How long does a garage floor coating last?

Service life tracks the preparation more than the resin. A two-part epoxy base with a polyaspartic topcoat over a dry, ground slab with filled joints is often still intact a decade later, while a thin kit over an untested slab fails within the first few seasons.
Garage Floor Epoxy Cost: What the Quote Really Covers

A two-car garage floor typically costs $1,200 to $3,000 installed in the thin-film systems most homeowners buy. Garage floor epoxy cost on a real bid follows what happens to the slab before the resin is ever opened.

The same 400-square-foot slab draws bids two thousand dollars apart, and both contractors are quoting real figures. One is pricing a floor that has been ground open and tested. The other is pricing a floor that has been swept and assumed dry.

What Does Garage Floor Epoxy Cost Per Square Foot?

Installed epoxy runs about $3 to $7 per square foot for water-based systems, $4 to $9 for solvent-based, and $5 to $12 for 100% solids, according to the published price guide from the coating contractor Intermountain Coatings.

System Installed price per sq ft Where it fits
Water-based epoxy $3 to $7 Rental units, light tire and foot traffic, tight budgets
Solvent-based epoxy $4 to $9 Better flow and penetration, still a thin film
100% solids epoxy $5 to $12 Heavier build, better hot-tire and chemical resistance
Decorative finishes Top of the band Metallic pours, flake and quartz broadcasts under a clear coat

On a 400-square-foot two-car slab that works out to roughly $1,200 to $2,800 in water-based epoxy and $2,000 to $4,800 in 100% solids, before a single crack is filled.

Decorative work sits at the top of those bands. Metallic pours, flake broadcasts, and quartz finishes add material and hand time on top of the base system.

Contractors quote per square foot because it is easy to compare. The work does not scale that evenly.

What Drives the Price Up?

Preparation carries more of the bill than the resin does. Grinding or shot blasting the slab, testing it for moisture, and repairing cracks and spalls take more crew hours than rolling out the coating, and two bids on the same garage separate right there.

The most expensive quote I have seen land on a residential slab was not the one with the best resin. It was the one where two coats of old paint had to come off first.

Surface profile decides how much grinding

Epoxy bonds by mechanical grip, so a sealed or painted slab has to be opened before any coating goes down. The usual tools are a diamond grinder or a shot blaster, and the target is the roughness the coating maker specifies in its technical data sheet.

The concrete industry grades that roughness on the ICRI concrete surface profile scale, which runs from a nearly smooth CSP 1 up to a deeply scarified CSP 9.

A jug of acid etch opens the surface far less than a grinder does. It gets a thin water-based product to stick on clean, unsealed concrete, and it does very little for a heavy build or a floor that still carries old sealer.

Moisture testing is the line item nobody quotes

Water vapor rising through a slab is the most common reason a garage floor coating blisters and peels within a season, and it is invisible from above. Two standard tests cover it, and both involve attaching or drilling something into the concrete.

ASTM F2170 places in-situ probes in holes drilled into the slab and reads relative humidity from inside the concrete. ASTM F1869 measures the vapor emission rate at the surface using anhydrous calcium chloride.

Manufacturers set their own ceilings, and those limits vary by product, so the figure that matters is the one printed in the data sheet for the coating being installed. A bid that never mentions moisture has assumed the slab is dry, and that assumption belongs to whoever signs the contract.

Cracks, spalls, and the cure clock

Cracks and spalled edges get filled with epoxy mortar before the coating goes down, a separate material on a separate labor line. It shows up on a serious bid and disappears from a lazy one.

New concrete carries its own wait. Coating makers generally call for a slab to cure around a month before it is coated, and most epoxy products want the slab and the air sitting in the low 60s to low 80s Fahrenheit through application and cure. Below that window the reaction slows and the film can stay soft for days.

On a Tuesday morning a bare garage slab looks dry.

After two days of rain, the same slab has a dark patch near the door that sweeping does not touch.

Is DIY Cheaper Than Hiring It Out?

The material is cheap next to the labor. On the AZBilliards garage thread about a 650-square-foot floor, one owner reported about $500 for three epoxy kits and $2,500 for two workers, roughly $3,000 for the finished job.

Another poster in the same thread described two coats plus a clear topcoat for somewhere between $700 and $900 doing it himself.

Hiring buys a grinder, a moisture test, and a crew that has already made the mistakes a first-timer is about to make.

“had 3 boxes of the epoxy kit $500 and paid 2 guys $2500 to do it. they spent day one prepping, day 2 applying. worth every penny.”

AZBilliards Main Forum: typical cost of epoxy coating for a 650 sq ft garage

Quotes on that thread started around $3 to $5 per square foot. A Florida owner reported a 20-by-20 garage in Naples coming in at $3,000 to $4,000 from licensed and insured companies, which is $7.50 to $10 per square foot on a 400-square-foot slab.

Doing it yourself still makes sense on bare, dry, uncracked concrete with a helper, a rented grinder, and a free weekend. It stops making sense the moment the slab fails a moisture reading or the old coating fights back. A floor that lifts has to be ground off and started over, and that bill arrives after the first one has been paid.

What Makes Two Quotes for the Same Garage Differ?

Fixed hours spread thinner as the slab grows. Machinery, diamond tooling, and a crew day cost the same on 400 square feet as on 1,000, so the larger floor carries a lower rate even when the coating system is identical.

Edge length matters as much as area. The stem wall, posts, thresholds, and the apron at the door all get cut in by hand, so a narrow bay with a pillar carries more handwork than an open rectangle of the same size.

Film thickness is the quiet variable. Material is bought by the gallon at a stated coverage rate, and a heavier build consumes more product per square foot, which is why 100% solids quotes sit above water-based ones on the same floor.

Then there is the topcoat.

A clear aliphatic urethane or polyaspartic layer resists the UV yellowing that plain epoxy shows near a sunlit garage door, and it adds both material and another application window to the schedule.

Common Questions About Garage Floor Epoxy Cost

How much does garage floor epoxy cost for a 1,000 sq ft floor?

At $3 to $7 per square foot for water-based systems, a 1,000-square-foot floor comes to about $3,000 to $7,000 installed, and 100% solids at $5 to $12 reaches $5,000 to $12,000. Buying kits instead means working from the coverage rate printed on the label and multiplying by the number of coats, and 100% solids covers less area per gallon than a water-based product does.

What are the disadvantages of epoxy flooring?

A glossy epoxy floor is slippery when wet, it yellows under UV unless a topcoat blocks it, and a thin film can lift under hot tires. It also needs a dry slab and a temperature window to cure, which rules out a cold-weather install without heat.

Does epoxy flooring increase home value?

No appraisal formula has a line for a coated garage slab. Buyers read the space as cleaner and more usable, and a floor that is intact supports that read, but a coating is a usability improvement rather than a measured return.

Is epoxy coating in a garage worth it?

Epoxy coating pays off when the slab passes a moisture test and the prep budget is real. Keeping a coated floor clean takes less work than scrubbing bare concrete that has taken in oil, road salt, and snow melt, and that is the return most owners actually collect.

Before signing anything, ask what the prep line covers. A garage floor epoxy cost estimate that names the grinder, the moisture reading, and the number of coats is priced against a known slab. One that says only surface preparation leaves the moisture risk with the garage’s owner.

Tips for Caring for Your Vinyl Plank Flooring

Vinyl plank flooring resists moisture and everyday wear; this makes it suitable for high-traffic areas. Dirt and grit can scratch the surface, while excess moisture damages the flooring or its subfloor. Regular cleaning and maintenance help prevent these problems and keep the flooring in good condition over time. Here are some tips for caring for your vinyl plank floors:

Complete Proper Installation

Caring for vinyl plank flooring begins before it’s installed. Professional installers prepare the subfloor by cleaning and repairing any previous damage; they fill cracks and holes and check that the subfloor is level. If the subfloor isn’t clean and level, it may cause the vinyl plank material to warp or buckle.

Vinyl expands and contracts based on changes in temperature and humidity. Professional installers may plan for these changes with a slight gap at the edges to prevent buckling. Too large a gap creates an uneven surface, becoming a trip hazard. Wide spaces between the boards allow moisture and excess wear, so installers make sure planks sit tightly next to each other.

Some installers install a moisture barrier between the subfloor and plank flooring to prevent bubbling, mold growth, and adhesive failure. Seams must be lined up tightly and the edges sealed, so dust and debris don’t get trapped between the boards. This could cause the floor to deteriorate faster. Professional installers preserve the wear layer through correct installation methods, directly impacting the lifespan of the flooring materials.

Remove Water Immediately

Even if your flooring is water-resistant or waterproof, water should never be left pooling on the floor. Standing water may seep into the seams and around the edges of the floor along the walls. To prevent this, wipe up water and other liquids right away with a clean, dry cloth. Choose a cloth that’s not abrasive. If you need to wipe up a large spill, use a damp mop and wring out excess water to prevent the planks from warping. You can place a fan on the floor to help it dry faster, which also helps reduce the risk of water damage.

Use Correct Cleaning Products

Choose the right cleaning tools for vinyl plank floors. Before you purchase a vacuum or broom, determine if it’s designed for your floors. A soft-bristled broom helps prevent scratches on the surface, while a vacuum should be built specifically for wood flooring. Avoid using a steam mop, since the heat and water can warp planks. A dust mop is an ideal option for cleaning vinyl planks because it won’t scratch the material, and it removes dust and fine particles that dull the shine. Choose a mop with microfiber so it won’t leave lint behind.

Avoid using harsh chemicals or household products; this includes straight vinegar or ammonia. They might strip the shine, create a dull film, or damage the adhesive and protective layer. Oil-based products sometimes leave a residue and make the floor slippery. Ask the installation team which products they recommend for your specific floor type.

Prevent Damage to Your Floors

Vinyl plank floors are built to be durable and withstand regular traffic, but some actions may cause damage. Moving a chair or couch with sharp edges sometimes leaves marks on floors. To help prevent damage to floors, try:

  • Placing felt or rubber protectors on the feet of couches, chairs, and tables so they slide easily on the floor.
  • Moving heavy furniture on blankets to prevent it from coming into direct contact with the floor and leaving dents.
  • Placing a welcome mat by the door to catch mud, dirt, and other debris so they don’t scratch the surface.
  • Removing shoes at the doorway; high-heeled shoes with a narrow base or rocks stuck in shoe treads may leave dents.
  • Keeping pets’ nails trimmed to avoid scratches as they run around.

Protect Your Vinyl Plank Flooring

Caring for your new vinyl plank floors helps keep them looking like new. Choose experienced installers who can answer any questions you have about caring for your new floors after installation. Vinyl plank flooring offers simple maintenance while still delivering a stylish look. Visit a flooring showroom so you can view different vinyl plank options and decide which style will suit your home. Contact a flooring specialist today to learn more about vinyl flooring. 

Best Concrete Flooring Options for Commercial Spaces in California

Concrete flooring offers durability, versatility, and a clean aesthetic that suits a wide range of commercial settings. In California, where design preferences often balance modern style with sustainability, selecting the right flooring finish can make a significant difference in performance and maintenance.

Understanding the Role of Commercial Concrete Floors

Commercial spaces experience heavy foot traffic, equipment movement, and frequent cleaning. The flooring must withstand these demands while maintaining a professional appearance. Concrete, when properly treated, meets these requirements effectively and can be customized to match different design goals.

Popular Concrete Finishes for Businesses

Several finishing techniques can enhance concrete’s appearance and performance. Each option offers distinct benefits depending on the function and aesthetic of the space.

polished concrete

This finish is known for its smooth surface and reflective quality. It is achieved through mechanical grinding and sealing, creating a low-maintenance, high-gloss appearance. Polished surfaces resist stains, making them ideal for retail stores, offices, and showrooms that value both beauty and practicality.

Epoxy-Coated Flooring

Epoxy coatings add a protective layer that improves abrasion resistance and chemical protection. This type of floor works well in warehouses, laboratories, and healthcare facilities where hygiene and durability are critical. Color additives can also define zones or pathways within large floor plans.

Stained and Dyed Finishes

Concrete stains and dyes provide rich, translucent color variations that mimic natural stone or decorative tile. They are often used in restaurants, galleries, and lobbies seeking a unique visual effect without sacrificing durability. Proper sealing ensures the colors remain vibrant over time.

Textured and Slip-Resistant Surfaces

Outdoor commercial areas, entryways, and industrial sites often require slip-resistant textures. Techniques such as broom finishing, sandblasting, or applying overlays can create the needed traction. These surfaces help enhance safety while maintaining a professional look.

Factors to Consider When Choosing a Concrete Finish

Each commercial environment presents different challenges. Evaluating performance needs and visual expectations helps narrow down the best option.

  • Traffic level: High-traffic zones may benefit from polished or epoxy finishes that resist wear.
  • Maintenance: Some finishes require periodic resealing, while others remain low maintenance for years.
  • Design goals: The desired visual effect should complement the branding and layout of the space.
  • Safety: Slip resistance and surface texture are essential in public or outdoor areas.

Sustainability and Environmental Considerations

Concrete floors contribute to sustainable building practices by using the existing slab as a finished surface. Reducing the need for additional materials minimizes waste. Reflective finishes can also improve lighting efficiency, supporting energy-conscious design goals common in California’s commercial developments.

Implementing the Right Flooring Strategy

Professionals typically begin with an assessment of the existing slab condition, moisture level, and intended use of the space. Proper surface preparation and selection of suitable finishing products ensure long-term performance. Combining aesthetic and functional priorities leads to a flooring system that supports business operations effectively.

Adapting Concrete Floors for Future Needs

One advantage of concrete surfaces is their adaptability. As a business evolves, floors can be refinished, recolored, or re-polished to match new layouts or design updates. This flexibility supports long-term cost efficiency and reduces the need for full replacement.

Reliable concrete solutions for Commercial Properties

Choosing the right flooring involves balancing design, maintenance, and durability. With the range of finishing techniques available today, concrete remains one of the most practical materials for commercial environments across California. Whether opting for sleek polished concrete, protective coatings, or decorative stains, each approach offers lasting value and professional appeal.

How to Install Vinyl Plank Flooring: A Complete Step-by-Step Guide

Installation vinyl plank flooring is a straightforward DIY project most homeowners finish in a single weekend. The click-lock floating method requires no adhesive, works over most existing floors, and delivers a waterproof result that holds up to pets, kids, and heavy foot traffic. Here is how to do it right, from subfloor prep to the final transition strip, while keeping broader homeowner responsibilities such as Houston rental payment rules in mind for rental spaces.

Tools and Materials You Need for Vinyl Plank Flooring Installation

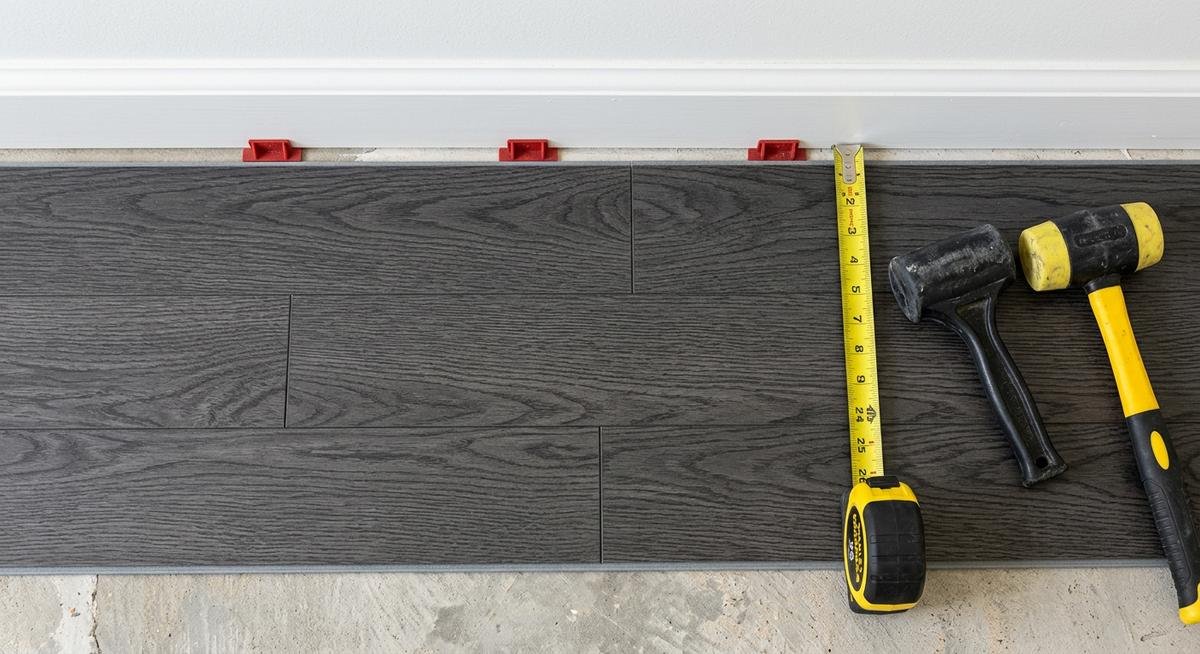
Gather all your tools and materials before opening a single box of flooring. You will need a rubber mallet, pull bar, tapping block, spacers, a utility knife or oscillating saw, tape measure, and a level. Budget for 10 percent extra flooring beyond your room’s square footage to account for cuts and mistakes.

Vinyl plank flooring (LVP) must acclimate inside the room where it will be installed for at least 24 to 48 hours before you lay a single plank. Skipping this step is one of the most common reasons floors buckle or gap after installation — the planks expand and contract with temperature and humidity, and they need to reach equilibrium with the room first.

Tools Supplies
Rubber mallet Vinyl plank flooring (+ 10% overage)
Pull bar Underlayment (if not pre-attached)
Tapping block 1/4″ spacers
Utility knife or oscillating saw Transition strips
Tape measure Floor patch or self-leveling compound
Long level or straightedge (6 ft+) Carpenter’s square
Chalk line Safety glasses and knee pads

Many LVP products come with underlayment pre-attached to the back of each plank. If yours does, do not add a separate underlayment layer — doubled underlayment creates a spongy, unstable surface that can cause the click-lock joints to fail over time.

tools and materials you need for vinyl plank flooring installation
Proper stagger pattern with 1/4-inch spacers maintaining the expansion gap — the most commonly skipped detail in DIY vinyl plank installs

Subfloor Preparation for Vinyl Plank Flooring Installation

Your subfloor must be flat to within 3/16 of an inch over any 10-foot span before you install vinyl plank flooring. Any variation beyond that tolerance will cause joints to peak, separate, or crack — especially with thinner LVP products under 6mm.

Use a long straightedge or level to sweep across the subfloor in multiple directions. Mark any high spots with a pencil and grind them down with a belt sander or floor grinder. Fill low spots with a self-leveling compound or floor patch, feathering the edges out so there is no abrupt height change.

Discussions in communities focused on DIY flooring repeatedly come back to the same theme: subfloor prep is where most failed installations begin. One experienced installer summed it up plainly:

“Subfloor prep is the only thing that actually matters. The floor install itself takes a few hours. Proper prep can take a full day. Do the prep.”

— r/DIY, April 2026 (27 upvotes)

The 3/16-inch tolerance is roughly the width of a pencil — a surprisingly small margin that separates a floor that stays solid for decades from one that creaks underfoot within months.

Clean the subfloor thoroughly after leveling. Remove all dust, adhesive residue, and debris. Even small particles can create raised spots that telegraph through thin LVP. For concrete subfloors, also check for moisture: tape down a sheet of plastic for 24 hours and look for condensation. Persistent moisture means you need a moisture barrier before any flooring goes down.

Vinyl Plank Flooring Installation: Step-by-Step Process

The standard floating method for installation vinyl plank flooring follows six sequential steps. Work from the longest, most visible wall in the room and move toward the door so your starting row is the most prominent feature in the space.

Step 1: Plan Your Layout

Measure the room’s width and divide it by the plank width to calculate how wide your final row will be. If the final row comes out to less than 2 inches, cut the first row narrower to avoid a thin, awkward strip at the far wall.

Most flooring professionals recommend running planks parallel to the longest wall or parallel to the main light source entering the room. A perpendicular layout can visually widen short hallways.

Step 2: Lay the First Row

Place 1/4-inch spacers against the starting wall to create an expansion gap. This gap is non-negotiable, vinyl expands significantly with heat and has nowhere to go if it’s locked against a wall. Start in a corner, groove side facing the wall, and click planks end to end along the full length of the row.

Cut the last plank of the first row to fit. Save the offcut, it should start the second row if it is at least 6 inches long, which automatically creates the required stagger.

Step 3: Install the Middle Rows

Stagger end joints by at least 6 to 8 inches between adjacent rows. This stagger pattern distributes weight evenly and makes the floor look more natural. Click each plank into its neighbor at a 45-degree angle and press down until the joint snaps flat.

Use a tapping block and rubber mallet for tight joints, never hit the planks directly. The pull bar lets you close the final joint in each row when there is no room to swing a mallet.

Step 4: Cut Around Obstacles

Score-and-snap works for straight cuts on most LVP products: score the surface deeply with a utility knife and a straightedge, then snap the plank over the edge of a table. For curves around door casings or pipes, use a jigsaw or oscillating tool.

Undercut door casings rather than scribing the plank around them. Slide a piece of scrap LVP under the casing to gauge the cutting height, then use a multi-tool to cut through the casing at that height. The plank slides neatly underneath for a professional-looking result.

Step 5: Install the Final Row

Measure the gap at the far wall, account for the 1/4-inch expansion gap, and rip the final row of planks to width with a table saw or circular saw. Use a pull bar to click the last row into place without damaging the edge.

Step 6: Finishing Touches

Remove all spacers after the floor is complete. Install transition strips where the new floor meets tile, carpet, or another room. Reinstall baseboards or add quarter-round molding to cover the expansion gap at walls, this is the detail that separates clean-looking work from amateur results.

Floating vs. Glue-Down vs. Peel-and-Stick: Which Method to Choose

Floating click-lock installation is the right choice for most residential projects. It is faster, reversible, and requires no adhesive or special tools. Glue-down installation makes sense for commercial settings, large open areas over 1,000 square feet, or rooms with in-floor radiant heating where a floating floor might lift at the edges.

Method Best For Skill Level Reversible? Cost
Floating (click-lock) Most residential rooms Beginner Yes Lowest
Glue-down Large areas, radiant heat, commercial Intermediate No Medium
Peel-and-stick Low-traffic areas, temporary Beginner Partial Lowest

Glue-down LVP on OSB subfloor is a topic that generates consistent debate in flooring communities. Manufacturers generally approve it, but real-world experience shows that OSB’s surface can be uneven enough to compromise adhesion at panel edges. Many installers recommend sanding OSB seams and applying a skim coat of floor patch before gluing.

According to Wikipedia’s overview of luxury vinyl tile, LVP was introduced to the consumer market around 2009 and has become one of the fastest-growing flooring categories, largely because click-lock technology made DIY installation genuinely achievable for homeowners without flooring experience.

5 Mistakes That Ruin Your Vinyl Plank Flooring Installation

The most preventable failures in installation vinyl plank flooring share a common cause: rushing past the preparation steps to get to the visible work. Knowing these five mistakes in advance saves a full reinstallation later.

  1. Skipping subfloor leveling. High or low spots transfer directly through LVP, creating a floor that bounces, peaks at joints, or develops squeaks within weeks. Any spot out of tolerance must be corrected before a single plank goes down.
  2. Forgetting the expansion gap. Vinyl expands with heat and humidity. Without the 1/4-inch perimeter gap, floors buckle in summer, a mistake that requires pulling up the entire installation to fix.
  3. Ignoring acclimation. LVP that goes straight from a cold delivery truck to a heated room can gap badly at joints as it warms up and expands. Give it 24 to 48 hours in the room first.
  4. Poor stagger pattern. End joints that land within 6 inches of each other in adjacent rows look unnatural and weaken the floor’s structural integrity. Start each row with a cut piece of at least 6 inches from the previous row’s end joint.
  5. Using the wrong underlayment. Adding a separate underlayment beneath planks that already have pre-attached padding creates a floor that flexes too much at joints, eventually causing them to disengage or crack. Read your product specs before adding anything below.

One detail worth knowing: “grout lines” appearing on vinyl plank floors, which became a recurring complaint in r/Flooring in early 2026, almost always trace back to thin LVP products installed over subfloors with panel edge ridges that telegraph through. The fix is the same as preventing it, a flat subfloor to begin with.

The FloorScore certification program tests finished vinyl flooring products for indoor air quality compliance, an important consideration when choosing between LVP brands. The EPA’s guidance on volatile organic compounds explains why off-gassing from flooring materials matters, particularly in rooms with limited ventilation like bedrooms. Choosing FloorScore-certified LVP eliminates this concern entirely.

Frequently Asked Questions About Vinyl Plank Flooring Installation

How long does installation vinyl plank flooring need to acclimate?

Vinyl plank flooring needs 24 to 48 hours to acclimate inside the installation room before you lay it. Open the boxes and let the planks rest flat in the room, at normal living temperature and humidity, for at least a full day. Thicker LVP products over 8mm benefit from the full 48 hours.

Do I need underlayment for vinyl plank flooring?

Whether you need separate underlayment depends on your specific product. Most modern LVP comes with underlayment pre-attached; adding a second layer underneath creates too much flex and can cause click-lock joints to fail. If your LVP has no attached underlayment, a thin 1mm to 2mm foam underlayment improves sound dampening without compromising stability.

What direction should I lay vinyl plank flooring?

Run vinyl plank flooring parallel to the longest wall in the room or parallel to the primary light source (usually the main window). Either approach creates the most natural visual result. Running planks perpendicular to a room’s long dimension makes narrow spaces feel wider but can make long halls feel shorter.

Can I install vinyl plank flooring over existing tile or hardwood?

Yes, vinyl plank flooring can be installed over existing tile or hardwood as long as the existing surface is flat, structurally sound, and no thicker than what your door clearances allow. Check that every grout line, tile edge, or hardwood board seam is flush within the 3/16-inch tolerance, high edges will telegraph through the LVP.

How much extra vinyl plank flooring should I buy?

Buy 10 percent more than your calculated square footage for a standard installation. If your room has many angles, alcoves, or a diagonal layout pattern, budget 15 percent extra. LVP from the same dye lot can vary slightly in color from batch to batch, so buying enough to finish the entire floor in one purchase matters.

Can vinyl plank flooring be installed in bathrooms?

Luxury vinyl plank flooring is fully waterproof and an excellent choice for bathrooms. The key is sealing the expansion gap around the toilet base and tub with silicone caulk after installation so standing water cannot seep beneath the planks and reach the subfloor. For the best waterproof options available, our guide to the best waterproof vinyl plank flooring breaks down the top-performing products by room type and budget.

Getting Your Installation Vinyl Plank Flooring Right the First Time

Vinyl plank earns its reputation as a beginner-friendly project because the click-lock system itself is genuinely forgiving. The complexity is in the preparation, leveling the subfloor, allowing proper acclimation, and maintaining consistent expansion gaps throughout.

Most homeowners who struggle with their LVP installation wish they had spent more time on prep and less time rushing to lay planks. An extra half-day on subfloor work usually prevents the kind of problems that require a full reinstallation to fix.

If you are still deciding on which product to install, our roundup of the best waterproof vinyl plank flooring options covers the top products across different thicknesses, budgets, and room types.