How Hidden Plumbing Leaks Undermine Home Waterproofing
A waterproofing system can only do its job when the building stays dry from both sides. Many homeowners focus on rain, groundwater, roof runoff, and basement seepage, but some of the most damaging moisture problems begin inside the home. A slow pipe leak behind a wall, a loose fixture connection under a sink, or a water heater drip in a utility room can quietly soak building materials long before the problem is visible.
Interior leaks are especially important because they can confuse the diagnosis of a waterproofing failure. A wet patch near a foundation wall may look like exterior seepage, while the real source is a supply line, drain line, appliance hose, or fixture above it. Good waterproofing therefore starts with one practical habit: confirm where the water is coming from before repairing the surface damage.
Why Small Plumbing Leaks Become Big Moisture Problems
Waterproofing protects a structure by controlling where water can travel. Plumbing leaks break that control from the inside. Even a small drip can keep drywall, wood framing, subflooring, insulation, and concrete surfaces damp for long periods. Once materials stay wet, stains, odors, swelling, paint bubbling, mold growth, and corrosion can follow.
The U.S. Environmental Protection Agency notes that household leaks can waste nearly 1 trillion gallons of water nationwide each year, a useful reminder that “minor” leaks are rarely harmless when they continue day after day. The EPA’s WaterSense program also points to common leak sources such as worn toilet flappers, dripping faucets, leaking showerheads, and fixture connections. These are simple areas to inspect, but they are often ignored until a water bill rises or visible damage appears.
For a waterproofing inspection, this matters because the moisture path may travel far from the leak. Water can run along pipes, framing, tile backer board, or the underside of flooring before showing up in a different room. That is why a stain on a lower wall or ceiling should not be treated as an isolated cosmetic issue.
Common Interior Leak Sources That Affect Waterproofing
Bathrooms, kitchens, laundry rooms, and mechanical spaces deserve close attention because they combine water supply lines, drains, valves, fixtures, and waterproof finishes. A tiled shower may look sealed from the outside, but damaged grout, a failed drain connection, or a leaking valve body can send water into the wall cavity. Under a kitchen sink, small leaks around shutoff valves and P-trap connections can soak cabinets and floors. Laundry hoses can weaken with age, and water heaters may produce slow leaks around fittings before failing more dramatically.
Basements and crawl spaces are also vulnerable. A damp basement is often blamed on the outside wall, but the cause may be a condensate line, a sweating pipe, a leaking water main, or a drain backup. In crawl spaces, plumbing leaks can raise humidity, wet the subfloor, and create conditions that make the rest of the building feel musty.
The most reliable approach is to inspect plumbing and waterproofing together. If the wall is wet, check what pipes, fixtures, appliances, and drains are nearby. If the floor is damp, inspect above and below it when possible. If the water appears after using a shower, sink, washing machine, or dishwasher, the timing itself is a useful clue.
How to Separate Plumbing Leaks From Waterproofing Failures
Start with pattern recognition. Exterior seepage often appears after rain, snowmelt, poor drainage, or high groundwater. Interior plumbing leaks may appear during or after fixture use, while pressure-line leaks may remain active even in dry weather. Condensation usually forms on cold surfaces in humid conditions, while drain leaks often appear only when water is flowing through the fixture.
A simple water meter check can also help. Turn off all faucets, appliances, irrigation, and water-using equipment, then watch the meter. Movement may suggest a leak somewhere in the supply system. This does not identify the exact location, but it tells you whether further plumbing inspection is needed.
Homeowners should also look for secondary clues: warm spots on floors near hot water lines, loose tiles near showers, swelling baseboards, mildew odors, peeling paint, soft drywall, unexplained low water pressure, or recurring dampness after previous repairs. Moisture meters and thermal imaging can help professionals narrow the search without opening large areas unnecessarily.
For more serious or persistent leaks, it is worth bringing in a licensed plumber before waterproofing repairs begin. A leak detection and pipe repair specialist can confirm whether the water source is active, hidden, or connected to the drainage system; according to Anytime Plumbing, Inc., pipework repairs, sewer line repairs, water heater service, drain cleaning, and same-day emergency plumbing support are all part of preventing small plumbing issues from becoming larger property problems.
Waterproofing Repairs Should Address the Cause, Not Just the Stain
After the leak source is confirmed, the repair sequence matters. First stop the water. Then remove or dry wet materials according to the severity of the damage. Finally, restore waterproofing layers, sealants, finishes, and protective coatings. Skipping the first step leads to repeated failure, because new paint, grout, caulk, membrane, or patching compound cannot perform well if moisture is still entering from behind.
Building Science Corporation’s guidance on interior water management explains that plumbing and occupant use are potential sources of liquid water inside buildings, not just exterior rain or groundwater. That idea is important for homeowners because it broadens the inspection. A good waterproofing plan looks at exterior drainage, wall assemblies, foundations, roofing, ventilation, and plumbing systems as connected parts of the same moisture-control strategy.
In practical terms, a bathroom wall leak may require both plumbing repair and renewed waterproofing behind tile. A basement wet spot may require pipe repair plus better drainage or vapor control. A damaged laundry room floor may require replacing a hose connection, drying the subfloor, and restoring a waterproof floor finish.
Preventive Habits That Protect the Building Envelope
Routine checks reduce the chance of hidden water damage. Inspect under sinks every month, especially around valves and drain joints. Look behind toilets for floor discoloration or movement. Replace aging washing machine hoses before they crack. Keep access panels available for tubs, showers, and mechanical equipment. Watch water bills for unusual increases. Test sump pumps before storm season. Keep gutters and downspouts clear so exterior water is not mistaken for interior leakage.
It also helps to document repairs. If a plumber fixes a leaking pipe or replaces a water heater, keep the date, location, and notes. If a waterproofing contractor repairs a wall or installs a membrane, keep photos of the area before it is covered. These records make future diagnosis faster because they show what has already been corrected.
Waterproofing is not only about blocking water from outside the building. It is about managing every route water can take through a structure. Hidden plumbing leaks are one of the easiest routes to overlook, but they are also one of the most preventable. By checking plumbing sources early, confirming the real cause of dampness, and repairing moisture-control layers properly, homeowners can protect both the waterproofing system and the structure it is meant to preserve.
Waterproofing Cinder Block Walls: A Complete How-To Guide
Waterproofing cinder block walls requires cleaning the surface, repairing cracks, and applying a penetrating masonry sealer or elastomeric coating in two coats. Interior sealers like DRYLOK stop vapor and minor seepage; exterior drainage membranes handle heavy hydrostatic pressure. Most homeowners complete the interior approach in a weekend for under $200, while Keyrenter Richmond can be a useful resource for owners considering ongoing property upkeep.
Why Cinder Block Walls Leak — and What You’re Really Fighting
Cinder block walls leak because concrete masonry units (CMUs) are porous by design, with voids inside each block and mortar joints that crack over time as the foundation settles. Water migrates through three pathways: capillary absorption through the block face, direct infiltration through cracked mortar joints, and hydrostatic pressure forcing water through the hollow cores during heavy rain.
The white chalky residue you see on older block walls is efflorescence — mineral salts carried to the surface by evaporating moisture. It’s cosmetic on its own, but it signals active moisture movement through the wall. Left untreated, repeated wet-dry cycles cause spalling, freeze-thaw damage, and eventually structural compromise of the mortar joints.
Two other forces work against you:
Hydrostatic pressure: Saturated soil outside the wall can exert 60+ lbs per square foot of outward force on the block face, driving water through even hairline cracks.
Negative-side pressure: Water vapor migrates from wetter soil toward the drier interior, pushing through the block regardless of surface coatings applied only to the outside.
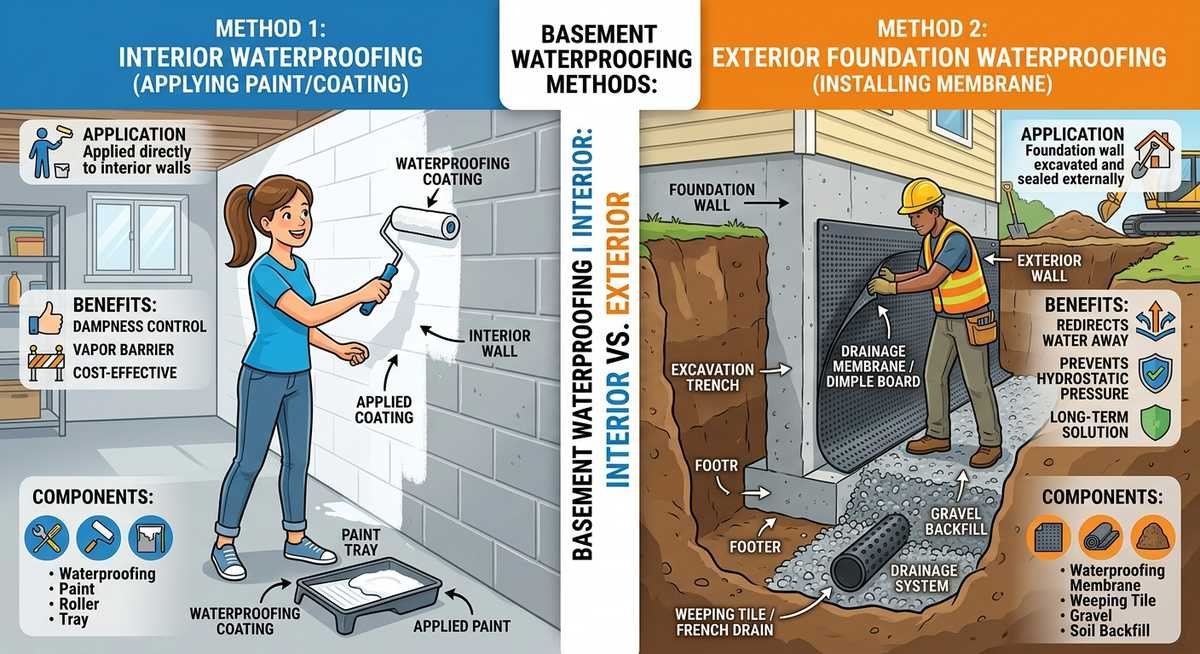
Interior vs. Exterior Waterproofing: Which Approach Is Right for You?
Interior waterproofing blocks moisture from entering the living space; exterior waterproofing keeps water away from the foundation itself. Interior methods are cheaper and accessible without excavation, but they don’t address the source. Exterior methods are the gold standard but cost 10–20× more due to excavation.
Approach
Best For
DIY Difficulty
Average Cost
Longevity
Interior masonry sealer (DRYLOK, RadonSeal)
Vapor/minor seepage, new builds
Easy
$0.15–$0.30/sq ft
5–10 years
Interior elastomeric coating
Moderate seepage, visible cracks
Moderate
$0.50–$1.00/sq ft
10–15 years
Interior drainage system (French drain + sump)
Chronic flooding, high water table
Professional only
$4,000–$12,000
25+ years
Exterior membrane + drainage board
New construction, severe hydrostatic pressure
Professional only
$8,000–$25,000
Lifetime
For most homeowners dealing with damp walls, minor seepage, or efflorescence, interior masonry sealer is the right starting point. It stops vapor transmission and minor capillary water without requiring excavation.
How to Waterproof Cinder Block Walls: Step-by-Step
Waterproofing cinder block walls starts with thorough surface preparation — the sealer is only as good as the bond it makes with the block. Budget a full day for prep and two half-days for application and cure between coats.
What You’ll Need
Wire brush and masonry chisel
Muriatic acid or masonry cleaner (for efflorescence)
Hydraulic cement (for active cracks and holes)
Masonry waterproofer: DRYLOK Extreme, RadonSeal Plus, or equivalent
Thick-nap (¾”) roller and masonry brush for joints
Safety glasses, nitrile gloves, and respirator
Step 1 — Remove Efflorescence and Loose Material
Scrub all white mineral deposits off the block face using a stiff wire brush. For heavy buildup, apply a diluted muriatic acid solution (1 part acid to 10 parts water), let it fizz for 5 minutes, then neutralize with a baking soda wash. Chip away any spalling concrete or loose mortar with a masonry chisel.
Step 2 — Repair Cracks and Mortar Joints
Fill cracks wider than 1/16″ with hydraulic cement, which expands as it cures and can stop active water flow. For deteriorated mortar joints, rake out the loose material to a depth of ¾” and repoint with Type S mortar. Allow 24–48 hours of cure time before waterproofing.
Step 3, Clean the Wall Thoroughly
Rinse the entire wall with clean water and let it dry to a damp but not wet state. Most masonry sealers actually bond better to a slightly damp surface, check your product label. Remove all dust, oil stains, and any previous paint or sealer that is peeling or flaking.
Step 4, Apply the First Coat
Work the sealer into the block face and mortar joints using a masonry brush first, then back-roll with a ¾” nap roller to ensure complete coverage. Apply generously, DRYLOK Extreme, for example, recommends a minimum of 1 gallon per 75 sq ft for the first coat. Work from top to bottom to catch drips.
Step 5, Apply the Second Coat
Allow the first coat to cure per manufacturer directions (typically 4–6 hours for DRYLOK). Apply a second full coat in the opposite direction from the first (horizontal vs. vertical strokes) to eliminate pinholes. Two coats are not optional, a single coat leaves micro-voids that allow vapor passage.
Step 6, Address the Exterior Grade
Even the best interior sealer won’t last if soil grading pushes water toward your foundation. Ensure the ground slopes away from the house at a minimum of 6″ drop per 10′ run. Clean gutters and extend downspouts at least 6 feet from the foundation to redirect roof runoff.
Best Products for Waterproofing Cinder Block Walls
Not all masonry waterproofers work the same way on cinder blocks. Penetrating sealers bond chemically inside the block’s pores; surface coatings create a physical barrier on top. Here’s how the leading products compare:
Product
Type
Coverage
Best For
Price (1 gal)
DRYLOK Extreme
Elastomeric surface coating
75 sq ft/gal (1st coat)
Minor to moderate seepage, painted look
~$35
RadonSeal Plus
Penetrating silicate sealer
100–200 sq ft/gal
Vapor control, radon reduction, new blocks
~$45
Ames Block & Wall
Liquid rubber coating
50 sq ft/gal
Heavy seepage, flexible crack bridging
~$65
UGL Drylok Fast Plug
Hydraulic cement plug
Spot repair only
Active water leaks, crack filling
~$18
Bottom line: DRYLOK Extreme is the most widely available and beginner-friendly for standard damp basement walls. RadonSeal Plus is the better choice if radon is also a concern (common in CMU basements) since its penetrating chemistry also reduces radon entry pathways. For walls with active seepage or cracks wider than 1/8″, Ames Block & Wall’s rubber-based formula bridges movement better than rigid surface coatings.
Hard Cases: Efflorescence Keeps Coming Back, Active Leaks, and Hollow CMU Cores
Some cinder block walls resist standard treatment because the problem is deeper than the surface. If efflorescence reappears within a year after waterproofing, or if you see water actively weeping through the wall after heavy rain, you’re dealing with conditions that require a different approach.
Persistent efflorescence: The mineral salts are being continuously fed by moisture migrating through the block cores. Apply a penetrating silicate sealer (RadonSeal Plus or similar) first to chemically densify the block, then follow with a surface elastomeric coat. The two-product approach addresses both the vapor pathway and the surface protection.
Active water entry through mortar joints: Mix hydraulic cement to a stiff putty consistency and press it firmly into the wet joint, holding for 3–5 minutes until it sets. For large areas of deteriorated mortar, repointing the entire wall before waterproofing is more durable than trying to seal over crumbling joints.
Hollow CMU cores (extreme cases): When hydrostatic pressure forces water through the hollow interior cavities of the blocks, thinset mortar injection or an epoxy injection system (such as the ElastiPoxy method used by contractors) fills the voids and stops the entry path entirely. This is generally a professional repair costing $800–$2,500 depending on wall area.
When to Call a Waterproofing Contractor
DIY interior sealing works well for vapor transmission and minor dampness, but certain conditions require professional intervention to protect your foundation’s long-term structural integrity and prevent costly damage.
Call a professional when you notice:
Standing water on the basement floor after rain (not just damp walls)
Horizontal cracks in the block wall (a sign of lateral soil pressure, not just moisture)
Bowing or bulging of the wall face
Water entering through the floor-wall joint rather than through the wall itself
Interior drainage systems that already exist but are failing
Professional waterproofing for a 1,000 sq ft basement typically runs $5,000–$15,000 for interior drainage systems. For a detailed look at how professional waterproofing companies like B-Dry Waterproofing approach foundation sealing, see our full review of their patented system and pricing and $15,000–$30,000 for full exterior excavation and membrane installation. Three competitive quotes are essential, pricing varies widely by region and contractor approach.
For homes built before 1978, be aware that lead-based paint may be present on interior block walls, which affects how you can prep and disturb the surface. Federal RRP rules require certified contractors for projects that disturb more than 6 sq ft of painted surface in pre-1978 homes.
Frequently Asked Questions
How long does waterproofing cinder block walls last?
Interior surface coatings like DRYLOK Extreme typically last 5–10 years before needing reapplication, depending on the severity of moisture pressure. Penetrating sealers bond permanently to the block chemistry and don’t need reapplication, but surface coatings applied over them still wear. Exterior membrane systems last the lifetime of the foundation when properly installed.
Can I waterproof cinder block walls from the inside?
Yes, interior waterproofing is effective for stopping vapor transmission and minor seepage, which covers the majority of residential basement moisture problems. It does not work for walls under sustained hydrostatic pressure from a high water table, which requires exterior drainage or an interior French drain system to relieve the pressure before sealing.
Do I need to paint over waterproofing sealer?
Elastomeric sealers like DRYLOK come in white and tintable versions, so many homeowners use them as the final finish coat. If you want a different color or texture, you can paint over cured masonry sealer with latex masonry paint. Avoid oil-based paints over elastomeric coatings as they may not bond well or allow moisture vapor to pass through properly.
What’s the difference between cinder blocks and concrete blocks?
Original cinder blocks used coal cinders as aggregate and are no longer manufactured; most modern “cinder block” foundations are actually CMUs (concrete masonry units) made with Portland cement and aggregate. Both have similar porosity and are treated the same way for waterproofing purposes. The distinction matters only when sourcing specialty materials, as some product labels still specify “cinder block” vs. “concrete masonry unit.”
How do I know if my waterproofing cinder block walls project worked?
Inspect the wall after the first heavy rain following treatment. A properly sealed wall stays dry to the touch with no new efflorescence forming. For added confidence, tape a 12×12″ piece of plastic sheeting to the wall with foil tape and leave it for 24 hours, condensation on the room side means indoor humidity is the source, while moisture on the wall side confirms ongoing water infiltration that needs further attention.
How to Waterproof Concrete: Methods, Products, and Step-by-Step Instructions
Concrete is porous by nature. Water doesn’t just sit on top of it — it migrates through capillary channels in the paste matrix, carrying dissolved salts and eventually causing spalling, rebar corrosion, and structural decay. The right waterproofing method stops that migration at the source, before visible damage starts, especially when property owners take a long-term maintenance view with guidance from the Keyrenter Northwest Chicago team.
Which method works best depends on where the concrete is, the direction of water pressure, and whether you’re working on a new pour or an existing structure. The four main approaches — penetrating sealers, sheet membranes, cementitious coatings, and crystalline waterproofing — each solve a different problem.
Why Concrete Needs Waterproofing
Fresh concrete typically achieves a water-to-cement ratio of 0.45–0.60 during mixing. Hydration consumes some of that water, but the remainder leaves behind a network of capillary pores averaging 0.1–1 micron in diameter. Under hydrostatic pressure, water moves through those channels at a measurable rate even in structurally sound concrete.
Reinforced concrete faces a second threat: chloride ions dissolved in water react with the embedded steel, initiating corrosion at concentrations as low as 0.4% by weight of cement. According to the American Concrete Institute (ACI 318, 2019), corrosion of embedded reinforcement is the leading cause of premature concrete structure failure in North America.
A hairline crack 0.1mm wide — too small to see without magnification, is wide enough for sustained moisture flow at typical groundwater pressures. That physical reality is what makes surface treatments alone an incomplete answer for below-grade applications.
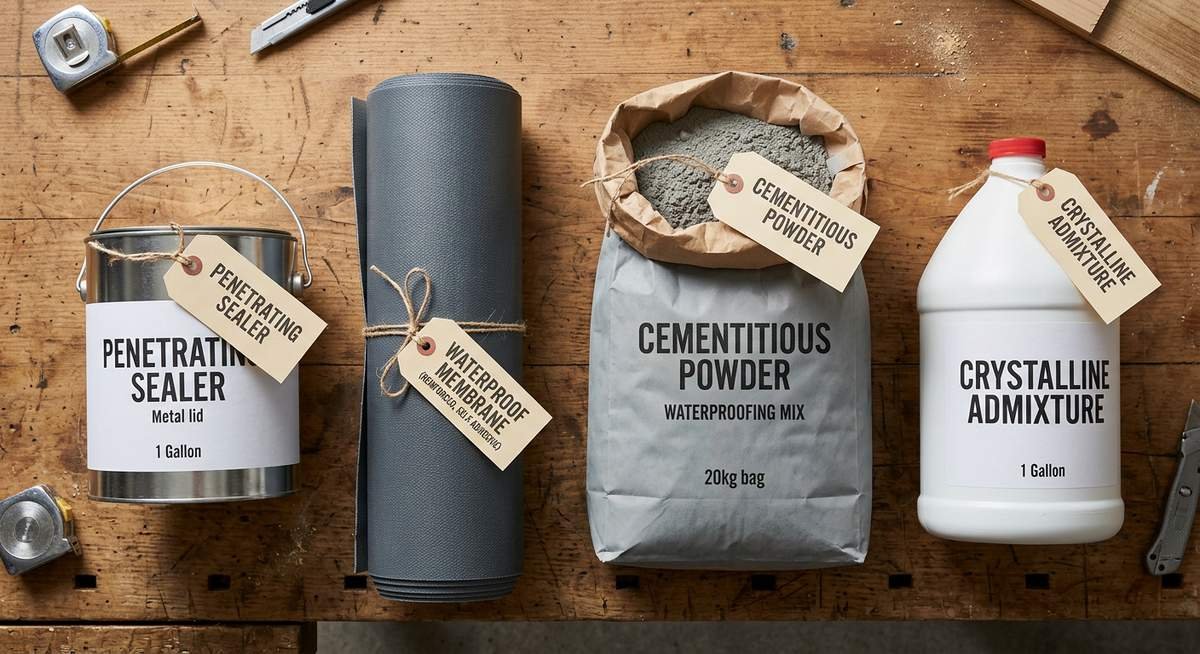
4 Methods to Waterproof Concrete (Compared)
Penetrating sealers, sheet membranes, cementitious coatings, and crystalline systems are the four field-proven approaches. Each works through a different mechanism, and choosing the wrong one for the application is the most common source of premature failure.
Side-by-side comparison of penetrating sealer, sheet membrane, cementitious waterproofing powder, and crystalline admixture, the four main methods for waterproofing concrete surfaces
Method
How It Works
Best For
Cost (DIY)
Durability
Penetrating sealer (silane/siloxane)
Reacts with Ca(OH)₂ in cement paste to form hydrophobic compounds inside the pores
Horizontal surfaces, driveways, above-grade walls
$0.15–0.35/sq ft
5–10 years
Sheet membrane (HDPE or TPO)
Physical barrier bonded to the exterior face of the structure
Reactive chemicals penetrate and form insoluble crystals that block pores permanently
New pours, below-grade structures with positive and negative pressure
$0.40–0.90/sq ft
Permanent (self-healing)
Crystalline systems stand apart from the other three: while sealers, membranes, and cementitious coatings sit on the surface or bond to it, crystalline chemistry penetrates up to 4 inches into the concrete matrix and re-activates when moisture returns. A damaged section of crystalline-treated concrete can partially self-repair, no other method on this list does that.
Surface Preparation: The Step That Determines Everything
No waterproofing product adheres properly to a contaminated or weakened surface. Surface preparation consistently accounts for 80% of waterproofing failures in post-project investigations, according to the Portland Cement Association (PCA, 2021).
Remove all loose material. Use a wire brush, grinder, or pressure washer (minimum 3,000 psi) to strip efflorescence, paint, oils, and deteriorated concrete. Hollow-sounding areas must be chipped out.
Open the pores. Acid etching with a 10% muriatic acid solution, followed by thorough rinsing, opens surface pores and promotes adhesion for cementitious and crystalline products. Skip this step for sheet membranes applied over smooth formed concrete.
Repair cracks before coating. Cracks wider than 1/16 inch require an epoxy injection or hydraulic cement patch. Waterproofing coatings bridge hairline cracks but cannot span structural movement joints.
Dampen (but don’t saturate) the surface. Cementitious products require a saturated surface dry (SSD) condition, damp but with no standing water. A bone-dry surface pulls moisture out of the coating too fast, preventing proper cure.
How to Apply Waterproofing to Concrete
Application steps vary by product type. The sequence below covers the cementitious coating method, which is the most accessible for residential DIY projects and the most commonly misapplied.
Mix the product. Standard cementitious waterproofing mortar uses a 4:1 sand-to-cement ratio by volume. When adding a hydrophobic admixture, use a 1:10 ratio of admixture to water. Mix with an electric drill and paddle until the consistency resembles a thick slurry.
Apply the first coat. Use a stiff masonry brush or slurry brush, working the material firmly into the surface in a scrubbing motion. Minimum layer thickness is 5–8mm. Pressing too hard thins the layer and reduces effectiveness.
Allow partial cure before the second coat. Wait until the first coat is firm but still slightly tacky, typically 4–6 hours at 70°F. Applying too early lifts the first coat; waiting too long creates a bond-line weakness.
Apply the second coat perpendicular to the first. Alternating application direction closes pinholes that form when brush strokes align.
Cure the finished surface. Keep the surface moist for 3–4 days by misting three times daily. In hot or windy conditions, cover with plastic sheeting between misting sessions. Early drying causes shrinkage cracks that compromise the waterproofing layer.
Most DIYers stop at the application and skip the curing step entirely. That decision turns a legitimate 10-year barrier into a coating that starts flaking within two seasons.
Choosing the Right Method for Your Project
Location and water pressure direction determine which waterproofing method will actually work. A product rated for interior negative-side pressure will fail against exterior hydrostatic pressure, and vice versa. Below is a decision matrix organized by the five most common concrete waterproofing scenarios.
Location
Water Pressure Direction
Recommended Method
Why
Below-grade foundation wall (exterior)
Positive (water pushes toward interior)
Sheet membrane or crystalline admixture in new pour
Accommodates thermal movement; continuous film resists ponded water
Water-retaining structure (pool, tank)
Both directions (varies)
Crystalline waterproofing admixture in mix design
Integral treatment resists pressure from both faces; no bond-line failure risk
Interior basement wall coatings are one of the most oversold solutions in home improvement retail. Brands like Drylok and RadonSeal work reasonably well on lightly damp surfaces with moderate vapor transmission. They are not designed to resist active hydrostatic pressure. A wall that’s visibly weeping or shows white mineral deposits (efflorescence) needs exterior drainage or excavation-based treatment, not a coat of paint-like product applied from inside.
“Most cost effective way to waterproof concrete flooring before tiling”, on r/Concrete, a community of concrete professionals and DIYers. A highly-voted response: “Cementitious slurry first, let it fully cure, then tile. Don’t rely on the tile adhesive to do double duty as waterproofing.”
— r/Concrete (2024)
5 Waterproofing Mistakes That Always Cause Failures
Surface preparation failures, skipped curing, and mismatched product selection cause the overwhelming majority of concrete waterproofing problems. These five mistakes appear consistently across both residential DIY projects and professionally installed systems.
Skipping crack repair before application. Coatings bridge hairline cracks under ideal conditions. Any crack that moves, thermally, seasonally, or under load, will break a surface coating within one winter cycle.
Applying to a dry surface. Cementitious products need SSD conditions. A dry surface absorbs water from the slurry before the cement can hydrate properly, resulting in a powdery, weak film.
Insufficient curing. The most common failure mode after application. Skipping the 3-day misting routine cuts effective curing by 60–70% according to PCA data.
Using interior coatings to solve exterior drainage problems. If water is entering a wall due to saturated soil pressing from outside, no interior product will stop it long-term. The hydrostatic pressure will eventually delaminate any coating applied from the inside.
Single-coat application below grade. Below-grade applications require two coats minimum for all cementitious products. Single-coat application achieves the thickness spec only on perfectly smooth formed surfaces, impossible on block or rough-poured walls.
Most homeowners who reach for an interior waterproofing product are doing so because excavating the exterior costs $5,000–$15,000. That price difference shapes the decision in ways that have nothing to do with which solution would actually work. Knowing the limitation of what you’re applying is more valuable than applying it perfectly.
Frequently Asked Questions
What is the best product to waterproof concrete?
The best product depends on the application: silane-siloxane penetrating sealers work well for above-grade horizontal surfaces and driveways; cementitious coatings are the standard for interior basement walls; sheet membranes or crystalline admixtures are preferred for below-grade exterior applications under hydrostatic pressure. There is no single product that performs best in all situations.
Can I waterproof concrete myself, or do I need a contractor?
Above-grade applications, driveways, garage floors, exposed walls, are fully DIY-accessible with proper surface preparation. Below-grade exterior waterproofing requires excavation, which is typically contractor work unless you have the equipment and experience. Interior negative-side coatings are DIY-friendly but come with significant performance trade-offs compared to exterior treatment.
How long does concrete waterproofing last?
Penetrating sealers last 5–10 years with proper surface prep. Cementitious coatings typically perform for 10–20 years. Sheet membranes range from 20–30 years under normal conditions. Crystalline waterproofing is rated as permanent by major manufacturers because the crystal structure within the concrete matrix does not degrade over time.
Is it better to waterproof concrete during the pour or after?
Integral waterproofing admixtures added during mixing provide the most complete protection because the treatment penetrates the entire concrete cross-section. Post-applied surface treatments only protect as far as they can penetrate from the surface, and their effectiveness depends entirely on surface condition and preparation quality.
What’s the difference between dampproofing and waterproofing concrete?
Dampproofing resists moisture vapor and light dampness but is not rated for hydrostatic pressure. Full waterproofing is specifically designed to resist liquid water under pressure. The International Building Code (IBC Section 1805) requires full waterproofing for structures where the water table is likely to rise within 6 inches of the floor level; dampproofing is only acceptable in well-drained conditions.
Does crystalline waterproofing work on existing concrete?
Yes. Crystalline waterproofing products are available as surface-applied slurries for existing structures as well as admixtures for new pours. When applied to existing concrete, the reactive chemicals require free moisture and calcium hydroxide in the concrete to form crystals, both are present in any cured concrete. Effectiveness is lower on very old or carbonated concrete where the calcium hydroxide has been largely depleted.
Final Thoughts
Waterproofing concrete is not complicated, but it requires matching the method to the application, preparing the surface correctly, and completing the cure. The most expensive product applied over poor prep will fail faster than a basic cementitious coating applied properly.
For below-grade foundations, explore the full treatment options in the guide to waterproofing basement walls. If you’re working on an interior DIY project with a limited budget, the DIY basement waterproofing guide covers product selection and application in detail. For projects involving membrane systems specifically, the RedGard waterproofing membrane guide is worth reviewing before you buy.
Nashville Basement Waterproofing: Costs, Methods, and What to Expect
Nashville homeowners deal with one of the most water-prone environments in the country. The city receives roughly 47 inches of rain each year, according to the National Weather Service’s Nashville office, and Middle Tennessee’s clay-heavy soils hold that moisture directly against foundation walls for weeks at a time.
That combination, clay soil plus heavy seasonal rainfall, is the core reason basement water intrusion is so common in the Nashville metro. Addressing it early, before water compromises structural materials or triggers mold growth, is almost always significantly cheaper than waiting.
Why Nashville Basements Are Especially Vulnerable
Nashville basements leak more frequently than those in drier regions because of three intersecting factors: annual rainfall above the national average, clay-dominated soils that drain poorly, and an underlying limestone karst geology that creates unpredictable water migration pathways beneath homes.
Clay soil expands when wet and contracts when dry, cycling through this process dozens of times each year. That expansion pushes against basement walls with what engineers call hydrostatic pressure, forcing water through hairline cracks and porous concrete block at a rate that accelerates over time.
Limestone karst, which underlies significant portions of Davidson and the surrounding counties, adds a second variable. Water moves through dissolved channels in the bedrock, occasionally surfacing beneath a slab without any visible surface indication of where it originated.
The humid climate compounds both problems. The National Weather Service Nashville office reports that Nashville’s average annual precipitation has trended slightly upward over the past two decades, with spring rain events becoming more intense. A basement that handled moisture fine for 20 years can begin showing problems after a single abnormally wet season, not because the waterproofing failed, but because the volume of water finally exceeded what the original drainage design anticipated.
6 Warning Signs Your Nashville Basement Needs Attention
The most reliable early warnings of basement water intrusion are efflorescence (white chalky deposits on walls), visible damp spots or tide lines, a persistent musty smell, and any active mold growth. Catching these signals before they escalate is the difference between a drainage installation and a structural repair bill.
Most Nashville homeowners notice problems in spring, when the ground saturates from March through May. Here are the six signs worth taking seriously:
Warning Sign
What It Indicates
Urgency
Efflorescence (white powder on walls)
Water moving through concrete, carrying salts to the surface
Moderate — address within one season
Damp spots or water stains
Intermittent or active seepage through walls or floor
Moderate to high
Musty odor
Elevated humidity or hidden mold growth
Moderate — mold can spread quickly
Visible mold or mildew
Sustained moisture above 60% relative humidity
High — health risk
Cracks in walls or floor
Hydrostatic pressure, settling, or freeze-thaw cycles
Variable — horizontal cracks are urgent
Standing water or pooling after rain
Active drainage failure or foundation breach
High, address immediately
Horizontal cracks in block or poured concrete walls deserve particular attention. Vertical cracks typically indicate shrinkage or minor settling; horizontal ones signal lateral pressure from saturated soil, which is a structural concern separate from waterproofing.
According to the U.S. Environmental Protection Agency, mold can begin colonizing damp surfaces within 24 to 48 hours of a water event. A damp Nashville basement that smells fine today can have active mold behind a finished wall within days of a significant rain event.
4 Waterproofing Methods That Work in Middle Tennessee
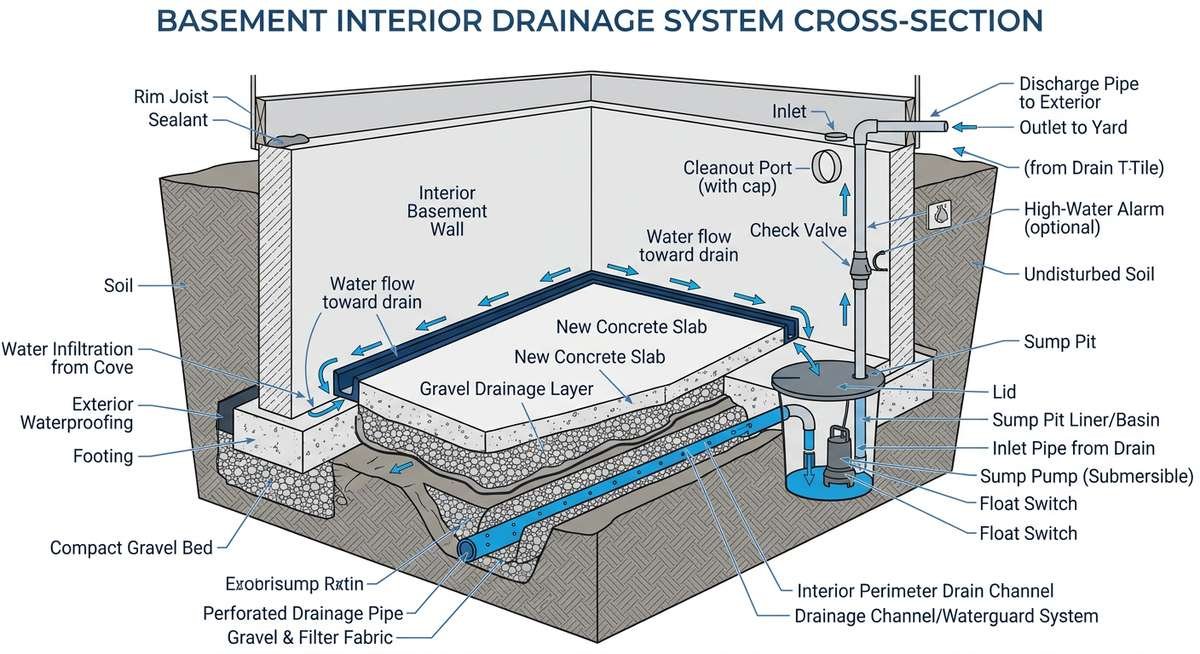
For most Nashville homes, interior drainage systems paired with a sump pump represent the most practical and cost-effective solution. Exterior waterproofing addresses the problem at the wall surface but requires excavation, and crack injection addresses isolated entry points without solving broader drainage problems. Choosing the right method depends on where the water is entering and how much pressure is involved.
How an interior perimeter drainage system channels groundwater from foundation walls to a sump pit, the most common Nashville basement waterproofing solution.
Method
How It Works
Best For
Typical Cost Range
Interior drainage system
Perimeter channel installed at floor-wall joint directs water to a sump pit
Seepage through walls or floor; hydrostatic pressure
$3,000–$12,000
Exterior waterproofing
Excavation, waterproof membrane applied to exterior wall, drainage board installed
Active cracks; new construction; severe hydrostatic pressure
$10,000–$30,000+
Sump pump system
Collects water from drainage system or floor; pumps it away from foundation
Any home with interior drainage; flood-prone areas
$1,200–$5,000
Crack injection (polyurethane or epoxy)
Fills hairline cracks in poured concrete walls from the interior
Isolated cracks in poured concrete (not block walls)
$300–$2,500 per crack
Interior drainage is by far the most common approach in Nashville for an important reason: excavating exterior walls in clay soil is expensive, disruptive, and sometimes requires permits. Interior systems handle the same water volume at a fraction of the cost and can be installed in a single day for most homes.
Sump pumps are nearly always part of the picture. Nashville’s storm intensity means that even a well-designed drainage channel can be overwhelmed without a pump to move accumulated water away from the foundation. A battery backup on the pump matters here, because Nashville loses power during the same storms that produce the highest basement water risk.
Crack injection works for poured concrete foundations with isolated hairline or step cracks but does not address block walls or widespread seepage. Many contractors offer it as a standalone service, and it is genuinely effective when the crack is the only entry point.
Nashville Basement Waterproofing Costs: What Homeowners Actually Pay
Most Nashville homeowners pay between $4,000 and $15,000 for a complete basement waterproofing project involving an interior drainage system, sump pump, and any necessary crack repair. Smaller jobs addressing a single seeping crack can run $500–$2,500; full exterior waterproofing on a larger home can exceed $35,000.
Several factors push costs higher in Middle Tennessee specifically:
Clay soil removal: Excavating clay for exterior work takes longer and requires more equipment than sandy soil.
Block vs. poured concrete: Block foundations are more porous and often require more extensive drainage than poured concrete walls.
Basement size: Interior drainage is priced per linear foot of perimeter, typically $75–$150 per foot in the Nashville market.
Battery backup system: Adds $500–$1,500 but is strongly recommended given Nashville’s storm patterns.
Permits: Davidson County requires permits for structural work; add $150–$500 depending on scope.
“Got quotes ranging from $7k to $30k for sump pump installation and basement waterproofing. The spread is insane.”
— r/basement (homeowner community thread on waterproofing quote variance; r/basement is a community focused on basement improvement and repair)
That price spread is real, and it reflects genuine differences in scope rather than contractor gouging. A quote at $7,000 might include a single sump pump and 40 linear feet of drainage. One at $28,000 might include full-perimeter interior drainage, a primary and backup sump system, wall crack repairs, and a dehumidifier installation.
The single most consistent piece of advice from experienced homeowners: get at least three written estimates from contractors who inspect the basement in person. Phone or website quotes for basement waterproofing are essentially meaningless without seeing the actual space.
Most Nashville waterproofing contractors offer financing, which is worth asking about. Payment is typically structured so the full amount is not due until after installation is complete.
How to Choose a Basement Waterproofing Contractor in Nashville
The most reliable Nashville basement waterproofing contractors carry an A or A+ Better Business Bureau rating, hold a Tennessee contractor’s license, offer a lifetime transferable warranty on drainage systems, and have documented local project history in Middle Tennessee. A transferable warranty adds measurable resale value to a home, making it one of the more financially significant selection criteria.
Several red flags are worth watching for:
High-pressure sales tactics: Any contractor who insists you sign a contract the same day they walk through your basement, especially citing a “one-day-only” discount, is worth avoiding.
No in-person inspection: Legitimate waterproofing proposals require seeing the actual basement, checking crack locations, testing wall moisture, and assessing drainage outlets.
No written warranty: Verbal lifetime warranties are not warranties. Get the terms in writing, and check whether the warranty transfers to a new buyer if you sell the home.
Waterproofing paint as the proposed solution: Paint-based sealants can slow minor condensation but do nothing against active water intrusion or hydrostatic pressure. When a quote leads with paint, the contractor either does not understand the problem or is not equipped to solve it.
No licensed subcontractors for electrical: Sump pump installations involve electrical work. Any contractor performing that work needs to use a licensed electrician or hold the license themselves.
Tennessee’s contractor licensing board (tn.gov) maintains a searchable database where you can verify that a contractor’s license is current before signing anything. Checking BBB complaints and Google Reviews for Nashville-specific projects (not just general reviews from across multiple states) gives a much better picture than star ratings alone.
Frequently Asked Questions
How much does basement waterproofing cost in Nashville?
Most Nashville homeowners pay $4,000–$15,000 for a full interior drainage system with a sump pump. Smaller jobs (isolated crack repair) run $500–$2,500, while full exterior waterproofing can reach $30,000 or more. Cost varies based on basement size, foundation type, and the drainage method required.
Is interior or exterior waterproofing better for Nashville homes?
Interior drainage systems are the practical choice for most Nashville homes because they cost significantly less and do not require excavating in clay soil. Exterior waterproofing provides a true barrier at the wall surface and is better for new construction or severe structural cracks, but the added cost is rarely justified for standard seepage problems.
How long does basement waterproofing last?
Professional interior drainage systems typically last 20–30 years when properly maintained, and many come with lifetime warranties. Sump pumps have a shorter service life, averaging 10–15 years, and should be tested annually. Exterior membrane waterproofing can last 20–30 years but may need inspection if significant soil movement occurs.
What causes basement flooding in Nashville?
The most common causes in Middle Tennessee are hydrostatic pressure from clay soil retaining rainwater, cracks in block or poured concrete walls, failed or overwhelmed sump pump systems, and poor grading that directs surface water toward the foundation. Clogged gutters and downspouts discharging too close to the house account for a significant percentage of water intrusion calls.
Can I waterproof my basement myself?
DIY options like waterproofing paint or hydraulic cement can address very minor moisture or pinhole leaks, but they cannot solve hydrostatic pressure, active cracks, or drainage failures. For anything more than surface condensation, professional installation is the only approach that actually resolves the underlying problem and comes with a warranty.
Does waterproofing a basement increase home value?
Yes. A dry, professionally waterproofed basement with a transferable lifetime warranty is a documented selling point in Nashville’s real estate market. Home inspectors flag water intrusion evidence as a material defect; eliminating that defect removes a negotiating point for buyers and can prevent a sale from falling through entirely during inspection contingency periods.
Getting Started with Nashville Basement Waterproofing
Nashville’s climate is not going to get drier. For homeowners noticing early warning signs, the calculation is straightforward: a $6,000 interior drainage system installed now costs far less than $20,000 in structural repairs three years from now.
The EPA’s mold guidance recommends addressing any moisture source within 24 to 48 hours to prevent colonization. In a Nashville basement that means not deferring an inspection after the first wet spring. Getting three in-person estimates from licensed local contractors, checking BBB ratings and Tennessee contractor license status, and asking specifically about transferable warranties covers the essential bases before signing anything.
Deck Coating Waterproof: Types, Application Guide, and How to Choose the Right System
A quality waterproof deck coating bonds directly to the surface, forms a continuous membrane, and blocks water intrusion before it reaches the substrate. Polyurethane coatings provide the highest durability and chemical resistance, acrylic coatings offer easier cleanup and UV stability, and elastomeric options handle cracked surfaces that other products cannot bridge. Choosing the wrong type — or skipping proper surface prep — is the most common reason deck waterproofing fails within the first few years.
The stakes are real. Wood rot beneath a deck can cost $3,000 to $15,000 to repair according to home improvement cost surveys, and often more when structural framing is involved. A good waterproof coating, properly applied, protects that investment for five to ten years before a recoat is needed.
What Waterproof Deck Coatings Actually Do — and Why Most Fail Early
A waterproof deck coating forms a continuous membrane over the surface, preventing water from penetrating into the substrate below. When a deck coating waterproof system fails, it is almost never because of the product itself — it is surface preparation that gets skipped, coats applied too thick, or recoating left too long.
The membrane works by filling surface pores, bonding chemically to the substrate, and curing into a flexible film that expands and contracts with temperature fluctuations. That flexibility matters. Wood and concrete move constantly, as much as 1/8 inch per 10 feet of surface in response to seasonal humidity changes. A brittle coating cracks at those stress points, and once cracked, water finds its way in immediately.
Three factors cause premature failure across all coating types: applying to a damp surface, skipping the primer on porous or weathered substrates, and applying a single thick coat instead of two thin coats. Each of these problems is avoidable, and each accounts for a disproportionate share of failed waterproofing jobs.
Contractors who work on deck restoration regularly report that peeling coatings almost always trace back to inadequate surface prep rather than product defects, a detail that rarely appears on packaging but defines whether the job holds up.
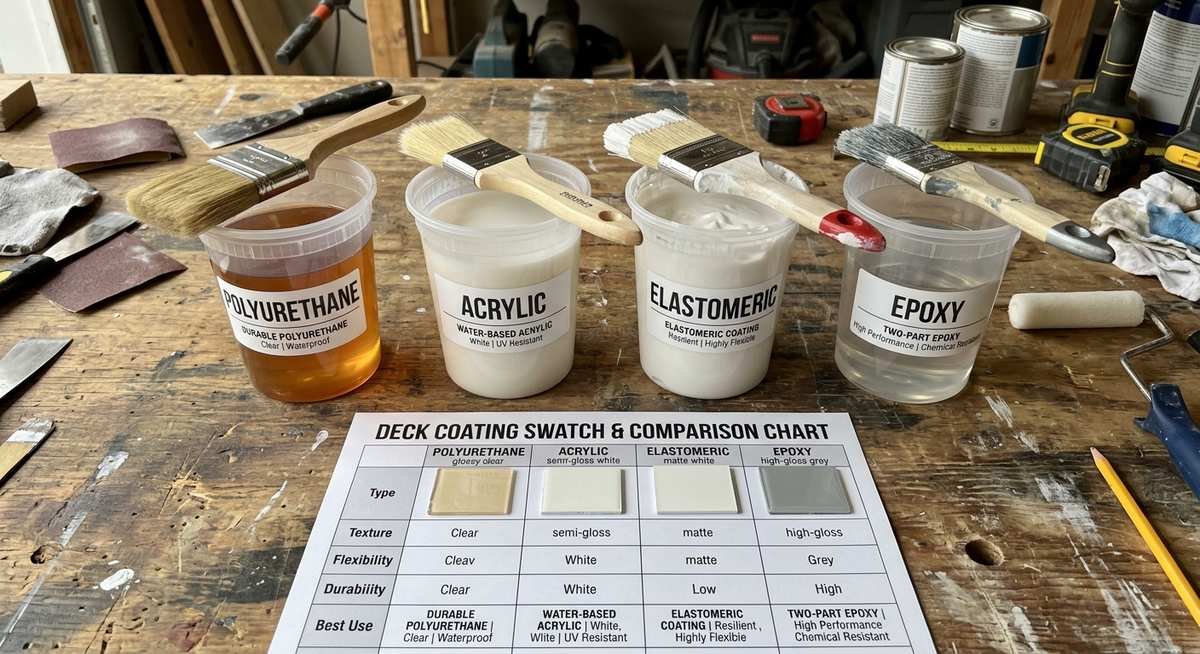
Types of Waterproof Deck Coatings Compared
The four main types of waterproof deck coating, polyurethane, acrylic, elastomeric, and epoxy, use different chemistry to repel water and each performs best in specific conditions. Polyurethane lasts longest but costs the most; acrylic is the most homeowner-friendly; elastomeric bridges existing cracks; epoxy works only on rigid concrete. The table below shows where each one excels and falls short.
Polyurethane, acrylic, elastomeric, and epoxy coatings each use different chemistry to repel water, and each performs best in different conditions. The table below summarizes what each type delivers and where it falls short.
The four main waterproof deck coating chemistries each suit different surface types, climate conditions, and performance requirements.
Coating Type
Best For
Durability
Flexibility
VOC Level
Typical Lifespan
Polyurethane
High-traffic wood and concrete decks
Excellent
High
Medium-High (solvent-based) / Low (water-based)
7–10 years
Acrylic
Residential decks, UV-exposed surfaces
Good
Medium
Low (water-based)
4–7 years
Elastomeric
Cracked concrete, aged surfaces
Good
Very High (bridges cracks up to 1/16 in)
Low-Medium
5–8 years
Epoxy
Concrete pool decks, garages
Very High
Low
Medium
5–10 years
Polyurethane is the workhorse of the category. Its molecular structure creates a tightly crosslinked film that resists abrasion, fuel spills, and UV degradation better than any other option. The tradeoff is cost, polyurethane coatings typically run $60 to $120 per gallon, roughly double what a basic acrylic costs. For high-traffic decks or rooftop applications, that premium is usually justified.
Acrylic coatings dominate the residential market because they balance performance, price, and ease of application. Water cleanup, low odor, and fast recoat times (as short as two hours) make acrylics practical for homeowners without specialized equipment. UV stability is genuinely impressive in modern formulations, 100% acrylic coatings from manufacturers like Ames Research resist color fade and chalking far better than older rubber-based products.
Elastomeric coatings are specifically engineered for surfaces with hairline cracks or slight surface irregularities. A high-build elastomeric formula can bridge gaps up to 1/16 inch, creating a seamless waterproof surface where other coatings would simply crack at the same stress point. On a concrete deck with normal settling cracks, elastomeric is often the most sensible choice.
Epoxy holds up to chemical exposure and mechanical abrasion better than any other type, which is why pool decks and commercial garage floors use it almost exclusively. The downside: epoxy is rigid. On a wood deck or any surface with significant thermal movement, it will crack. Epoxy belongs on concrete only, and that rule is not negotiable.
For deeper research on waterproofing products and their chemical compositions, the Sunanda Waterproofing guide covers product-level specifications and application parameters across a broad range of systems.
How to Choose the Right Waterproof Deck Coating by Surface Type
Surface material determines which coating chemistry bonds correctly and lasts. Applying a product designed for concrete to a wood deck, or vice versa, produces adhesion failures within one to two seasons, regardless of brand or price.
Wood and Plywood Decks
Wood expands and contracts significantly with moisture changes, so flexibility is non-negotiable. Polyurethane and acrylic are the standard choices here, with polyurethane preferred on pressure-treated lumber and acrylic common on cedar or redwood where UV protection matters as much as waterproofing. Any wood deck must be fully dry before coating, moisture content above 15% will prevent proper adhesion.
Plywood subdecks under tile or pavers require a different approach. A dedicated waterproofing membrane applied directly to the plywood, followed by a topcoat, provides the redundancy needed when the surface above cannot be easily removed for recoating. Life Specialty Coatings and similar manufacturers offer under-tile systems specifically for this application.
Concrete and Masonry Decks
Concrete is porous and alkaline, which limits product compatibility. Not every coating bonds reliably to concrete without a dedicated primer; skipping the primer step on bare concrete is the single most common reason for delamination on these surfaces. A penetrating concrete primer applied 24 hours before the waterproof coating dramatically improves bond strength.
Elastomeric and epoxy coatings both perform well on concrete. Elastomeric is the better choice on residential patios and balconies with existing cracks. Epoxy suits pool surrounds, commercial garage decks, and any surface that sees regular chemical or mechanical stress. On vehicular traffic applications, a coating rated for dynamic load, typically a two-component polyurethane or epoxy, is required.
Composite and Manufactured Decks
Most composite decking is designed to be left uncoated, the manufacturer’s warranty will often void if a topcoat is applied. Before coating any composite surface, verify that the product is specifically listed as compatible. On older composite boards where factory sealing has worn down, a clear penetrating sealer rather than a film-forming waterproof coating is usually the correct choice, preserving the original texture while restoring moisture resistance.
Step-by-Step Application Guide for Waterproof Deck Coatings
Proper application requires surface prep, priming where specified, and two thin coats rather than one heavy coat. Each step below is sequenced to match the actual curing requirements of the coating, not convenience.
Clean the surface thoroughly. Power wash at 1,500 to 2,500 PSI to remove dirt, mildew, and loose material. For concrete, a diluted muriatic acid wash removes efflorescence and opens pores. Allow 24 to 48 hours of drying time, longer in humid climates.
Repair cracks and damaged areas. Fill cracks wider than 1/16 inch with a compatible caulk or patching compound. Allow complete cure before proceeding.
Apply primer if required. Check the product datasheet. On porous concrete, weathered wood, or previously coated surfaces, primer is not optional. A primer cut in at edges before rolling the field ensures no gaps.
Apply the first coat at the specified coverage rate. Most products specify 50 to 100 square feet per gallon for the first coat on porous surfaces. Working in 4-foot sections with a 3/8-inch nap roller ensures uniform film thickness.
Allow full recoat window before second coat. Rushing the second coat traps solvents in the first coat and creates delamination. The 24-hour wait between coats has eliminated more failed waterproofing jobs than any other single variable.
Apply second coat in perpendicular direction. Rolling the second coat 90 degrees to the first ensures complete coverage of any thin spots or roller holidays in the first coat.
Allow full cure before traffic. Light foot traffic is typically safe at 24 to 48 hours, but furniture placement and normal use should wait 72 hours minimum. Full chemical cure on polyurethane systems takes 7 days.
Coverage varies significantly by surface porosity and condition. A smooth, sealed concrete surface might yield 150 square feet per gallon on the second coat, while a rough, weathered wood deck may absorb a gallon for every 40 to 50 square feet on the first coat. Planning around an average of 75 square feet per gallon per coat on first application keeps most projects within budget.
Surface Condition
Coverage (sq ft/gallon, 1st coat)
Coats Needed
Product Cost Estimate
Smooth concrete, good condition
100–150
2
$0.80–$1.50/sq ft
Wood deck, light weathering
75–100
2
$1.20–$2.00/sq ft
Rough or porous concrete
50–75
2–3
$1.50–$2.80/sq ft
Heavily weathered wood
40–60
3
$2.00–$3.50/sq ft
Material costs for a 200-square-foot residential deck typically run $80 to $250 for the coating alone, depending on product type and surface condition. Adding primer ($25 to $50 for a gallon), a roller set ($15 to $25), and surface cleaning supplies puts the DIY total for most projects between $130 and $350.
Professional installation adds labor costs ranging from $1.50 to $4.00 per square foot on top of materials. For a 200-square-foot deck, expect total installed costs of $400 to $1,100 through a professional contractor, varying by product selection and local labor rates.
Low-VOC and water-based formulations typically cost 10 to 20 percent more than solvent-based equivalents. The EPA’s guidelines on volatile organic compounds and indoor air quality explain why low-VOC products have become the standard choice for residential applications near living areas.
How Long Waterproof Deck Coatings Last, and When to Recoat
Polyurethane coatings on a well-prepared surface in a moderate climate last 7 to 10 years before recoating. Acrylic coatings in the same conditions typically reach 4 to 7 years. Climate matters substantially: surfaces in coastal environments with salt spray, or regions with extreme UV exposure, will require recoating 30 to 40 percent sooner than the manufacturer’s stated lifespan under standard conditions.
Recoating at the right time extends the life of the substrate. Waiting until the coating fails completely allows water infiltration during the unprotected window and requires more aggressive surface preparation before the next application. The better approach is to recoat on schedule, or at the first sign of performance loss.
Signs that a waterproof deck coating needs attention:
Water no longer beads on the surface, it absorbs or spreads flat
Visible cracking, flaking, or peeling at edges or stress points
Discoloration or chalking that cannot be cleaned away
Any area where the coating has separated from the substrate (identified by a hollow sound when tapped)
Standing water that persists in the same location, suggesting the coating has failed and the water is finding a low point
When recoating over an existing waterproof coating, compatibility testing is important. Solvent-based polyurethane applied over a water-based acrylic, for example, can lift the original coating through solvent action. Most manufacturers publish compatibility charts; following them avoids a full strip-and-recoat job.
For indoor waterproofing applications like showers and wet areas, where the substrate protection principles are similar but the product requirements differ substantially, the complete guide to waterproofing a shower covers the specific membrane systems and tiled surface requirements.
Frequently Asked Questions About Waterproof Deck Coatings
What is the best waterproof coating for a wood deck?
Polyurethane provides the longest-lasting waterproof protection on wood, typically lasting 7 to 10 years with proper surface prep. For homeowners who prefer a DIY-friendly option, a 100% acrylic elastomeric coating balances performance with easier application and cleanup, lasting 4 to 7 years on most residential wood decks.
Can waterproof deck coating be applied over existing paint or sealer?
Yes, but compatibility depends on what is already on the surface. Water-based acrylics bond over most existing water-based paints and sealers in sound condition. Solvent-based polyurethane requires an adhesion test first, apply a small patch, let it cure, and check for lifting or delamination after 48 hours before coating the full surface.
How many coats of waterproof deck coating are needed?
Two coats are the minimum for proper waterproof performance. Three coats are recommended on porous or heavily weathered surfaces where the first coat partially absorbs into the substrate. Single-coat application rarely achieves the film thickness needed for continuous waterproofing, regardless of product claims.
How long does waterproof deck coating take to dry?
Most water-based acrylic coatings allow recoating in 2 to 4 hours under normal conditions (70°F, 50% humidity). Polyurethane systems typically require 4 to 8 hours between coats. Full cure, meaning the coating reaches its final hardness and chemical resistance, takes 5 to 7 days regardless of dry-to-touch time.
Does waterproof deck coating work on concrete?
Waterproof deck coatings bond well to concrete when a compatible primer is applied first. On porous or previously unsealed concrete, primer fills surface voids and establishes a consistent bonding surface. Without primer, even high-quality coatings can delaminate from concrete within one to two seasons.
How long does waterproof deck coating last?
Properly applied polyurethane coatings last 7 to 10 years on a prepared surface. Acrylic coatings deliver 4 to 7 years. Both figures assume a dry surface at application, correct film thickness (typically 12 to 20 mils dry film), and no pooling water on the surface during the service life. Coastal and high-UV environments reduce lifespan by 30 to 40 percent.
What temperature is best for applying waterproof deck coating?
Most coatings specify application between 50°F and 90°F (10°C to 32°C) with surface temperature above the dew point by at least 5°F. Applying below 50°F slows cure significantly and can prevent proper film formation. Applying in direct sun on surfaces above 100°F causes the coating to skin over before it levels, leaving roller marks and reducing adhesion.
Are waterproof deck coatings slip-resistant?
Standard coatings provide a textured surface that offers moderate slip resistance when dry, but become slippery when wet unless an anti-slip aggregate is added. Silica sand, aluminum oxide, or polymer additives are commonly mixed into the topcoat or broadcast onto the wet surface before it cures, increasing the surface coefficient of friction to meet safety standards for outdoor wet areas.
Getting Waterproofing Right the First Time
The right waterproof deck coating for any project comes down to three decisions: surface type, performance requirement, and application skill level. Polyurethane for maximum durability on high-traffic wood or concrete. Acrylic for residential projects where ease of application matters. Elastomeric when cracking is already present. Epoxy only on concrete that will never flex.
Surface preparation is not a step that can be rushed or condensed. Every failed deck coating waterproof job in the data and in contractor field experience traces back to one of three skipped steps: insufficient drying time, missing primer, or a single thick coat instead of two thin ones. The product is almost never the problem.
Budget for two coats, allow the full recoat window, and test adhesion before committing to a product on an unfamiliar substrate. A waterproof deck coating system that costs twice as much and lasts three times longer is the better value in almost every scenario.
Basement Waterproofing in Cincinnati: Costs, Methods, and How to Choose the Right Contractor
Basement waterproofing Cincinnati homeowners need typically costs between $3,000 and $15,000, depending on the method used and the severity of the water intrusion. Interior drainage systems are the most common solution, while exterior excavation is reserved for active foundation leaks. For cases where water persists through cracks or cove joints, tile injection repair offers a targeted, minimally invasive way to seal those entry points from the inside without digging up the exterior. With Cincinnati’s clay-heavy soil and nearly 42 inches of annual rainfall, moisture problems are not a quirk of older homes — they are a predictable outcome of the region’s geology that most homeowners will face at some point.
Why Cincinnati Basements Are Especially Vulnerable to Water Damage
Basement waterproofing Cincinnati addresses a problem rooted in the region’s geology, not just its weather. Cincinnati sits on glacial till and clay-based subsoil that drains poorly and expands when wet. This creates hydrostatic pressure against basement walls, and after a heavy rain, that pressure increases significantly. Homes built before 1970, which make up a large share of Cincinnati’s residential housing stock, were constructed with porous concrete block or stone foundations that had no waterproof membrane applied during original construction.
The city averages about 42 inches of precipitation per year, spread fairly evenly across all seasons, which means basement walls face sustained moisture pressure rather than a single seasonal event. Spring snowmelt adds another layer of saturation. When clay soil freezes in winter and thaws in spring, it shifts, opening up hairline cracks in foundation walls that water finds immediately.
The Little Miami and Great Miami River valleys, along with dozens of smaller tributaries running through Hamilton County, push the water table higher in many older Cincinnati neighborhoods. Price Hill, Mount Lookout, Hyde Park, and Norwood all sit in areas where homeowners routinely deal with seasonal flooding in their lower levels. That geography is not going anywhere, which is why the question for Cincinnati homeowners is rarely “will my basement have moisture issues?” but rather “when and how bad?”
“Why are moldy basements accepted as standard in Cincinnati? What can I do about it?”
— r/cincinnati, a community focused on Cincinnati area news and local discussion (August 2020, 20 comments)
That question drew over a dozen responses from homeowners who had simply accepted standing moisture as a fact of life in their basements. It is not. Chronic basement moisture that goes untreated leads to structural damage, mold colonization, and significantly reduced home resale value — problems that a properly installed waterproofing system prevents entirely.
Interior vs. Exterior Waterproofing: What the Difference Actually Means
Interior waterproofing manages water that has already entered the foundation, routing it away before it damages floors or framing. Exterior waterproofing stops water from reaching the foundation wall in the first place. Both approaches solve different problems, and the right choice depends on where the water is coming from and the condition of your foundation.
Interior drainage systems (left) manage water after entry; exterior systems (right) block moisture before it reaches the foundation wall.
Method
How It Works
Typical Cincinnati Cost
Best For
Interior French Drain / Drain Tile
Perforated pipe installed along footer collects seeping water, directs it to a sump pit
$5,000 – $12,000
Chronic seepage through walls or floor, most Cincinnati homes
Sump Pump Installation
Electric pump removes collected water from pit and discharges outside
$1,000 – $3,000
Often paired with interior drain tile system
Exterior Waterproofing
Excavation around perimeter, waterproof membrane applied to exterior foundation wall
$10,000 – $25,000
Active foundation cracks, situations where interior system is insufficient
Crack Injection
Polyurethane or epoxy injected directly into foundation cracks under pressure
$400 – $1,500 per crack
Isolated vertical or horizontal cracks in poured concrete walls
Wall Vapor Barrier
Heavy-gauge plastic sheeting attached to basement walls directs seeping water down to drain
$1,500 – $4,000
Block wall seepage without full interior excavation
For most Cincinnati homeowners with older concrete block foundations, interior drainage combined with a sump pump is the standard solution. Exterior excavation is more invasive, more expensive, and generally reserved for situations where structural repair to the foundation wall is also required. A contractor who recommends full exterior excavation for routine seepage on a structurally sound wall is likely upselling.
Warning Signs Your Cincinnati Basement Needs Waterproofing Now
When scheduling basement waterproofing Cincinnati homeowners commonly see three early indicators: white chalky deposits on basement walls, a persistent musty smell, and water stains along the base of the walls are the three most reliable early indicators that waterproofing is needed. Ignoring these early signs typically allows the problem to progress until structural damage or significant mold growth forces a more expensive intervention.
Efflorescence (white chalky deposits): Mineral salts left behind as water migrates through masonry. The presence of efflorescence confirms active water movement through foundation walls.
Horizontal cracks in block foundation walls: These indicate lateral soil pressure pushing against the wall. Unlike vertical cracks, horizontal cracks suggest structural compromise and warrant immediate evaluation.
Water stains or tide marks: Rust-colored or gray staining along the wall base or floor indicates regular water infiltration, even if the basement appears dry during your inspection.
Peeling paint or bubbling drywall: Moisture trapped behind finished basement walls often reveals itself first as paint failure or soft, discolored drywall panels.
Floor cracks or heaving: Basement floor cracks that were not there when you moved in suggest soil movement or hydrostatic pressure building beneath the slab.
Sump pump running constantly or cycling frequently: A sump pump that runs every few minutes in normal conditions, rather than occasionally during heavy rain, signals that groundwater levels have risen enough to require a more permanent system.
A single hairline crack in a poured concrete wall might look harmless. But water under pressure finds any opening, and a crack that passes only small amounts of moisture one spring can transmit several gallons per hour after another season of soil movement. The cost of intervention grows faster than most homeowners expect once structural repairs enter the picture.
What Basement Waterproofing Costs in Cincinnati
Most homeowners seeking basement waterproofing Cincinnati quotes spend between $5,000 and $15,000 for a full interior drainage system with sump pump installation. Smaller jobs like crack injection or vapor barrier installation fall well below that range, while exterior excavation and waterproofing with foundation repair can reach $30,000 or more for large homes or severe damage.
Pricing in the Cincinnati market depends on four main variables: the linear footage of foundation wall being treated, whether a sump pit needs to be excavated, the extent of any foundation repair required, and whether the existing sump pump can be retained or needs replacement. Some contractors price per linear foot of drain tile installed; a typical Cincinnati basement perimeter runs 130 to 180 linear feet.
Job Type
Low End
High End
Notes
Interior drainage system (partial perimeter)
$3,000
$7,000
Common for single wall or corner seepage
Interior drainage system (full perimeter)
$7,000
$15,000
Includes sump pump installation in most quotes
Sump pump only (no drainage system)
$800
$2,500
Replacement units run lower than new installations
Crack injection
$400
$1,500
Per crack; poured concrete walls only
Exterior waterproofing
$10,000
$30,000+
Depends heavily on depth of foundation and landscaping
Community discussions on r/basement have documented quotes ranging from $7,000 to $30,000 for sump pump and drainage system combinations in the Midwest — figures consistent with what Cincinnati contractors report for similar scopes. Get at least three quotes from different companies, and be cautious of estimates that come in significantly below the others without a clear explanation of what they are leaving out.
How to Choose a Basement Waterproofing Contractor in Cincinnati
Choosing the right company for basement waterproofing Cincinnati homeowners can actually trust takes more than a Google search. The right contractor will inspect the basement before providing a quote, explain exactly which products and installation methods they are recommending, and provide a warranty that is transferable to future homeowners. Any contractor who offers a same-day quote by phone without seeing the space, or who pressures you to sign before a deadline, is a red flag worth heeding.
Ohio does not require a specific license for basement waterproofing, which means virtually anyone can operate in this space. This is precisely why verification steps matter more here than in other home improvement categories.
Verify Ohio business registration: Check the Ohio Secretary of State’s business search database to confirm the company is properly registered and has been operating for at least a few years.
Check BBB and Google reviews separately: Look specifically for complaints about warranty claims being honored, callbacks for recurring leaks, and how the company handles problems after installation. Positive reviews about the sales process are less meaningful than positive reviews about follow-through.
Ask about the warranty explicitly: Reputable Cincinnati waterproofing companies typically offer warranties ranging from 10 years to lifetime on their drain tile systems, and many of these are transferable. Get the warranty terms in writing before signing anything.
Understand what is and is not included: Drain tile installation quotes often do not include sump pump replacement, electrical work for the pump circuit, or wall vapor barrier material. Ask for an itemized scope of work.
Request local references: Ask for contact information of two or three customers in Cincinnati who had similar work done at least two years ago. A company confident in its work will provide these without hesitation.
Some Cincinnati homeowners on r/cincinnati have shared positive experiences with locally owned companies that do not rely on aggressive in-home sales presentations, while others have detailed frustrating post-installation warranty disputes with national franchise operations. The pattern suggests that companies with local ownership and a local reputation at stake tend to be more responsive when problems arise after installation.
Frequently Asked Questions About Basement Waterproofing in Cincinnati
How long does basement waterproofing take to complete?
Most interior drainage system installations in Cincinnati take one to three days for a typical single-family home. Exterior waterproofing projects take longer, generally three to five days, since they require excavation, foundation preparation, membrane application, and backfill. The work is disruptive but does not typically require homeowners to vacate the property.
Does basement waterproofing increase home value in Cincinnati?
Yes. According to National Association of Realtors research, basement waterproofing typically returns between 30 and 50 percent of its cost in home value, and a dry, problem-free basement also speeds up the sale process. In Cincinnati’s housing market, disclosure requirements mean that known water intrusion history must be reported, which makes a documented waterproofing system and warranty a genuine selling point.
Is interior or exterior waterproofing better for Cincinnati homes?
For most Cincinnati homes, particularly those with concrete block foundations built before 1980, interior drainage systems are the preferred approach. They are less disruptive, less expensive, and well-suited to managing the hydrostatic seepage common in Hamilton County’s clay-heavy soil. Exterior waterproofing is the right choice when foundation wall damage requires repair from the outside, or when a previous interior system has failed.
Can Cincinnati homeowners waterproof their own basements?
DIY sealers and hydraulic cement can address minor surface moisture, but they do not manage hydrostatic pressure. Products applied to the interior face of a block wall will eventually fail under sustained water pressure. Homeowners with active seepage, pooling water, or cracks with water infiltration need a proper drainage system — which requires saw-cutting concrete, installing perforated pipe at or near the footer, and connecting to a sump pit. That work is beyond a typical DIY project.
How long does a basement waterproofing system last in Cincinnati?
A properly installed interior drainage system with a quality sump pump can last 20 to 30 years with minimal maintenance. The sump pump itself typically requires replacement every 7 to 10 years. Most warranties from reputable Cincinnati contractors cover the drainage system for 10 years to lifetime, and the better ones transfer to new owners. Regular annual checks, testing the pump, clearing the drain channel of debris, keep the system functioning properly over its lifespan.
Will waterproofing fix my Cincinnati basement mold problem?
Waterproofing eliminates the moisture source that allows mold to grow, but it does not remove mold that is already present. Any existing mold colonies on framing, drywall, or insulation need to be remediated before or simultaneously with waterproofing work. Leaving mold in place after waterproofing will trap it behind vapor barriers where it continues to affect indoor air quality. Contractors who offer both mold remediation and waterproofing can handle both in the same project window.
When is the best time of year to schedule basement waterproofing in Cincinnati?
Late summer and fall are generally the best windows for basement waterproofing in Cincinnati. Soil moisture is typically lower after the dry summer months, which makes interior drain tile installation cleaner and excavation easier. Spring and early summer are the busiest periods for waterproofing contractors due to post-flooding demand, so scheduling times and wait lists are often longer. However, if active water intrusion is occurring, there is no benefit to waiting for an ideal season.
Effective basement waterproofing Cincinnati homeowners rely on is not luck. It is the result of understanding why the water comes in and choosing the right system to manage it. The geology, the housing stock, and the rainfall patterns all point toward the same conclusion: waterproofing is maintenance, not an upgrade. Homeowners who treat it that way avoid the far more expensive repairs that follow years of unmanaged moisture.
Basement Waterproofing Membrane: Best Types, Costs, and How to Choose the Right System
A basement waterproofing membrane is the barrier layer that helps stop groundwater, seepage, and moisture from moving through below-grade walls and floors. The right system depends on where the water is entering, how much hydrostatic pressure the foundation sees, whether the substrate moves, and whether you are fixing an existing leak or protecting new construction.
If you want the short answer, the best long-term exterior basement waterproofing membrane solution is usually a properly installed sheet or liquid-applied membrane paired with drainage. For interior repairs, coatings and drainage management can help, but they do not usually solve exterior water pressure at the source. If you need a broader primer first, see our guide to basement waterproofing and our breakdown of foundation waterproofing membranes.
What is this system?
This below-grade membrane is a liquid or sheet-applied barrier installed on basement walls, floors, or both to resist water entry. Its job is either to block water before it reaches the foundation, manage seepage after it reaches the wall, or work with drainage so the pressure around the structure stays under control.
In practical terms, homeowners usually hear this phrase used for five system families: cementitious coatings, bituminous products, polyurethane or liquid rubber membranes, HDPE or similar sheet membranes, and bentonite-based systems. Each one works best under a specific set of site conditions, so choosing by material name alone is where many projects go wrong.
Best basement waterproofing membrane types
The best option is the one that matches water pressure, wall condition, access, and installation quality. For most retrofit projects, the decision comes down to whether you need an exterior membrane that stops water before it reaches the wall or an interior system that manages moisture after it arrives.
Membrane type
Best use
Main strengths
Main limits
Cementitious
Interior walls, masonry, stable concrete
Affordable, easy to apply, bonds well to mineral surfaces
Rigid; can crack if the substrate moves
Bituminous coating or sheet
Exterior foundation walls
Good water resistance, proven below grade, cost-effective
Application quality matters; some systems need torches or careful seam work
Polyurethane or liquid rubber
Detailed areas, irregular surfaces, seamless exterior work
Flexible, seamless, strong adhesion around penetrations
Surface prep and thickness control are critical
HDPE sheet membrane
Exterior walls, high-moisture foundations, long-life systems
Durable, puncture resistant, strong chemical resistance
Seams, laps, and detailing decide performance
Bentonite composite
Below-grade walls, blindside or new-construction style work
Self-sealing behavior when confined, useful around minor penetrations
Not ideal for every retrofit; confinement and installation details matter
At Aqviz, we generally separate membrane choice into two buckets. If the goal is to stop outside water pressure, you are usually comparing exterior sheet and liquid systems. If the goal is to reduce minor seepage and surface dampness inside an already-finished basement, cementitious and coating-style products may be part of the repair, but they should not be confused with a full exterior waterproofing solution.
Which membrane works best for exterior basement waterproofing?
For exterior work, the most dependable basement waterproofing membrane option is usually a professionally detailed liquid-applied or sheet-applied system installed on the outside face of the wall and paired with drainage protection. That is the setup that addresses water before it pushes through concrete or block.
Bituminous systems remain common because they are proven, widely available, and budget-friendly. If you are comparing bitumen with other systems, our guide to bituminous waterproofing membranes explains where it fits best. HDPE sheet systems are attractive when durability, puncture resistance, and long service life matter. Bentonite composites can also work well in below-grade conditions, especially where self-sealing behavior around minor punctures is a real advantage.
A good exterior assembly is not just the membrane. It also includes wall preparation, crack repair, proper overlaps or continuity, drainage board where specified, and a functioning perimeter drain or outlet path. A membrane without drainage is one reason homeowners pay twice for the same problem.
Interior vs. exterior systems
An exterior membrane prevents water from reaching the foundation wall in the first place. An interior coating or drainage-side solution usually manages moisture after water has already reached the structure. That difference matters more than the product label.
Exterior systems are stronger when you are dealing with hydrostatic pressure, recurring seepage through wall cracks, wall-floor joint leakage, or chronic wet soil conditions. Interior systems can still be useful for condensation, light dampness, or as one part of a broader interior drainage setup, especially when excavation is impractical.
Homeowners often buy a coating or roll product expecting it to fix an active exterior water problem from the inside. Sometimes it improves the surface appearance for a while. It does not always remove the pressure outside the wall. That is why interior coatings should be matched to the actual failure mechanism, not just the visible stain pattern.
How to choose the right system
The right system is the one that matches how water is entering, what the wall is made of, how much movement the substrate has, and whether exterior access is realistic. Start with the failure mode, then choose the material.
Choose an exterior membrane when water enters through the wall body, through recurring cracks, or after heavy rain with obvious outside saturation.
Choose a more flexible liquid system when the wall has complex geometry, penetrations, corners, or irregular surfaces that are hard to detail with rigid sheets.
Choose a sheet system when you want controlled thickness, strong puncture resistance, and a clearly defined installation layer.
Choose cementitious coatings carefully for stable interior concrete or masonry where the goal is surface protection rather than solving major exterior pressure.
Choose bentonite-based systems carefully where their swelling, self-sealing behavior is an advantage and the assembly can be properly confined.
Before final selection, check five practical items: crack activity, wall material, outside access, drainage condition, and finish level inside the basement. A membrane that works on poured concrete may be a poor fit for block walls if the real issue is hidden water inside the cores or a failed footing drain.
How this membrane system is installed
A below-grade membrane only performs as well as the prep beneath it. Most failures come from dirty surfaces, skipped crack repairs, thin spots, bad overlaps, or no drainage path.
Inspect the basement and foundation to locate cracks, seepage lines, wall-floor leakage, efflorescence, and grading issues.
Decide whether the repair is interior management, exterior waterproofing, or a combined system.
Clean the substrate and repair honeycombs, voids, tie holes, and active cracks.
Prime the surface if the membrane system requires it.
Apply or install the membrane to the specified thickness, overlap, and cure sequence.
Add protection board or drainage board where the system calls for it.
Connect the work to drainage, sump discharge, footing drains, or safe runoff control so water is actually redirected away.
Backfill carefully on exterior jobs to avoid damaging the membrane.
That is why it should be treated as a system, not a bucket or roll. Material quality matters, but continuity matters even more.
Basement waterproofing membrane costs and service life
Project costs vary widely because the membrane is only one part of the job. Material cost is usually not the biggest number. Labor, excavation, drainage upgrades, crack repair, access limitations, and cleanup often decide the final bill.
For full basement waterproofing projects, national estimates from Bob Vila and Forbes Home place many jobs in the low-thousands to low-five-figures, depending on scope. In real projects, a basic interior coating repair can be far cheaper than an exterior full-perimeter excavation and membrane job. Once excavation, drainage board, and footing-drain work are added, the number rises quickly.
Service life also depends on system type. Cementitious products can perform well on stable substrates but are less forgiving of movement. Bituminous and polyurethane systems can last for many years when the substrate is prepared properly and the membrane is protected. HDPE sheet systems are chosen partly because of long-term durability. Bentonite systems are valued for their ability to swell and help seal minor gaps when installed in the right assembly.
Common membrane mistakes
The most expensive mistake is using one product as if every leak has the same cause. Basement water problems rarely fail in a neat, one-product way.
Using interior paint or coating to fight active exterior hydrostatic pressure.
Skipping drainage improvements and expecting the membrane alone to do all the work.
Applying membrane over dust, loose mortar, damp contamination, or unfilled cracks.
Ignoring corners, penetrations, and cold joints where leaks often begin.
Confusing dimple board or drainage board with the waterproofing layer itself.
Choosing by brand popularity instead of wall type, movement, and water conditions.
If you are deciding between systems, it helps to compare the membrane with the entire repair path. In many basements, the winning solution is not just “best membrane,” but “best membrane plus drainage plus crack treatment plus grading correction.”
Our recommendation for homeowners
If your basement has occasional surface dampness and stable concrete, a coating-based basement waterproofing membrane may be enough for part of the repair. If the basement has recurring seepage, hydrostatic pressure, or outside wall leakage, an exterior membrane system with drainage is usually the more durable answer.
For homeowners who are still narrowing the options, start with these rules:
Pick cementitious for stable, interior mineral surfaces when budget matters and movement is low.
Pick bituminous when you want a proven exterior membrane with broad contractor familiarity.
Pick polyurethane or liquid rubber when detail work and seamless coverage are more important than sheet handling.
Pick HDPE sheet when long-term exterior durability and puncture resistance are priorities.
Pick bentonite composite when the project conditions suit a confined, self-sealing below-grade assembly.
If you want help comparing the actual condition of your basement to the right system, Aqviz can help you evaluate the membrane type, drainage needs, and repair sequence before you buy materials that do not fit the problem.
Frequently Asked Questions
Is it better than waterproof paint?
Yes, in most serious leak scenarios, a true membrane system is better than waterproof paint because it is designed to create a dedicated barrier layer, not just a cosmetic surface coating. Paint may help with mild dampness, but it is usually not enough for recurring seepage or outside water pressure.
What is the best basement waterproofing membrane for exterior walls?
The best basement waterproofing membrane for exterior walls is usually a properly installed liquid-applied or sheet-applied system paired with drainage. The exact winner depends on wall condition, detailing complexity, access, and whether the project needs flexibility, puncture resistance, or self-sealing behavior.
Can you install one from the inside?
Yes, some interior products and coatings can be installed from the inside. They are useful for selected conditions, but they do not always remove the exterior water pressure causing the leak. That is why interior systems should be chosen after diagnosis, not as an automatic shortcut.
How long does it last?
A quality system can last for many years, and in some assemblies decades, when the substrate is prepared well and the membrane is protected from installation damage. Actual lifespan depends on the material type, site drainage, wall movement, and workmanship quality.
Is damp-proofing the same thing?
No. Damp-proofing mainly slows moisture movement, while a true waterproofing membrane is intended to resist or block water intrusion more aggressively. The difference matters most when the basement faces hydrostatic pressure or repeat leakage after storms.
Need help choosing the right system for your project? Start with Aqviz resources on building waterproofing, compare membrane options, and then match the product to the water problem instead of guessing from shelf labels.
How to Waterproof a Shower: The Complete Step-by-Step Guide
A single missed coat of waterproofing membrane can send $10,000 in mold remediation bills straight to your kitchen table. Waterproofing a shower means applying a continuous barrier (liquid membrane, sheet membrane, or PVC liner) over cement backer board before any tile goes up, with particular care at corners, seams, and drain connections. Get it right once, and the system lasts 10 to 15 years without intervention. Cut corners, and moisture migrates into wall cavities within months.
The good news: this is a project most confident DIYers can handle over a weekend. The bad news: the margin for error is razor-thin, especially around the shower pan and drain assembly. Everything below covers how to waterproof a shower from start to finish: which method to choose, what materials to buy, how to apply the membrane step by step, and how to test the seal before committing to tile.
Waterproofing Methods Compared: Liquid Membrane vs. Sheet Membrane vs. PVC Liner
Liquid-applied membranes like RedGard are the easiest for DIY application, sheet membranes like Schluter Kerdi provide the most reliable waterproof barrier for tile-ready walls, and PVC liners remain the standard for traditional mortar-bed shower pans. Each system has a clear sweet spot depending on your budget, skill level, and shower design.
Liquid membranes go on with a paint roller. Two coats, roughly 12 to 24 hours of cure time between applications, and the surface turns into a rubberized waterproof skin. RedGard from Custom Building Products and HydroDefense from Laticrete are the two dominant brands in the North American market. A gallon covers about 55 square feet at the recommended thickness of 30 mils dry, running roughly $0.50 to $0.80 per square foot for materials alone.
Sheet membranes take a different approach. Schluter’s Kerdi system bonds directly to cement backer board with unmodified thinset mortar, creating a vapor-tight envelope. The membrane itself runs about $1.20 to $1.80 per square foot, but installation requires precise cutting and overlap management. Professional tile setters tend to prefer this system for its consistency.
PVC and CPE liners serve a narrower purpose. According to Oatey’s waterproofing guide, these flexible sheet liners wrap the shower pan before the mortar bed is poured, creating a catchment system that directs water to the drain through weep holes. Material cost sits around $0.60 to $1.00 per square foot.
Method
Cost per Sq Ft
DIY Difficulty
Cure Time
Best For
Liquid membrane (RedGard)
$0.50 – $0.80
Easy
12 – 24 hours
Walls, ceilings, simple layouts
Sheet membrane (Kerdi)
$1.20 – $1.80
Moderate
Immediate (after thinset sets)
Full shower envelope, walk-in showers
PVC/CPE liner
$0.60 – $1.00
Moderate-Hard
None (mechanical seal)
Traditional mortar-bed shower pans
A single pinhole in a liquid membrane lets through roughly one gallon of water per day. That volume, trapped behind tile in a wall cavity, can rot a floor joist in under six months.
Materials and Tools You Need Before Starting
A complete shower waterproofing project requires cement backer board, your chosen waterproofing membrane, alkaline-resistant mesh tape, thinset mortar, and a handful of standard tools. Total material cost runs $150 to $400 depending on shower size and method.
Materials Checklist
Material
Liquid Membrane
Sheet Membrane
PVC Liner
Cement backer board (1/2″)
Required
Required
Required
Backer board screws
Required
Required
Required
Alkaline-resistant mesh tape
Required
Included (Kerdi Band)
Required
Waterproofing membrane
1 gal per 55 sq ft
By linear foot
By linear foot
Thinset mortar
For backer board only
Unmodified (for Kerdi)
For backer board only
Drain flange kit
Recommended
Required (Kerdi Drain)
Required (PVC bonding)
Pre-slope mix
Optional
Optional
Required
Tools List
Notched trowel (1/4″ x 3/16″ V-notch for Kerdi; flat for liquid)
Paint roller or brush (for liquid membrane application)
Utility knife with fresh blades
Mixing drill with paddle attachment
Level (4-foot minimum)
Tape measure and pencil
Cement board scoring tool or circular saw with dust extraction
How to Waterproof a Shower Step by Step
Shower waterproofing follows five stages: substrate preparation, backer board installation, membrane application, corner and seam treatment, and drain connection sealing. Each stage builds on the previous one, and skipping or rushing any of them compromises the entire system.
Step 1: Prepare the Substrate
Strip the shower area down to bare studs. Check every stud for plumb using a 4-foot level, and sister any warped studs with straight lumber. Install blocking between studs at 12-inch intervals where grab bars, shower valves, or niches will go. The framing needs to be flat and stable because cement backer board does not flex to accommodate a crooked wall.
Verify that the subfloor slopes toward the drain at a minimum pitch of 1/4 inch per foot. For mortar-bed pans, this pre-slope gets built up with deck mud before the liner goes down. For direct-to-membrane systems, the subfloor itself must already have the correct pitch.
Step 2: Install Cement Backer Board
Cut 1/2-inch cement backer board to fit the shower walls, leaving a 1/8-inch gap between panels and a 1/4-inch gap at the bottom edge above the shower pan. Fasten with corrosion-resistant backer board screws every 8 inches along studs. Use shims behind the board where studs are recessed to keep the surface plane flat.
Tape all seams with alkaline-resistant mesh tape and skim-coat with thinset mortar. This step prevents moisture from migrating through the joints even if the waterproofing membrane develops a localized failure years later.
Step 3: Apply the Waterproofing Membrane
For liquid membranes, stir the product thoroughly and apply the first coat with a paint roller or brush. Work from top to bottom, maintaining a consistent thickness of approximately 15 mils wet per coat. Cover the entire backer board surface, extending at least 3 inches past the shower threshold onto the adjoining wall or floor surface.
Wait the full cure time printed on the product label (typically 12 to 24 hours for liquid membranes) before applying the second coat. The second coat should go on perpendicular to the first. Total dry thickness after two coats needs to hit 30 mils minimum. A wet film thickness gauge costs under $10 and prevents guesswork.
For sheet membranes, spread unmodified thinset mortar over a manageable section of backer board, press the Kerdi sheet into the thinset, and smooth out air bubbles with a flat trowel or Kerdi smoother. Overlap adjacent sheets by a minimum of 2 inches.
Waterproofing membrane coating applied over cement backer board, with reinforcement mesh tape visible at corner joints
Step 4: Seal Corners, Seams, and Penetrations
Inside corners get a strip of membrane fabric or pre-formed corner piece bedded in additional membrane or thinset. The fabric strip should extend at least 2 inches on each side of the corner. Pipe penetrations (shower valve, shower head arm) require a tight seal using the membrane manufacturer’s specific pipe collar or a generous application of liquid membrane built up in multiple thin coats.
“Contractor installing shower tiles over cementboard (and drywall?) with no visible waterproof? […] That’s a tear-out. No waterproofing on cement board in a shower is a guaranteed failure within a few years.”
— r/HomeImprovement, March 2026 (55 upvotes)
This aligns with industry standards from the Tile Council of North America (TCNA), which requires a waterproof barrier behind all tile in wet areas.
Professional tile setters debate sheet versus liquid membrane endlessly online, yet they all agree on one point: skipping the corner reinforcement tape is the fastest route to a callback.
Step 5: Waterproof the Shower Pan and Drain
The shower pan is where most waterproofing failures originate. For PVC liner systems, the liner wraps up the walls at least 3 inches above the finished curb height and folds into the drain assembly with a clamping ring that compresses the material against the drain body. The pre-slope underneath directs any water that penetrates the tile and mortar bed toward weep holes in the drain.
For bonded membrane systems (Kerdi or liquid), the membrane runs continuously from the walls down across the shower floor and into the drain flange. The Kerdi Drain, for example, uses a bonding flange that integrates directly with the sheet membrane, creating a single unbroken waterproof surface from wall to drain.
The curb deserves extra attention. Wrap the membrane over the top of the curb and at least 2 inches down the outside face. Water splashes onto the curb constantly during every shower, and an unwrapped curb is a leak waiting to happen.
How to Flood Test Your Shower Waterproofing
A flood test fills the shower pan with 1 to 2 inches of water for 24 hours to verify the waterproofing seal holds before any tile gets installed. This step is non-negotiable.
Plug the drain with an expandable test plug (available at any plumbing supply store for under $15). Fill the pan slowly with a garden hose until water reaches 1 to 2 inches above the drain. Mark the water level with a pencil line on the curb or a piece of tape. Walk away for 24 hours.
Come back and check the water level against your mark. Any drop means a leak exists somewhere in the pan assembly. Check the ceiling below the shower for moisture stains, and inspect the drain connection and curb corners first, as these are the two most common failure points.
“Was My Shower Properly Waterproofed? […] If you can, do a flood test before any tile goes on. It’s the only way to know for sure.”
— r/Tile, April 2026 (22 comments)
The 24-hour wait feels excessive until you calculate the alternative: ripping out $2,000 worth of freshly laid tile to patch a leak that a bucket of water would have caught.
Common Shower Waterproofing Mistakes to Avoid
The five most costly shower waterproofing mistakes are insufficient membrane thickness, skipping corner treatment, mixing incompatible waterproofing systems, tiling before full cure, and neglecting the shower curb. Each one leads to the same outcome: water behind tile, mold in wall cavities, and an expensive demolition.
Insufficient membrane thickness. One thin coat of RedGard looks like coverage, but it is not waterproof until it reaches 30 mils dry. Two full coats are the minimum. Three coats at corners and changes of plane.
Skipping corner and seam treatment. Backer board joints and inside corners are the highest-stress points in a shower. Mesh tape embedded in membrane at every joint prevents cracking as the structure shifts seasonally.
Mixing incompatible systems. Using modified thinset with Schluter Kerdi, for instance, traps moisture between the membrane and the mortar. Schluter specifically requires unmodified thinset for this reason. Mixing brands without checking compatibility charts causes the same problem.
“Help interpreting shower leak and mixed waterproofing system (Kerdi + RedGard + HardieBacker) […] Mixing waterproofing systems is a recipe for finger-pointing when it fails. Pick one manufacturer’s system and stick with it.”
— r/Tile, October 2024 (51 comments)
This concern matches guidance from Schluter Systems, which voids warranty coverage when their products are combined with third-party waterproofing membranes.
Tiling before full cure. Liquid membranes that feel dry to the touch may not have reached full cure. Tiling too early traps uncured chemicals against the backer board, weakening adhesion over time. Follow the manufacturer’s printed cure schedule, not the touch test.
Neglecting the shower curb. The curb takes direct water contact from every shower. Wrapping membrane over the top and down the outside face is required, not optional. An exposed curb wicks moisture into the framing below.
A veteran tile installer on r/Tile put it plainly: mixing waterproofing systems is a recipe for finger-pointing when something eventually fails. Pick one manufacturer’s ecosystem and follow their installation manual cover to cover.
Maintenance After Waterproofing: Keeping Your Shower Leak-Free
Shower waterproofing lasts 10 to 15 years with proper maintenance, primarily through regular caulk joint inspection and resealing every one to two years at all changes of plane.
Caulk joints where the tile meets the shower pan, the curb, and any wall-to-wall corners are the first line of defense above the waterproofing layer. When caulk cracks or pulls away, water reaches the membrane underneath and tests its integrity constantly. Recaulking with a quality silicone (not latex) sealant every 12 to 18 months prevents this accumulation.
Watch for these signs of waterproofing failure: loose tiles that sound hollow when tapped, persistent musty odor near the shower, water stains on the ceiling below, or soft spots in the floor adjacent to the shower. According to the U.S. Environmental Protection Agency, mold can begin growing on damp surfaces within 24 to 48 hours, making early detection critical. Any of these symptoms warrant opening up the wall for inspection rather than waiting.
Frequently Asked Questions
Do I need to waterproof a shower before tiling?
Yes, every tiled shower requires a waterproof barrier behind the tile. Cement backer board alone is water-resistant, not waterproof. Without a dedicated membrane, moisture migrates through grout joints and backer board seams into the wall cavity, causing mold growth and structural damage within one to three years.
What is the best waterproofing membrane for a shower?
Schluter Kerdi sheet membrane is the most reliable system for full shower waterproofing, offering immediate tile-readiness and consistent factory-controlled thickness. RedGard liquid membrane is a strong alternative for DIYers due to its simple roller application and lower material cost. The right choice depends on your skill level and budget.
Can I waterproof a shower with RedGard?
RedGard is a proven liquid waterproofing membrane approved for shower walls, floors, and ceilings when applied at the correct thickness of 30 mils dry (two full coats minimum). It meets ANSI A118.10 and ANSI A118.12 standards for waterproofing and crack isolation in tile installations.
How long does waterproofing need to dry before tiling?
Liquid membranes like RedGard require 12 to 24 hours between coats and a minimum of 24 hours after the final coat before tiling. Sheet membranes like Kerdi allow tiling as soon as the thinset mortar used for installation reaches initial set, typically 24 hours. Always follow the specific manufacturer’s cure schedule printed on the product label.
How do I waterproof shower corners and seams?
Embed alkaline-resistant mesh tape or pre-formed corner pieces in a bed of waterproofing membrane at every inside corner, outside corner, and backer board seam. The tape or fabric strip should extend at least 2 inches on each side of the joint. Apply an additional coat of membrane over the tape to fully encapsulate it.
What happens if you don’t waterproof a shower properly?
Water penetrates through grout joints and backer board seams into wall cavities, causing mold growth within 24 to 48 hours of sustained moisture exposure. Over weeks and months, the framing lumber rots, subfloor deteriorates, and tile begins loosening and falling off. Remediation typically costs $3,000 to $10,000 or more depending on the extent of damage.
Knowing how to waterproof a shower properly is the single most important skill in any tiled shower installation. If you are working with waterproof vinyl plank flooring in the bathroom area outside the shower, the transition point between the shower pan and the bathroom floor deserves the same careful sealing attention.
Sunanda Waterproofing: Complete Guide to Products, Applications & Expert Tips
Sunanda waterproofing solutions have protected some of India’s most demanding structures, from the world’s largest cricket stadium in Ahmedabad to the Signature Bridge in New Delhi. For contractors, homeowners, and civil engineers sourcing construction chemicals in India, the brand carries a specific reputation: technically differentiated, research-backed, and consistently awarded over four decades of operation.
India’s waterproofing solutions market is expanding rapidly alongside infrastructure investment and urban construction activity. The segment is valued at USD 1.47 billion in 2026 and projected to reach USD 2.09 billion by 2031 at a 7.29% compound annual growth rate, according to Mordor Intelligence’s India Waterproofing Solutions Market report (2026). In that competitive environment, understanding which brands deliver technical depth versus marketing claims has real consequences for construction outcomes.
What Makes Sunanda Waterproofing Stand Out
Sunanda Global is an ISO 9001:2015 certified construction chemicals manufacturer with a dedicated in-house R&D function, which the company states is unique in the Indian segment, and holds three FICCI Product Innovator of the Year awards (2012, 2013, 2015) from India’s Department of Chemicals and Petrochemicals for documented innovations. Both credentials are verifiable through the company’s official certifications and government award records.
Most construction chemical companies in India source innovation from international partners or license foreign formulations. Sunanda built its own R&D function and had it independently certified under the ISO quality framework. The ISO accreditation covers the research process itself, not just the manufactured product output. For specifiers comparing brands, that distinction matters: it means the company’s product development follows a documented, auditable quality process rather than ad-hoc formulation.
The FICCI recognition came from the Department of Chemicals and Petrochemicals, Government of India. The 2012 award was specifically for the development of an anti-washout concrete admixture, a technical formulation that prevents cement from washing out of fresh concrete in underwater and wet placement conditions. The 2013 and 2015 awards followed for liquid-applied joint-free waterproofing membranes and spray-applied polyurethane foam insulation systems respectively. Three awards across six years, each for a distinct and verifiable innovation, reflects a pattern of product development the FICCI selection committee found substantively different from existing solutions.
The company has operated for over 45 years and is a member of the Indian Green Building Council. Crunchbase lists Sunanda Global as the only Indian construction chemicals manufacturer with this specific combination of in-house R&D certification and central government innovation recognition.
Sunanda Waterproofing Products: What Each One Does
POLYALK WP handles most residential waterproofing (roofs, bathrooms, walls, water tanks); KRYSTAL WP provides permanent crystalline protection for concrete foundations and basements, self-sealing cracks up to 0.5mm; polyurethane membranes cover high-movement surfaces like parking decks; and PU sealants seal expansion joints. POLYALK WP is available at approximately Rs 300-350/kg from authorized distributors, per the company’s published pricing.
Product
Type
Primary Use
Key Benefit
POLYALK WP
Acrylic polymer cementitious
Roof slabs, bathrooms, external walls, water tanks
Flexible, alkaline-compatible, applies in moist conditions
KRYSTAL WP
Crystalline admixture
Concrete foundations, tunnels, basement walls
Self-healing: seals hairline cracks up to 0.5mm automatically
PU Membrane
Polyurethane liquid membrane
RCC roofs, podiums, parking garages, bridge decks
High elasticity, handles structural movement without cracking
PU Sealant
Joint sealant
Expansion joints, construction joints
Prevents water ingress at structural movement points
POLYALK WP in detail: This acrylic polymeric solution mixes directly with cement to form an impermeable co-matrix film. The formulation provides high flexural strength, meaning the cured coating moves slightly with the substrate rather than cracking during minor thermal expansion. It applies in wet conditions, including on terraces during monsoon seasons and on water tank surfaces immediately after emptying.
Available in 1 kg, 5 kg, and 20 kg packaging, the 20 kg pack retails at approximately Rs 3,675 from authorized distributors, with per-kg pricing around Rs 325. That positions it in the mid-range of the Indian cementitious waterproofing market, below premium imported systems but above commodity products from smaller domestic manufacturers.
KRYSTAL WP: Crystalline technology works differently from surface coatings. The active chemicals penetrate concrete pores and react with water and cement particles to form insoluble crystals, permanently blocking water passage. This self-healing mechanism continues to activate whenever the concrete is re-exposed to moisture, sealing new hairline cracks up to 0.5mm wide without reapplication. For underground structures, retaining walls, and water treatment facilities, that represents a significant long-term cost advantage over surface-applied systems requiring periodic recoating.
PU Membranes: Polyurethane waterproofing membranes handle applications where structural movement is anticipated. Parking decks, podium slabs, and bridge surfaces experience dynamic loads that crack rigid cementitious coatings. PU membranes stretch and recover, maintaining a continuous waterproof barrier as the substrate flexes. According to Sunanda Global’s project documentation, these membranes were specified and installed for the Narendra Modi Cricket Stadium in Ahmedabad.
POLYALK WP and application tools. The product mixes with cement on-site, making it compatible with standard masonry practices across India.
How to Apply Sunanda POLYALK WP: Step-by-Step
POLYALK WP is applied in six steps: surface preparation (clean, repair cracks), pre-wetting the substrate 24 hours ahead, mixing 1:1 with Portland cement by volume, two perpendicular brush coats, an optional third coat for high-exposure areas, and 3-7 days of water misting to cure. Surface preparation failure accounts for the majority of cementitious waterproofing failures in field conditions.
Surface preparation: Remove all loose material, oil, paint, and existing coatings. Repair cracks deeper than 3mm with cement-sand mortar mixed with POLYALK WP. Allow repairs to cure for at least 24 hours before proceeding.
Pre-wetting: Dampen the entire surface with water 24 hours before application. At the time of coating, the surface should be moist without standing water. A dry substrate pulls moisture from the slurry and creates adhesion failure.
Mixing: Combine POLYALK WP with ordinary Portland cement at a 1:1 ratio by volume. Mix to a consistent slurry without lumps. Prepare only the quantity that can be applied within 30 minutes, as the working time is limited in warm weather.
First coat: Apply the slurry by brush or broom in a single direction. Cover all areas including corners and junction points between floors and walls. Allow to reach touch-dry state (approximately 4-6 hours at 25°C).
Second coat: Apply perpendicular to the first coat to eliminate directional gaps. For high-water-exposure areas (overhead tanks, basement walls), apply a third coat after the second has dried.
Curing: Mist the completed coating with water for 3-7 days. Avoid foot traffic for 48 hours and full water loading for 7 days after the final coat.
One technical detail from Sunanda’s product data: POLYALK WP is alkaline and does not facilitate carbonation of the concrete beneath it. In coastal Indian environments where embedded steel reinforcement corrodes from carbonation-induced alkalinity loss, that property provides a secondary protective benefit beyond water resistance alone.
Where Sunanda Waterproofing Is Used
POLYALK WP suits roofs, bathrooms, walls, and water tanks; KRYSTAL WP handles basements and below-grade concrete under hydrostatic pressure; PU membranes protect parking decks, podiums, and bridge surfaces where structural movement occurs; PU sealant seals expansion joints. The three deciding factors are exposure type (surface vs. submerged), structural movement, and whether the surface contacts potable water supplies.
Application Area
Recommended Product
Key Consideration
Flat and sloping roofs
POLYALK WP / PU Membrane
PU for high foot-traffic terraces; POLYALK for standard RCC roofs
Bathrooms and toilets
POLYALK WP
Apply to sunk portion before tiling; works on wet surfaces
External walls
POLYALK WP
Can be mixed with any cement-based paint for a colored finish
Water tanks (overhead + underground)
POLYALK WP
Alkaline, non-toxic, safe for potable water contact
Applies to sloped and cantilevered concrete surfaces
Parking decks and podiums
PU Membrane
Handles dynamic vehicle loads and seasonal thermal movement
Expansion joints
PU Sealant
Bonds to concrete, absorbs movement without cracking or delamination
According to Sunanda Global’s project documentation, its waterproofing systems have been specified for the Narendra Modi Cricket Stadium in Ahmedabad (132,000 seats, the world’s largest cricket venue), the Signature Bridge in New Delhi, Kolkata Metro Railway, and the Al Yaqoub Tower in Dubai. Each project used a different combination of products from the same portfolio, with a single technical support team managing application across different climates and structural types.
For homeowners, the practical implication is that products verified in landmark infrastructure projects and available through local dealers at Rs 325/kg are the same formulations. There is no residential-grade versus commercial-grade split in the catalog.
Sunanda Waterproofing vs. Other Brands in India
Sunanda’s technical R&D certification and crystalline technology give it specification advantages for infrastructure projects; Dr. Fixit (Pidilite) dominates general consumer availability; Sika India addresses premium imported-technology segments; Asian Paints SmartCare captures the retail paint-dealer market. For residential projects, product availability often determines the choice; for infrastructure projects, technical documentation and specification compliance matter more.
Brand
Parent Company
Key Differentiator
Relative Limitation
Sunanda (POLYALK WP)
Sunanda Global
ISO 9001:2015 R&D certification, FICCI innovation awards, crystalline technology
Smaller distributor network than Pidilite
Dr. Fixit
Pidilite Industries
Widest distribution in India, strong consumer brand recognition
Less technical differentiation in cementitious products
Asian Paints SmartCare
Asian Paints
Integrated with paint supply chain, accessible at paint dealers
Global technology standards, strong infrastructure project presence
Premium pricing, limited availability in rural and tier-3 markets
Where Sunanda waterproofing holds a genuine technical edge is in the crystalline category. KRYSTAL WP’s permanent self-healing mechanism for concrete structures is a differentiated feature that most domestic brands have not replicated. For projects where long-term zero-maintenance concrete waterproofing is the specification requirement, the choice narrows significantly.
For standard residential waterproofing (bathrooms, terraces, water tanks), acrylic cementitious products from all four major brands perform similarly when correctly applied. The real variable in those applications is usually the quality of surface preparation and application rather than the product itself. Sunanda waterproofing products come with technical data sheets and application guidance that support proper use, which matters when work is done by general contractors rather than specialist waterproofing teams.
According to Mordor Intelligence, the India waterproofing solutions market is growing at 7.29% CAGR through 2031, driven by increased infrastructure spending and growing awareness of moisture damage in residential construction. In a market expanding that quickly, the brands with documented R&D processes and verified project credentials are better positioned to hold specification advantages than those competing on price alone.
Frequently Asked Questions
What is Sunanda POLYALK WP used for?
Sunanda POLYALK WP is an acrylic polymer waterproofing solution mixed with cement at the job site to create a flexible, impermeable cementitious coating. It is used on roof slabs, bathrooms, external walls, balconies, and water tanks. The product is alkaline, concrete-compatible, and can be applied in moist conditions, including on water tanks immediately after emptying.
How does Sunanda waterproofing compare to Dr. Fixit?
Both are established Indian construction chemical brands with proven cementitious waterproofing products. Sunanda differentiates through its ISO 9001:2015 R&D certification (the company identifies this as unique among Indian construction chemicals manufacturers) and its crystalline waterproofing technology. Dr. Fixit (Pidilite) has a substantially broader distribution network and stronger name recognition at consumer retail. For infrastructure and commercial projects with technical specifications reviewed by consultants, Sunanda is more commonly specified; for residential DIY applications, Dr. Fixit has wider availability at hardware shops and paint dealers.
What is the price of Sunanda POLYALK WP in India?
Sunanda POLYALK WP retails at approximately Rs 325 per kilogram through authorized dealers and distributors. The standard 20 kg pack is priced at around Rs 3,675. Regional distributor pricing may vary by 5-10%. Smaller packs (1 kg and 5 kg) are available for residential jobs or patch repairs where the full 20 kg pack is more than required.
What is crystalline waterproofing and how does KRYSTAL WP work?
Crystalline waterproofing is a technology where active chemicals penetrate concrete pores and react with moisture to form insoluble crystals, permanently blocking water pathways. Sunanda’s KRYSTAL WP seals existing hairline cracks up to 0.5mm wide and continues to activate against new cracks throughout the structure’s service life. Unlike surface coatings that can peel or degrade with UV exposure and thermal cycling, crystalline protection becomes part of the concrete matrix. It is used primarily in basements, tunnels, water treatment plants, and below-grade foundations where reapplication access is difficult.
What major projects have used Sunanda waterproofing?
According to Sunanda Global’s project documentation, its waterproofing systems have been specified for the Narendra Modi Cricket Stadium in Ahmedabad (the world’s largest cricket stadium with 132,000 seats), the Signature Bridge in New Delhi, Kolkata Metro Railway, the Al Yaqoub Tower in Dubai, and Hotel Cabana in Florida, USA. Each project used different products from the Sunanda portfolio, reflecting the range of its system capability across climates and structural types.
Can Sunanda waterproofing be applied during the monsoon?
Yes. POLYALK WP is specifically formulated for application in moist conditions, including on exteriors and terraces during wet monsoon spells. The surface must be damp but without standing water at the time of application. KRYSTAL WP can also be applied to water-saturated concrete surfaces, which is particularly useful when repairing active water leaks in basements or tanks where drying the substrate fully before treatment is not practical.
Who manufactures Sunanda waterproofing chemicals?
Sunanda waterproofing products are manufactured by Sunanda Global (formerly Sunanda Speciality Coatings Pvt. Ltd.), a Mumbai-based construction chemicals company with over 45 years of operation. The company holds ISO 9001:2015 certification for its Research and Development function and is a member of the Indian Green Building Council. It received the FICCI Product Innovator of the Year award in 2012, 2013, and 2015, an award administered by the Department of Chemicals and Petrochemicals, Government of India.
How long does Sunanda waterproofing last?
The service life of Sunanda waterproofing depends on the product type and application conditions. Crystalline systems (KRYSTAL WP) provide permanent protection as long as the concrete structure is intact, since the crystals become part of the concrete matrix and reactivate with moisture. Cementitious coatings (POLYALK WP) typically require reapplication every 5-10 years in exposed conditions, though protected areas (buried structures, covered tanks) can perform longer. Polyurethane membranes generally carry a 10-15 year expected service life with proper application and surface preparation.
DIY Basement Waterproofing: A Step-by-Step Guide That Saves Thousands
A single hairline crack in a poured concrete foundation can funnel more than 20 gallons of water into a basement during one heavy rainstorm. Professional waterproofing companies charge an average of $5,213 per job, according to 2025 industry pricing data, with exterior excavation projects reaching $15,000 or more. The good news: most residential basement moisture problems respond to interior DIY methods that cost between $200 and $500 in materials.
This guide walks through each step of DIY waterproofing basement projects, from diagnosing the moisture source to applying the final sealant coat. It also covers the mistakes that cause most waterproofing jobs to fail and the situations where hiring a professional actually makes sense.
Why Basement Waterproofing Matters More Than Most Homeowners Realize
Basement moisture does far more than create a musty smell. Left unchecked, water infiltration degrades concrete, rots wooden framing, and creates conditions where mold colonies establish themselves within 24 to 48 hours of sustained dampness.
According to the U.S. Environmental Protection Agency (EPA), mold produces allergens and irritants that trigger allergic reactions, asthma attacks, and respiratory irritation in both sensitive and non-sensitive individuals. The EPA’s guidance is clear: all wet areas should be completely dried within 48 hours to prevent mold growth.
Water damage also hits the wallet. Foundation repairs caused by prolonged moisture exposure range from $2,000 to $7,000 for minor crack injection and up to $15,000 or more for structural underpinning. Catching a moisture problem early and addressing it with a $300 DIY waterproofing project prevents repair bills that can run 10 to 50 times higher.
Signs Your Basement Needs Waterproofing
Several warning signs indicate water is getting into a basement, and catching them early keeps a manageable DIY project from becoming a structural emergency. Here are the most common red flags:
White powdery deposits (efflorescence) on concrete or block walls, caused by minerals left behind as water evaporates through masonry
Musty or damp odors that persist even after cleaning, signaling hidden moisture behind walls or under flooring
Visible cracks in foundation walls or the basement floor, especially horizontal cracks in block walls (which indicate lateral soil pressure)
Water stains or discoloration along the base of walls or around window wells
Peeling paint or bubbling on basement walls, a sign that moisture is pushing through from behind
Condensation on pipes and windows in the basement, even during moderate weather
Quick moisture test: Tape a 12-inch square of aluminum foil to a suspect wall area and leave it for 24 hours. If condensation forms on the room-facing side, the problem is humidity (solved with ventilation and a dehumidifier). If moisture appears between the foil and the wall, water is seeping through the masonry, and the wall itself needs waterproofing treatment.
Interior vs Exterior Waterproofing: Which Approach Fits Your Situation
Interior waterproofing methods handle roughly 80% of residential basement moisture problems for under $500 in materials. Exterior waterproofing solves structural water intrusion but requires excavation around the foundation, heavy equipment, and budgets starting at $5,000. Most homeowners tackling basement waterproofing from the outside hire contractors for the excavation portion.
Factor
Interior Waterproofing (DIY-Friendly)
Exterior Waterproofing (Pro-Level)
Typical cost
$200 – $3,000
$5,000 – $15,000
DIY difficulty
Moderate (painting, patching, sealing)
Very high (excavation, drainage)
Best for
Minor seepage, condensation, wall dampness
Severe water intrusion, hydrostatic pressure
Timeline
1-3 days for most basements
1-2 weeks with excavation
Effectiveness
Stops surface moisture and minor seepage
Addresses root cause at foundation level
Warranty
Product warranty only (5-15 years)
Contractor warranty (10-25 years typical)
Waterproofing companies rarely lead with interior solutions because exterior jobs generate significantly higher revenue. For basements with occasional dampness, efflorescence, or minor crack seepage, interior methods provide reliable long-term protection at a fraction of the cost.
Interior waterproofing costs under $500 and takes 1-3 days, while exterior excavation starts at $5,000 and requires 1-2 weeks
Step-by-Step DIY Waterproofing Basement Guide
DIY waterproofing basement projects follow six steps, and skipping any of them reduces the lifespan of the finished job. Total materials cost for a standard 1,000-square-foot basement runs between $200 and $500.
Step 1: Fix Exterior Water Sources First
No amount of interior sealant compensates for water pouring toward the foundation from outside. Before touching a single basement wall, check these exterior items:
Clean gutters and extend downspouts at least 4 to 6 feet away from the foundation
Regrade soil so it slopes away from the house at a minimum of 6 inches over the first 10 feet
Seal any visible cracks in exterior concrete or stucco above grade
Clear window wells of debris and verify drainage
These exterior fixes cost little or nothing and eliminate the most common water sources before they ever reach the basement.
Step 2: Clean and Prep Walls
Waterproofing products bond to clean, bare masonry. Use a stiff wire brush to remove efflorescence, loose paint, dirt, and any existing coatings. For stubborn mineral deposits, apply a masonry cleaning solution (muriatic acid diluted per manufacturer instructions works on heavy efflorescence). Rinse thoroughly and allow walls to dry.
Step 3: Patch Cracks and Holes
Fill cracks and holes with hydraulic cement, which expands as it cures and can stop active water flow through a crack. For hairline cracks under 1/8 inch, an epoxy injection kit provides a permanent structural bond. Larger cracks (over 1/4 inch) or horizontal wall cracks may indicate structural movement and warrant a professional evaluation before any waterproofing work.
Step 4: Apply Waterproofing Sealant
Three product categories dominate the DIY market, each suited to different severity levels:
Product Type
Example Brands
Best For
Coverage
Approx. Cost
Waterproofing paint
DRYLOK, Zinsser WaterTite
Minor dampness, condensation
75-100 sq ft/gal
$30-50/gallon
Penetrating sealer
RadonSeal, Ghostshield
Porous concrete, radon mitigation
100-200 sq ft/gal
$40-70/gallon
Membrane system
Sani-Tred, Liquid Rubber
Active seepage, below-grade walls
50-75 sq ft/gal
$60-100/gallon
Apply with a thick-nap roller or stiff bristle brush, working the product into pores and surface imperfections. Most products require two coats with 24 hours of drying time between applications. A standard basement (800-1,200 sq ft of wall surface) typically needs 3 to 5 gallons total.
Step 5: Address Floor Seepage
If water comes up through the basement floor, apply a concrete floor sealant after the wall treatment. For persistent floor water, an interior perimeter drain (French drain) connected to a sump pump is the most effective long-term solution. DIY interior French drain installation runs $1,000 to $3,000 in materials and rental equipment, compared to $3,000 to $8,000 professionally installed.
Step 6: Control Humidity After Treatment
Waterproofing treatment stops liquid water, but basement humidity still needs management. Run a dehumidifier rated for the basement’s square footage (50-pint units handle most residential basements) and keep relative humidity below 50%. Ensure dryer vents exhaust outdoors, not into the basement. Properly sealed basement walls combined with humidity control keep the space dry for years.
Total materials cost for steps 1 through 6, excluding a French drain system: roughly $200 to $500. That covers hydraulic cement ($8-15), epoxy injection kit ($25-40 per crack), 4-5 gallons of waterproofing product ($120-250), wire brush and roller supplies ($20-30), and a dehumidifier ($150-250 if not already owned).
Common DIY Waterproofing Basement Mistakes That Waste Time and Money
The most expensive mistake in any DIY waterproofing basement project costs nothing at the hardware store: skipping the prep work. Here are the five failures that account for the majority of waterproofing jobs that do not last.
Painting over dirty or damp walls. Waterproofing products need clean, dry masonry to bond properly. Applying sealant over efflorescence or existing paint creates a barrier that peels within months.
Ignoring exterior drainage. Interior waterproofing manages moisture that reaches the basement walls. If gutters overflow onto the foundation or soil slopes toward the house, no interior coating can keep up with the volume of water pushing through.
Using the wrong product. Waterproofing paint handles surface dampness. Active water flow through cracks requires hydraulic cement first, then sealant. Penetrating sealers work on bare concrete but fail on previously painted surfaces.
Skipping the second coat. One coat of waterproofing paint provides roughly half the rated protection. Manufacturers specify two coats for a reason, and each coat needs a full 24 hours of curing time.
Forgetting post-treatment humidity control. A sealed basement without a dehumidifier traps moisture in the air, which condenses on cooler surfaces and creates the same mold conditions the waterproofing was meant to prevent.
Frequently Asked Questions
How much does DIY waterproofing basement projects cost?
DIY waterproofing basement materials typically cost $200 to $500 including sealant, hydraulic cement, and supplies. Professional waterproofing averages $5,213 nationally in 2025, with interior systems ranging from $2,459 to $8,181 depending on basement size and method.
Does waterproofing paint actually work?
Waterproofing paints like DRYLOK and Zinsser WaterTite effectively stop minor dampness and condensation when applied to clean, bare masonry per manufacturer instructions. They are rated to withstand up to 10-15 PSI of hydrostatic pressure. Active leaks through cracks require patching with hydraulic cement before painting, and severe water intrusion from high water tables may need a drainage system rather than surface coatings alone.
How long does DIY basement waterproofing last?
Properly applied waterproofing paint lasts 10 to 15 years on interior basement walls. Penetrating sealers can last the lifetime of the concrete since they chemically react within the pores rather than forming a surface film. Hydraulic cement crack repairs are permanent unless the foundation experiences new structural movement.
Can I waterproof a basement with standing water?
Standing water must be removed and the source addressed before any waterproofing product is applied. Pump out the water, dry the space with fans and a dehumidifier for at least 48 hours (per EPA mold prevention guidelines), then proceed with crack repair and sealant application.
When should I hire a professional instead of doing it myself?
Hire a professional if the basement has horizontal wall cracks (indicating structural pressure), persistent standing water that returns after pumping, water entering from multiple sources simultaneously, or if the home sits in an area with a high water table. Foundation wall bowing, significant settling, or cracks wider than 1/4 inch also warrant professional structural evaluation before any waterproofing work begins.
Protect Your Basement Before the Next Heavy Rain
DIY waterproofing basement work is one of the highest-return home maintenance projects available. A weekend of prep work, crack repair, and sealant application costing $200 to $500 prevents thousands in foundation damage, keeps mold out of the living space, and adds usable square footage to the home. Start with the exterior drainage check, fix what you find, and work inward from there.