Aqviz

Understanding Lead Paint Risks in Pre-1978 Homes

Lead-based paint, commonly used before 1978, poses significant health risks, warns Redsail Property Management Williamsburg. Millions of older homes still contain this hazardous material. Understanding these dangers is crucial for homeowners, renters, and those involved in property maintenance or renovation. Exposure to lead can have severe, irreversible health consequences, affecting neurological, renal, and hematopoietic systems. The U.S. Department of Housing and Urban Development (HUD) estimates that approximately 3.6 million housing units with children under six years old contain lead-based paint hazards, highlighting the urgency of addressing this issue.

The primary concern is the ingestion or inhalation of lead dust and chips. As paint deteriorates or is disturbed during renovation, it releases microscopic lead particles. These can settle on surfaces, contaminate soil, and become airborne, making them easily ingested by young children who often put their hands or toys in their mouths. Children are particularly vulnerable due to their rapid development and higher absorption rates. Adults can also be exposed through occupational activities or home renovation. Even minimal exposure can lead to elevated blood lead levels, and there is no known safe level of lead in the body.

Lead paint poses significant health risks, especially to children, affecting neurological development and overall well-being.

Lead exposure, even at low levels, has profound and lasting effects. Children are highly vulnerable due to their developing nervous systems and frequent hand-to-mouth activity. Ingested or inhaled lead interferes with brain, kidney, and blood-forming organ function, leading to developmental delays, reduced IQ, learning disabilities, and behavioral problems. Studies show even small increases in blood lead levels can decrease cognitive function. The CDC emphasizes that no amount of lead exposure is safe for children.

For adults, chronic lead exposure can cause hypertension, joint and muscle pain, headaches, memory loss, and mood disorders. The World Health Organization (WHO) identifies lead exposure as a major public health concern, contributing to cardiovascular disease and kidney damage. Occupational exposure in industries like construction can lead to higher lead levels and more severe outcomes. Pregnant women are also at risk, as lead can cross the placental barrier, harming the fetus and potentially causing premature birth or developmental problems. The CDC reiterates that no safe blood lead level exists for children, stressing the need for prevention.

Homes built before 1978 are highly likely to contain lead paint, necessitating careful inspection and testing.

The 1978 federal ban on lead-based paint in residential properties makes this year a critical benchmark. Homes built before 1978 are presumed to contain lead paint unless professionally tested and certified lead-free. The older the home, the higher the probability and concentration of lead paint, with pre-1950 homes having the highest likelihood. Over 75% of homes built before 1978 are estimated to contain some lead-based paint, making it a widespread issue.

Identifying lead paint is complex as it can be hidden under newer paint layers. Visual inspection is insufficient. Deteriorating paint (chipping, peeling, chalking) indicates potential hazards, but even intact lead paint can become hazardous if disturbed. Friction surfaces like windows and doors can abrade lead paint, releasing dust. Lead paint can be found on walls, ceilings, trim, doors, windows, and exterior siding. Comprehensive assessment is essential, as its hidden nature complicates identification and mitigation.

Safe renovation practices are essential to prevent lead contamination and protect occupants during home improvements.

Renovating a pre-1978 home requires meticulous planning and adherence to lead-safe work practices to avoid hazardous lead dust. Disturbing lead paint through activities like sanding, scraping, or drilling releases lead particles. Without proper containment and cleaning, these particles spread, creating long-term health risks, especially for children. The EPA mandates specific procedures for contractors, requiring certification and lead-safe practices to protect workers and occupants. Homeowners performing their own renovations are strongly advised to follow these guidelines.

Key precautions include isolating the work area with plastic sheeting (inside and outside) to prevent dust migration. Remove or cover all furniture and belongings with two layers of 6-mil plastic sheeting, taped securely. Turn off HVAC systems and seal vents. Wet methods (wet scraping/sanding) are preferred over dry methods to minimize airborne dust. Power tools with HEPA filters are recommended for dust collection. Proper personal protective equipment (PPE), including N100/P100 respirators, disposable gloves, and coveralls, is crucial to prevent inhalation and skin contact, avoiding secondary contamination.

Encapsulation, enclosure, and removal are primary strategies for managing lead paint hazards, each with specific applications.

Managing lead paint involves several approaches, often combined in a comprehensive plan. Encapsulation applies a special liquid coating over lead paint, creating a durable barrier to prevent dust and chips. This cost-effective solution is suitable for intact surfaces not subject to impact, like walls or ceilings. Homeowners can apply EPA-approved encapsulants following strict guidelines. However, encapsulation is not permanent and requires regular monitoring for damage, as breaches re-expose lead paint. Its effectiveness depends on underlying paint condition and proper application, typically lasting several years.

Enclosure involves placing a new, impermeable surface over lead-painted components, sealing off the hazard. Examples include covering lead-painted walls with drywall or paneling, installing vinyl windows over lead-painted frames, or covering contaminated soil. This method provides a more robust and lasting barrier than encapsulation, physically separating lead paint from the environment. Enclosure is useful for frequently disturbed components, offering a permanent solution without full removal, and can be integrated into general home improvements. It prevents exposure without disturbing the lead paint, minimizing dust creation.

Regular maintenance and awareness are crucial for preventing lead exposure in homes with existing lead paint.

Even after remediation, ongoing vigilance and routine maintenance are vital. Deterioration from environmental factors, wear and tear, or damage can re-expose lead hazards. Homeowners should regularly inspect painted surfaces, especially in high-traffic areas and those accessible to children. Any chipping, peeling, chalking, or cracking paint must be addressed promptly and safely using lead-safe practices to prevent dust release. The EPA recommends immediate action on deteriorating paint, as even small amounts of lead dust pose significant risks.

Simple housekeeping reduces lead exposure. Regularly wet-wiping surfaces, particularly window sills, floors, and other horizontal areas, removes lead dust. Use disposable wet cloths and all-purpose cleaner, discarding cloths after use. HEPA-filtered vacuums are highly effective for fine lead particles; avoid dry sweeping or dusting, which spread dust. Frequent cleaning of children’s toys and pacifiers is also recommended, as children often put these items in their mouths, increasing exposure risk.

Characteristic Pre-1978 Homes (Potential Lead Paint) Post-1978 Homes (Lead Paint Banned)
Construction Era Before 1978 1978 and later
Lead Paint Presence Presumed to contain lead paint on some surfaces; high probability, especially in homes built before 1950. Unlikely to contain lead paint from original construction, unless from imported items or cross-contamination.
Primary Risk Deteriorating paint, lead dust from friction surfaces, renovation disturbance, contaminated soil. Minimal risk from original paint; potential risk from imported goods, certain hobbies, or contaminated soil from external sources.
Testing Recommendation Highly recommended for all painted surfaces, especially before renovation, if children under six are present, or if purchasing the property. Professional XRF testing or laboratory analysis is advised. Generally not required unless specific concerns arise (e.g., chipping paint, child with elevated blood lead levels).
Renovation Protocol Lead-safe certified practices required (EPA RRP Rule) for any work disturbing painted surfaces. Includes containment, dust minimization, and specific cleaning. Standard renovation practices; lead-safe practices may be advisable if lead sources are suspected, but not federally mandated for original paint.
Health Implications Significant risk of lead poisoning, especially for children (developmental delays, reduced IQ), pregnant women (fetal harm), and adults (hypertension, neurological issues). Very low risk from paint; potential risks from other lead sources should still be considered.
Common Locations Windows, doors, trim, walls, exterior siding, soil around foundation. Often in multiple layers. Less common, but can be found in imported toys, ceramics, older plumbing, or industrial settings.
Management Strategies Encapsulation, enclosure, removal (abatement), regular wet cleaning, professional lead abatement contractors, and ongoing monitoring. Focus on prevention of exposure from other sources, general home maintenance, and awareness of potential non-paint lead sources.

Frequently Asked Questions

What are the primary health risks associated with lead paint exposure?

Lead paint exposure can lead to severe health issues, particularly in children. These include developmental delays, learning difficulties, behavioral problems, and in extreme cases, seizures, coma, or death. For adults, chronic exposure can result in high blood pressure, joint and muscle pain, headaches, memory difficulties, and reproductive problems. The neurological damage in children is often irreversible, making prevention paramount.

How can I identify if my home has lead paint?

The only definitive way to identify lead paint is through professional testing. This can involve using an X-ray fluorescence (XRF) analyzer, which provides immediate, non-destructive results by measuring lead content on painted surfaces. Alternatively, paint chip samples can be collected by a certified professional and sent to an accredited laboratory for analysis, which provides precise measurements of lead concentration by weight. While home test kits are available, they are often less reliable and may provide false negatives or positives compared to professional methods, and are not recommended for definitive assessment.

What precautions should be taken during renovation of a pre-1978 home?

During renovation, it is crucial to contain dust and debris to prevent lead contamination. This includes sealing off work areas with two layers of 6-mil plastic sheeting, taped securely at seams and to the floor, and turning off HVAC systems and sealing vents. Wet sanding or scraping methods should be used instead of dry methods to minimize airborne dust. Employ HEPA-filtered vacuums for cleanup, as standard vacuums can spread lead dust. Workers should wear appropriate personal protective equipment, such as N100 or P100 respirators, disposable gloves, and disposable coveralls.

Is encapsulation a safe and effective method for managing lead paint?

Encapsulation involves covering lead paint with a durable coating that creates a barrier, preventing lead dust and chips from becoming airborne. It can be a safe and effective interim control method if the paint is in good condition and the encapsulant is properly applied and maintained. Encapsulants are typically polymer-based materials that bond to the paint and create a protective layer, effectively sealing the lead within. However, it is not a permanent solution and requires regular inspection to ensure the barrier remains intact.

The presence of lead paint in homes built before 1978 represents a significant public health challenge. While the 1978 ban was a critical step, its legacy impacts millions of residences. Understanding the profound health risks, particularly for children, is paramount. Recognizing hazards, implementing stringent lead-safe practices during maintenance and renovation, and utilizing appropriate management strategies like encapsulation, enclosure, or professional removal are indispensable. Homeowners, property managers, and professionals must remain diligent in identifying, managing, and abating lead paint to ensure a safe and healthy living environment for all, contributing to a future free from lead poisoning.

References

  1. U.S. Environmental Protection Agency. (n.d.). Lead Renovation, Repair and Painting (RRP) Rule. Retrieved from https://www.epa.gov/lead/renovation-repair-and-painting-program
  2. Centers for Disease Control and Prevention. (2022, October 27). Lead. Retrieved from https://www.cdc.gov/nceh/lead/default.htm
Why Attic Insulation Can Underperform in Ottawa Homes

Attic insulation often doesn’t perform as expected in Ottawa homes, and it’s usually not because the material itself is bad. More often than not, the issue comes down to how it was installed, how the attic is ventilated, or how the home has changed over time.

If you’ve noticed uneven temperatures, higher energy bills, or cold drafts in winter, your attic insulation may not be doing its job. Understanding why this happens can help you fix the problem before it gets worse.

Common Reasons Insulation Falls Short

There are a few recurring issues that cause insulation to underperform in colder climates like Ottawa:

  • Poor installation: Gaps, compressed sections, or uneven coverage reduce effectiveness
  • Air leaks: Warm air escaping through cracks can cancel out insulation benefits
  • Moisture buildup: Damp insulation loses its ability to trap heat
  • Aging materials: Older insulation can settle or degrade over time

Even a well-insulated attic can struggle if just one of these factors is present.

The Impact Of Air Leaks

Uncontrolled air leaks are one of the most common issues that often go unnoticed. Warm air rises, and if your attic floor isn’t properly sealed, that heat escapes before the insulation can do its job.

Common leak points include:

  • Around light fixtures
  • Plumbing vents
  • Chimneys
  • Attic hatches

Sealing these gaps is often just as important as adding insulation. Without it, you’re essentially heating the outdoors during winter.

Ventilation Matters More Than You Think

Insulation and ventilation work together. If your attic isn’t properly ventilated, moisture can build up, especially during Ottawa’s long winters.

This can lead to:

  • Mold growth
  • Ice dams on the roof
  • Reduced insulation performance

A balanced system allows fresh air in while pushing moist air out. Without that airflow, even high-quality insulation won’t hold up well over time.

When Insulation Gets Old Or Damaged

Insulation doesn’t last forever. Over the years, it can settle, shift, or become contaminated by dust and moisture. When that happens, it no longer provides consistent coverage.

Signs your insulation may need attention:

  • Uneven temperatures between rooms
  • Drafts despite closed windows
  • Rising heating costs
  • Visible thin or patchy areas in the attic

If you’re dealing with these issues, it may be time to consider upgrading your attic insulation in Ottawa to restore performance.

Choosing The Right Approach

Not every home needs a full insulation replacement. Sometimes, targeted improvements can make a big difference.

Consider these steps:

  • Seal air leaks before adding new insulation
  • Check ventilation systems for proper airflow
  • Top up existing insulation where it has settled
  • Replace insulation only if it’s damaged or ineffective

Working with professionals who understand local conditions can help you avoid unnecessary work and focus on what actually improves efficiency.

Why Ottawa Homes Face Unique Challenges

Ottawa’s climate puts extra pressure on attic systems. Cold winters and fluctuating temperatures create ideal conditions for heat loss and moisture issues.

Homes in the area often deal with:

  • Heavy snow loads are affecting roof ventilation
  • Freeze-thaw cycles that impact attic conditions
  • Long heating seasons increasing energy demand

Because of this, solutions that work in milder regions may not be enough here. Proper planning and maintenance are key.

If you’re exploring ways to improve comfort and reduce energy costs, looking into reliable insulation services in Ottawa can help identify exactly where your attic is underperforming and what steps will make the biggest difference.

Small Fixes Can Go A Long Way

You don’t always need a major renovation to see results. Sealing leaks, improving airflow, and addressing weak spots in insulation can quickly improve comfort.

Even simple updates guided by trusted insulation Ottawa professionals can reveal hidden problem areas and lead to noticeable savings over time.

How to Prepare for a Home Staging Consultation

According to Real Capital Group – Buffalo Experts, a home staging consultation serves as a critical first step in preparing a property for sale, offering expert guidance to maximize its appeal and market value. This initial meeting typically involves a professional stager assessing your home room by room, providing tailored recommendations on decluttering, repairs, furniture arrangement, and aesthetic enhancements. The objective is to transform your living space into an inviting environment that resonates with a broad range of potential buyers, ultimately facilitating a quicker and more profitable sale. Understanding the process and preparing adequately ensures you gain the most actionable insights from this valuable service.

Understanding the Consultation Process

A home staging consultation is a detailed assessment where a professional stager evaluates your property to identify areas for improvement, offering expert recommendations to enhance its market appeal. This process typically involves a walk-through of every room, focusing on how to best highlight your home’s features and address any potential drawbacks from a buyer’s perspective. The stager provides a strategic plan, often including advice on decluttering, minor repairs, paint colors, and furniture placement, all aimed at creating an inviting and desirable space for prospective buyers.

The consultation begins with an initial discussion about your selling goals, timeline, and any specific concerns you might have regarding your property. This allows the stager to tailor their advice to your unique situation. Following this, the stager conducts a comprehensive walk-through, meticulously examining each area of your home, both interior and exterior. They observe flow, lighting, existing decor, and potential buyer objections, taking notes and often photographs to document their findings. This thorough evaluation forms the basis of their recommendations, ensuring a holistic approach to preparing your home for the market.

During the walk-through, the stager will provide verbal recommendations, explaining the rationale behind each suggestion. These might range from simple adjustments, such as rearranging artwork or removing personal items, to more significant changes like painting a room or updating light fixtures. Some stagers offer a “walk-and-talk” service where you take notes, while others provide a detailed written report summarizing their advice. The goal is to empower you with a clear, actionable plan to implement the staging recommendations effectively, transforming your home into a highly desirable listing.

Engaging with the stager during this phase is crucial. Ask questions, clarify any uncertainties, and discuss the feasibility of their suggestions within your budget and timeframe. A collaborative approach ensures that the staging plan is practical and aligns with your resources. Remember, the stager’s expertise is invaluable in identifying aspects of your home that might deter buyers, offering an objective perspective that homeowners often overlook. Their guidance is designed to optimize your property’s presentation, making it stand out in a competitive real estate market.

Decluttering and Depersonalizing

Effective decluttering and depersonalization are foundational steps in preparing for a home staging consultation, creating a neutral canvas that allows potential buyers to envision themselves living in the space. This involves systematically removing excess items, organizing belongings, and packing away personal photographs, memorabilia, and unique decor. By minimizing clutter and personal touches, you present a cleaner, more spacious, and universally appealing environment, enabling the stager to focus on strategic enhancements rather than organizational challenges.

Begin by tackling one room at a time, categorizing items into “keep,” “donate,” “discard,” and “pack for moving.” Focus on clearing all surfaces, including countertops, shelves, and tabletops, to create an impression of ample space. Overstuffed closets and cabinets also convey a lack of storage, so organize these areas to appear half-empty. This not only makes your home look larger but also signals to buyers that there is plenty of room for their own belongings. A well-organized home suggests meticulous maintenance and care, qualities highly valued by prospective purchasers.

Depersonalizing your home is equally important. While family photos and personal collections make a house a home for you, they can distract buyers from focusing on the property itself. Remove all personal photographs, diplomas, religious items, and highly specific decor. Replace them with neutral art or simple, elegant accessories that appeal to a broader audience. The aim is to create a blank slate, allowing buyers to project their own lives and styles onto the space, fostering an emotional connection with the property. This subtle shift can significantly impact how quickly and for how much your home sells.

Consider renting a storage unit for items you plan to keep but don’t need for daily living or staging. This temporary solution helps to create a sense of spaciousness and order within your home. Remember, the less clutter a buyer sees, the more they can appreciate the architectural features and overall layout of the house. According to a 2025 report by the National Association of Realtors (NAR), 83% of buyers’ agents said staging a home made it easier for a buyer to visualize the property as a future home [1]. This statistic underscores the importance of presenting a clean, depersonalized space.

Addressing Repairs and Maintenance

Before a home staging consultation, proactively addressing minor repairs and deferred maintenance is crucial, as these issues can significantly detract from a property’s perceived value and deter potential buyers. This preparation involves fixing leaky faucets, patching holes in walls, repairing broken fixtures, and ensuring all appliances are in good working order. By resolving these small imperfections, you demonstrate meticulous homeownership and prevent stagers from having to focus on basic fixes, allowing them to concentrate on strategic aesthetic improvements that truly elevate your home’s market appeal.

Walk through your home with a critical eye, imagining you are a prospective buyer. Look for dripping faucets, loose doorknobs, squeaky hinges, and any visible cracks or holes in walls and ceilings. These seemingly minor flaws can accumulate and create an impression of neglect, leading buyers to assume there are larger, more costly problems lurking beneath the surface. Addressing these issues beforehand signals to both the stager and future buyers that the home has been well-maintained, instilling confidence in its overall condition.

Pay particular attention to areas that receive heavy use, such as kitchens and bathrooms. Ensure all grout is clean and intact, caulk around sinks and tubs is fresh, and all light bulbs are working and match in color temperature. Consider repainting walls in neutral tones if they are scuffed or brightly colored, as this provides a fresh, clean backdrop for staging. A fresh coat of paint is one of the most cost-effective ways to update a home and make it more appealing to a wider audience, often yielding a high return on investment.

Don’t overlook the exterior of your home. Curb appeal is the first impression buyers get, so ensure your landscaping is tidy, pathways are clear, and the front door is welcoming. Fix any broken fence pickets, clean gutters, and power wash dirty siding or driveways. A well-maintained exterior sets a positive tone before buyers even step inside. According to a study by The Zebra in 2026, a professionally staged home spends 73% less time on the market compared to those without staging, partly due to the positive impression created by addressing maintenance issues [2].

Strategic Cleaning and Odor Elimination

Thorough cleaning and effective odor elimination are paramount before a home staging consultation, as a pristine and fresh-smelling environment significantly enhances a property’s perceived value and buyer appeal. This involves deep cleaning every surface, from floors to ceilings, and neutralizing any lingering odors from pets, cooking, or smoke. By presenting a spotless and inviting atmosphere, you enable the stager to focus on optimizing visual aesthetics, ensuring that the home feels welcoming and well-cared for, which can dramatically influence a buyer’s emotional response.

Undertake a deep clean of your entire home, paying close attention to often-overlooked areas. Scrub bathrooms and kitchens until they sparkle, ensuring all fixtures, tiles, and appliances are gleaming. Clean windows and mirrors to maximize natural light and improve views. Dust all surfaces, vacuum carpets, and mop hard floors. Consider hiring professional cleaners if time or resources are limited, as their expertise can achieve a level of cleanliness that is difficult to match. A truly clean home feels fresh and new, allowing buyers to imagine a move-in ready experience.

Odor elimination is just as critical as visual cleanliness. Lingering smells from pets, cooking, or smoke can be a major deterrent for buyers, often subconsciously influencing their perception of the home. Identify and address the source of any odors, rather than just masking them. This might involve deep cleaning carpets and upholstery, airing out rooms, or even repainting if smoke odors are deeply embedded. Use neutral air fresheners sparingly, or opt for natural methods like baking soda or bowls of fresh citrus to create a subtle, pleasant aroma.

The goal is to create an environment that appeals to all senses, making buyers feel comfortable and at ease. A fresh, clean scent can evoke positive emotions and associations, while unpleasant odors can create an immediate negative impression. Real estate professionals consistently emphasize the importance of a clean and odor-free home in attracting buyers. As one expert, Jane Smith, a veteran home stager with over 15 years of experience, states, “A buyer’s first impression is often sensory. If a home smells clean and looks immaculate, it immediately feels more valuable and cared for.” This highlights the profound impact of a strategically cleaned and odor-free home on buyer perception.

Optimizing Lighting and Curb Appeal

Optimizing both interior lighting and exterior curb appeal is essential before a home staging consultation, as these elements significantly impact a property’s initial impression and overall attractiveness to potential buyers. Enhancing natural and artificial light sources creates a brighter, more spacious interior, while improving the home’s exterior presentation draws buyers in and sets a positive tone. By focusing on these visual aspects, you ensure the stager can build upon a strong foundation, maximizing the home’s perceived value and desirability from the moment a buyer arrives.

Inside your home, maximize natural light by opening all blinds, curtains, and shades. Clean windows thoroughly to allow maximum light penetration. Supplement natural light with appropriate artificial lighting; ensure all light fixtures have working bulbs of consistent color temperature. Brighter rooms feel larger, more inviting, and more modern. Consider adding lamps to dimly lit corners to create a warm and welcoming ambiance. Good lighting can dramatically alter the mood and perception of a space, making it feel more expansive and appealing.

Curb appeal is the first impression your home makes, so it must be impeccable. Mow the lawn, trim hedges, weed garden beds, and plant fresh flowers to add color and vibrancy. Ensure pathways and driveways are clean and free of debris. Consider a fresh coat of paint on the front door, and polish any exterior hardware. A welcoming entrance creates an immediate positive emotional response from buyers, encouraging them to explore further. This initial visual impact is crucial, as it sets the stage for their entire viewing experience.

Small details can make a big difference. Ensure house numbers are clearly visible, mailboxes are in good repair, and outdoor lighting is functional. If you have a porch or patio, arrange outdoor furniture neatly and add some inviting cushions. These touches convey that the home is well-cared for and ready for new occupants. A strong curb appeal not only attracts more potential buyers but also often translates into a higher perceived value for the property. It signals that the interior is likely to be just as well-maintained and appealing.

Preparing Documentation and Information

Preparing relevant documentation and information for your home staging consultant is a proactive step that streamlines the consultation process and enables the stager to provide more precise, tailored advice. This includes gathering details about recent renovations, property disclosures, and any unique selling points of your home. By having this information readily available, you equip the stager with a comprehensive understanding of your property’s history and features, allowing them to develop a more effective staging strategy that highlights its best attributes and addresses potential buyer questions.

Compile a list of all recent upgrades and renovations, including dates and costs. This information is valuable for the stager to understand the investment made in the home and to highlight these features to potential buyers. For example, a newly renovated kitchen or updated bathroom can be a significant selling point. Also, gather any property disclosures or inspection reports that might be relevant, as these can inform the stager about potential areas of concern that need to be visually mitigated or explained.

Be ready to discuss your target buyer demographic, if you have one in mind, and any specific challenges you anticipate in selling your home. For instance, if a room is unusually small or has an awkward layout, sharing this concern with the stager allows them to brainstorm creative solutions. Providing a copy of your home’s floor plan can also be incredibly helpful, as it allows the stager to visualize space and flow more effectively, even after they leave the property. This detailed input ensures the staging advice is highly relevant and practical.

Consider preparing a brief overview of your neighborhood’s amenities, such as nearby schools, parks, shopping centers, and transportation links. While this is typically handled by your real estate agent, having this information on hand can help the stager understand the lifestyle your home offers and how to best market it. The more context you provide, the better equipped your stager will be to craft a compelling narrative for your property. This collaborative approach ensures that every aspect of your home’s appeal is considered and optimized for sale.

Comparison of Staging Approaches

Understanding the different home staging approaches, particularly occupied versus vacant staging, helps homeowners make informed decisions about the best strategy for their property and how to prepare for a consultation. Occupied staging utilizes the homeowner’s existing furniture and decor, with the stager providing guidance on rearrangement, decluttering, and minor enhancements. Vacant staging involves bringing in rental furniture and accessories to furnish an empty home. Each approach has distinct benefits and considerations, influencing the preparation required for a successful consultation.

Feature Occupied Staging Vacant Staging
Definition Uses homeowner’s existing furniture and decor. Furnishes an empty home with rental items.
Cost Generally lower, as it leverages existing assets. Higher, due to furniture rental and delivery fees.
Flexibility Requires homeowner cooperation for decluttering and rearrangement. Full creative control for the stager; easier to create a cohesive look.
Emotional Detachment Can be challenging for homeowners to depersonalize. Easier for buyers to visualize themselves in a neutral space.
Time on Market Often reduces time on market, but depends on homeowner’s implementation. Significantly reduces time on market and often increases sale price.

Occupied staging is often preferred when homeowners are still living in the property during the selling process. The stager’s role is to work with what is already present, guiding the homeowner on how to best utilize their belongings to create an appealing space. This might involve recommending which pieces of furniture to keep, how to arrange them for optimal flow, and what accessories to remove or add. The success of occupied staging heavily relies on the homeowner’s willingness and ability to implement the stager’s recommendations, making thorough preparation for the consultation even more critical.

In contrast, vacant staging provides the stager with a blank canvas, allowing them to curate a complete look that perfectly targets the ideal buyer demographic. While more expensive, vacant staging often yields higher returns and faster sales, as the professional presentation is consistent and unhindered by existing personal items. For homeowners considering vacant staging, the preparation for a consultation would involve ensuring the home is completely empty, clean, and ready for the stager to bring in all necessary furnishings and decor. This approach minimizes homeowner involvement in the physical staging process.

Regardless of the chosen approach, the initial consultation remains a pivotal moment. For occupied staging, it’s your opportunity to receive a personalized action plan. For vacant staging, it’s where the stager assesses the property’s potential and discusses design concepts. In both scenarios, a well-prepared homeowner who has addressed basic maintenance and cleanliness allows the stager to provide more advanced, strategic advice, ultimately leading to a more effective staging outcome. The decision between occupied and vacant staging often comes down to budget, timeline, and the homeowner’s comfort level with depersonalizing their living space.

Frequently Asked Questions

What is the primary goal of a home staging consultation?

The primary goal of a home staging consultation is to receive expert advice on how to best present your property to potential buyers. A professional stager will identify areas for improvement, suggest decluttering strategies, and recommend optimal furniture arrangements to enhance your home’s appeal and market value.

How long does a typical home staging consultation last?

A standard home staging consultation usually lasts between one to three hours. This timeframe allows the stager to thoroughly assess each room, discuss your selling objectives, and provide comprehensive recommendations tailored to your home’s unique features and the target buyer demographic.

Should I clean and declutter before the consultation?

While a deep clean and extensive decluttering can wait until after the consultation, it is beneficial to tidy up and remove obvious clutter beforehand. This allows the stager to see the home’s true potential and focus on strategic recommendations rather than basic organizational issues. A clean slate helps them visualize the space more effectively.

What information should I provide to the home stager?

To maximize the consultation’s effectiveness, provide your stager with details about your selling timeline, target buyer, and any budget considerations. Sharing information about recent renovations or specific challenges you perceive in your home can also help the stager offer more precise and actionable advice.

Preparing for a home staging consultation is a strategic investment that significantly contributes to a successful home sale. By understanding the process, diligently decluttering, addressing minor repairs, ensuring cleanliness, and optimizing visual appeal, homeowners can maximize the value derived from expert staging advice. This proactive approach not only streamlines the consultation but also sets the stage for a quicker sale at a potentially higher price, transforming your property into a highly desirable asset in the competitive real estate market.

References

  1. National Association of Realtors. “2025 Profile of Home Staging.”
  2. The Zebra. “Home Staging Statistics in 2026.”

How to Spot Potential Water Damage in a Home Before You Buy

Water damage is one of the most costly and consequential defects a homebuyer can encounter, explains Quality Rental Homes Specialists. Unlike structural issues that are often visible to the naked eye, water damage frequently hides behind walls, under floors, and above ceilings, revealing itself only after it has progressed to the point where remediation is expensive and disruptive. According to industry estimates, water damage and mold remediation costs can range from a few thousand dollars for minor issues to tens of thousands for extensive damage involving structural components or widespread mold colonization. Learning to identify the warning signs of water damage before making an offer is one of the most valuable skills a homebuyer can develop.
Water damage can originate from multiple sources: roof leaks, plumbing failures, foundation infiltration, HVAC condensation, and appliance malfunctions are among the most common. Each source tends to produce characteristic patterns of damage in specific locations. A systematic inspection of the property – both interior and exterior – combined with a professional home inspection that includes moisture testing, provides the most comprehensive assessment of a property’s water damage history and current condition.

Interior Warning Signs: What to Look for Room by Room

Begin your interior inspection in the rooms most susceptible to water intrusion: the basement, bathrooms, kitchen, and laundry room. In the basement, look for efflorescence (white mineral deposits) on concrete walls, which indicates water has been migrating through the foundation. Staining at the base of walls, a musty or earthy odor, and rust stains around floor drains are additional indicators of chronic moisture intrusion. Tap on basement walls; a hollow sound in areas that should be solid can indicate that moisture has caused the material to delaminate.

In bathrooms, inspect the caulking and grout around the tub, shower, and toilet base. Deteriorated, cracked, or missing caulk allows water to penetrate behind tile and into the subfloor, causing progressive damage that may not be visible until the subfloor has been significantly compromised. Soft or spongy flooring near the toilet or tub is a reliable indicator of subfloor damage. Check under bathroom sinks for staining, warping of cabinet materials, or the presence of mold on the back wall of the cabinet.

Ceiling and Wall Stains: Reading the Evidence

Ceiling stains are among the most visible indicators of water damage and should always be investigated. A yellow or brown ring-shaped stain on a ceiling typically indicates a past or ongoing roof leak or plumbing leak from the floor above. The shape and color of the stain can provide clues about the source: a stain directly below a bathroom is more likely to indicate a plumbing leak, while a stain near an exterior wall or in a corner may suggest roof or flashing issues.

Fresh paint over a stain is a common attempt to conceal water damage. Look for areas of ceiling or wall paint that appear newer or have a slightly different sheen than the surrounding surface. A moisture meter – a tool that measures the moisture content of building materials – can detect elevated moisture levels behind painted surfaces and is a standard tool in a professional home inspector’s kit. Buyers who are particularly concerned about water damage can request that the inspector use a moisture meter throughout the property.

Basement and Foundation Water Intrusion

how-to-spot-potential-water-damage-in-a-home-befor-2

Foundation water intrusion is among the most serious forms of water damage, as it can affect the structural integrity of the home and create chronic moisture conditions that support mold growth. Signs of foundation water intrusion include horizontal cracks in poured concrete or block foundation walls (which can indicate hydrostatic pressure from saturated soil), staining at the base of foundation walls, and the presence of a sump pump – which, while a legitimate water management tool, indicates that the basement is prone to water accumulation.

Exterior grading – the slope of the ground immediately surrounding the foundation – plays a critical role in directing surface water away from the home. Negative grading, in which the ground slopes toward the foundation, allows rainwater to pool against the foundation wall and infiltrate the basement. Inspect the grading around the entire perimeter of the home during your visit, and note any areas where soil, mulch, or hardscaping has settled in a way that directs water toward the foundation.

Roof and Attic Inspection for Water Damage

The roof is the primary barrier between the home’s interior and the elements, and roof-related water damage is one of the most common sources of interior moisture problems. During a property tour, look for missing, curling, or cracked shingles, damaged flashing around chimneys and skylights, and sagging areas that may indicate structural damage from chronic moisture. Gutters that are clogged, damaged, or improperly pitched can cause water to overflow and pool against the foundation or infiltrate behind the fascia board.

The attic is often the first place where roof leaks manifest. During a professional inspection, the inspector should access the attic and look for water stains on the roof sheathing, daylight visible through the roof, and signs of mold or mildew on the framing members. Inadequate attic ventilation can also cause moisture problems by allowing condensation to accumulate on cold surfaces during winter months.

Plumbing System Inspection

Plumbing leaks – both active and historical – are a significant source of water damage in residential properties. During a property tour, turn on faucets and flush toilets to observe water pressure and drainage. Check under all sinks for staining, warping, or mold on cabinet materials. Inspect the area around the water heater for rust stains, corrosion, or pooling water. In homes with older galvanized steel pipes, ask about the plumbing history and whether any sections have been replaced.

The washing machine connection is a frequently overlooked source of water damage. Rubber washing machine hoses have a typical lifespan of five years and are a leading cause of residential water damage when they fail. Inspect the hose connections for signs of bulging, cracking, or mineral deposits, and note whether the hoses are rubber or the more durable braided stainless steel variety.

Frequently Asked Questions

What are the common signs of hidden water damage?

Common signs include musty odors, unexplained staining on ceilings or walls, bubbling or peeling paint, warped or soft flooring, and visible mold growth.

How can I detect water leaks in my home?

Monitor your water meter for unexplained usage, check under sinks and around appliances for staining, and listen for running water when all fixtures are off.

When should I call a professional for water damage?

Call a professional when you discover active leaks, significant staining or mold growth, soft or structurally compromised materials, or when a musty odor persists.

What are the risks of undetected water damage?

Undetected water damage can lead to progressive structural deterioration, mold colonization, and compromised insulation – all of which become exponentially more expensive to address over time.

How can I prevent future water damage?

Inspect and maintain the roof annually, clean gutters seasonally, maintain proper grading around the foundation, replace washing machine hoses every five years, and install water leak detectors.

Conclusion

Water damage is a pervasive and potentially devastating defect in residential real estate. Buyers who develop the ability to recognize its warning signs – and who invest in a thorough professional inspection that includes moisture testing – are far better positioned to avoid purchasing a property with hidden water damage issues. When water damage is discovered during the due diligence process, it becomes a negotiating opportunity: buyers can request remediation, a price reduction, or a repair credit that reflects the true cost of addressing the problem. The key is to identify the issue before closing, while you still have the leverage to act on it.

How to Budget for Unexpected Home Repair Costs

One of the most common financial surprises that new homeowners encounter is the cost of maintaining and repairing a home, reports Property Manage CT specialist. Unlike renting, where maintenance responsibilities fall to the landlord, homeownership requires the owner to fund every repair, replacement, and improvement – from a leaking faucet to a failed HVAC system to a roof replacement. These costs are not merely inconvenient; they can be financially destabilizing for homeowners who have not planned for them. Developing a realistic home repair budget and building the financial reserves to fund it is one of the most important steps a homeowner can take to protect their financial stability and the long-term value of their property.
The challenge of budgeting for home repairs lies in their inherent unpredictability. While some maintenance tasks are scheduled and predictable – annual HVAC servicing, gutter cleaning, exterior painting on a regular cycle – others are sudden and costly: a water heater that fails without warning, a roof damaged by a storm, a sewer line that backs up. The goal of a home repair budget is not to predict exactly when each repair will occur, but to accumulate sufficient reserves so that when repairs do occur – as they inevitably will – they do not create a financial crisis.

The 1 Percent Rule and Its Limitations

The most widely cited guideline for home maintenance budgeting is the 1 percent rule: set aside 1 percent of the home’s purchase price each year for maintenance and repairs. On a $400,000 home, this translates to $4,000 per year, or approximately $333 per month. This rule provides a simple, memorable starting point, but it has significant limitations that buyers should understand.

The 1 percent rule does not account for the age or condition of the home. A newly constructed home with modern systems and a full builder’s warranty will have substantially lower maintenance costs in its early years than a 40-year-old home with original systems approaching the end of their useful lives. For older homes, a more appropriate guideline is 2 to 4 percent of the home’s value annually. Additionally, the 1 percent rule is based on purchase price, which may not reflect current replacement costs in markets where home values have appreciated significantly since purchase.

Home Age Recommended Annual Budget Example (on $400K home)
0-10 years (new construction) 0.5-1% of value $2,000-$4,000/yr
10-25 years 1-2% of value $4,000-$8,000/yr
25-40 years 2-3% of value $8,000-$12,000/yr
40+ years 3-4% of value $12,000-$16,000/yr

Building a Dedicated Home Repair Fund

how-to-budget-for-unexpected-home-repair-costs-2

The most effective way to prepare for home repair costs is to establish a dedicated savings account specifically for this purpose and to fund it consistently through automatic monthly transfers. Keeping home repair funds separate from your general savings or checking account serves two important purposes: it prevents the funds from being spent on non-emergency items, and it provides a clear, real-time picture of your repair reserve balance.

A high-yield savings account is an appropriate vehicle for a home repair fund. The funds should be liquid – accessible within a day or two without penalty – since emergency repairs cannot wait for investment accounts to be liquidated. The interest earned on a high-yield savings account, while modest, provides a small return on the accumulated balance while maintaining full liquidity. Avoid investing home repair funds in volatile assets; the purpose of this fund is stability and accessibility, not growth.

Prioritizing Preventive Maintenance

Preventive maintenance is the most cost-effective approach to managing home repair costs over time. Regular, scheduled maintenance tasks – cleaning gutters, servicing the HVAC system, inspecting the roof, caulking windows and doors, and testing smoke and carbon monoxide detectors – prevent small problems from escalating into large, expensive ones. The cost of an annual HVAC service call ($80 to $150) is trivial compared to the cost of replacing a failed system ($5,000 to $15,000 or more). The cost of cleaning gutters ($100 to $250) is negligible compared to the cost of repairing water damage caused by overflowing gutters ($1,000 to $10,000 or more).

Developing a seasonal maintenance checklist and adhering to it consistently is one of the highest-return activities available to a homeowner. Spring maintenance should include inspecting the roof and gutters after winter, servicing the air conditioning system, and checking the foundation for any settling or cracking. Fall maintenance should include servicing the heating system, cleaning gutters after leaf fall, and inspecting weatherstripping and caulking before winter. A written checklist, reviewed and completed twice annually, provides both a reminder system and a maintenance record that can be valuable when selling the home.

Understanding Major System Lifespans

Effective long-term budgeting for home repairs requires an understanding of the typical useful life of major home systems and components. This knowledge allows homeowners to anticipate major expenditures and begin saving for them in advance, rather than being caught off guard when a system fails. The following are typical lifespans for major home systems, though actual longevity varies significantly based on quality of installation, maintenance history, and local climate conditions.

Roofing materials vary widely in lifespan: asphalt shingles typically last 20 to 30 years, while metal roofing can last 40 to 70 years. HVAC systems generally last 15 to 25 years. Water heaters have a typical lifespan of 8 to 12 years for tank-style units and 20 years or more for tankless units. Kitchen appliances typically last 10 to 15 years. Exterior paint on wood siding requires repainting every 5 to 7 years. Understanding where each major system in your home falls within its expected lifespan allows you to plan and budget for replacements proactively.

Home Warranties: A Supplemental Safety Net

A home warranty is a service contract that covers the repair or replacement of major home systems and appliances for a defined period, typically one year, in exchange for an annual premium and a per-service-call deductible. Home warranties are commonly offered by sellers as an incentive in real estate transactions, but buyers can also purchase them independently. Annual premiums typically range from $400 to $700, with per-service-call fees of $75 to $125.

The value of a home warranty depends heavily on the age and condition of the covered systems. For buyers of older homes with aging HVAC systems, water heaters, or appliances, a home warranty can provide meaningful financial protection. For buyers of newer homes with systems still under manufacturer’s warranties, the incremental value of a home warranty is lower. Read the contract carefully before purchasing, as home warranties typically contain exclusions for pre-existing conditions, improper installation, and lack of maintenance that can limit their practical utility.

Frequently Asked Questions

How much should you budget for home maintenance?

A common guideline is to budget 1 to 4 percent of your home’s value annually for maintenance and repairs, with the appropriate percentage depending on the age and condition of the property.

What is the 1% rule for home maintenance?

The 1 percent rule suggests setting aside 1 percent of your home’s purchase price each year for maintenance and repairs.

How do I save for unexpected home repairs?

Establish a dedicated home repair savings account and set up automatic monthly transfers from your checking account. Keeping these funds separate ensures they are available when needed.

What factors influence home maintenance costs?

The primary factors are the age of the home, the size of the home, the geographic location, and the quality of construction and materials used in the original build.

Is a home warranty worth it?

A home warranty can be worth it, particularly for buyers of older homes with aging systems. The annual cost of $500 to $700 can be offset by a single covered repair.

Conclusion

Budgeting for home repair costs is not a passive activity – it requires proactive planning, consistent saving, and a working knowledge of the systems and components that make up your home. Homeowners who establish a dedicated repair fund, adhere to a preventive maintenance schedule, and understand the expected lifespan of their home’s major systems are far better prepared to handle the inevitable costs of homeownership without financial disruption. The goal is not to eliminate surprise – in homeownership, surprises are inevitable – but to ensure that when they occur, you have the resources to address them promptly and effectively.

5 Common Mistakes to Avoid When Choosing a Party Wall Surveyor in Essex

Are you planning a construction or renovation project in Essex? You need to choose the right party wall surveyor to make sure your project complies with Party Wall etc. Act 1996.

If you make any mistakes as you pick a party wall surveyor in Essex, you could experience delays to your project and incur unnecessary costs. In this article, we look at the top five mistakes you should avoid when choosing a party wall surveyor for your project in Essex, so you make a smarter decision.

Basing your choice on price alone

One of the biggest mistakes you can make as a property owner is going for the cheapest surveyor available. Although it may seem like a cost-saving decision, a surveyor charging unusually low fees could be an indicator of inexperience or shortcuts in service delivery. Typical surveyor fees in Essex vary a great deal and several factors influence them, including project complexity and disputes.

In some cases, low-cost surveyors may lack the expertise to deal with complications, and this could potentially lead to high costs later due to errors or delays. Instead, you should focus on value, often shown by experience, reliability and transparency, but not just on price.

Ignoring qualifications and experience

Not all party wall surveyors in Essex are equally qualified. Unfortunately, some people may claim to be “party wall surveyors” even when they don’t have what it takes to offer the service.

Before hiring a party wall surveyor in Essex, take some time to check their credentials. You should especially check on membership in professional bodies like the Royal Institute of Chartered Surveyors (RICS) to avoid exposing yourself to risk. The beauty of working with an experienced surveyor is that they understand the nuances of notices, awards and dispute resolution. This ensures your project stays compliant and efficient.

Overlooking impartiality

You may have the notion that a party wall surveyor in Essex works solely in your interest. This couldn’t be farther from the truth, as these professionals should act impartially under the law even when you’re the one who appointed them.

Thus, choosing a surveyor who comes out as biased or too “client-friendly” can backfire on you. If a party wall surveyor lacks independence, this may be considered a professional failing. It may even lead to poor decisions or disputes. You must ensure that your lawyer always demonstrates fairness and a clear understanding of their statutory role.

Failing to research before appointing one

You should avoid the mistake committed by many project owners who rush into hiring the first surveyor they find. The risk in this is that after appointing a party wall surveyor, replacing them is not easy.

It is unwise to skip research steps such as reading reviews. Check past projects or get recommendations. The mistake can leave you with an underperforming professional. You can escape long-term frustration by taking time to vet your options.

Believing unrealistic promises

It is crucial to exercise caution when dealing with a party wall surveyor in Essex who guarantees quick approvals, fixed timelines and zero disputes. This is because the party wall process involves many parties and legal steps, most of which fall beyond the surveyor’s control.

You should take such promises as red flags. Among the qualities of trustworthy surveyors is setting realistic expectations and explaining potential challenges, but not overselling outcomes.

Conclusion

If you avoid the above mistakes, you can save time, money, and avoid unnecessary stress when choosing a party wall surveyor in Essex. You need to focus more on qualifications, proven experience and impartiality rather than their rates or convenience.

How to Patch Large Holes in Drywall: Two Methods That Actually Work

What Counts as a Large Hole

A small hole is something you can cover with an adhesive mesh patch and a few swipes of joint compound. A large hole is anything wider than six inches across, the kind left behind by a doorknob punch-through, a plumbing access cutout, or a badly aimed piece of furniture during a move. At this size, standard drywall mesh alone will not hold. The patch needs structural support behind it, or you need to cut a new piece of drywall to fit.

There are two approaches that work, and which one you pick depends on the hole size and your comfort level with drywall work. The backer board method is the standard, the one professionals use.

The California patch, sometimes called a butterfly patch, is faster and requires fewer materials but demands more precision. Both beat the hack job of stuffing newspaper in the hole and mudding over it, which absolutely does not work and you already knew that.

“How to fix a somewhat large hole in the drywall? About the size of a fist. My landlord is coming next week and I need to get this sorted.”

— u/anonymous in r/HomeMaintenance · 30 upvotes · 43 comments

Tools and Materials You Need

Before cutting into anything, gather everything. Nothing is more frustrating than holding a piece of drywall in place with one hand and realizing the screw gun is still in the garage. Here is what you need for either method:

  • Drywall panel (2 ft x 2 ft patch panel covers most holes, about $8 at Home Depot)
  • Utility knife with fresh blades
  • Drywall saw or jab saw
  • Measuring tape and pencil
  • Wood backer board, 1×3 or 1×4 pine (only needed for backer board method)
  • 1-1/4 inch drywall screws
  • Power drill or screwdriver
  • Mesh drywall tape
  • All-purpose joint compound (pre-mixed tub, about $12)
  • 6-inch and 10-inch putty knives
  • 150-grit sandpaper and sanding block
  • Primer and matching paint

Method 1: The Backer Board Technique

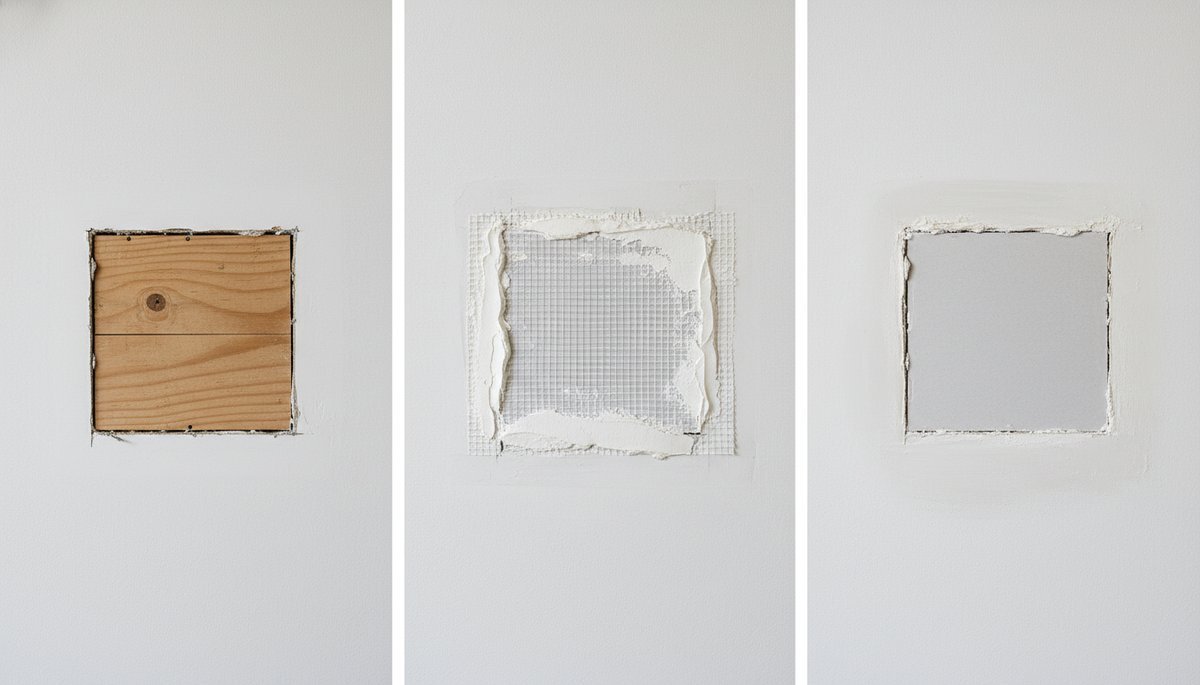
method 1 the backer board technique
The three stages of a backer board patch: framing the support behind the opening, applying tape and compound, and the finished result ready for paint.

This is the method for holes larger than about twelve inches across, or any hole where structural support behind the patch matters. It takes longer than the California patch but produces a repair that is indistinguishable from the original wall once painted.

Step 1: Square up the hole. Use the drywall saw to cut the damaged area into a clean rectangle or square. Find the nearest studs on either side of the hole. Ideally, your cutout extends to the center of the studs on both sides so you have something to screw into. If the hole does not reach the studs, no problem. That is what the backer board is for.

Step 2: Install the backer board. Cut two pieces of 1×3 or 1×4 pine about four inches longer than the height of your cutout. Slide one piece into the hole and position it vertically behind the drywall on the left side of the opening.

Screw through the existing drywall into the backer board above and below the hole. Repeat on the right side. You now have a solid frame behind the opening to screw your patch into.

Step 3: Cut and attach the patch. Measure the opening and cut a piece of drywall to fit. It should be slightly smaller than the opening to leave a thin gap around all four sides for joint compound to fill. Screw the patch into the backer boards using drywall screws spaced every six inches. The screw heads should dimple slightly below the surface without breaking the paper face.

Step 4: Tape, mud, sand, repeat. Cover all four seams with mesh drywall tape. Apply the first coat of joint compound with the six-inch knife, pressing it through the tape and feathering the edges out about four inches beyond the seams.

Let it dry completely, usually 24 hours. Apply a second coat with the ten-inch knife, feathering farther out. Sand lightly between coats. Most patches need three coats to disappear. Prime and paint to match.

“Large hole in drywall. How to fix? This is behind my bathroom door. The doorstop failed and the handle went straight through.”

— u/anonymous in r/HomeMaintenance · 28 upvotes · 51 comments

Method 2: The California Patch

The California patch works for holes roughly six to twelve inches across. It is faster than the backer board method because you do not need wood supports or to screw into studs. The patch itself provides the structure. The trick is cutting the drywall correctly.

Step 1: Cut the patch blank. Cut a square of drywall about two inches larger than the hole in both directions. On the back side of this piece, measure in two inches from each edge and score a line through the gypsum core with a utility knife, but do not cut through the front paper.

Snap the gypsum along the score lines and peel away the excess, leaving a two-inch paper border around all four sides of the face. This paper flap is what bonds the patch to the wall.

Step 2: Trace and cut the wall opening. Hold the patch over the hole and trace around the gypsum portion, not the paper border. Cut along this line with the drywall saw. The opening in the wall should now match the gypsum piece exactly.

Step 3: Mud and set the patch. Spread a thin layer of joint compound around the edges of the opening on the wall. Press the patch into place. The paper border should lay flat against the surrounding wall surface.

Use the putty knife to embed the paper into the compound, working from the center outward to squeeze out air bubbles. Apply a thin skim coat over the entire patch and paper border.

Step 4: Finish like normal. Let the first coat dry. Apply two more coats, feathering each one wider than the last. Sand, prime, paint. The paper border creates a seamless transition that, done right, disappears completely.

“Can I patch a hole in drywall without using mesh tape? I ran out and the store is closed. My wife wants this fixed tonight.”

— u/anonymous in r/HomeImprovement · 16 upvotes · 37 comments

Mistakes That Turn a One-Day Job Into a Week

Skipping the backer board when you need it. If the hole is wider than twelve inches and you try a California patch, the unsupported drywall will flex every time someone leans on the wall. The joint compound cracks. You end up doing the job twice. Use the right method for the hole size.

Applying joint compound too thick. Joint compound shrinks as it dries. If you trowel it on a quarter-inch thick hoping to finish in one coat, you get shrinkage cracks and a lumpy surface. Three thin coats always beat one thick one. Dry time between coats is not optional. If the compound feels cool to the touch, it is still wet inside even if the surface looks white.

Sanding without dust control. Drywall dust is fine enough to float through an entire house. Tape plastic sheeting over doorways to contain the mess. A damp sponge can knock down ridges between coats without generating dust at all. For final sanding, hook a shop vac to a sanding block with a dust port, or use a vacuum-assisted hand sander. Your lungs and your furniture will thank you. Once the wall is patched and painted, take the opportunity to inspect the rest of your home for hidden issues. A quick foundation check can catch structural problems before they turn into bigger repairs.

Painting over unprimed compound. Joint compound is porous. If you paint directly over it without primer, the paint absorbs at a different rate than the surrounding wall and the patch flashes through no matter how many coats you apply. One coat of PVA drywall primer, then paint.

Frequently Asked Questions

How to patch large holes in drywall without replacing the whole sheet?

Both the backer board method and the California patch avoid replacing the entire drywall sheet. For holes up to twelve inches, the California patch is faster and requires fewer materials. For larger holes, the backer board method provides structural support that a paper-only patch cannot match. Neither method requires removing full sheets.

Can you use spackle for large drywall holes?

Spackle is designed for nail holes and small dents, not structural repairs. For holes larger than a few inches, spackle lacks the strength to bridge gaps and will crack as it dries. Joint compound, applied in thin layers over mesh tape or a drywall patch, is the correct material. Spackle is the wrong tool for this job.

How long does a drywall patch take from start to finish?

Expect two to three days for a professional-looking repair. Day one: cut the hole, install the patch, and apply the first coat of compound. Day two: apply second and third coats with drying time between. Day three: sand, prime, and paint. Rushing the drying between coats is the number one reason patches fail.

What if there are wires or pipes behind the hole?

Before cutting, probe the hole with a bent wire hanger to check for obstructions. If you find electrical wiring or plumbing, keep your saw shallow. Cut through the drywall only, not deeper. For peace of mind, shut off power to the room at the breaker before working near any wall that might contain wiring. If the hole is from a doorknob, the only thing behind it is empty stud space.

Do you need to use mesh tape on drywall patches?

For the backer board method, yes. Mesh tape prevents cracks from forming along the seams where the patch meets the existing wall. For the California patch, the paper border serves the same purpose as tape. The paper flap bonds to the joint compound and creates a reinforced seam without needing separate mesh tape.

Are Home Warranty Plans Worth It? An Honest Look at the Numbers

What a Home Warranty Actually Covers

A home warranty is a service contract, not insurance. The distinction matters because it shapes everything about what gets covered and what gets denied. A home warranty steps in when your water heater rusts out or your oven stops heating. It does nothing when a tree falls through your roof or a pipe bursts and floods the basement. That is homeowners insurance territory.

Most standard plans cover major built-in systems: electrical, plumbing, and HVAC. They also cover a handful of major appliances: refrigerator, dishwasher, oven, washing machine. Some plans include the garage door opener. Some even count the ceiling fan. The list looks generous until you read the exclusions.

Cosmetic damage, pre-existing conditions, improper installation, code violations, and lack of maintenance records all serve as grounds for denial. If your air conditioner died because the filter had not been changed in three years, the warranty company has a valid reason to say no.

Coverage caps are the other thing nobody reads until it is too late. A plan might cover your HVAC system, but only up to $1,500 per repair. If the compressor fails and the bill comes to $3,200, you are covering the difference.

Some providers cap total annual payouts at $3,000 or $5,000 regardless of how many things break. These numbers, buried in the fine print, make or break whether the plan ever pays for itself.

What This Actually Costs You

The math on home warranty plans is not complicated, but most people never run it. According to the American Home Shield website, the average annual premium runs between $500 and $700, depending on your location and the level of coverage, as documented by Wikipedia. On top of that, every service call triggers a trade fee, typically $75 to $125, paid directly to the technician who shows up at your door.

So the minimum annual cost if nothing breaks is the premium: call it $600. If one appliance fails and you call for service, you are at $700. Two failures: $800. And if the technician determines the failure is not covered, which happens more often than the brochures suggest, you still pay that $100 trade fee for a diagnosis that leads nowhere.

Consumer Reports ran the numbers in their 2025 analysis and concluded that the average homeowner who buys a warranty will spend more on premiums than they recoup in covered repairs. This is not a secret. The warranty industry is profitable for a reason. Most people pay more than they claim. That is how insurance and service contracts work, and home warranties are no exception.

“Thoughts on home warranties? Are they worth it? We’re closing on a house in Phoenix next month and the seller is offering to include a one-year home warranty. Trying to figure out if we should ask for something else instead.”

— u/anonymous in r/phoenix · 0 upvotes · 54 comments

When a Home Warranty Actually Makes Sense

There are specific situations where buying a home warranty is not just defensible but genuinely smart. The most common is when you are buying an older home with aging systems.

If the house has a fifteen-year-old HVAC unit and a water heater from the Obama administration, the odds of a major failure in the first year are high enough to shift the math in your favor. A single AC compressor replacement can easily exceed $2,000, which covers several years of premiums.

Sellers sometimes throw in a one-year home warranty as a closing incentive. If the seller is paying, there is zero reason to say no. The warranty can buffer the transition period when any deferred maintenance from the previous owner might surface.

First-time homebuyers who have drained their savings on the down payment and cannot absorb a surprise $1,500 repair are also reasonable candidates. The warranty buys peace of mind during the financially tightest stretch of homeownership.

Real estate agents often recommend home warranties for exactly these scenarios. It is not because the plans are universally good. It is because the agent has seen deals fall apart over inspection findings, and a warranty can reassure nervous buyers enough to close. The warranty serves a purpose beyond the coverage, it lubricates the transaction.

When You Are Better Off Saying No

If your home is less than ten years old and the major systems are still under manufacturer warranty, a home warranty is almost certainly a waste of money. The same goes for anyone with a healthy emergency fund.

If you have $5,000 set aside for home repairs, you are self-insured. You are the warranty. Setting aside the $600 premium into that fund every year builds a repair budget that does not come with exclusions, coverage caps, or thirty minutes of hold music to file a claim.

Another scenario to avoid: buying a warranty expecting it to cover pre-existing problems. Warranty companies typically require a thirty-day waiting period before coverage kicks in, and they will send an inspector if a major claim comes through in the first few months. If your HVAC was on its last legs when you bought the policy, they will find out and deny the claim.

The fine print on exclusions is worth a dedicated read before signing anything. Some plans exclude specific expensive components like refrigerant line sets, ductwork modifications, or disposal fees for old appliances. A repair that looks fully covered on paper can end up costing hundreds out of pocket once the line-item exclusions stack up.

Alternatives Worth Considering

If a home warranty does not make sense for your situation, there are better ways to protect yourself. The simplest is a dedicated home repair savings account. Automate a monthly transfer of $50 to $75 into a separate account labeled house emergencies. In a year you will have $600 to $900, which covers most single-appliance failures. In three years you will have enough to replace a major system.

For specific high-cost items, manufacturer extended warranties sometimes offer better terms than home warranty plans. An HVAC manufacturer warranty that extends coverage to ten years for a few hundred dollars covers the single most expensive system in your home without the overhead of a general service contract.

Regular preventive maintenance is its own form of warranty. A $150 annual HVAC tune-up catches small problems before they become compressor-level disasters, and it creates the maintenance paper trail that home warranty companies demand anyway.

Keeping your home’s major systems in good shape reduces the odds of a catastrophic failure regardless of whether you have a warranty. A seasonal roof maintenance routine and regular inspections of your home’s foundation catch problems early and keep repair costs manageable.

5 Questions to Ask Before You Sign Anything

Whether are home warranty plans worth it depends heavily on the fine print. Most home warranty complaints trace back to assumptions the buyer made before reading the contract. These five questions cut through the sales pitch and reveal what a plan is actually worth.

What is the per-item coverage cap? A plan that covers your HVAC up to $1,500 is a very different product than one that covers it up to $5,000. If your home has a high-end system, a low cap plan leaves you exposed on the single most expensive repair. Ask for the cap schedule in writing before comparing plans.

What are the specific exclusions? Every plan has a list. Refrigerant line sets on AC units. Ductwork modifications. Disposal fees for old appliances. Code upgrades required after a repair. These line items can turn a covered repair into a four-figure out-of-pocket bill. Get the exclusion list, not the brochure summary.

How are service providers chosen? Most warranty companies select the contractor and dispatch them. You do not get to pick your own HVAC guy. If the contractor they send has mixed reviews and a two-week wait time, you are stuck. Some plans allow you to choose your own contractor with pre-approval. That flexibility is worth paying for.

What is the claims process timeline? Some companies promise same-day dispatch. Others take 48 to 72 hours just to assign a contractor, then another week for the appointment. If your air conditioner fails in July in Phoenix, a two-week wait is not a solution. Ask for the average response time in your zip code, not the national marketing number.

Is the plan renewable at the same rate? First-year premiums are often discounted. Year two renewals can jump by twenty to thirty percent. If the plan only made financial sense at the introductory rate, it will not make sense at the renewal rate. Lock in the renewal terms before you buy the first year.

How to Pick a Provider Without Getting Burned

Not all home warranty companies are interchangeable. Check the Better Business Bureau rating and read the complaint volume, not just the star rating. A company with a 4.2 rating and twelve thousand complaints is a different story than one with a 3.8 rating and two hundred complaints. The volume tells you more than the average.

Look for a provider that has been in business at least ten years. The home warranty industry has a high failure rate. Companies that survive a decade have figured out how to balance claims payouts with premium revenue without going under.

A newer company offering significantly lower premiums may be underpricing to gain market share, and that strategy ends when the claims start rolling in. You do not want to hold a policy from a company that declares bankruptcy.

Read reviews with a filter. Happy customers rarely leave reviews for warranty companies. The people who post are the ones who got denied. That said, look for patterns. If dozens of reviews mention the same exclusion being used to deny claims, or the same contractor showing up late over and over, those are systemic problems, not one-off bad experiences.

Frequently Asked Questions

Are home warranty plans worth it for older homes?

Older homes with aging systems are the strongest case for a home warranty. A single HVAC or water heater replacement can cost $2,000 to $5,000, dwarfing the $500 to $700 annual premium. If the home is over fifteen years old and the major systems are original, a warranty can provide genuine financial protection during the first few years of ownership.

What does a home warranty typically exclude?

Home warranties exclude cosmetic damage, pre-existing conditions, improper installation, code violations, and items lacking maintenance records. Many also cap coverage per repair and per year. Outdoor systems like sprinklers and pools are usually excluded from base plans. Always read the specific exclusions in your contract before purchasing.

How much do home warranty plans cost per year?

Annual premiums range from $500 to $700 for a standard plan covering major systems and appliances, according to industry data. Service call fees add $75 to $125 per visit. Comprehensive plans covering additional items like pools or well pumps cost more, sometimes exceeding $1,000 annually.

Can I buy a home warranty after closing on a house?

Yes. Home warranties can be purchased at any time, not just during a real estate transaction. Most providers allow you to enroll online and coverage typically begins after a thirty-day waiting period. This waiting period prevents people from buying a warranty only after something breaks.

What is the best alternative to a home warranty?

The most effective alternative is a dedicated home repair savings fund. Setting aside $50 to $75 monthly builds a repair budget without coverage exclusions or service fees. For high-cost items like HVAC systems, manufacturer extended warranties often provide better value than a general home warranty plan.

How to Waterproof Plywood: 5 Methods That Actually Hold Up

Plywood Is Not Waterproof, and That’s a Problem

Standard plywood soaks up water like a sponge. Its layered veneer construction, held together by adhesives that vary widely in water resistance, as explained by Wikipedia, means moisture can seep in from any edge, any cut surface, any scratch in the face. Once water gets inside, the plies delaminate. The wood swells. Mold follows. Left unchecked, a piece of plywood that cost you forty bucks can rot through in a single wet season.

Knowing how to waterproof plywood correctly changes the equation entirely. A well-applied waterproof coating doesn’t just sit on the surface, it penetrates, bonds, and creates a barrier that turns a fragile material into something you can trust outdoors, in bathrooms, on boat decks, under tile, anywhere moisture lives.

The method you pick depends on where the plywood lives, what it needs to look like, and how long you need it to last.

“Need advice for waterproofing plywood. I made an exhaust fan manifold for my camper van. What would you use to seal the plywood? Polyurethane? I’ll try to avoid camping in heavy rain, but I want it to handle it.”

— u/kirbykoot in r/woodworking · 54 upvotes · 121 comments

Before Anything: Surface Prep Is Not Optional

No coating, no matter how expensive, will save plywood that hasn’t been prepped. The surface needs to be clean, dry, and slightly rough for any sealant to grip properly. Sand the plywood with 120 to 150 grit sandpaper, focusing on edges and corners where moisture intrusion starts.

Wipe away all dust with a tack cloth or a rag dampened with mineral spirits. Do not use water for cleaning, you are literally trying to keep water out of the wood.

Fill any voids, knot holes, or gaps with wood filler and sand flush once dry. The edges of plywood are the most vulnerable point. End grain is exposed across every ply, and water wicks into those layers fast. If you are doing this right, you will spend extra time on the edges with every method below.

“Will this waterproof my plywood? Planning to use it as a base for my outdoor turtle pond area.”

— u/potchy_22 in r/BeginnerWoodWorking · 9 comments

Method 1: Exterior Paint (Budget-Friendly, Solid Protection)

Exterior-grade latex or oil-based paint is the most accessible way to waterproof plywood. It is cheap, comes in any color, and requires no special equipment beyond a brush or roller. The paint forms a protective film on the surface that repels water and blocks UV damage. For plywood used in outdoor furniture, shed walls, or garden boxes, paint is often the right answer.

Start with an exterior wood primer, one coat, allowed to dry fully. Then apply two to three coats of exterior paint, letting each coat dry before the next. Pay extra attention to edges. Give them an extra pass.

Paint will crack and peel eventually, especially somewhere with freeze-thaw cycles, so plan on repainting every two to three years. It is not a forever solution, but it is a perfectly good one for most people.

Method 2: Polyurethane Varnish (Clear Finish, Natural Wood Look)

If you want the plywood to still look like wood, polyurethane is the move. Oil-based polyurethane penetrates deeper and provides better water resistance than water-based versions, though both work. The trade-off: oil-based poly yellows slightly over time, which matters on light woods like birch, but on darker plywood the color shift is barely noticeable.

Apply with a high-quality brush in thin, even coats. Thin coats cure harder and more evenly than thick ones. Sand lightly with 220 grit between coats to knock down any raised grain. Three coats is standard, four if the piece lives outside. Polyurethane holds up well on plywood furniture, cabinet boxes, and interior trim in moisture-prone rooms like bathrooms and laundry areas.

Method 3: Epoxy Resin (Maximum Protection, Marine-Grade)

Epoxy is what you use when the plywood absolutely cannot fail. Boat builders use it. Shower pan installers use it. Anyone who has ever watched a plywood project disintegrate and swore never again uses it. Epoxy creates a hard, impermeable shell that water cannot penetrate, period. It also adds structural strength, bonding the veneers together more tightly than the original glue.

The catch is cost and effort. Epoxy is expensive, requires mixing two parts in precise ratios, has a limited working time once mixed, and needs proper ventilation and gloves. You apply it with a roller or spreader, working quickly.

Two coats are typical, with light sanding between coats. The result is a glassy, nearly indestructible surface. If you are waterproofing a plywood boat deck or an outdoor kitchen countertop, epoxy is the answer and everything else is a compromise.

Method 4: Penetrating Wood Oil (Natural Look, Easy Reapplication)

Tung oil, linseed oil, and specialized deck oils soak into the wood fibers rather than sitting on top. They do not create a film, which means they never peel or crack. The wood breathes.

The trade-off: protection is less absolute than epoxy or polyurethane, and you need to reapply every six to twelve months depending on exposure. For plywood garden furniture, raised beds, or decorative outdoor pieces where you want the wood grain visible and you don’t mind an annual maintenance ritual, oil is the simplest path.

Apply liberally with a rag or brush, let it soak in for fifteen to twenty minutes, then wipe off the excess. Multiple thin coats beat one heavy one. The oil darkens the wood slightly and gives it a warm, matte finish that paint and poly can’t match.

Method 5: Liquid Rubber or Membrane Coating (Heavy-Duty, Flexible)

Liquid rubber coatings like Durabak or Red Guard create a thick, flexible waterproof membrane. Unlike paint or epoxy, these coatings stretch slightly as the wood expands and contracts with temperature and humidity changes. This makes them ideal for plywood decks, balconies, and flat roofs where movement is inevitable.

Application is straightforward: roll it on like thick paint, two to three coats, with curing time between each.

The finish is textured and rubbery, not something you would use on furniture, but for structural applications it is hard to beat. Red Guard waterproofing membrane is one of the most widely available options for this approach, commonly used under tile in bathrooms but equally effective on exterior plywood when applied according to manufacturer specs.

If the plywood will be walked on heavily, consider a deck coating waterproof system designed for foot traffic rather than a standard membrane product.

“What’s the best way to waterproof plywood for a travel trailer floor? I’ve got a 1991 camper and the floor needs replaced. Trying to figure out what product to use so I don’t have to do this again.”

— u/mountain_ad_8332 in r/traveltrailers · 7 upvotes · 10 comments

Which Method Should You Pick?

which method should you pick
Five waterproofing options side by side: exterior paint, polyurethane, epoxy resin, tung oil, and liquid rubber membrane, each tested on a plywood square.
Situation Best Method Durability
Outdoor furniture, visible wood grain wanted Polyurethane or Wood Oil 2-4 years
Painted shed/garden box Exterior Paint 2-3 years
Boat deck, shower pan, absolute waterproof Epoxy Resin 10+ years
Balcony, deck, flat roof Liquid Rubber / Membrane 5-10 years
Camper van, trailer floor Epoxy or Liquid Rubber 5-10 years

Frequently Asked Questions

Can you permanently waterproof plywood?

No method makes plywood permanently waterproof in all conditions. Epoxy resin comes closest, lasting a decade or more with proper application. But all coatings degrade over time from UV exposure, temperature swings, and physical wear. The goal is to choose a method where the maintenance cycle matches your willingness to reapply.

How to waterproof plywood for outdoor use?

For outdoor plywood, exterior paint is the simplest option and works well for most projects. Epoxy resin offers the longest protection if you are willing to invest the time and money. Liquid rubber membranes excel on horizontal surfaces like decks. The key for all outdoor applications is sealing the edges thoroughly, since that is where water enters first.

Do you need to waterproof both sides of plywood?

Yes. Waterproofing only one side creates uneven moisture absorption, which leads to warping and cupping. Seal all six sides, faces and edges, for any plywood that will face moisture. If one side is inaccessible after installation, seal it before you put the piece in place.

Is marine plywood already waterproof?

Marine plywood uses waterproof glue between the veneers, but the wood itself still absorbs moisture. It resists delamination far better than standard plywood, but it still benefits from a surface sealant. Think of marine plywood as water-resistant, not waterproof. A coat of epoxy or polyurethane on top extends its life significantly.

How long does waterproofed plywood last outside?

With proper sealing and maintenance, outdoor plywood can last five to fifteen years depending on the method used and climate conditions. Epoxy-sealed plywood in a moderate climate can last over a decade. Painted plywood in a wet climate may need attention every two to three years. The biggest variable is how well the edges were sealed at the start.

Everything Homeowners Need To Know About Water Softeners

Water quality plays a major role in the comfort, efficiency, and longevity of a home. Many homeowners deal with hard water without fully realizing its impact on plumbing and appliances. Hard water contains high levels of calcium and magnesium that build up over time. These minerals reduce cleaning effectiveness and cause visible residue. Long term exposure can lead to costly maintenance issues. A water softener helps address these challenges by treating water before it enters the home. Understanding how water softeners work allows homeowners to make smarter decisions.

What Hard Water Is And Why It Matters

Hard water forms when groundwater absorbs minerals from soil and rock. These minerals are not harmful to drink, but they affect household systems. Scale buildup inside pipes restricts water flow and efficiency. Appliances like water heaters and dishwashers wear out faster with hard water exposure. Soap and detergent become less effective, increasing usage and cost. Fixtures often develop spotting and buildup. Recognizing hard water problems is the first step toward improvement.

How Water Softeners Work In A Home

Water softeners remove hardness minerals through a process called ion exchange. The system replaces calcium and magnesium with sodium or potassium ions. Resin beads inside the unit attract and trap unwanted minerals. Once saturated, the system regenerates using a salt solution. This process restores resin efficiency. Softened water then flows throughout the home. This cycle occurs automatically based on usage or schedules.

Key Components Of A Water Softener System

A typical water softener includes several important components. The resin tank contains beads responsible for mineral removal. The brine tank stores salt used during regeneration. Control valves manage water flow and regeneration timing. Distribution tubes ensure even contact with resin. Each part must function properly for optimal performance. Understanding components helps homeowners recognize potential issues.

Benefits Of Installing A Water Softener

Softened water provides noticeable benefits throughout the home. Soap lathers more effectively during cleaning and bathing. Appliances operate more efficiently and last longer. Plumbing systems experience less scaling and corrosion. Energy efficiency improves as water heaters heat softened water faster. Skin and hair often feel cleaner after bathing. Overall maintenance costs decrease over time.

Different Types Of Water Softeners Available

Several types of water softeners are available to homeowners. Salt based systems are the most common and effective. Salt free alternatives condition water without removing minerals. Dual tank systems support uninterrupted softened water supply. Magnetic and electronic systems claim improvement but vary in effectiveness. Choosing the right system depends on water hardness and household needs. Professional guidance helps ensure correct selection.

Choosing The Right Size And Capacity

Proper sizing ensures consistent soft water availability. System capacity depends on household size and water usage. Oversized units waste resources while undersized ones regenerate frequently. Water hardness levels influence capacity requirements. Accurate testing is necessary before purchase. Matching system size to needs improves efficiency. Correct sizing supports long term performance.

Efficiency And Modern Water Softener Technology

Modern systems offer significant improvements over older designs. Advanced controls minimize water and salt usage. Smart monitoring adjusts regeneration based on demand. A high efficiency water softener reduces operating costs while maintaining performance. These systems support sustainability and convenience. Improved technology enhances reliability. Efficiency upgrades benefit both homeowners and the environment.

Installation And Ongoing Maintenance Considerations

Installation can be professional or homeowner handled depending on complexity. Proper placement ensures effective whole home coverage. Routine maintenance includes salt refills and occasional cleaning. Annual inspections help identify wear or inefficiency. Brine tank maintenance prevents clogs and bridging. Consistent care extends system lifespan. Maintenance ensures continued water quality.

Conclusion

Water softeners offer practical solutions for managing hard water challenges. They protect plumbing, appliances, and home surfaces. Understanding system function helps homeowners make informed choices. Proper sizing and modern efficiency improve performance. Regular maintenance supports long term reliability. Softened water increases comfort and reduces costs. Knowledge empowers homeowners to improve water quality effectively.