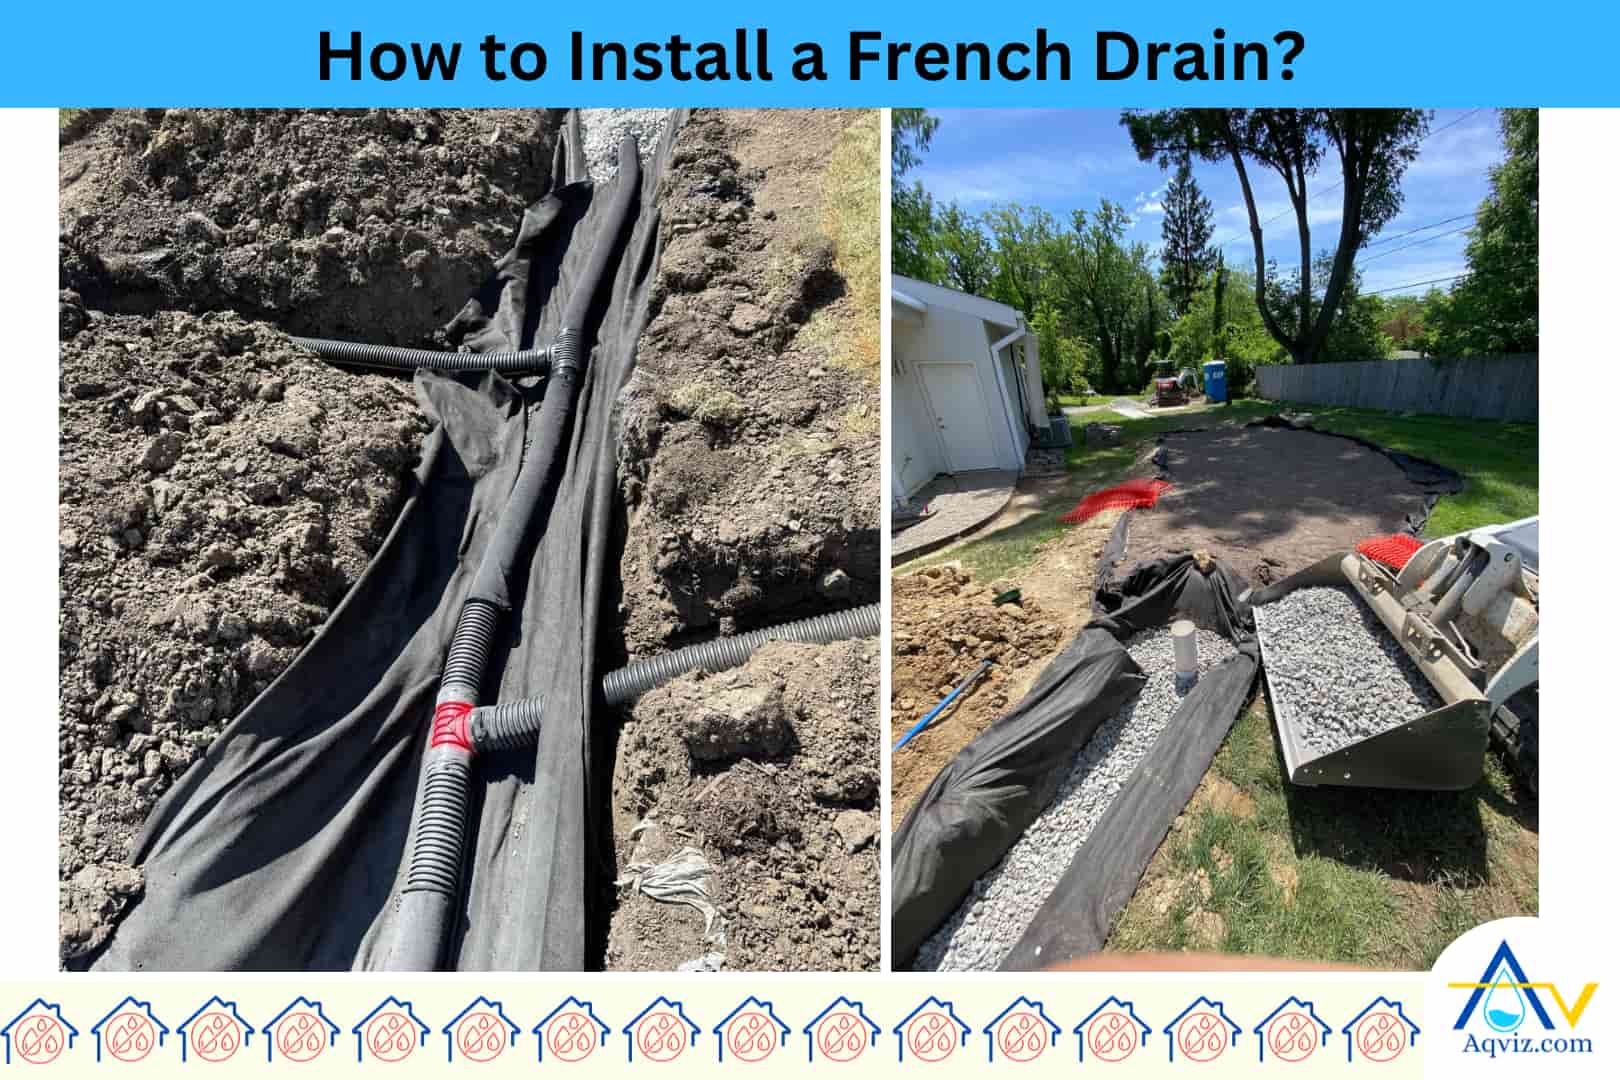
How to Install a French Drain?

French drain installation is a step-by-step process. For each step, you should follow the proper method to build an efficient French drain system. A properly installed French drain system helps control groundwater and minimize water problems and structural damage. So let’s review the recommended installation steps as suggested by the experts.
7 expert steps to install a French drain
- Inspect the basement and plan the French drain layout
- Gather relevant tools and materials for the French drain
- Excavate the French trench
- Set up a catch basin
- Lay the geotextile fabric at the bottom of the French drain
- Add rock base and install a perforated pipe
- Cover the perforated pipe and backfill
After installing a french drain system you should setup a sump pump, direct the run off water away from the basement, increase the grading of the ground away from the basement, fix all downspout problems, fix all roof gutter clogs, control the watering in the garden, install window stripe for basement windows to protect the basement from water.
1. Inspect the Basement and Plan the French Drain Layout
Before installing a French drain , you should inspect the basement thoroughly to identify all water-related issues and damages. You should look for efflorescence, mold growth, musty odors, water stains along the base of walls, rusted nails or fasteners, and peeling or bubbling paint in the basement. In this step, you can download this basement inspection checklist to examine wall-floor joints, cold joints, visible foundation cracks, and damp basement corners.
After the inspection process, you can decide whether you should go for an interior or exterior French drain based on the water entry points. You should choose an interior system if the basement is old and water enters through floor joints, and an exterior system if the basement is new and poor drainage or high groundwater pressure exists outside.
To plan the French drain layout, you should locate the lowest point in the basement for placing the sump basin. First, mark a route for the discharge pipe that slopes away from the foundation and exits at least 10 feet (3 meters) from the house.
Remember to avoid directing water near walkways, public sidewalks, or neighboring properties. After the French drain installation, you should seal all structural cracks, apply a high-grade waterproofing membrane on the walls, and regrade exterior soil to direct surface runoff away. So in the first step, you must plan everything about the project as well as its future repair and maintenance.
Aqviz experts have a French drain calculator . It includes everything about the calculation related to the French drain construction. You should use it to determine materials requirements before starting a French drain system.
2. Gather Relevant tools and Materials for the French Drain
Before starting the installation, you should gather all the essential tools and materials for French drains to build a functional and durable French drain system. We highly recommend that you prepare everything in advance to avoid delays and ensure the process runs smoothly. You should always verify the quality and specifications of each item based on the layout and soil conditions.
You should gather the following tools for French drains.
- Trenching shovel
- Trenching spade
- Wheelbarrow
- Utility knife
- Measuring tape
- Level
- Chalk line
- Hammer drill (for interior drains)
- Pipe cutter
- Tamper or plate compactor
You should gather the following materials for French drains.
- Perforated pvc or corrugated drain pipe (4 in or 6 in)
- Gravel (washed angular stone, 3/4 in (19 mm size))
- Geotextile filter fabric
- Catch basin
- Sump basin and sump pump
- Pvc glue and primer
- Solid drain pipe for discharge
- Waterproof tape or joint sealer
You should check local code requirements for drainage pipe types and discharge rules before purchasing materials.
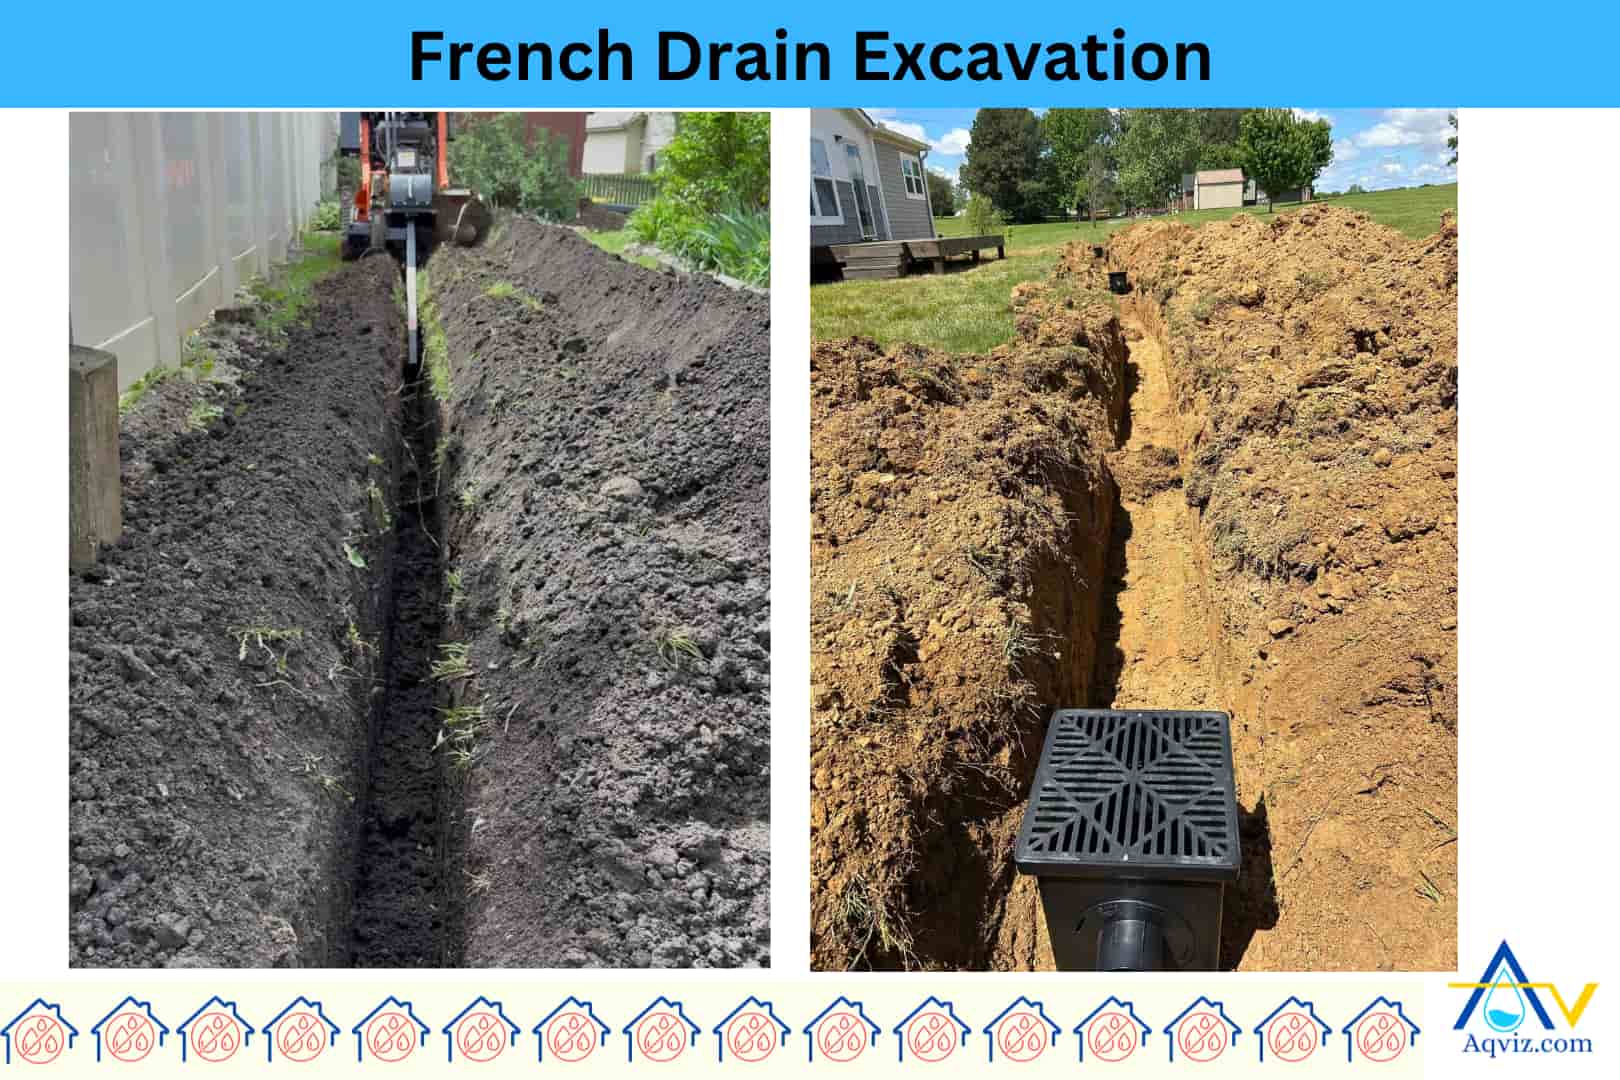
3. Excavate the French Trench
Now, it is time to excavate the French trench. In this step, you should start excavating the French drain trench along the path you planned during the inspection phase. You should begin at the highest point where water collects and dig toward the lowest point where you will install the sump basin or connect to a gravity-based discharge line. For interior systems, you should remove the concrete slab along the basement perimeter first, then dig the trench directly beside the foundation wall.
You should dig the trench to a recommended depth of 18 to 24 inches (45 to 60 cm) and a width of 12 to 18 inches (30 to 45 cm). You should always maintain a consistent slope of at least 1% (1 inch per 8 feet or 2.5 cm per 2.5 meters) from the start of the trench to the outlet. You can use a level and string line to check slope accuracy every few feet. You must avoid sudden drops or dips in the trench, as these can cause water to pool. You should clear the trench of sharp debris to prevent damage to the pipe or fabric during installation.
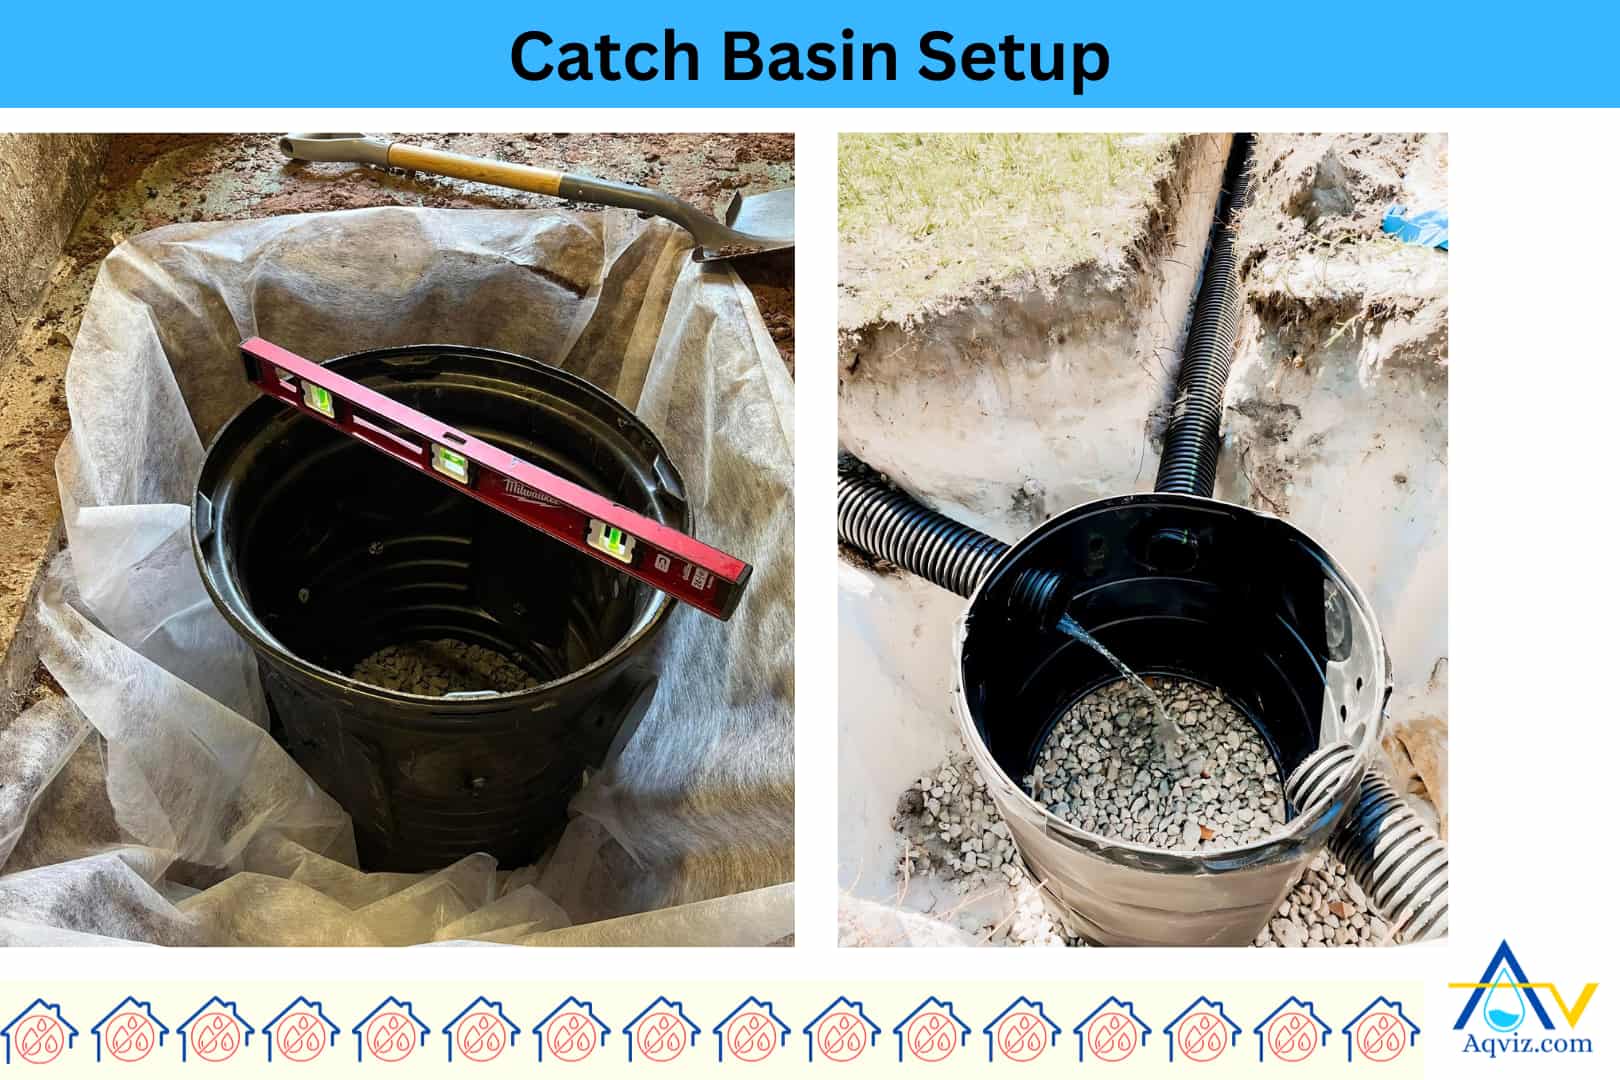
4. Setup a Catch Basin
A catch basin is also called a sump pump basin, a durable container made from high-density polyethylene (HDPE) or structural foam that houses the sump pump and collects accumulated water drained from the French drain system. The main task of the catch basin is to serve as a reservoir for incoming groundwater before it is pumped out through a discharge pipe to a safe location away from the foundation.
You should place the sump pump basin at the lowest point of the trench layout to allow gravity-fed drainage. For interior French drains, you should locate the catch basin in a corner or near a utility area for easier power access and future maintenance. When placing the catch basin, you should ensure it sits level and deep enough so that the basin rim is flush with the concrete floor surface after backfilling it. We highly recommend you to drill additional inlet holes in the sides if not pre-perforated and surrounding the basin with gravel for added drainage support.
After you set up the catch basin, how to install a sump pump? You can read our sump pump installation guide to find the answer for this question from Aqviz experts.
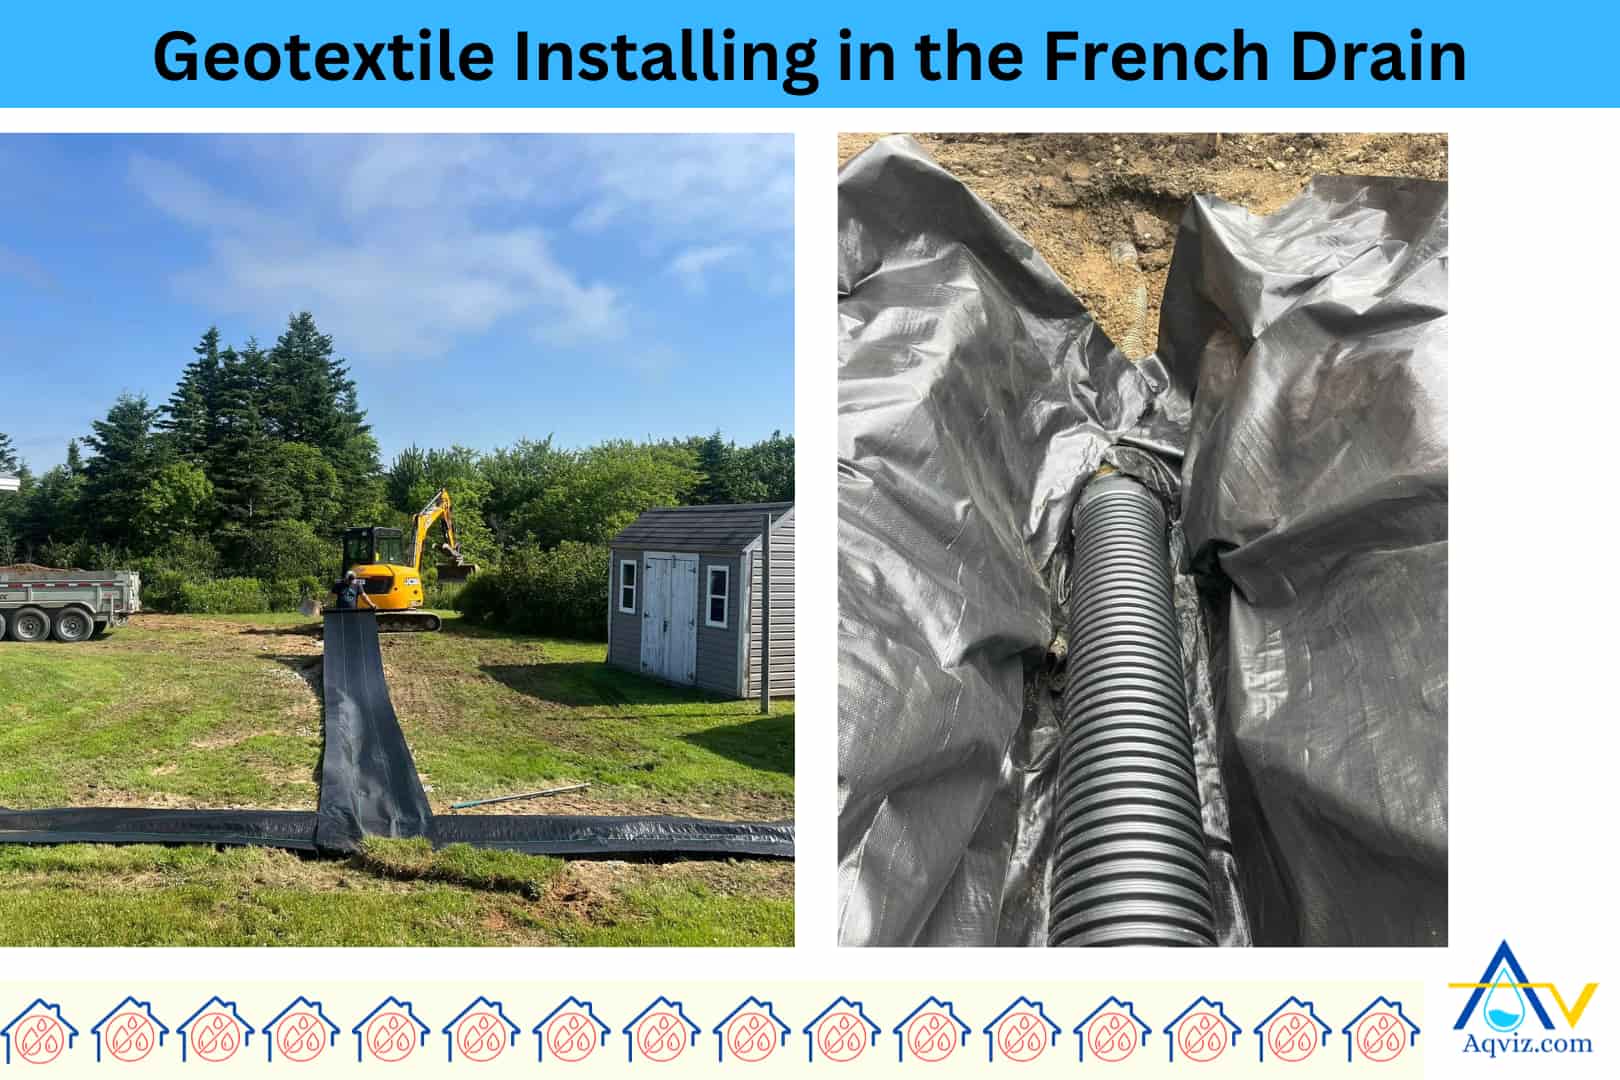
5. Lay the Geotextile Fabric at the Bottom of the French Drain
A geotextile fabric is a permeable, woven or non-woven synthetic membrane designed to separate soil from drainage rock layers. Its main task in a French drain system is to prevent sediment and fine particles from clogging the gravel and perforated pipe. So it extends the life and performance of the drain.
You should lay the geotextile fabric along the entire bottom, top, and sides of the excavation. Simply, it should be a shield for the French drain rocks. This fabric comes in at least 36 inches (91 cm) as it can cover all the rock surface in the French drain. During installation, you should overlap it at least 6 inches (15 cm) at seams.
We highly recommend that you choose a non-woven, needle-punched fabric with a high water flow rate and good soil retention (typically rated at 90 gallons per minute per square foot or higher). You should smooth the fabric flat to avoid folds and allow consistent water flow into the drainage layer.
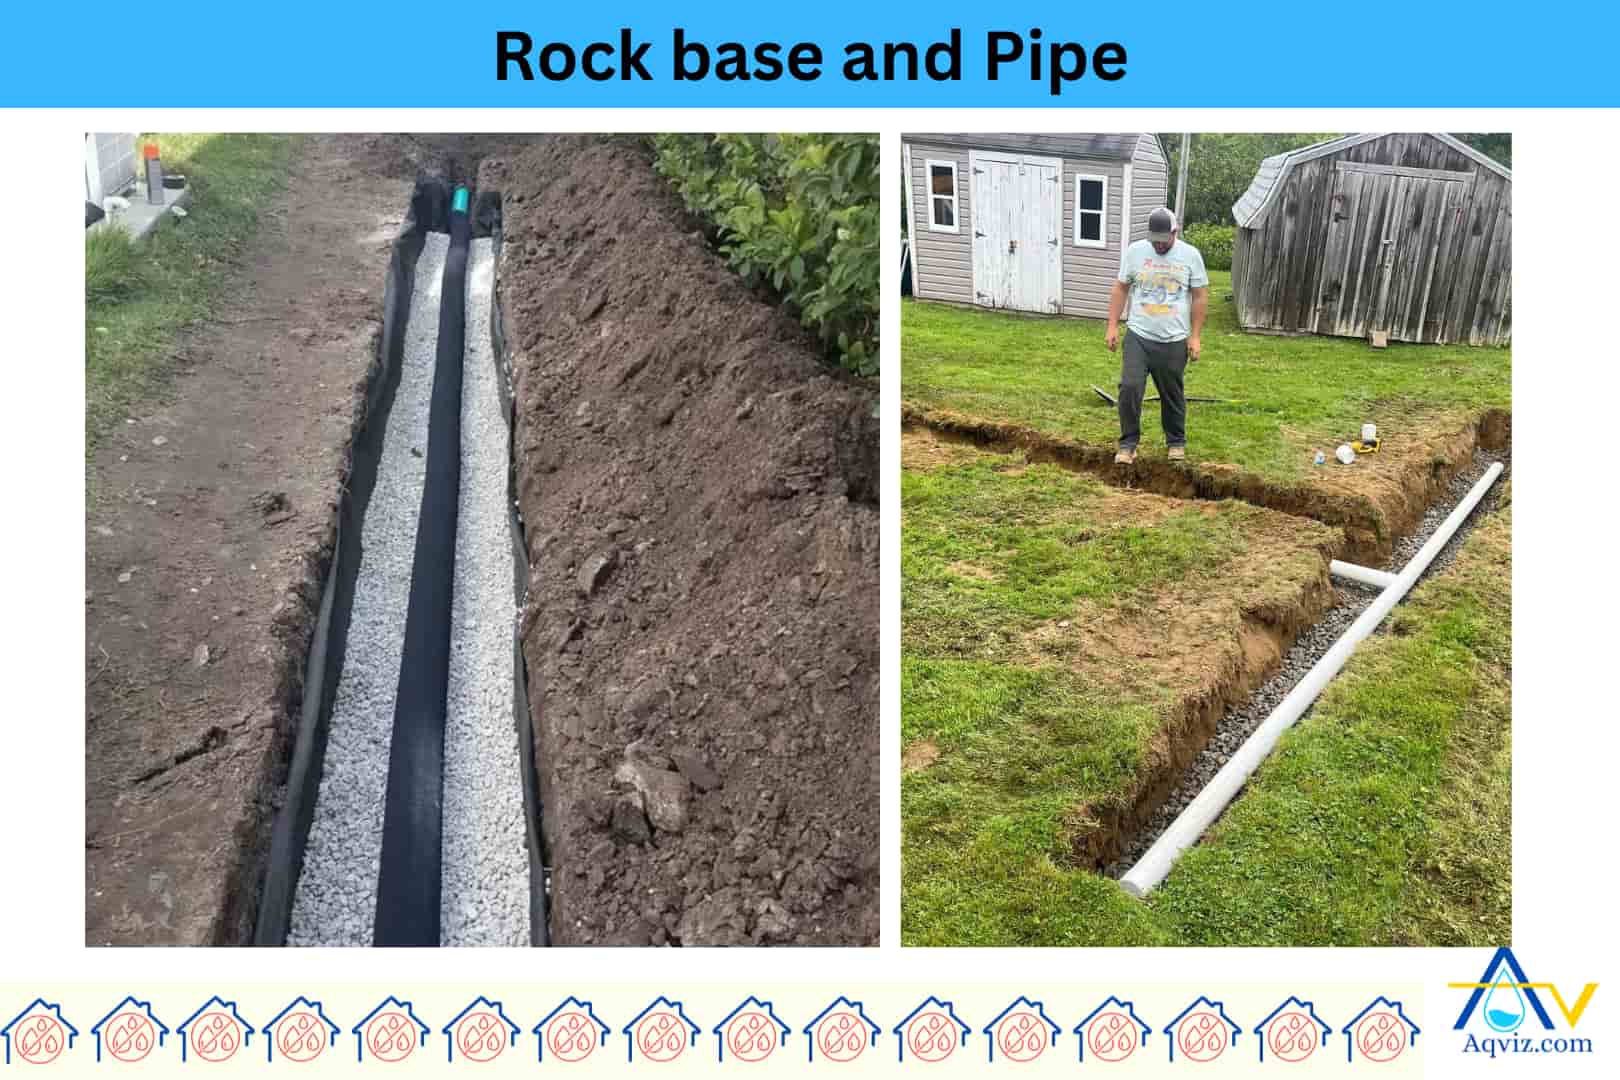
6. Add Rock Base and Install Perforated Pipe
You should start by laying a rock base to support the perforated pipe and promote free water flow. The selected French drain rock should be washed and angular stone with a size of 3/4 inch (19 mm). You should avoid rounded or unwashed gravel, as it compacts poorly and can clog with sediment.
Aqviz experts highly recommend you to lay the rocks to a height of 4 to 6 inches (10 to 15 cm) at the bottom of the trench and a width matching the trench, typically 12 to 18 inches (30 to 45 cm). You should level and compact the gravel lightly to provide a stable bed for the pipe.
A perforated pipe is a rigid or flexible drainage pipe with uniformly spaced holes that collect groundwater into the system. You should use a 4-inch (100 mm) diameter pipe with ⅜ inch (9.5 mm) holes, positioned facing downward at the 4 and 8 o’clock positions in the French drain.
You should maintain a consistent slope of 1% (1 inch per 8 feet or 2.5 cm per 2.5 meters) by using a string line and bubble level along the trench. You should verify the slope every few feet to ensure efficient water flow toward the discharge point.
To calculate the amount of rock for the French drain, you can use the Aqviz French drain rock calculator. Using the French drain rock calculator , you can calculate the rock amount and cost.
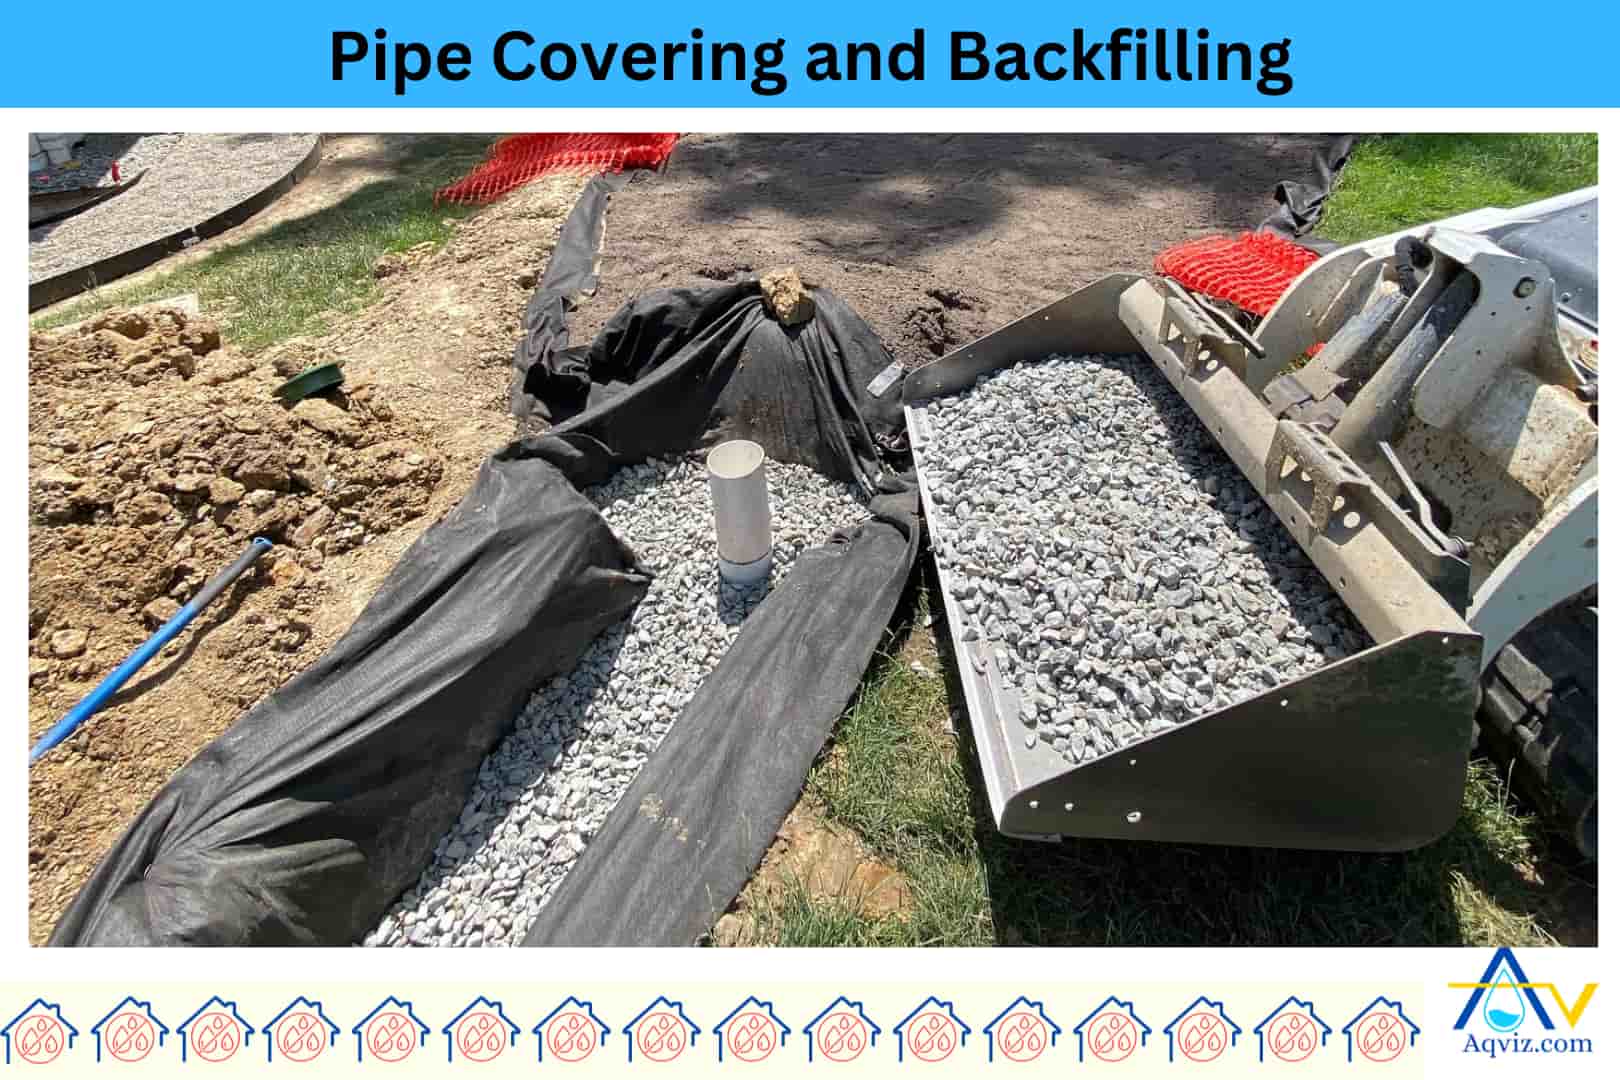
7. Cover Pipe and Back Fill
Here you are in the final step. In this step, you should cover the perforated pipe with an additional 8 to 12 inches (20 to 30 cm) of clean, washed 3/4 inch (19 mm) gravel. This top gravel layer protects the pipe from soil intrusion, promotes consistent water filtration, and reduces surface pressure. You should never use crushed limestone or recycled concrete, as these can compact too tightly or leach fines into the system.
You should fold the geotextile fabric over the top of the gravel layer to act as a barrier, preventing silt, sediment, and debris from entering and clogging the drain over time.
To backfill, you should choose well-draining soil types like sandy loam or clean fill dirt with minimal clay content. You should avoid heavy clay or silty soils that retain moisture and reduce drainage performance. We highly recommend that you fully test the French drain system before backfilling it. In this step, you can pour water at the start of the trench and verify a steady flow toward the sump basin or discharge point.
When you backfill, you should compact soil in layers to prevent future settling and avoid using heavy machinery directly over the drain to protect pipe integrity. You should also maintain a final slope away from the foundation to direct surface runoff.
What You Should Do After Installing a French Drain
After installing a French drain system, you should take several follow-up steps to maximize its performance and prevent water from re-entering the basement. Each of these actions supports the drainage system and helps control surface and subsurface water around the home.
You should set up a sump pump in the basin if the drain relies on mechanical discharge. Use a pump with a minimum of 1/3 HP, and ensure it has a check valve to prevent backflow.
You should also direct runoff water at least 10 feet (3 meters) away from the foundation using solid discharge pipes or pop-up emitters.
You should increase the grading of the ground around the house to slope at least 1 inch per foot (8%) for the first 5 feet (1.5 meters) to keep water flowing away.
You should also fix all downspout issues, such as leaks or poorly placed extensions. Downspouts should discharge away from the house foundation.
Clean all roof gutters to prevent overflow, which often contributes to water pooling near the basement.
You should control garden watering by using soaker hoses or drip irrigation and avoid overwatering areas near the foundation.
Finally, you should install window well covers or window stripes on basement windows to block rain and splashback. These combined actions provide a complete defense against water intrusion.
What Causes French Drain Clogs?
French drain clogs are typically caused by sediment buildup, root intrusion, organic debris, and poor installation practices.
The most common cause for French drain clogging is sediment infiltration. If you don’t use high-quality non-woven geotextile fabric, fine soil particles can enter the gravel and clog the perforations.
Another major issue for French drain cloggings is tree root intrusion, especially when drains are placed near large shrubs or mature trees. Roots can grow through small openings and clog the pipe internally.
Organic debris, such as leaves, mulch, and silt, can also wash in from poorly managed gutters or open catch basins. Improper slope or low spots in the trench cause standing water, which allows debris to settle and block flow.
To avoid these issues, you should always use clean angular gravel, wrap the drain completely in geotextile fabric, and maintain a proper slope throughout the system.
If the French drain is clogged, you can unclog it using this guide How to Unclog French Drain?