You noticed a small puddle of water at the base of the toilet. It appeared after someone showered, so you assumed it was splashed bathwater. Then you smelled it. The toilet seal has failed, and sewer gas is leaking into your bathroom along with a small amount of water every time you flush, notes Premier Property Management solutions. The fix costs less than ten dollars and takes about an hour, most of which is spent cleaning the old wax off the floor.
A wax toilet ring is the seal between the bottom of the toilet and the closet flange in the floor. It prevents water from leaking out when you flush and sewer gas from entering the bathroom. Wax rings last for decades but fail when the toilet rocks, when the flange is too low, or when the toilet is removed for any reason. Once a wax ring is compressed, it cannot be reused. Every time the toilet is lifted, the ring must be replaced.
Wax Ring vs. Wax-Free Seal: Which to Use
A traditional wax ring is a ring of sticky wax, sometimes with a plastic sleeve or funnel embedded in it. The toilet is set onto the ring, compressing the wax to form a watertight seal. Wax rings have been the standard for over a century. They work. They are cheap. They are messy to remove. Once the wax is compressed, the seal is permanent until the toilet is lifted.
A wax-free toilet seal is a rubber or foam gasket that replaces the wax ring. It compresses when the toilet is set and creates a seal without the mess of wax. Wax-free seals are reusable if the toilet is lifted and reset, which wax rings are not. They are more forgiving of imperfect flange heights. They cost $10 to $15, compared to $3 to $5 for a wax ring.
Use a wax ring if the toilet flange is flush with or slightly above the finished floor. This is the ideal flange height. Use a wax ring with a plastic sleeve or funnel if the flange is slightly below the floor surface, up to about a quarter inch below. Use a wax-free seal or a double wax ring if the flange is recessed more than a quarter inch below the floor, which happens when a second layer of flooring has been installed over the original floor. Use a wax-free seal if you want a reusable seal or do not want to deal with cleaning wax off the floor.
When to Replace the Wax Ring
Water around the base of the toilet is the most obvious sign. The water may appear only when you flush or may be present constantly. Wipe the area dry, flush the toilet, and watch for water seeping from under the base. If water appears, the wax ring has failed.
A sewer gas smell in the bathroom that you cannot locate means the wax ring is not sealing against gas. The water in the toilet bowl blocks sewer gas from entering through the bowl itself. If the wax ring fails, gas escapes around the base of the toilet rather than through the bowl.
A toilet that rocks or moves when you sit on it has broken the wax seal. The wax is compressed and has no elasticity. Once the toilet shifts, the seal is broken, and water and gas will leak. If your toilet rocks, you need to reset it with a new wax ring and shims to prevent movement.
Whenever you remove the toilet for any reason, such as replacing the flooring, painting behind the toilet, or retrieving an object that fell into the bowl, you must replace the wax ring. Do not try to reuse the old ring. It will not seal.
Install a New Wax Ring Step by Step
Turn off the water supply to the toilet. The shutoff valve is on the wall behind the toilet near the floor. Turn it clockwise until it stops. Flush the toilet to empty the tank. Hold the handle down to drain as much water as possible. There will be water remaining in the bowl and the trap. This is unavoidable.
Disconnect the water supply line from the bottom of the fill valve on the underside of the toilet tank. Use an adjustable wrench. Have a small bucket or towel ready to catch the water that drains from the line.
Remove the caps covering the closet bolts on each side of the toilet base. The caps are plastic and pry off with a flathead screwdriver. Underneath each cap is a nut on a bolt. Remove the nuts with an adjustable wrench. If the nuts are rusted and will not turn, cut them off with a hacksaw blade or a reciprocating saw. Replacement bolts and nuts cost three dollars. Do not spend an hour fighting a rusted nut.
Lift the toilet straight up and set it aside. The toilet is heavy, approximately 60 to 80 pounds for a standard two-piece toilet. Lift with your legs, not your back. Have a helper if possible. Set the toilet on a drop cloth or old towels. Water will drain from the trap onto the floor. Have towels ready.
Plug the closet flange opening with a rag. This prevents sewer gas from entering the bathroom and prevents you from dropping a tool or a bolt into the drain, which will require retrieving it from the sewer line, a task you do not want.
Scrape the old wax off the bottom of the toilet and off the closet flange. Use a putty knife. The wax will be sticky, dark, and unpleasant. Wear disposable gloves. Scrape all of it off. Wipe the surfaces clean with a rag or paper towels. Mineral spirits remove the last residue. The toilet base and the flange must be clean and dry for the new wax to adhere.
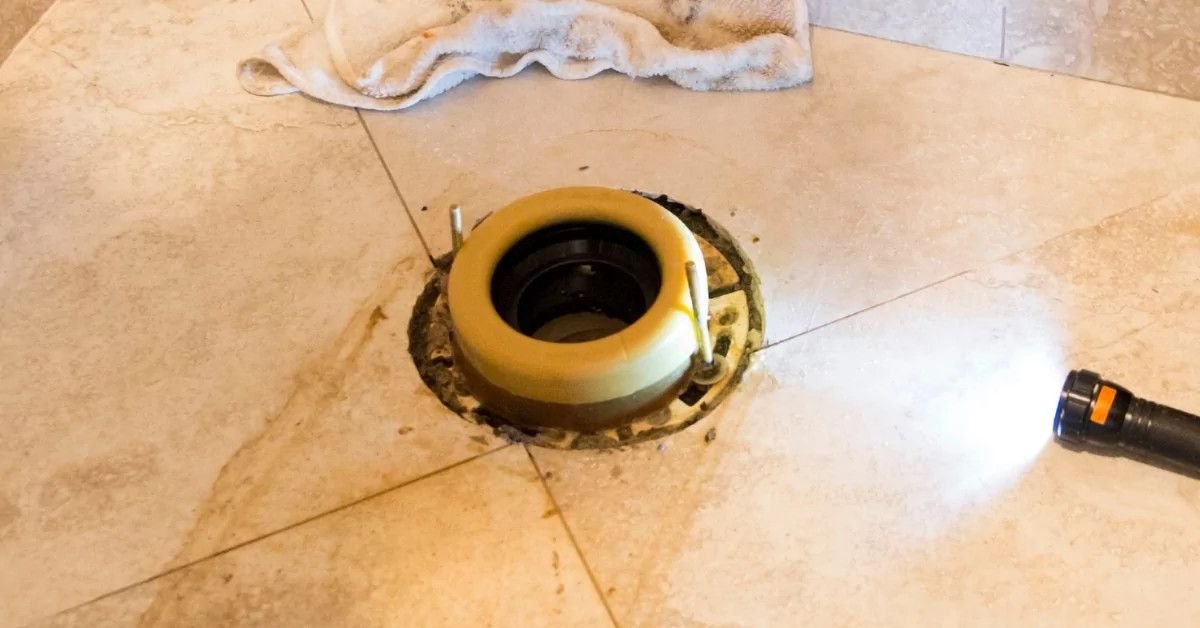
Inspect the closet flange. The flange is the metal or plastic ring screwed to the floor around the drainpipe. It should be solidly attached to the floor and not cracked. The closet bolts should be in good condition and standing upright in the flange slots. If the flange is cracked, you need a flange repair kit or a replacement flange before proceeding. If the closet bolts are rusted or broken, replace them now. Slide the new bolts into the flange slots and hold them upright with a dab of wax or a bolt holder clip.
Determine whether you need a standard wax ring or a wax ring with a sleeve. If the flange is flush with or slightly above the floor, use a standard ring. If the flange is below the floor surface, use a ring with a plastic sleeve that extends into the drainpipe to guide water past the gap.
Place the wax ring on the closet flange. Center it on the flange opening with the wax side up and the plastic sleeve, if present, pointing down into the drainpipe. Press it gently so it adheres to the flange. Alternatively, place the wax ring on the bottom of the toilet, centering it on the toilet outlet. Both methods work. Placing it on the flange is easier because you can see the alignment.
Lift the toilet and lower it straight down onto the flange, aligning the holes in the toilet base with the closet bolts. Do not slide the toilet into position. Lower it straight down. Sliding smears the wax and prevents a proper seal. The weight of the toilet compresses the wax. Press down firmly on the bowl rim on both sides. Do not rock the toilet. Press straight down.
Install the washers and nuts on the closet bolts. Hand-tighten, then tighten with a wrench, alternating sides. Tighten until the nuts are snug and the toilet does not move. Do not overtighten. Overtightening cracks the porcelain toilet base. A cracked toilet base cannot be repaired. The entire toilet must be replaced. If the toilet rocks after tightening, insert plastic shims between the toilet base and the floor at the low spots. Do not tighten the bolts further to eliminate rocking. The bolts hold the toilet down. Shims stabilize it.
Trim the excess length from the closet bolts with a hacksaw, leaving about a quarter inch above the nut. Install the bolt caps. Reconnect the water supply line. Turn the water on slowly and let the tank fill. Flush the toilet several times. Check for leaks around the base and the supply line connection. Wait fifteen minutes and check again. If no water appears around the base, the wax ring is sealing correctly.
Apply a bead of silicone caulk around the front and sides of the toilet base where it meets the floor. Leave the back of the base uncaulked. If the wax ring leaks in the future, water will escape from the back of the toilet where you can see it, rather than being trapped under the toilet by a continuous caulk bead. A fully caulked toilet base hides a leaking wax ring until the subfloor rots.
Common Mistakes That Cause the New Ring to Fail
Sliding the toilet into position instead of lowering it straight down is the most common error. Wax does not slide. It smears. A smeared wax ring has a gap that leaks. Lower the toilet straight down.
Overtightening the closet bolts cracks the porcelain. A cracked toilet base is a total loss. Tighten until the toilet does not move and the nuts are snug. Stop. If the toilet rocks, use shims.
Reusing old closet bolts with rusted threads. New bolts cost three dollars. If you cannot thread the nuts smoothly by hand, replace the bolts.
Failing to plug the flange opening with a rag. You will drop a tool. It will fall into the drain. You will spend two hours retrieving it or calling a plumber.
Using two wax rings when one with a sleeve would work better. Stacking wax rings creates a tall, unstable seal that compresses unevenly. If the flange is below the floor, use a single ring with a deep sleeve or a flange extender. Do not stack rings.
The Short Version
Turn off the water. Flush to empty. Disconnect the supply line. Remove the nuts from the closet bolts. Lift the toilet straight up. Scrape off the old wax. Plug the drain with a rag. Inspect the flange. Place the new wax ring on the flange. Lower the toilet straight down onto the bolts. Tighten the nuts until snug. Do not overtighten. Reconnect the water. Flush and check for leaks. Caulk the front and sides. Leave the back open.
The wax ring costs five dollars. New closet bolts cost three dollars. The tools are a wrench, a putty knife, gloves, and rags. The time is under an hour. The smell of sewer gas in your bathroom will be gone, and the puddle at the base of the toilet will not return.