Replacing a wall-mounted toilet is much simpler than installing one from scratch. The carrier frame and in-wall tank are already in place. The waste pipe and water supply are already connected. You are swapping the bowl and the flush actuator plate, not rebuilding the wall. The entire job takes one to two hours and requires no drywall work, no plumbing modifications, and no framing.
The catch is compatibility. The new bowl must match the carrier frame brand and model that is already inside your wall. A TOTO bowl will not fit a Geberit carrier. A Duravit bowl will not fit a TOTO carrier. The mounting bolt spacing, the waste outlet height, and the flush connection are all proprietary. Here is how to identify what you have, buy the right replacement, and install it correctly.
Step Zero: Identify Your Existing Carrier
Before buying a replacement bowl, you must know what carrier is inside your wall. The carrier brand and model determine which bowls will fit. The easiest identification method is the flush actuator plate. The plate is branded and is the only visible part of the in-wall system besides the bowl. Remove the actuator plate by pulling it straight off the mounting frame. It is held by spring clips and comes off without tools. Behind the plate, the carrier frame usually has a label with the model number.
Common combinations include Geberit carriers with Geberit-compatible bowls from multiple manufacturers including Duravit, Laufen, and others. TOTO carriers with TOTO wall-hung bowls are a closed system. American Standard carriers work with American Standard wall-hung bowls. If the label is missing or illegible, take a photo of the mounting bolt pattern behind the bowl, the waste outlet shape, and the actuator mechanism inside the opening. Take these photos to a plumbing supply showroom. An experienced salesperson can identify the carrier by sight.
If your bathroom has a wall-hung toilet from the original construction and the carrier brand is unknown, measure the distance between the centers of the two mounting bolts that hold the bowl to the carrier. This is the bolt spacing, and it is the single most important measurement for compatibility. Standard bolt spacings are 180 millimeters for Geberit and many European carriers, and 7 inches for TOTO wall-hung models. These are not interchangeable. If you measure 180 millimeters, buy a bowl designed for a Geberit-compatible carrier. If you measure 7 inches, buy a TOTO bowl.
What You Need
| Item | Estimated Cost | Purpose |
| Replacement wall-hung toilet bowl (carrier-compatible) | $300–$800 | New bowl, must match carrier brand |
| Replacement flush actuator plate (compatible) | $50–$150 | New plate if old one is worn or mismatched |
| New bowl-to-carrier gasket | $10–$20 | Usually included with new bowl; buy separately if not |
| Socket wrench set with deep sockets | $30–$60 | Removing and installing mounting nuts |
| Utility knife | $5–$10 | Cutting caulk between old bowl and wall |
| Level (2-foot minimum) | $10–$30 | Checking new bowl is level |
| Silicone caulk (clear or white) | $5–$10 | Sealing bowl edges where they meet the wall |
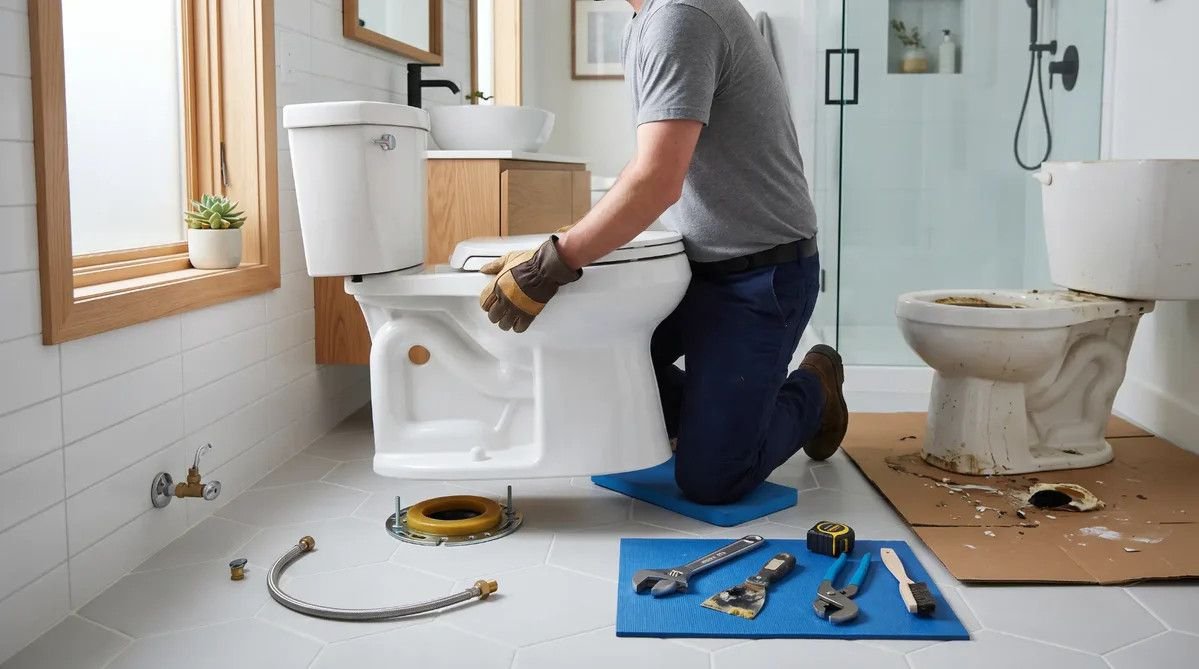
Step One: Remove the Old Bowl
Turn off the water supply to the toilet. The shutoff valve is inside the wall, accessible through the actuator plate opening. Remove the actuator plate by pulling it straight off. Reach inside the opening and turn the shutoff valve clockwise until it stops. Flush the toilet to drain the tank. The tank is inside the wall and will hold approximately 1.5 to 2 gallons of water that must be emptied before the bowl is removed.
Disconnect the water supply line from the fill valve inside the tank. This connection is also accessed through the actuator opening. Use an adjustable wrench to loosen the compression nut. Have a small bowl or towel ready to catch the water that drains from the supply line.
Remove the protective caps that cover the bowl mounting bolts on either side of the bowl near the wall. The caps snap off or unscrew. Behind each cap is a nut on a threaded bolt. The nuts are typically 13-millimeter or 17-millimeter depending on the carrier brand. Loosen each nut a few turns at a time, alternating between the left and right sides, until the nuts are finger-loose.
Slide the old bowl straight away from the wall. It is heavy. Ceramic wall-hung bowls weigh 50 to 70 pounds. Have a helper support the bowl as it comes off the bolts. The bowl will have a gasket on the back where it connected to the waste outlet on the carrier. The gasket may stay on the carrier or come off with the bowl. Remove it and discard it.
Inspect the exposed carrier. Check the mounting bolts for rust, corrosion, or damage. Clean the threads with a wire brush if needed. Check the waste outlet on the carrier for cracks or debris. Clean the gasket mating surface with a rag. This is your only chance to inspect the carrier without a toilet in the way. If the bolts are damaged, replace them now. Most carriers use standard metric threaded rod that can be purchased at a plumbing supply store.
Step Two: Install the New Bowl
Install the new bowl-to-carrier gasket on the back of the new bowl or on the carrier waste outlet, depending on the manufacturer’s instructions. Most gaskets are a compression-fit design that seals when the bowl is tightened against the carrier. Apply a thin layer of plumber’s silicone grease to the gasket to help it seat smoothly.
Lift the new bowl onto the mounting bolts. This is the physical challenge of the job. The bowl must be aligned with two bolts while you hold 50 to 70 pounds at arm’s length against the wall. Get a helper. Slide the bowl onto the bolts until the gasket contacts the waste outlet. The bowl should be against the wall with the bolts protruding through the mounting holes.
Thread the nuts onto the bolts by hand, then tighten progressively. Alternate between left and right, tightening each nut a quarter turn at a time. The goal is even pressure across the gasket. The bowl should draw tight against the wall. Overtightening cracks the porcelain. The correct tightness is when the bowl does not rock or shift when you press down on the front edge. There is no torque specification printed on the bowl. Tighten until the bowl is rigid, then stop.
Place a level on the bowl in both directions. The bowl should be level front to back and side to side. If it is not, the carrier frame may have shifted over time, the mounting bolts may be bent, or the gasket is not seated evenly. Loosen the nuts, adjust, and retighten. The level check matters because an out-of-level bowl looks wrong and may not flush correctly. Water finds level. If the bowl is tilted, the water surface in the bowl will be tilted, and the rim wash may be uneven.
Snap the bolt caps back into place. Reconnect the water supply line inside the actuator opening. Turn on the shutoff valve slowly and check for leaks at the supply connection. Flush the toilet and check for leaks at the bowl-to-carrier connection. Run your finger along the joint between the bowl and the wall. If you feel moisture, the gasket is not sealing. Loosen and retighten the nuts, ensuring even pressure.
Step Three: Replace the Flush Actuator Plate
If the old actuator plate is compatible with the carrier and is in good condition, you can reuse it. If you want a new plate or if the old one is worn, scratched, or yellowed, now is the time to replace it. The actuator plate mounting frame inside the carrier is likely compatible with multiple plate styles from the same brand, but confirm before buying.
Install the actuator rods that connect the plate buttons to the flush valve. Adjust the rod length so each button engages the flush valve with approximately 1/8 inch of travel before contact. The full flush button typically operates the main flush. The reduced flush button operates the partial flush for liquid waste. Test both before snapping the plate into place.
Snap the plate onto the mounting frame. It should sit flush against the wall with no gaps. The plate is the only visible part of the in-wall system. If the plate sits crooked or leaves a gap, the mounting frame may need adjustment, which is done by loosening the frame screws inside the actuator opening, repositioning, and retightening. This is a five-minute adjustment.
Step Four: Seal the Bowl to the Wall
Apply a thin bead of silicone caulk around the bowl where it meets the wall. The caulk is cosmetic and prevents water from running down the wall behind the bowl during cleaning. Leave a small gap at the bottom of the seal on both sides. This gap allows you to see water if the gasket ever leaks. A fully caulked seal hides a leak until the water damages the wall and floor. A caulk line with a 1-inch gap at the bottom on each side provides a visual leak indicator.
Do not caulk the bottom of the bowl to the floor. The bowl floats. The gap under the bowl is the whole point of a wall-hung toilet. Filling that gap with caulk defeats the purpose and traps moisture.
Maintenance After Replacement
The new bowl gasket should be leak-free for 10 to 15 years. The flush actuator plate may need adjustment if the buttons become sticky or unresponsive, which is corrected through the actuator opening. The in-wall tank components including the fill valve and flush valve can be replaced through the actuator opening without removing the bowl or opening the wall. This is the design intent of the carrier system.
Frequently Asked Questions
Can I put any wall-hung bowl on my existing carrier?
No. The bowl must match the carrier brand and bolt spacing. Geberit carriers use specific Geberit-compatible bowl mounting patterns, typically 180-millimeter bolt spacing. TOTO carriers use TOTO-specific bowls with different bolt spacing, typically 7 inches. Mounting a bowl to an incompatible carrier will result in the bowl not fitting, the gasket not sealing, or the bowl cracking when you tighten the bolts because the mounting points do not align. The only exception is that some European manufacturers including Duravit, Laufen, and Keramag design their bowls to be compatible with Geberit carriers. Check the bowl specifications for Geberit compatibility before purchasing.
The new bowl feels loose or rocks when I sit on it. What is wrong?
The mounting nuts are not tight enough or the gasket is not compressed evenly. Remove the bolt caps, loosen the nuts slightly, press the bowl firmly against the wall, and retighten the nuts evenly. If the bowl still rocks, the mounting bolts may be bent from overtightening the previous bowl, or the carrier frame itself may have shifted over time. Bent bolts can be replaced individually through the bolt holes. A shifted carrier is a bigger problem that requires opening the wall. Fortunately, carrier shifts are rare and usually occur only in buildings that have experienced significant foundation movement.
Can I adjust the height of the new bowl?
No. The height is determined by the carrier frame inside the wall, which is fixed. The mounting bolts are at the height set during the original installation. You can replace the bowl with a different shape from the same manufacturer that positions the seat higher or lower relative to the mounting bolts, but the bolt height itself is not adjustable without removing the wall and repositioning the carrier frame. If the existing height is uncomfortable, a thicker or thinner toilet seat is the only practical adjustment.