Waterproofing a bathroom floor requires cleaning and priming the subfloor, sealing all seams and gaps with silicone caulk, applying a liquid waterproofing membrane (one to two coats), embedding fabric mesh in corners, and allowing each layer to cure fully before tiling. The entire process takes one to three days depending on drying times. Skipping even one step puts your subfloor at risk of rot, mold, and structural damage that costs far more to fix than doing it right the first time.
Why Bathroom Floor Waterproofing Matters
Water finds its way through grout lines, expansion gaps, and hairline cracks — even when tile looks perfectly sealed on the surface. According to the U.S. Environmental Protection Agency’s mold guidelines, mold begins to grow on wet building materials within 24 to 48 hours of moisture exposure. Over time, unprotected moisture saturates the subfloor, creating conditions for black mold, wood rot, and structural damage. Remediation costs for a failed subfloor that requires full demo and reconstruction routinely exceed $10,000, compared to roughly $120 in materials to waterproof it correctly the first time.
A proper waterproofing layer beneath tile acts as the last line of defense. It does not need to be visible or complicated, but it does need to be continuous — no gaps, no thin spots, no skipped corners.
The pattern shows up clearly across renovation communities: properly waterproofed bathrooms hold up for decades, while those where the membrane step was rushed or skipped tend to show tile lifting, grout cracking, and subfloor damage within five to ten years.
Tools and Materials You Need
A bathroom floor waterproofing project requires a liquid membrane (or sheet membrane), fabric mesh for corner reinforcement, 100% silicone caulk, a floor primer for porous substrates, a paint roller with 1/2-inch nap, and basic prep tools. Total material cost for a standard 50–80 sq ft bathroom runs $50–$120 for DIY, compared to $300–$600 for professional installation of the same area.
Gather everything before you start. Running out of primer mid-coat causes uneven adhesion, and a half-dried membrane edge is difficult to feather back in smoothly.
| Item | Purpose | Notes |
|---|---|---|
| Liquid waterproofing membrane | Primary moisture barrier | Laticrete Hydroban, RedGard, or equivalent |
| Waterproofing fabric mesh / fleece tape | Reinforces corners and seams | Embedded in first membrane coat |
| Silicone caulk (100%) | Seals floor-wall joints and cracks | Use neutral-cure for tile applications |
| Concrete primer (optional) | Improves membrane adhesion on porous slabs | Required on bare concrete; skip on backer board |
| Paint roller (1/2″ nap) + brush | Applies membrane to field areas and edges | Foam rollers leave fewer air bubbles |
| Putty knife or margin trowel | Presses mesh into membrane at corners | — |
| Masking tape | Creates clean termination line on walls | Remove before fully dry to avoid tearing |
| Vacuum or broom | Surface prep | Dust-free surface is non-negotiable |
Budget roughly $50–$120 in materials for a standard 50–80 sq ft bathroom floor. Professional waterproofing installation for the same space typically runs $300–$600, the DIY savings are real, but only if the process is followed correctly.
Step-by-Step: How to Waterproof a Bathroom Floor
Each step below builds directly on the one before it. Rushing the drying times is the single most common mistake DIYers make, a membrane applied too thick or tiled over before curing traps moisture rather than blocking it.
- Clean and vacuum the subfloor thoroughly. Remove all dust, debris, adhesive residue, and loose particles. Any contamination under the membrane creates a weak bond. For wood subfloors, check for soft spots, squeaks, or flex, fix those before waterproofing, not after.
- Fill cracks and fix uneven areas. Use floor-patching compound for cracks wider than 1/8 inch. A floor that moves or flexes will eventually crack the membrane above it. Allow patching compound to cure fully (typically 24 hours).
- Apply primer if required. Concrete and cement board are porous and will aggressively absorb your first membrane coat without primer. Apply a compatible floor primer in a thin, even coat using a roller. Work from the far corner toward the door. Allow to dry per manufacturer specs, usually 2–4 hours.
- Seal the floor-to-wall joints with silicone caulk. This is the most underestimated step. The joint where the floor meets the wall is the highest-movement area in any bathroom, it flexes constantly as the structure settles. Run a bead of 100% silicone caulk along the entire perimeter. Tool it smooth and allow a full 24-hour cure before applying membrane over it.
- Embed fabric mesh at all corners and seams. Cut the fleece tape or fabric mesh to length. Apply a thin coat of liquid membrane to the corner, press the mesh firmly into the wet membrane with a putty knife, and work out any bubbles. Let this tack up for 30–45 minutes before applying the full first coat over the top. This step is what separates a professional-quality waterproofing job from a coat of paint.
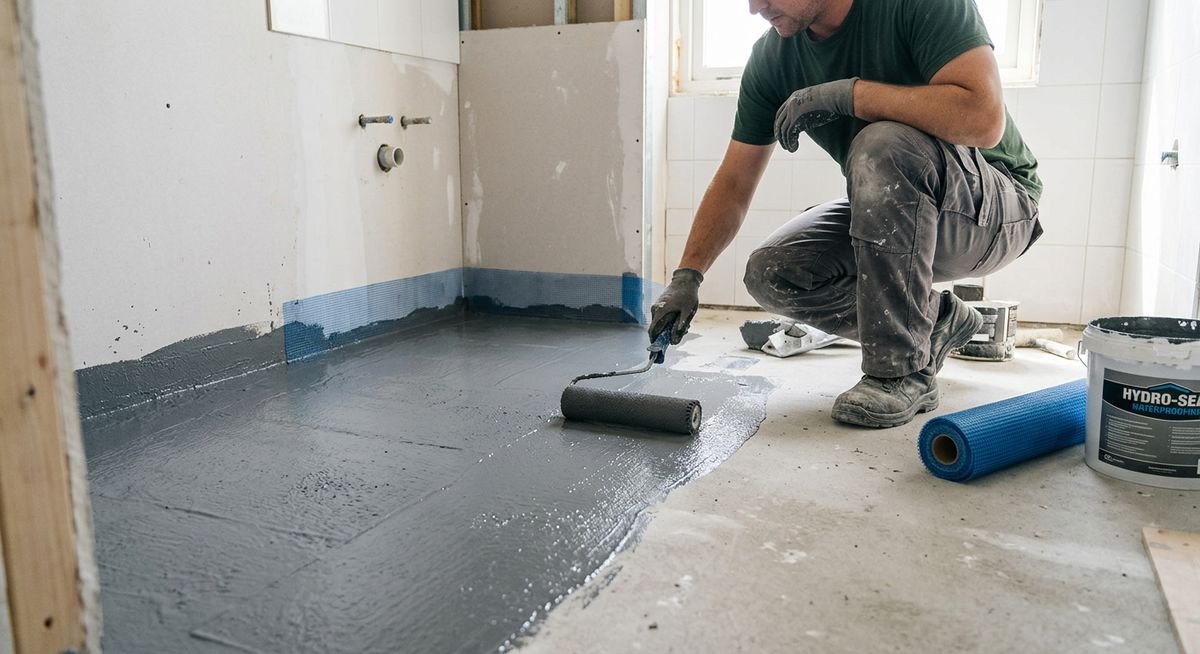
- Apply the first coat of liquid membrane to the field. Pour the membrane into a paint tray. Use a 1/2″ nap roller for the main floor area and a brush or small roller for tight spots. Work from the far corner toward the door. Apply to the walls as well, going up at least 6 inches (and up to the full height of the shower zone if waterproofing a shower floor). Let the first coat dry completely, typically 1–2 hours, though some membranes require 4 hours between coats. The membrane should change color as it dries; apply the second coat only once it has reached the manufacturer’s stated dry color.
- Apply the second coat in the opposite direction. Rolling perpendicular to the first coat ensures full coverage and fills any pinholes. Some manufacturers, including Laticrete, require a minimum of two coats to achieve the rated waterproof performance. Do not skip this step and assume one thick coat is equivalent. Allow the second coat to cure per product specs before tiling, this ranges from 4 hours (fast-dry products) to 24 hours for standard membranes.
- Test before tiling. The simplest test: tape a piece of plastic sheeting flat over a small section of the floor, seal the edges with tape, and leave it overnight. If condensation forms on the underside of the plastic, the membrane has not fully cured. Tile only when the membrane is dry to the touch, flexible, and fully cured throughout.
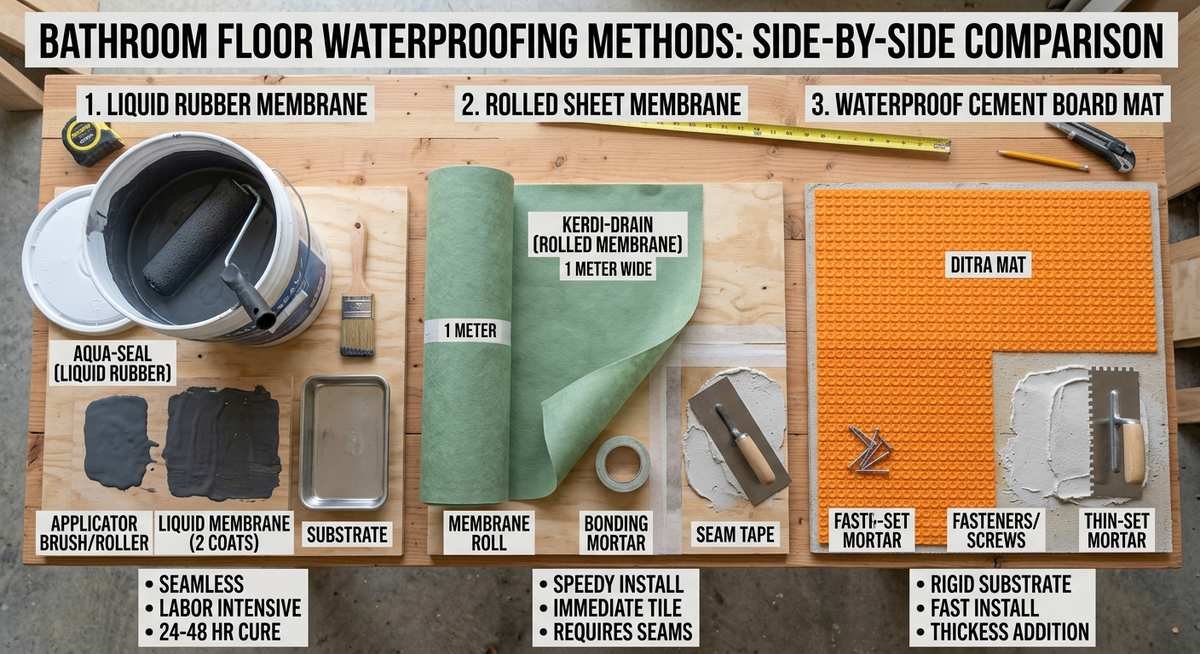
Waterproofing Methods Compared
The four main bathroom floor waterproofing systems are: liquid membrane (best for concrete slabs, $30–$50 per 50 sq ft), sheet membrane such as Schluter Kerdi (best for full new installs, $80–$150), foam tile backer boards like Wedi or GoBoard (best for wood subfloors, $100–$200), and uncoupling mats like Schluter Ditra (best for crack prevention over both substrate types, $80–$130). Subfloor material is the primary factor in choosing between them.
Not all waterproofing systems work the same way. The right choice depends on your subfloor type, tile selection, and how much flexibility you need at the joints.
| Method | Best For | Application | Approx. Cost (50 sq ft) | Drying Time |
|---|---|---|---|---|
| Liquid membrane (RedGard, Hydroban) | Concrete slabs, cement board | Roller/brush, 2 coats | $30–$50 | 1–4 hrs between coats |
| Sheet membrane (Schluter Kerdi) | New builds, full system installs | Thinset-bonded, seams overlapped | $80–$150 | 24 hrs (thinset cure) |
| Foam tile backer (Wedi, GoBoard) | Wood subfloors, second-story baths | Screw-fastened, seams taped | $100–$200 (material only) | 0 (ready to tile immediately) |
| Waterproofing mat (Schluter Ditra) | Uncoupling layer, crack prevention | Thinset-bonded | $80–$130 | 24 hrs (thinset cure) |
Liquid membrane is the most accessible and DIY-friendly option. Sheet membranes like Schluter Kerdi require more precision at seams but are the go-to choice for certified tile setters because the system approach eliminates guesswork.
On r/Flooring, a community that fields dozens of bathroom tile questions per week, the split between liquid membrane and Schluter Ditra is a recurring debate. The practical consensus: use Ditra or a similar uncoupling mat over wood subfloors where movement is a concern, and liquid membrane over concrete where adhesion to the substrate is the priority.
“Roll on waterproofing before tile, on bathroom floor?”, the question from r/Flooring captures exactly what most DIYers are working out. The community answer is consistent: yes, but the membrane only works when you also seal the corners and joints, not just the open field. A painted floor with unsealed seams is not waterproofed.
— r/Flooring, 2025
This aligns with the installation guidelines from Laticrete’s official Hydro Ban product page, which specifies that fleece fabric must be fully embedded at all terminations, changes of plane, and penetrations for the system to carry its warranty.
Common Mistakes That Cause Waterproofing Failures
The five most common waterproofing failures are: skipping primer on concrete, applying one thick coat instead of two thin ones, skipping fabric mesh reinforcement at corners, tiling before the membrane has fully cured, and polished concrete left unsealed. Each of these mistakes allows moisture to reach the subfloor, where the EPA notes that mold can begin growing on wet building materials within 24 to 48 hours.
- Skipping primer on concrete. Concrete pulls moisture out of the membrane before it can film-form properly, leaving a weak, porous layer instead of a continuous barrier. Primer is not optional on bare slabs.
- Applying one thick coat instead of two thin ones. A thick single coat traps air bubbles and sags in low spots. Two thin coats with full drying between them produce a more uniform, stronger film than one heavy application.
- Not reinforcing corners. Corners and seams are where tile assemblies flex and crack. Fabric mesh embedded at these points gives the membrane something to hold against movement. Without it, small cracks in the tile or grout eventually let water through to an unreinforced joint.
- Tiling before full cure. Thinset and tile weight pressed onto a membrane that has not fully cured can compress or displace the film. The manufacturer’s stated cure time is the minimum, not a suggestion.
- Polished concrete without sealing. A related question that surfaces often in r/HomeImprovement: polished concrete does not become waterproof just from polishing. It requires a penetrating sealer to close the surface pores, plus a cove base at the wall joint.
Frequently Asked Questions
Does tile waterproof a bathroom floor on its own?
No. Tile itself is not waterproof, grout lines and the joints between floor and wall allow water to penetrate to the subfloor over time. A dedicated waterproofing membrane applied beneath the tile is required to prevent moisture damage to the subfloor and framing below.
Can I waterproof over existing tile without removing it?
Not effectively. Waterproofing membranes need to bond to the substrate below the tile assembly, not on top of it. Surface sealers applied to existing tile grout can slow water absorption but will not provide the same protection as a properly installed sub-tile membrane. If the existing tile is sound and level, tiling over it with a new waterproofed assembly is an option, but it adds height to the floor.
How long does bathroom floor waterproofing last?
A properly installed liquid membrane or sheet membrane system lasts 10–20 years under normal bathroom use. The weak points are always at joints and corners, these benefit from recaulking every 5–7 years as part of regular bathroom maintenance, even when the underlying membrane remains intact.
Do I need to waterproof under vinyl plank flooring in a bathroom?
Vinyl plank flooring marketed as “waterproof” refers to the plank surface, not the subfloor protection. Water that gets beneath the planks through seams or around toilets can still damage the subfloor. For bathroom installations, sealing the subfloor perimeter and any penetrations adds meaningful protection, even if you are not applying a full membrane under the field area.
What is the best waterproofing product for a bathroom floor?
Laticrete Hydroban and Custom Building Products RedGard are the most widely used liquid membranes among professional tile setters. Schluter Kerdi is the preferred sheet membrane for complete system installs. For wood subfloors where movement is a factor, Schluter Ditra or a foam tile backer (Wedi, GoBoard) provides both waterproofing and uncoupling in one product.
How thick should the waterproofing membrane be?
Most liquid membranes require a minimum dry film thickness of 20–30 mils (0.020–0.030 inches) to provide rated waterproof performance. Two full coats with a 1/2″ nap roller typically achieve this. Check the product spec sheet for the specific dry film thickness and coverage rate, applying at the listed coverage rate per coat is more reliable than visual inspection alone.
Can I waterproof a bathroom floor myself?
Yes. Liquid membrane waterproofing is a straightforward DIY project. The tools are basic, the materials cost under $100 for a standard bathroom, and the process, clean, prime, caulk joints, embed mesh at corners, roll two coats, takes about a day of active work plus drying time. The most important factor is patience: allow each layer to cure fully before moving on.
For a related project, see the complete guide on how to waterproof a shower, which covers wall membrane installation, shower pan waterproofing, and curb details in the same step-by-step format.
Getting It Right the First Time
Waterproofing a bathroom floor is not the most dramatic part of a remodel. Nobody photographs the grey membrane coat or writes home about applying fleece tape to a corner. But it is the step that decides whether the beautiful tile job above it lasts 20 years or starts failing in five. Two coats, full corner reinforcement, sealed joints, and the patience to let it cure completely, that is the whole job. Everything that goes wrong in a bathroom floor usually skipped one of those four things.