A simple under-deck drainage system turns wasted space beneath an elevated deck into dry, usable square footage. The best approach depends on whether the deck is new construction or an existing build, and most homeowners can handle the retrofit in a single weekend for $2-8 per square foot.
Water dripping through deck board gaps rots joists, stains concrete below, and makes the space under a second-story deck practically useless. Five waterproofing methods solve this, ranging from a $1/sq ft DIY corrugated metal setup to a $15+/sq ft professional trough system.
Why Waterproofing Under Your Deck Changes Everything
Under-deck waterproofing does three things at once: it protects structural joists from moisture damage, creates usable covered outdoor space, and prevents water staining on the patio or concrete slab below. Prolonged moisture exposure is the leading cause of premature wood deck failure, according to building science researchers and home inspection professionals.
Unprotected deck joists absorb water from above after every rain. That moisture lingers in humid climates, feeding mold growth and accelerating rot in pressure-treated lumber that was never designed to stay perpetually wet from above. A waterproofing system redirects that water to a gutter or drip edge before it ever reaches the framing.
The practical upside is significant. A 350-square-foot dead zone under a second-story deck becomes a bike garage, outdoor workshop, or covered patio with one weekend of installation work.
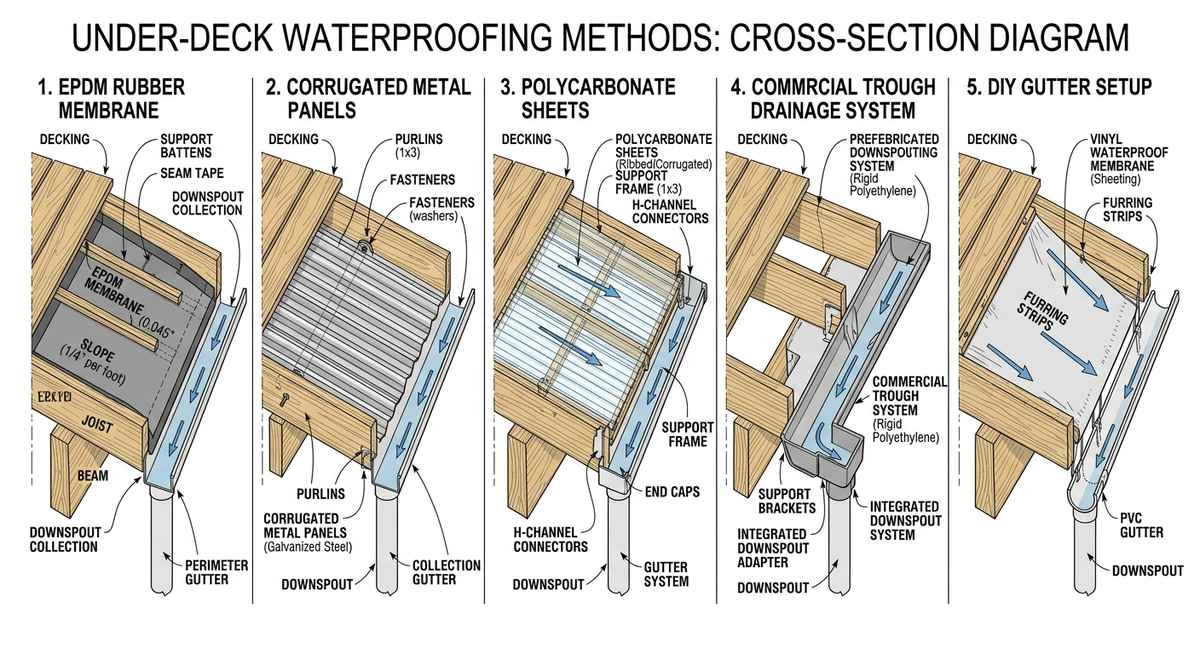
Five Methods to Waterproof a Deck from Underneath
Each of these five under-deck waterproofing methods works, but they differ sharply in cost, installation difficulty, and how well they suit existing decks versus new builds. The table below compares them side by side.
| Method | Cost / sq ft | DIY Difficulty | Durability | Best For |
|---|---|---|---|---|
| Corrugated metal panels | $1-2 | Moderate | 20-30 years | Existing deck retrofits |
| EPDM rubber membrane | $3-5 | Moderate-Hard | 25-40 years | New builds (installed on top of joists) |
| Polycarbonate / fiberglass sheets | $2-4 | Moderate | 10-20 years | Budget retrofit with light transmission |
| Commercial trough systems (Trex RainEscape, DekDrain) | $5-15 | Easy-Moderate | 20+ years | New builds or full deck resurfacing |
| DIY gutter and ceiling panel | $2-6 | Hard | 15-25 years | Custom finished ceilings with drainage |
Corrugated galvanized metal at $1-2 per square foot also happens to be the method most experienced contractors recommend for retrofit projects. It holds up better than fiberglass or plastic sheeting, resists sagging, and installs from below without removing deck boards.
EPDM Rubber Membrane
EPDM (ethylene propylene diene monomer) rubber is the gold standard for new-build waterproofing. The membrane lays directly on top of the joists before the deck boards go down, creating a continuous waterproof barrier. Trex RainEscape uses this principle with a pre-formed trough design that channels water to a gutter at the beam.
The catch: EPDM cannot be installed from underneath on an existing deck without pulling up the walking surface. For retrofits, it only works if you are already planning to replace the deck boards.
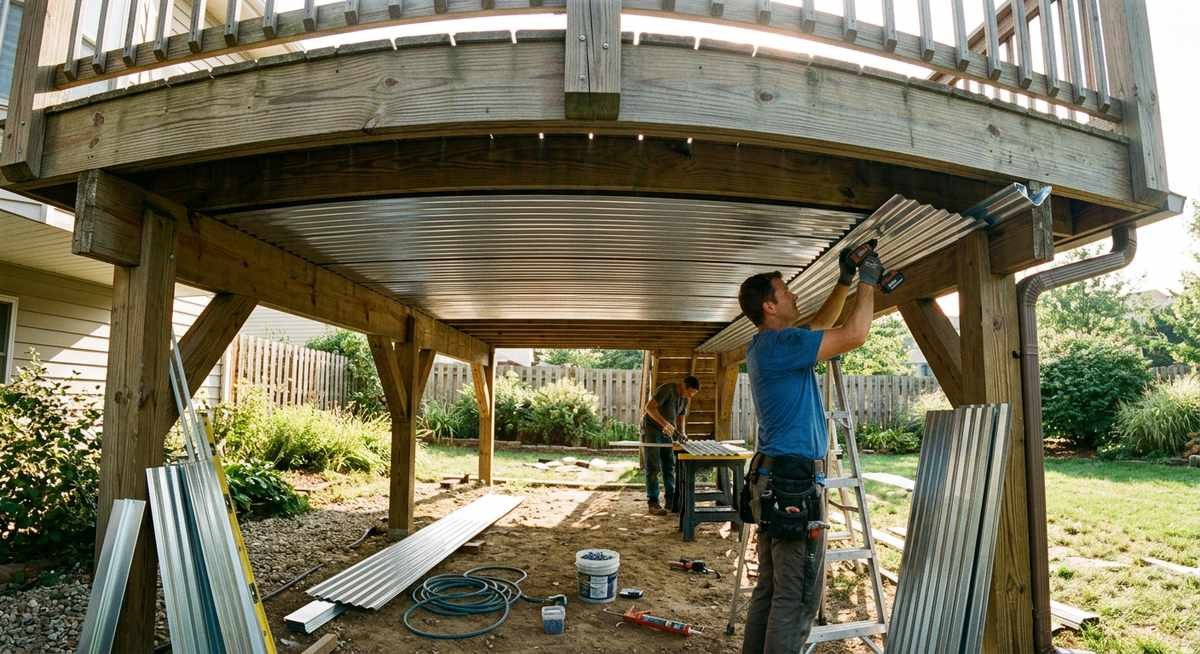
Corrugated Metal Panels
Galvanized corrugated metal panels cut slightly wider than the joist bay get bowed into a U-shape and press-fit between joists. Wooden blocking screwed underneath holds each panel in place. This method installs entirely from below and requires no modification to the deck surface above.
Commercial Trough Systems
Products like Trex RainEscape and DekDrain use vinyl or rubber troughs that attach to the top of joists. Water collects in each trough and flows to a central gutter. These systems are engineered for the job but require deck board removal for installation, making them impractical for existing decks unless a full resurface is planned.
Step-by-Step DIY Installation (Corrugated Metal Method)
Corrugated galvanized metal is the most accessible retrofit waterproofing method because every step happens from underneath the existing deck. No deck boards need to come up. Here is the full process.
- Measure joist spacing. Check the distance between each pair of joists at both the ledger board (house side) and the beam (outer edge). Most residential decks use 16-inch on-center spacing, but verify because variations of even half an inch matter for a snug fit.
- Cut corrugated metal panels. Using tin snips or a metal-cutting circular saw blade, cut each panel about 1/4 inch wider than the measured joist bay. The extra width lets you bow the panel into a U-shape for a friction fit against the joists.
- Bow panels into a U-shape. Flex each panel lengthwise so the center dips down and the edges press up against the joist faces. This creates a natural trough that channels water toward the low end.
- Maintain a 1/4-inch per foot slope. The house-side (ledger) end should sit higher than the beam end. For a 12-foot joist span, that means the ledger end sits 3 inches higher than the beam end. Use a level and shims to verify slope before securing.
- Install 2×2 blocking underneath. Screw short blocks of 2×2 or 2×4 lumber between the joists, directly beneath the metal panels, to hold them in position. Space blocks every 3-4 feet along the joist run.
- Seal at the ledger board. Where the high end of each panel meets the ledger board, apply a bead of exterior-grade silicone caulk or spray foam to prevent water from running back toward the house wall. This seal is the most failure-prone joint in the entire system.
- Install a rain gutter at the beam. Attach a standard aluminum rain gutter along the beam at the low end of the panels. Water flowing off the panel edges drops into the gutter and routes to a downspout. Without this gutter, water sheets off the beam and splashes onto whatever is stored below.
Tools needed: tin snips or metal-cutting saw blade, drill/driver, level, tape measure, caulk gun, safety glasses, work gloves. Materials: corrugated galvanized steel panels (26-gauge), 2×2 lumber for blocking, exterior wood screws, silicone caulk, aluminum rain gutter and downspout kit.
Common Mistakes That Ruin Under-Deck Waterproofing
Trapped moisture is the number one reason under-deck waterproofing projects fail. A system that keeps rain out but seals moisture in accelerates the rot it was supposed to prevent. Here are the five mistakes that cause the most damage.
Skipping the slope. Flat panels collect standing water. Even 1/8 inch per foot of slope moves water toward the gutter, but 1/4 inch per foot is the reliable minimum. Standing water on corrugated panels adds weight, promotes corrosion, and breeds mosquitoes.
Poor ledger seal. Water finds the path of least resistance. If the ledger-board junction is not sealed with caulk or foam, water runs along the panel edge and behind the ledger, soaking the rim joist and potentially entering the house wall cavity.
“Installer tucked rubber waterproofing UNDER the flashing. I felt this was wrong. 1 year later I am getting water dripping out the pinholes in my siding UNDERNEATH the deck.”
— r/Decks, November 2024 (11 comments)
Standard building practice dictates that waterproofing membranes must always lap over flashing, never tuck beneath it. Reversing the overlap sends water behind the siding, exactly as this homeowner experienced.
No ventilation gap. Sealing the entire underside of a deck without any air movement traps humidity between the waterproofing layer and the deck boards. The EPA’s guide on mold and moisture identifies trapped condensation as a primary cause of indoor mold growth, and the same principle applies to enclosed joist cavities. Leave a 1-2 inch gap at the fascia or install small vents to allow airflow.
Wrong fasteners. Standard steel screws rust in outdoor applications and leave orange streaks on everything below. Use stainless steel or hot-dipped galvanized fasteners exclusively. The cost difference is negligible (roughly $5-10 more per box) compared to the replacement labor.
Forgetting the gutter. Panels that terminate at the beam without a gutter dump water in a concentrated line directly below, exactly where most people want to walk or store equipment. A 10-foot section of aluminum gutter costs under $15 and solves the problem permanently.
“You can use corrugated galvanized sheet metal roofing and cut it just a hair wider than the distance between joists. Bow it like a U so it holds tight to the joists. Run it over the beam maintaining about a 1/4 per foot slope.”
— Snipe Hunter, WoodNet Forums, January 2024 (MasterCarpenter, 67K+ posts)
Cost Breakdown and What to Expect
DIY under-deck waterproofing costs $2-8 per square foot for materials, depending on the method. Professional installation roughly doubles that figure. Here is what each approach costs for a typical 300-square-foot under-deck area.
| Method | Materials (300 sq ft) | Pro Labor | Total DIY | Total Pro | Lifespan |
|---|---|---|---|---|---|
| Corrugated metal | $300-600 | $400-800 | $300-600 | $700-1,400 | 20-30 yrs |
| EPDM rubber | $900-1,500 | $600-1,200 | $900-1,500 | $1,500-2,700 | 25-40 yrs |
| Polycarbonate sheets | $600-1,200 | $400-800 | $600-1,200 | $1,000-2,000 | 10-20 yrs |
| Trex RainEscape | $1,500-4,500 | $800-1,500 | $1,500-4,500 | $2,300-6,000 | 20+ yrs |
| DIY gutter + ceiling | $600-1,800 | $600-1,200 | $600-1,800 | $1,200-3,000 | 15-25 yrs |
The corrugated metal method delivers the best cost-to-lifespan ratio for existing decks. At roughly $1-2 per square foot in materials and a 20-30 year service life, the per-year cost comes to under $0.10 per square foot. Commercial trough systems cost 5-10 times more but add the convenience of engineered components and manufacturer warranties.
“Wife and I waterproofed our deck. The house has a second floor deck that’s roughly 350 sq ft, and we’d like to use the space underneath for storage.”
— r/Decks, March 2026 (33 upvotes, 30 comments)
Frequently Asked Questions
What is the best material to waterproof under a deck?
EPDM rubber is the most durable option for new construction (25-40 year lifespan), while corrugated galvanized metal is the best choice for retrofitting an existing deck because it installs from below without removing deck boards. For homeowners planning a full deck resurface, Trex RainEscape offers an engineered trough system with manufacturer warranty support.
Can you waterproof a deck from underneath after it’s built?
Yes. Corrugated metal panels, polycarbonate sheets, and DIY gutter-and-ceiling systems all install from below the existing deck. EPDM membranes and commercial trough systems like Trex RainEscape require deck board removal, so they only make sense during a full resurface or rebuild.
How long does under-deck waterproofing last?
Galvanized corrugated metal lasts 20-30 years. EPDM rubber membranes last 25-40 years with minimal maintenance. Polycarbonate and fiberglass sheets degrade faster, typically 10-20 years depending on UV exposure. Commercial trough systems from Trex and DekDrain are rated for 20+ years.
Does under-deck waterproofing cause moisture problems?
Only when installed without adequate ventilation. Sealing the entire joist cavity traps humidity and promotes mold. Leave a 1-2 inch ventilation gap at the fascia or install small soffit vents to maintain airflow. In humid climates (Southeast US, mid-Atlantic), ventilation is not optional.
Do I need a permit to install under-deck waterproofing?
Most jurisdictions do not require a permit for under-deck waterproofing because it is classified as a maintenance improvement, not a structural modification. However, if you plan to enclose the space with walls or add electrical wiring for lighting, a building permit is typically required. Check with your local building department before starting.
Under-deck waterproofing is one of the highest-ROI improvements for any home with an elevated deck. Start with the corrugated metal method if the deck is already built, or specify EPDM or a commercial trough system if building new.