A single missed coat of waterproofing membrane can send $10,000 in mold remediation bills straight to your kitchen table. Waterproofing a shower means applying a continuous barrier (liquid membrane, sheet membrane, or PVC liner) over cement backer board before any tile goes up, with particular care at corners, seams, and drain connections. Get it right once, and the system lasts 10 to 15 years without intervention. Cut corners, and moisture migrates into wall cavities within months.
The good news: this is a project most confident DIYers can handle over a weekend. The bad news: the margin for error is razor-thin, especially around the shower pan and drain assembly. Everything below covers how to waterproof a shower from start to finish: which method to choose, what materials to buy, how to apply the membrane step by step, and how to test the seal before committing to tile.
Waterproofing Methods Compared: Liquid Membrane vs. Sheet Membrane vs. PVC Liner
Liquid-applied membranes like RedGard are the easiest for DIY application, sheet membranes like Schluter Kerdi provide the most reliable waterproof barrier for tile-ready walls, and PVC liners remain the standard for traditional mortar-bed shower pans. Each system has a clear sweet spot depending on your budget, skill level, and shower design.
Liquid membranes go on with a paint roller. Two coats, roughly 12 to 24 hours of cure time between applications, and the surface turns into a rubberized waterproof skin. RedGard from Custom Building Products and HydroDefense from Laticrete are the two dominant brands in the North American market. A gallon covers about 55 square feet at the recommended thickness of 30 mils dry, running roughly $0.50 to $0.80 per square foot for materials alone.
Sheet membranes take a different approach. Schluter’s Kerdi system bonds directly to cement backer board with unmodified thinset mortar, creating a vapor-tight envelope. The membrane itself runs about $1.20 to $1.80 per square foot, but installation requires precise cutting and overlap management. Professional tile setters tend to prefer this system for its consistency.
PVC and CPE liners serve a narrower purpose. According to Oatey’s waterproofing guide, these flexible sheet liners wrap the shower pan before the mortar bed is poured, creating a catchment system that directs water to the drain through weep holes. Material cost sits around $0.60 to $1.00 per square foot.
| Method | Cost per Sq Ft | DIY Difficulty | Cure Time | Best For |
|---|---|---|---|---|
| Liquid membrane (RedGard) | $0.50 – $0.80 | Easy | 12 – 24 hours | Walls, ceilings, simple layouts |
| Sheet membrane (Kerdi) | $1.20 – $1.80 | Moderate | Immediate (after thinset sets) | Full shower envelope, walk-in showers |
| PVC/CPE liner | $0.60 – $1.00 | Moderate-Hard | None (mechanical seal) | Traditional mortar-bed shower pans |
A single pinhole in a liquid membrane lets through roughly one gallon of water per day. That volume, trapped behind tile in a wall cavity, can rot a floor joist in under six months.
Materials and Tools You Need Before Starting
A complete shower waterproofing project requires cement backer board, your chosen waterproofing membrane, alkaline-resistant mesh tape, thinset mortar, and a handful of standard tools. Total material cost runs $150 to $400 depending on shower size and method.
Materials Checklist
| Material | Liquid Membrane | Sheet Membrane | PVC Liner |
|---|---|---|---|
| Cement backer board (1/2″) | Required | Required | Required |
| Backer board screws | Required | Required | Required |
| Alkaline-resistant mesh tape | Required | Included (Kerdi Band) | Required |
| Waterproofing membrane | 1 gal per 55 sq ft | By linear foot | By linear foot |
| Thinset mortar | For backer board only | Unmodified (for Kerdi) | For backer board only |
| Drain flange kit | Recommended | Required (Kerdi Drain) | Required (PVC bonding) |
| Pre-slope mix | Optional | Optional | Required |
Tools List
- Notched trowel (1/4″ x 3/16″ V-notch for Kerdi; flat for liquid)
- Paint roller or brush (for liquid membrane application)
- Utility knife with fresh blades
- Mixing drill with paddle attachment
- Level (4-foot minimum)
- Tape measure and pencil
- Cement board scoring tool or circular saw with dust extraction
How to Waterproof a Shower Step by Step
Shower waterproofing follows five stages: substrate preparation, backer board installation, membrane application, corner and seam treatment, and drain connection sealing. Each stage builds on the previous one, and skipping or rushing any of them compromises the entire system.
Step 1: Prepare the Substrate
Strip the shower area down to bare studs. Check every stud for plumb using a 4-foot level, and sister any warped studs with straight lumber. Install blocking between studs at 12-inch intervals where grab bars, shower valves, or niches will go. The framing needs to be flat and stable because cement backer board does not flex to accommodate a crooked wall.
Verify that the subfloor slopes toward the drain at a minimum pitch of 1/4 inch per foot. For mortar-bed pans, this pre-slope gets built up with deck mud before the liner goes down. For direct-to-membrane systems, the subfloor itself must already have the correct pitch.
Step 2: Install Cement Backer Board
Cut 1/2-inch cement backer board to fit the shower walls, leaving a 1/8-inch gap between panels and a 1/4-inch gap at the bottom edge above the shower pan. Fasten with corrosion-resistant backer board screws every 8 inches along studs. Use shims behind the board where studs are recessed to keep the surface plane flat.
Tape all seams with alkaline-resistant mesh tape and skim-coat with thinset mortar. This step prevents moisture from migrating through the joints even if the waterproofing membrane develops a localized failure years later.
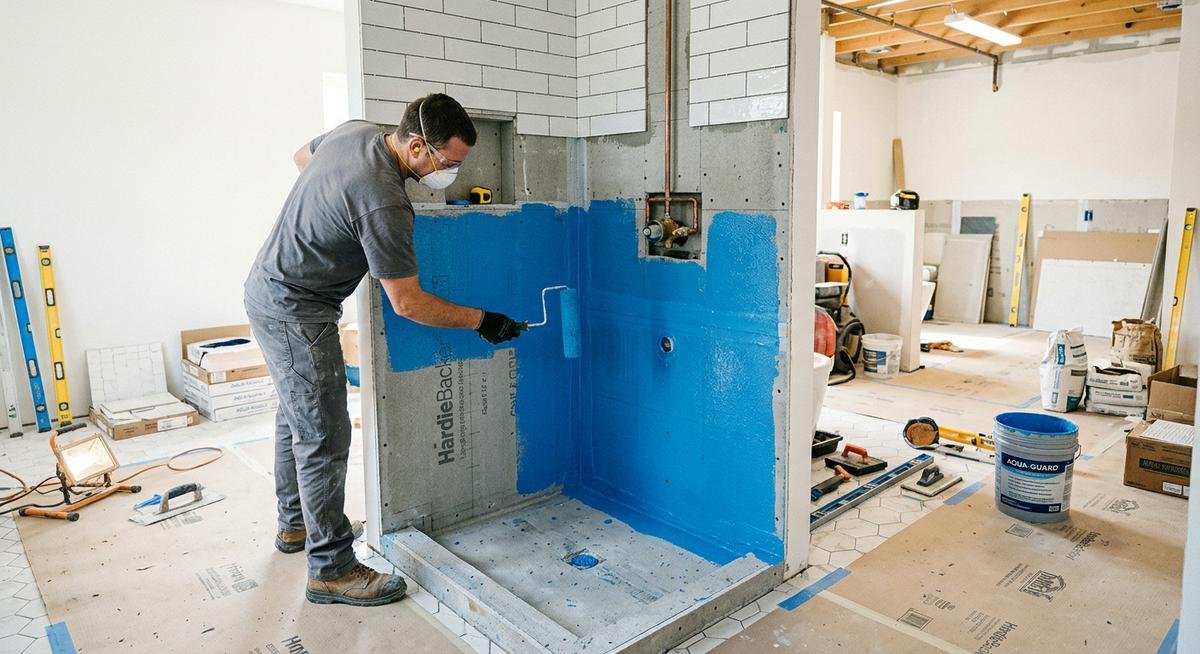
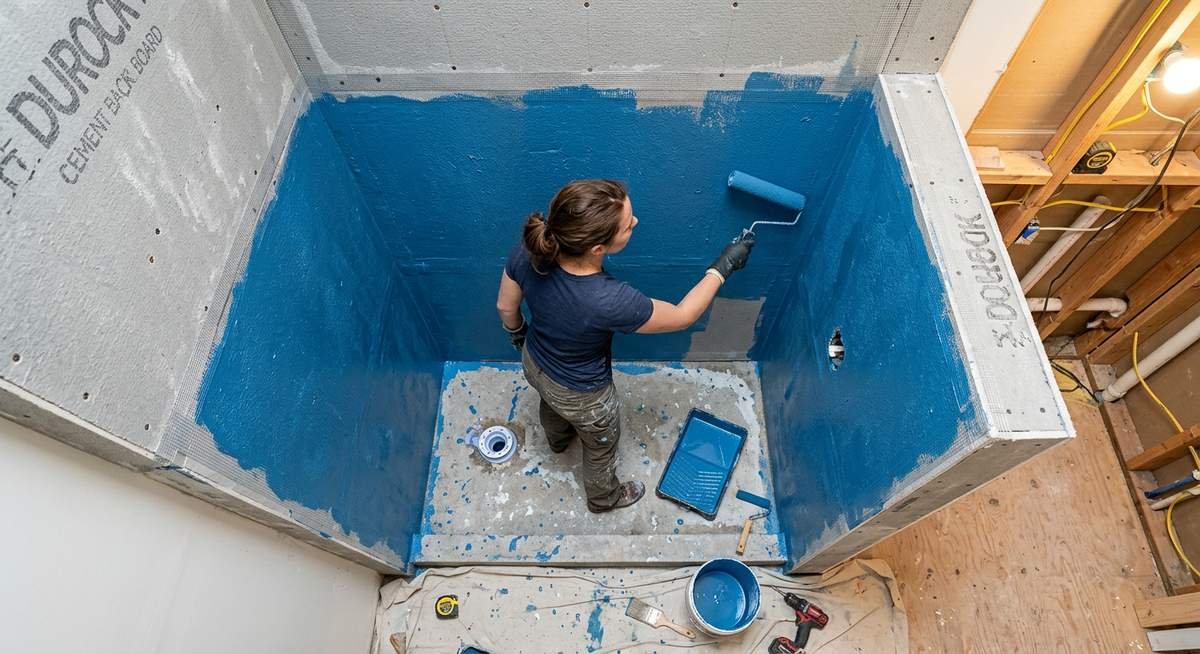
Step 3: Apply the Waterproofing Membrane
For liquid membranes, stir the product thoroughly and apply the first coat with a paint roller or brush. Work from top to bottom, maintaining a consistent thickness of approximately 15 mils wet per coat. Cover the entire backer board surface, extending at least 3 inches past the shower threshold onto the adjoining wall or floor surface.
Wait the full cure time printed on the product label (typically 12 to 24 hours for liquid membranes) before applying the second coat. The second coat should go on perpendicular to the first. Total dry thickness after two coats needs to hit 30 mils minimum. A wet film thickness gauge costs under $10 and prevents guesswork.
For sheet membranes, spread unmodified thinset mortar over a manageable section of backer board, press the Kerdi sheet into the thinset, and smooth out air bubbles with a flat trowel or Kerdi smoother. Overlap adjacent sheets by a minimum of 2 inches.
Step 4: Seal Corners, Seams, and Penetrations
Inside corners get a strip of membrane fabric or pre-formed corner piece bedded in additional membrane or thinset. The fabric strip should extend at least 2 inches on each side of the corner. Pipe penetrations (shower valve, shower head arm) require a tight seal using the membrane manufacturer’s specific pipe collar or a generous application of liquid membrane built up in multiple thin coats.
“Contractor installing shower tiles over cementboard (and drywall?) with no visible waterproof? […] That’s a tear-out. No waterproofing on cement board in a shower is a guaranteed failure within a few years.”
— r/HomeImprovement, March 2026 (55 upvotes)
This aligns with industry standards from the Tile Council of North America (TCNA), which requires a waterproof barrier behind all tile in wet areas.
Professional tile setters debate sheet versus liquid membrane endlessly online, yet they all agree on one point: skipping the corner reinforcement tape is the fastest route to a callback.
Step 5: Waterproof the Shower Pan and Drain
The shower pan is where most waterproofing failures originate. For PVC liner systems, the liner wraps up the walls at least 3 inches above the finished curb height and folds into the drain assembly with a clamping ring that compresses the material against the drain body. The pre-slope underneath directs any water that penetrates the tile and mortar bed toward weep holes in the drain.
For bonded membrane systems (Kerdi or liquid), the membrane runs continuously from the walls down across the shower floor and into the drain flange. The Kerdi Drain, for example, uses a bonding flange that integrates directly with the sheet membrane, creating a single unbroken waterproof surface from wall to drain.
The curb deserves extra attention. Wrap the membrane over the top of the curb and at least 2 inches down the outside face. Water splashes onto the curb constantly during every shower, and an unwrapped curb is a leak waiting to happen.
How to Flood Test Your Shower Waterproofing
A flood test fills the shower pan with 1 to 2 inches of water for 24 hours to verify the waterproofing seal holds before any tile gets installed. This step is non-negotiable.
Plug the drain with an expandable test plug (available at any plumbing supply store for under $15). Fill the pan slowly with a garden hose until water reaches 1 to 2 inches above the drain. Mark the water level with a pencil line on the curb or a piece of tape. Walk away for 24 hours.
Come back and check the water level against your mark. Any drop means a leak exists somewhere in the pan assembly. Check the ceiling below the shower for moisture stains, and inspect the drain connection and curb corners first, as these are the two most common failure points.
“Was My Shower Properly Waterproofed? […] If you can, do a flood test before any tile goes on. It’s the only way to know for sure.”
— r/Tile, April 2026 (22 comments)
The 24-hour wait feels excessive until you calculate the alternative: ripping out $2,000 worth of freshly laid tile to patch a leak that a bucket of water would have caught.
Common Shower Waterproofing Mistakes to Avoid
The five most costly shower waterproofing mistakes are insufficient membrane thickness, skipping corner treatment, mixing incompatible waterproofing systems, tiling before full cure, and neglecting the shower curb. Each one leads to the same outcome: water behind tile, mold in wall cavities, and an expensive demolition.
- Insufficient membrane thickness. One thin coat of RedGard looks like coverage, but it is not waterproof until it reaches 30 mils dry. Two full coats are the minimum. Three coats at corners and changes of plane.
- Skipping corner and seam treatment. Backer board joints and inside corners are the highest-stress points in a shower. Mesh tape embedded in membrane at every joint prevents cracking as the structure shifts seasonally.
- Mixing incompatible systems. Using modified thinset with Schluter Kerdi, for instance, traps moisture between the membrane and the mortar. Schluter specifically requires unmodified thinset for this reason. Mixing brands without checking compatibility charts causes the same problem.
“Help interpreting shower leak and mixed waterproofing system (Kerdi + RedGard + HardieBacker) […] Mixing waterproofing systems is a recipe for finger-pointing when it fails. Pick one manufacturer’s system and stick with it.”
— r/Tile, October 2024 (51 comments)
This concern matches guidance from Schluter Systems, which voids warranty coverage when their products are combined with third-party waterproofing membranes.
- Tiling before full cure. Liquid membranes that feel dry to the touch may not have reached full cure. Tiling too early traps uncured chemicals against the backer board, weakening adhesion over time. Follow the manufacturer’s printed cure schedule, not the touch test.
- Neglecting the shower curb. The curb takes direct water contact from every shower. Wrapping membrane over the top and down the outside face is required, not optional. An exposed curb wicks moisture into the framing below.
A veteran tile installer on r/Tile put it plainly: mixing waterproofing systems is a recipe for finger-pointing when something eventually fails. Pick one manufacturer’s ecosystem and follow their installation manual cover to cover.
Maintenance After Waterproofing: Keeping Your Shower Leak-Free
Shower waterproofing lasts 10 to 15 years with proper maintenance, primarily through regular caulk joint inspection and resealing every one to two years at all changes of plane.
Caulk joints where the tile meets the shower pan, the curb, and any wall-to-wall corners are the first line of defense above the waterproofing layer. When caulk cracks or pulls away, water reaches the membrane underneath and tests its integrity constantly. Recaulking with a quality silicone (not latex) sealant every 12 to 18 months prevents this accumulation.
Watch for these signs of waterproofing failure: loose tiles that sound hollow when tapped, persistent musty odor near the shower, water stains on the ceiling below, or soft spots in the floor adjacent to the shower. According to the U.S. Environmental Protection Agency, mold can begin growing on damp surfaces within 24 to 48 hours, making early detection critical. Any of these symptoms warrant opening up the wall for inspection rather than waiting.
Frequently Asked Questions
Do I need to waterproof a shower before tiling?
Yes, every tiled shower requires a waterproof barrier behind the tile. Cement backer board alone is water-resistant, not waterproof. Without a dedicated membrane, moisture migrates through grout joints and backer board seams into the wall cavity, causing mold growth and structural damage within one to three years.
What is the best waterproofing membrane for a shower?
Schluter Kerdi sheet membrane is the most reliable system for full shower waterproofing, offering immediate tile-readiness and consistent factory-controlled thickness. RedGard liquid membrane is a strong alternative for DIYers due to its simple roller application and lower material cost. The right choice depends on your skill level and budget.
Can I waterproof a shower with RedGard?
RedGard is a proven liquid waterproofing membrane approved for shower walls, floors, and ceilings when applied at the correct thickness of 30 mils dry (two full coats minimum). It meets ANSI A118.10 and ANSI A118.12 standards for waterproofing and crack isolation in tile installations.
How long does waterproofing need to dry before tiling?
Liquid membranes like RedGard require 12 to 24 hours between coats and a minimum of 24 hours after the final coat before tiling. Sheet membranes like Kerdi allow tiling as soon as the thinset mortar used for installation reaches initial set, typically 24 hours. Always follow the specific manufacturer’s cure schedule printed on the product label.
How do I waterproof shower corners and seams?
Embed alkaline-resistant mesh tape or pre-formed corner pieces in a bed of waterproofing membrane at every inside corner, outside corner, and backer board seam. The tape or fabric strip should extend at least 2 inches on each side of the joint. Apply an additional coat of membrane over the tape to fully encapsulate it.
What happens if you don’t waterproof a shower properly?
Water penetrates through grout joints and backer board seams into wall cavities, causing mold growth within 24 to 48 hours of sustained moisture exposure. Over weeks and months, the framing lumber rots, subfloor deteriorates, and tile begins loosening and falling off. Remediation typically costs $3,000 to $10,000 or more depending on the extent of damage.
Knowing how to waterproof a shower properly is the single most important skill in any tiled shower installation. If you are working with waterproof vinyl plank flooring in the bathroom area outside the shower, the transition point between the shower pan and the bathroom floor deserves the same careful sealing attention.