
Knowing how to waterproof the basement walls saves homeowners thousands of dollars. DIY interior waterproofing costs between $200 and $1,500, compared to $5,000 to $15,000 for professional exterior work. The gap is enormous, and so is the payoff: a dry basement protects your foundation, prevents mold, and adds measurable resale value to your home.
Most homeowners discover they need waterproofing the hard way. A heavy rainstorm, a musty smell that won’t quit, or white crusty deposits creeping across the concrete. The good news is that interior waterproofing is a manageable weekend project for anyone comfortable with a paintbrush and a caulk gun.
This guide walks through the full process: diagnosing water problems, choosing the right method, applying waterproofing products correctly, and avoiding the mistakes that send people back to square one.
Signs Your Basement Walls Need Waterproofing
Water damage rarely announces itself with a flood. It starts with subtle clues that many homeowners overlook for months or even years. Catching these signs early prevents thousands of dollars in structural repairs.
- Efflorescence: White, chalky mineral deposits on concrete or block walls. This means water is migrating through the wall and leaving dissolved salts behind as it evaporates.
- Damp spots or discoloration: Dark patches that appear after rain and slowly dry out between storms.
- Musty odor: A persistent earthy smell, even when no visible water is present. This usually indicates mold growth behind walls or in porous concrete.
- Peeling paint or bubbling: Moisture trapped behind paint or coatings pushes them off the surface.
- Visible cracks: Hairline fractures in mortar joints or poured concrete, especially along the floor-wall joint (the cove joint).
- Rust stains: Orange or brown streaks near metal fasteners, pipes, or rebar embedded in the wall.
- Standing water or puddles: The most obvious sign, typically concentrated in corners or along the base of walls after heavy rain.
“Waterproofing issues in my basement and I have no idea where to start. There’s visible moisture on the walls after every rain.”
r/Indiana, March 2026 (24 upvotes)
That damp, earthy scent you catch walking downstairs isn’t just unpleasant. According to the Environmental Protection Agency, mold can begin growing on wet surfaces within 24 to 48 hours. A basement that smells musty probably already has active mold colonies feeding on moisture in the concrete.
How Water Gets Into Basement Walls
Three forces drive water through foundation walls: hydrostatic pressure, capillary action, and gravity seepage through cracks. Understanding which one is affecting your basement determines the correct fix.
Hydrostatic pressure is the biggest culprit in areas with high water tables. Groundwater pushes against the foundation from all sides, and a cubic foot of water weighs 62.4 pounds. Multiply that by the full height and length of a basement wall, and the cumulative force is enormous. Interior-only solutions often fail against hydrostatic pressure because the water has nowhere else to go.
Capillary action pulls moisture upward through porous concrete, much like a paper towel absorbs a spill. You’ll notice this as dampness that extends above the waterline, sometimes reaching 12 to 18 inches above grade level.
Gravity seepage enters through cracks, gaps around pipes, or the cove joint where the wall meets the floor. Poor exterior grading, clogged gutters, and short downspout extensions are the usual culprits. According to the American Society of Home Inspectors, over 60% of basements in the United States experience some form of water intrusion.
Thousands of pounds of water pressure working silently against a 10-inch concrete wall, 24 hours a day. The wall holds, until one day it doesn’t, and by then the damage is well underway.
Interior vs Exterior Waterproofing: Which Method Fits Your Situation
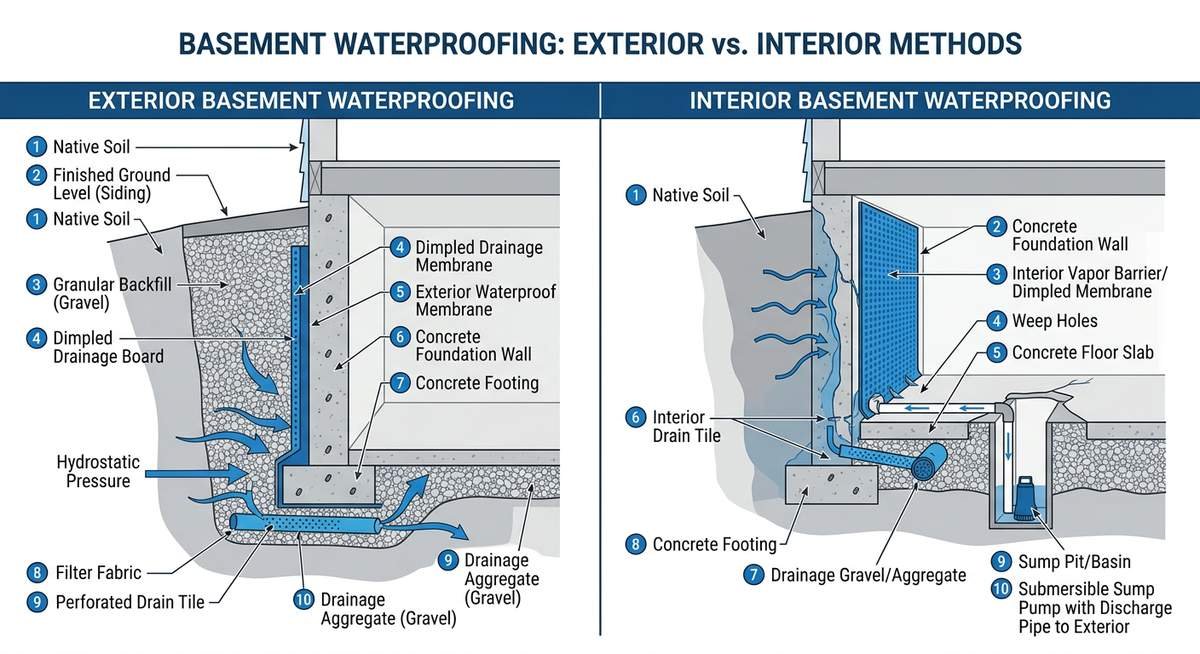
Interior waterproofing manages water after it reaches the wall. Exterior waterproofing stops water before it touches the foundation. The right choice depends on the severity of your problem, your budget, and whether your basement is already finished.
| Method | Cost Range | DIY Difficulty (1-10) | Effectiveness | Timeline | Best For |
|---|---|---|---|---|---|
| Interior sealant/paint | $200-$1,500 | 3 | Moderate (minor seepage) | 1-2 days | Light moisture, condensation, damp walls |
| Interior drain tile + sump pump | $3,000-$8,000 | 8 | High | 3-5 days | Active water intrusion, high water table |
| Exterior membrane | $5,000-$15,000 | 9 (requires excavation) | Very high | 5-10 days | New construction, severe water, foundation cracks |
| Exterior drain tile | $8,000-$15,000 | 9 | Very high | 5-10 days | Hydrostatic pressure, chronic flooding |
| Combination (interior + exterior) | $10,000-$25,000 | 10 (professional only) | Maximum | 7-14 days | Severe, recurring issues in finished basements |
For most homeowners dealing with damp walls and minor seepage, interior sealant or waterproof paint is the practical starting point. It costs a fraction of excavation work and handles the majority of moisture problems caused by condensation and light capillary action.
“Getting conflicting advice on basement waterproofing. One company says interior drain is enough, another says we need exterior. Both gave quotes around $8K-$12K.”
If you’re exploring professional interior waterproofing systems like B-Dry, understanding the difference between these approaches helps you evaluate contractor proposals with sharper questions.
Step-by-Step Guide to Waterproofing Basement Walls From Inside
Learning how to waterproof the basement walls from the inside takes most homeowners one to two days, requires no excavation, and handles light to moderate moisture. Follow these seven steps in order for a lasting result.
- Inspect and diagnose the water source (30 minutes). Run a simple tape test: secure a 12-inch square of aluminum foil to the wall with duct tape. After 24 hours, check both sides. Moisture on the outer face (wall side) means water is coming through the foundation. Moisture on the inner face means condensation from indoor humidity.
- Remove old paint, coatings, and loose material (1-3 hours). Scrape off any peeling paint with a wire brush or paint scraper. For stubborn coatings, use a masonry-specific paint remover. Waterproofing products bond to bare concrete or masonry, not old paint layers.
- Repair cracks and holes (1-2 hours). Fill hairline cracks with hydraulic cement, which expands as it cures and can set even in wet conditions. For larger cracks (wider than 1/4 inch), use a polyurethane injection kit. Seal the cove joint where the wall meets the floor with polyurethane caulk.
- Clean the wall surface thoroughly (1-2 hours). Remove efflorescence with a stiff brush and a solution of muriatic acid diluted 10:1 with water. Treat any visible mold with a bleach-and-water solution (1 cup bleach per gallon). Rinse and allow the wall to dry completely.
- Apply a masonry primer or conditioner (30 minutes). Some waterproofing products require a primer coat; others bond directly to clean concrete. Check the manufacturer’s instructions. If priming, use a roller for flat surfaces and a brush for mortar joints and rough areas.
- Apply the waterproofing product (2-4 hours per coat). Use a thick-nap roller (3/4 inch minimum) or a stiff masonry brush. Apply generously, filling all pores and pinholes in the concrete. Most products require two coats with 4 to 12 hours of drying time between applications. Work in sections of about 50 square feet to maintain a wet edge.
- Inspect and allow full cure (24-72 hours). After the final coat, inspect for missed spots, thin areas, or visible pinholes. Touch up as needed. Most waterproofing paints reach full cure in 3 to 7 days. Avoid placing anything against the walls during this period.
Experienced contractors consistently point to step three as the one homeowners rush through most often. Skipping crack repair before applying sealant is like putting a bandage on a leaking pipe: the water finds a new path, and the sealant fails within months.
Waterproofing Products Compared: Paint vs Sealant vs Membrane
Waterproof paint costs $1 to $4 per square foot and handles light moisture. Penetrating sealers run $2 to $6 and offer deeper protection. Sheet membranes cost $3 to $10 per square foot and block severe water intrusion, but they’re typically a professional install.
| Product Type | Cost per Sq Ft | Durability | Application | Best For |
|---|---|---|---|---|
| Waterproof paint (acrylic/latex) | $1-$4 | 5-10 years | Roller or brush, 2 coats | Condensation, light dampness |
| Penetrating sealer (silicate/silicone) | $2-$6 | 10-15 years | Sprayer or roller, 1-2 coats | Capillary moisture, porous block walls |
| Cementitious coating (crystalline) | $2-$5 | 15+ years (permanent) | Brush or trowel, 1-2 coats | Active seepage, concrete walls |
| Sheet membrane (rubber/plastic) | $3-$10 | 20+ years | Adhesive or mechanical fasteners | Severe water intrusion, exterior application |
Crystalline waterproofing products (like Xypex or Krystol) deserve a closer look for concrete walls. They react chemically with moisture and unhydrated cement particles to form insoluble crystals deep inside the concrete matrix. The result is a self-sealing system that actually improves with age, since new crystals form whenever water contacts the treated surface.
For most DIY interior projects on poured concrete or block walls, a quality waterproof paint (DRYLOK Extreme or Zinsser WaterTite) applied in two thick coats provides reliable protection against minor to moderate moisture at the lowest cost and effort.
Basement Waterproofing Cost Breakdown
A standard 1,000-square-foot basement costs $200 to $1,500 for DIY interior waterproofing and $5,000 to $15,000 for professional exterior work. The massive spread depends almost entirely on the method and whether excavation is required.
| Method | DIY Cost | Professional Cost | What’s Included |
|---|---|---|---|
| Interior paint/sealant | $200-$600 | $1,000-$3,000 | Crack repair, surface prep, 2 coats of sealant |
| Interior drain tile + sump pump | $1,500-$3,000 | $3,000-$8,000 | Trench, perforated pipe, gravel, sump basin, pump |
| Exterior membrane | Not recommended DIY | $5,000-$15,000 | Excavation, membrane, drainage board, backfill |
| Full perimeter system | Not recommended DIY | $10,000-$25,000 | Interior drain, exterior membrane, sump, grading |
“Basement seepage and sinus problems. Need honest waterproofing advice. Got quotes from two companies: $8,500 for interior drain tile and $14,000 for exterior excavation.”
Two gallons of DRYLOK Extreme at $45 each covering 500 square feet total, or $14,000 to dig up the entire foundation perimeter. For a homeowner with damp walls and no active flooding, that cost gap is the difference between a Saturday project and a second mortgage conversation.
Common Mistakes That Ruin Basement Waterproofing
Skipping surface preparation, applying coatings to wet walls, and ignoring exterior drainage are the three errors that cause most waterproofing failures. Each one wastes both time and money, and the fix is almost always starting over from scratch.
- Applying sealant over old paint or coatings. Waterproofing products must bond directly to bare concrete or masonry. Painting over existing layers creates a weak sandwich that peels within months.
- Waterproofing a wet surface. Most sealants and paints require a dry wall to cure properly. Hydraulic cement is the exception. Check the product label for moisture tolerance before applying.
- Ignoring exterior grading and gutters. No interior sealant can overcome water pooling against the foundation. Grade soil to slope away from the house at least 6 inches over the first 10 feet, and extend downspouts at least 4 feet from the foundation.
- Using interior paint as the only defense against hydrostatic pressure. Paint blocks vapor and light moisture. It cannot hold back thousands of pounds of groundwater pressure. If water is coming up through the floor or the cove joint, you need a drain tile system.
- Skipping crack repair before coating. Sealant bridges hairline cracks temporarily, but water under pressure will exploit any unfilled gap. Hydraulic cement costs under $15 per container and takes 15 minutes to apply.
- Applying too thin a coat. Waterproofing paint needs heavy, pore-filling application. A single thin coat with a standard roller leaves thousands of pinholes that defeat the purpose entirely.
- Neglecting post-waterproofing maintenance. Gutters clog, grading settles, sump pumps fail. Annual inspection of your drainage system and exterior grading prevents the water from returning.
“Can we apply new waterproof cement coating over the old one? The previous owners painted over the walls and now it’s peeling everywhere.”
Homeowners keep making the same calculation: skip the tedious prep work, save a few hours, and hope the coating sticks anyway. That shortcut turns a $300 project into a $3,000 problem when the sealant fails and moisture damage reaches the framing above.
Frequently Asked Questions
How much does it cost to waterproof a basement?
DIY interior waterproofing with sealant or paint costs $200 to $1,500 for a standard basement. Professional interior drain tile systems run $3,000 to $8,000. Exterior excavation and membrane work ranges from $5,000 to $15,000, with full perimeter systems reaching $25,000.
Can you waterproof a basement from the inside only?
Interior-only waterproofing works for condensation, light dampness, and minor seepage through porous concrete. It does not stop hydrostatic pressure from a high water table. If water is actively entering through the cove joint or floor, an interior drain tile system combined with a sump pump is the minimum effective solution from inside.
What is the best waterproofing product for basement walls?
DRYLOK Extreme and Zinsser WaterTite are the most widely recommended waterproof paints for DIY interior use. For penetrating protection on bare concrete, crystalline products like Xypex provide permanent waterproofing that self-heals minor cracks over time.
How long does basement waterproofing last?
Waterproof paint lasts 5 to 10 years before reapplication. Penetrating sealers last 10 to 15 years. Cementitious crystalline coatings are considered permanent. Exterior membranes last 20 or more years when properly installed. Actual lifespan depends on water pressure, wall condition, and ongoing maintenance of exterior drainage.
What is the difference between waterproofing and damp-proofing?
Damp-proofing resists moisture in soil but cannot hold back liquid water under pressure. Waterproofing creates a continuous barrier that stops both moisture vapor and liquid water. Most new-construction foundations receive only damp-proofing (a tar-like coating), which is why many newer homes still develop basement water problems.
Does waterproofing a basement increase home value?
A dry, waterproofed basement increases usable square footage and eliminates a major red flag for home inspectors. According to the National Association of Realtors, finishing a basement returns roughly 70% of the investment at resale. Waterproofing is a prerequisite for any finishing work.
Can I apply new waterproofing over old coating?
No. Old coatings must be removed completely before applying new waterproofing. Previous layers prevent proper adhesion and trap moisture between coats, leading to peeling and failure. Use a wire brush, scraper, or chemical paint remover to strip the wall back to bare concrete or masonry before recoating.
When should I call a professional instead of doing it myself?
Knowing how to waterproof the basement walls yourself covers most minor moisture problems. Call a professional if you see water actively flowing through walls or the floor, if foundation cracks are wider than 1/4 inch, if the basement floods repeatedly after moderate rain, or if you suspect structural damage. Any situation involving excavation or drain tile installation also benefits from professional equipment and experience.