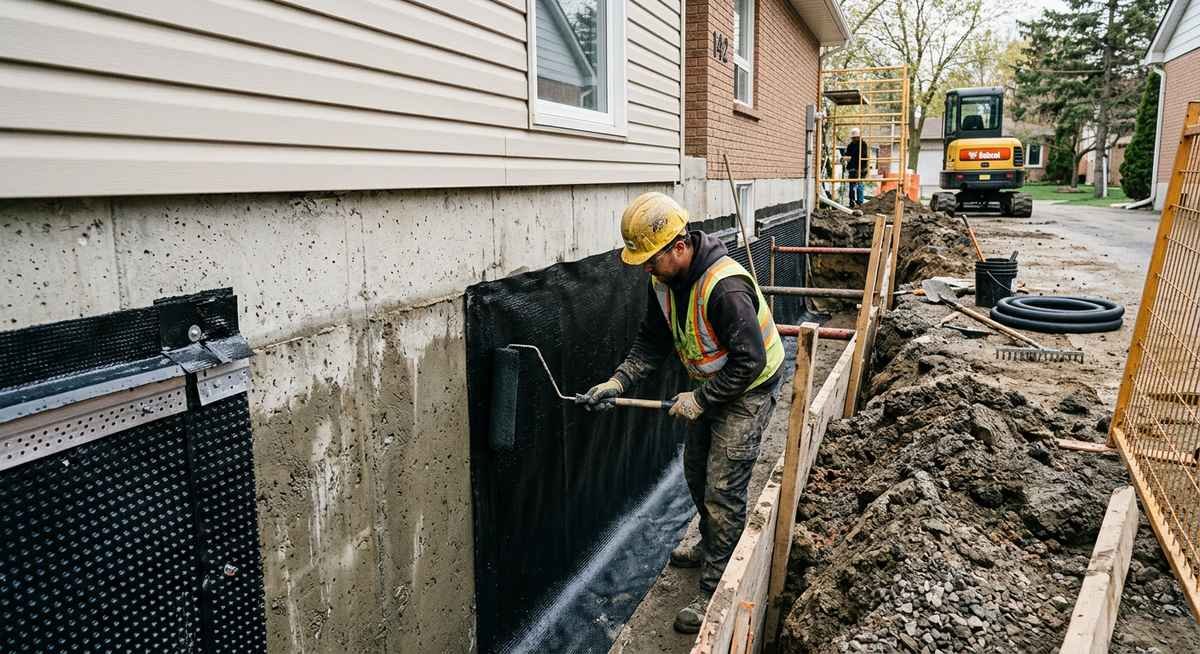
Knowing how to waterproofing basement on exterior walls is the difference between managing leaks and preventing them entirely. Exterior basement waterproofing stops water before it ever touches the inside of your foundation wall. The process involves excavating soil around the perimeter, applying a waterproof membrane or coating to the exposed concrete, installing a drainage system at the footing level, and backfilling with gravel and soil graded away from the house. Professional jobs run $80-$120 per linear foot, while a hands-on DIY approach can cut costs to $3,000-$5,000 for a typical 1,200 square-foot basement.
Most interior waterproofing systems just manage water that has already found its way inside. They channel it to a sump pump and call it solved. Exterior waterproofing is the only approach that actually prevents moisture from reaching the foundation in the first place. That distinction matters more than most homeowners realize when they are waterproofing basement walls from the inside and still finding damp spots every spring.
Why Exterior Waterproofing Outperforms Interior Methods
Exterior waterproofing creates a positive-side barrier that blocks water at the soil-to-concrete interface, before hydrostatic pressure can push moisture through the wall. Interior systems, by contrast, are negative-side solutions: they manage water after it penetrates the concrete.
Hydrostatic pressure is the force exerted by groundwater pressing against your foundation. According to the International Code Council (ICC), a single foot of water depth generates 62.4 pounds of pressure per square foot against a basement wall. After heavy rain, that pressure can overwhelm even well-built concrete within hours.
Interior French drains and sump pumps relieve that pressure once water enters. They work, but they accept leakage as inevitable. Exterior waterproofing eliminates the leakage entirely by sealing the outside face of the wall.
| Factor | Exterior Waterproofing | Interior Waterproofing |
|---|---|---|
| How it works | Blocks water at the wall surface | Redirects water already inside |
| Typical cost | $8,000-$15,000 professional | $3,000-$7,000 professional |
| Lifespan | 15-25 years | 5-10 years (pump dependent) |
| Disruption | Exterior excavation, landscaping impact | Interior floor cutting, dust |
| Foundation protection | Prevents wall deterioration | Does not protect the wall itself |
The cost gap between exterior and interior closes significantly when you factor in the 15-25 year lifespan of a properly applied membrane versus the 5-10 year effective life of interior drain tiles that depend on a sump pump running continuously. One method protects the structure. The other just manages a symptom.
Exterior Waterproofing Methods Compared
Four main methods handle exterior basement waterproofing: liquid-applied coatings ($1-6 per square foot), sheet membranes ($3-8 per square foot), bentonite clay panels ($4-10 per square foot), and dimple boards ($2-5 per square foot). The right choice depends on your foundation material, soil conditions, and budget.
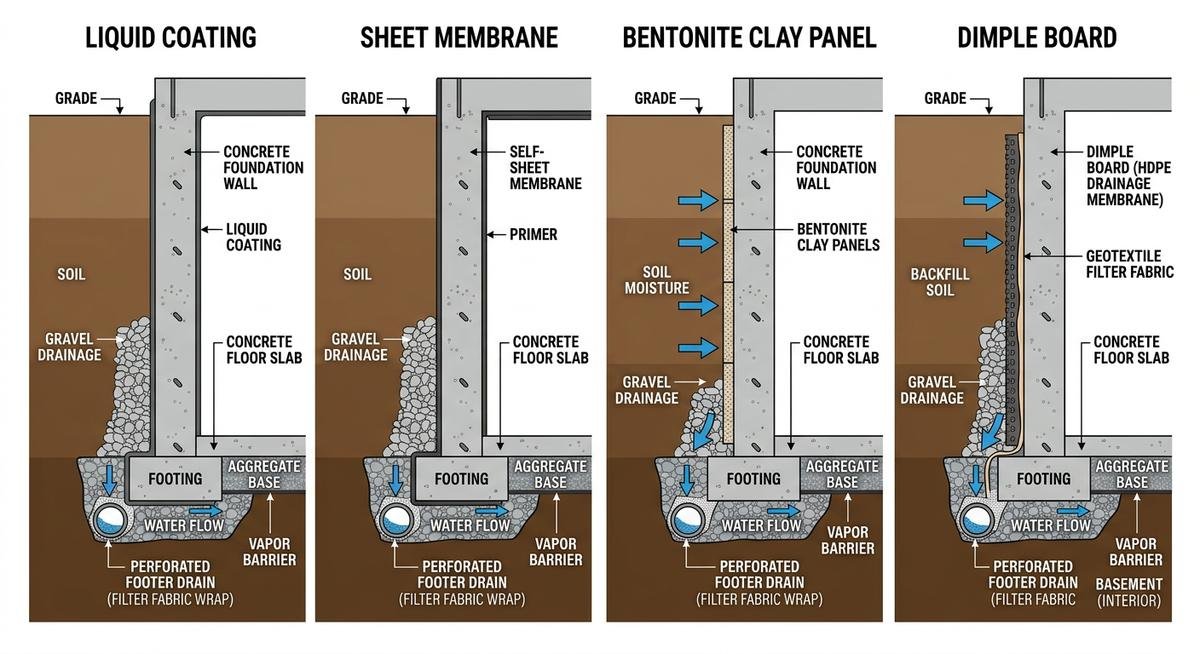
| Method | Cost per Sq Ft | Lifespan | Best For | DIY Difficulty |
|---|---|---|---|---|
| Liquid-applied coating | $1-$6 | 10-15 years | Retrofits, minor moisture issues | Moderate |
| Sheet membrane (peel-and-stick) | $3-$8 | 20-25 years | New construction, high water table | Hard |
| Bentonite clay panels | $4-$10 | Indefinite (self-healing) | High water table, difficult access | Hard |
| Dimple board (drainage mat) | $2-$5 | 25+ years | Used with another method as drainage layer | Easy |
Liquid coatings like rubberized asphalt emulsions are the most accessible option for DIY homeowners. They roll or spray on, cure in 24-48 hours, and handle typical moisture conditions well. Sheet membranes offer superior protection because they maintain a consistent thickness, but they require precise application: wrinkles or gaps at seams become failure points. Bentonite panels swell when they contact water, creating a self-healing seal, though they cost the most upfront. Dimple boards rarely work alone. They create an air gap and drainage channel that pairs with a coating or membrane to form a two-layer defense.
Step-by-Step Exterior Basement Waterproofing Process
A full exterior waterproofing job takes 3-7 days depending on house size and soil conditions, following eight core steps from inspection through final grading. Excavation is the most labor-intensive phase and accounts for roughly 40% of total project time.
“We got three quotes for exterior waterproofing. Every contractor said the same thing: the excavation is what kills you on cost. Our house has a porch on one side and a driveway on the other, so they could only trench two walls without removing hardscape.”
r/HomeMaintenance, March 2026 (20 upvotes)
- Inspect the foundation. Walk the perimeter and mark every visible crack, spalling area, and mortar joint gap. Photograph each one. Hairline cracks under 1/8 inch typically need sealant only. Anything wider may indicate structural movement that requires engineering review before waterproofing.
- Excavate to the footing. Dig a trench along the foundation wall down to the bottom of the footer, typically 6-8 feet deep. Keep the trench at least 2-3 feet wide to allow working room. Shore unstable soil as required by local code.
- Clean the wall surface. Power wash or wire brush all dirt, efflorescence, and loose concrete from the exposed wall. The surface must be clean and dry before applying any product. Let it air dry for 24 hours if possible.
- Repair all cracks. Fill cracks with hydraulic cement or polyurethane injection. For structural cracks wider than 1/4 inch, consult a foundation specialist before proceeding. According to the Portland Cement Association, epoxy injection restores 100% of the original wall strength on non-moving cracks.
- Apply primer (if required). Some membrane systems require a primer coat. Follow the manufacturer’s specifications exactly. Primer typically dries in 2-4 hours.
- Apply the waterproof barrier. Roll, spray, or adhere your chosen membrane/coating. For liquid coatings, apply two coats at 60 mils wet thickness each (manufacturer spec varies). For sheet membranes, start at the footing and work upward, overlapping seams by at least 3 inches. Seal all seam edges with compatible mastic.
- Install the drainage system. Lay perforated drain pipe (4-inch minimum) along the footing, sloped at 1/8 inch per foot toward the sump or daylight outlet. Cover with 12 inches of washed gravel (3/4-inch stone). Wrap the pipe in filter fabric to prevent sediment clogging.
- Backfill and grade. Fill the trench with native soil in 12-inch lifts, compacting each layer. Grade the final surface so it slopes away from the foundation at a minimum of 6 inches over the first 10 feet. This is the step most DIYers rush, and poor grading is the single most common cause of exterior waterproofing failure.
That eight-step list reads clean on paper. The reality of spending three days in a trench that keeps filling with groundwater while wrestling 60-pound rolls of membrane against a wall is a different experience entirely.
Exterior Basement Waterproofing Cost Breakdown
Full exterior waterproofing runs $80-$120 per linear foot when a contractor handles the job, or $3,000-$5,000 for a committed DIY project on an average 1,200 square-foot basement. The U.S. Department of Housing and Urban Development (HUD) identifies exterior waterproofing as one of the most cost-effective foundation preservation investments, with properly waterproofed basements adding 3-5% to resale value.
| Cost Category | DIY Estimate | Professional Estimate |
|---|---|---|
| Materials (membrane/coating, primer, sealant) | $800-$2,000 | $1,500-$3,500 |
| Drainage materials (pipe, gravel, fabric) | $400-$800 | $600-$1,200 |
| Equipment rental (mini excavator, pump) | $500-$1,200/day | Included |
| Permits | $50-$200 | $50-$200 |
| Labor | Your time (40-60 hours) | $4,000-$8,000 |
| Total | $3,000-$5,000 | $8,000-$15,000 |
“I DIY’d two walls of my 1950s ranch. Materials ran about $1,800. The mini excavator rental was $450/day and I needed it for two days. Total was around $3,200 not counting my labor. A contractor quoted me $11,500 for the same two walls.”
r/centuryhomes, March 2026 (6 upvotes)
This aligns with industry estimates from the National Association of Home Builders (NAHB), which reports typical contractor markups of 2.5-3x over material costs for foundation work.
Equipment rental alone ($500-1,200 per day for a mini excavator) makes the “cheap DIY” calculation less straightforward than it first appears. A homeowner who rents for three days and still needs to rent a plate compactor, pump, and pressure washer has already spent $2,000 before buying a single sheet of membrane.
Common Mistakes That Cause Exterior Waterproofing to Fail
Three factors cause most exterior waterproofing failures: skipping crack repair before membrane application, using the wrong drainage stone, and improper backfill grading. Every professional waterproofing contractor has a story about tearing out a failed system to find one of these root causes.
- Skipping crack repair. Applying membrane over an active crack is like putting a bandage on a broken bone. The crack will continue moving, eventually tearing through the membrane. Fill every crack first, let it cure, then apply the barrier.
- Wrong drainage gravel. Round river stone compacts poorly and migrates. Crushed angular gravel (3/4-inch minus) locks together and stays in place around the drain pipe. This single material choice determines whether your drainage system works in year 10.
- Poor backfill grading. The final soil grade must slope away from the foundation at 6 inches over the first 10 feet. Flat or bowl-shaped grading pools rainwater right against the wall you just waterproofed.
- No filter fabric on drain pipe. Bare perforated pipe in direct soil contact clogs within 2-5 years. Wrap the pipe in geotextile filter fabric, or use pre-wrapped pipe.
- Insufficient membrane overlap. Sheet membrane seams need a minimum 3-inch overlap, fully sealed with compatible mastic or tape. A 1-inch gap at a seam joint lets more water through than having no membrane at all, because the gap concentrates flow.
“Paid $10K for exterior waterproofing five years ago. This spring the basement flooded again. Contractor came back and found the drain tile was completely clogged because they used pea gravel instead of crushed stone and no filter fabric. Whole system had to be redone.”
r/basement, March 2026 (4 upvotes)
This is consistent with data from the Basement Health Association, which reports that drainage system failure accounts for roughly 60% of exterior waterproofing callbacks. One skipped step, one wrong material, and the entire investment is compromised.
Maintenance and Long-Term Care
A properly installed exterior waterproofing system lasts 10-25 years depending on method and soil conditions. Annual inspections catch small problems before they become expensive repairs.
Spring inspection checklist:
- Check gutters and downspouts for clogs. Extend downspouts at least 6 feet from the foundation.
- Walk the perimeter and verify grading still slopes away from the house. Settling is normal in the first 1-2 years.
- Inspect any visible membrane edges at grade level for peeling, cracking, or UV damage.
- Test sump pump operation by pouring a bucket of water into the pit.
- Look for new cracks in the foundation above grade.
Signs your waterproofing may be failing:
- Damp spots or efflorescence (white mineral deposits) on interior basement walls
- Musty odor that appears after rain, which the EPA identifies as a key indicator of hidden mold growth
- Standing water near the foundation after the soil has had 48 hours to drain
- Sump pump running much more frequently than usual
Most liquid coatings need reapplication every 10-15 years. Sheet membranes and bentonite panels typically last the full 20-25 year span without intervention, provided drainage remains functional.
Frequently Asked Questions
How long does exterior basement waterproofing last?
Exterior waterproofing lasts 10-25 years depending on the method used. Liquid coatings last 10-15 years, sheet membranes last 20-25 years, and bentonite clay systems can last indefinitely because the clay self-heals when it contacts water. Proper drainage maintenance extends the lifespan of any system.
Can you waterproof a basement from the outside yourself?
Yes, learning how to waterproofing basement on exterior walls is a feasible DIY project for liquid coatings and dimple board installation on accessible walls. Budget $3,000-$5,000 for materials and equipment rental. Full sheet membrane installation typically requires professional expertise due to the precision needed at seams and transitions.
Is exterior or interior basement waterproofing better?
Exterior waterproofing is more effective because it stops water before it reaches the wall. Interior systems manage water already inside. Exterior costs more upfront ($8,000-$15,000 vs $3,000-$7,000) but lasts 2-3 times longer and actually protects the foundation structure from deterioration.
What is the best method for exterior basement waterproofing?
Sheet membranes (peel-and-stick rubberized asphalt) are the gold standard for new construction and high water table conditions. For retrofit projects where cost matters, a liquid-applied rubberized coating combined with a dimple board drainage mat provides strong protection at lower cost.
How deep do you need to excavate for exterior waterproofing?
Excavation must reach the bottom of the foundation footing, typically 6-8 feet below grade for a full basement. The trench should be 2-3 feet wide to allow working room. Soil shoring may be required by local building codes for trenches deeper than 5 feet.
Does exterior waterproofing increase home value?
Exterior waterproofing typically adds 3-5% to resale value according to the National Association of Realtors. A dry basement with documented waterproofing also removes a major negotiation point for buyers, often preventing $10,000-$20,000 in price reduction requests during home inspections.
Making the Right Call
Understanding how to waterproofing basement on exterior walls gives you the most effective path to keeping a basement dry, but the project demands significant investment in time, money, or both. If your foundation is accessible, your soil drains reasonably well, and you are comfortable operating heavy equipment, a liquid coating plus dimple board system is a realistic DIY project. For high water tables, structural cracks, or limited access, a professional crew with sheet membrane expertise is worth the premium.
Whatever route you choose, the drainage system matters as much as the barrier itself. A perfect membrane with a clogged drain pipe still results in a wet basement. Get the gravel right, grade the backfill correctly, and maintain the gutters. Those three details outlast any product choice. For a closer look at one popular professional system, see this B-Dry waterproofing review.