Ceiling Cracks: Identify, Reasons, and How to Fix

A ceiling crack is a visible or hidden fracture that develops in the interior ceiling directly below a roof structure. Ceiling cracks often occur in drywall, plasterboard, or wooden panels.
Celing cracks can be identified by the visible stains, marks, line-shaped or spider web cracks on the ceiling, attic issues, paint peeling, and pressing and feeling for soft spots on the ceiling area. The ceiling is cracked due to stress in the roof, movement, water intrusion, or structural weakness. The negative impact of ceiling cracks is water seepage, moisture intrusion, mold and mildew growth, structural weakening, interior ceiling damage, and increased energy bills in the house.
In order to prevent these negative impacts, you should fix the ceiling crack by following the Aqviz recommended methodology mentioned below. In order to prevent further ceiling cracks, you should maintain the roof waterproof regularly, ensure proper attic ventilation, control indoor humidity, reinforce ceiling joints, and inspect the roof structure after storms. These prevention methods help to maintain the proper ceiling without cracks and water damage.
What Is a Ceiling Crack?
A ceiling crack is a visible or hidden fracture that develops in the interior ceiling directly below a roof structure. Ceiling cracks often occur in drywall, plasterboard, or wooden panels.
Ceiling cracks occur due to the roofing system above suffering stress, movement, water intrusion, or structural weaknesses. Sloped asphalt shingle roofs and flat concrete roofs are the most prone to ceiling cracks due to thermal expansion, settlement, and waterproofing failure.
Cracks in ceilings allow moisture penetration, weaken structural integrity, reduce insulation effectiveness, foster mold growth, and increase energy bills. If ceiling cracks are neglected, these seemingly small flaws can lead to interior staining, musty odors, pest infestations, and even the collapse of ceiling sections in extreme cases over time.
How to Identify Ceiling Cracks?
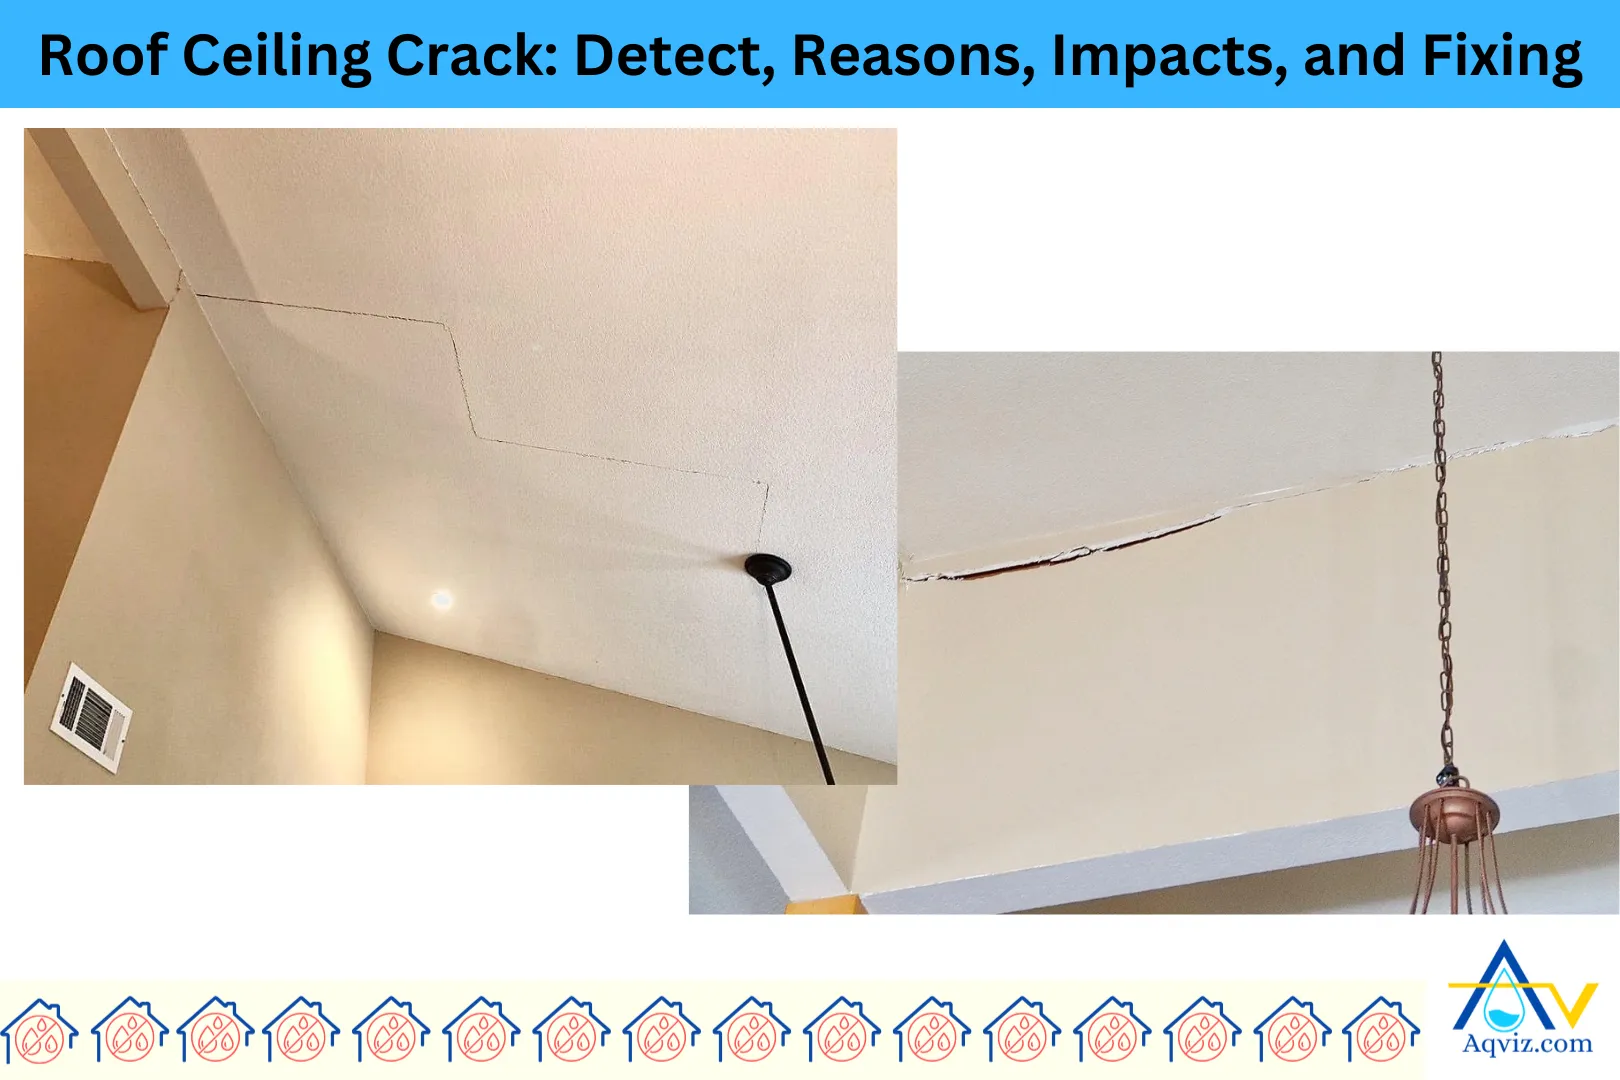
To identify the cracks in the ceiling, you should follow these 5 steps. These 5 steps include all the visible detection methods. So you should carefully observe the ceiling for cracks according to these 5 steps.
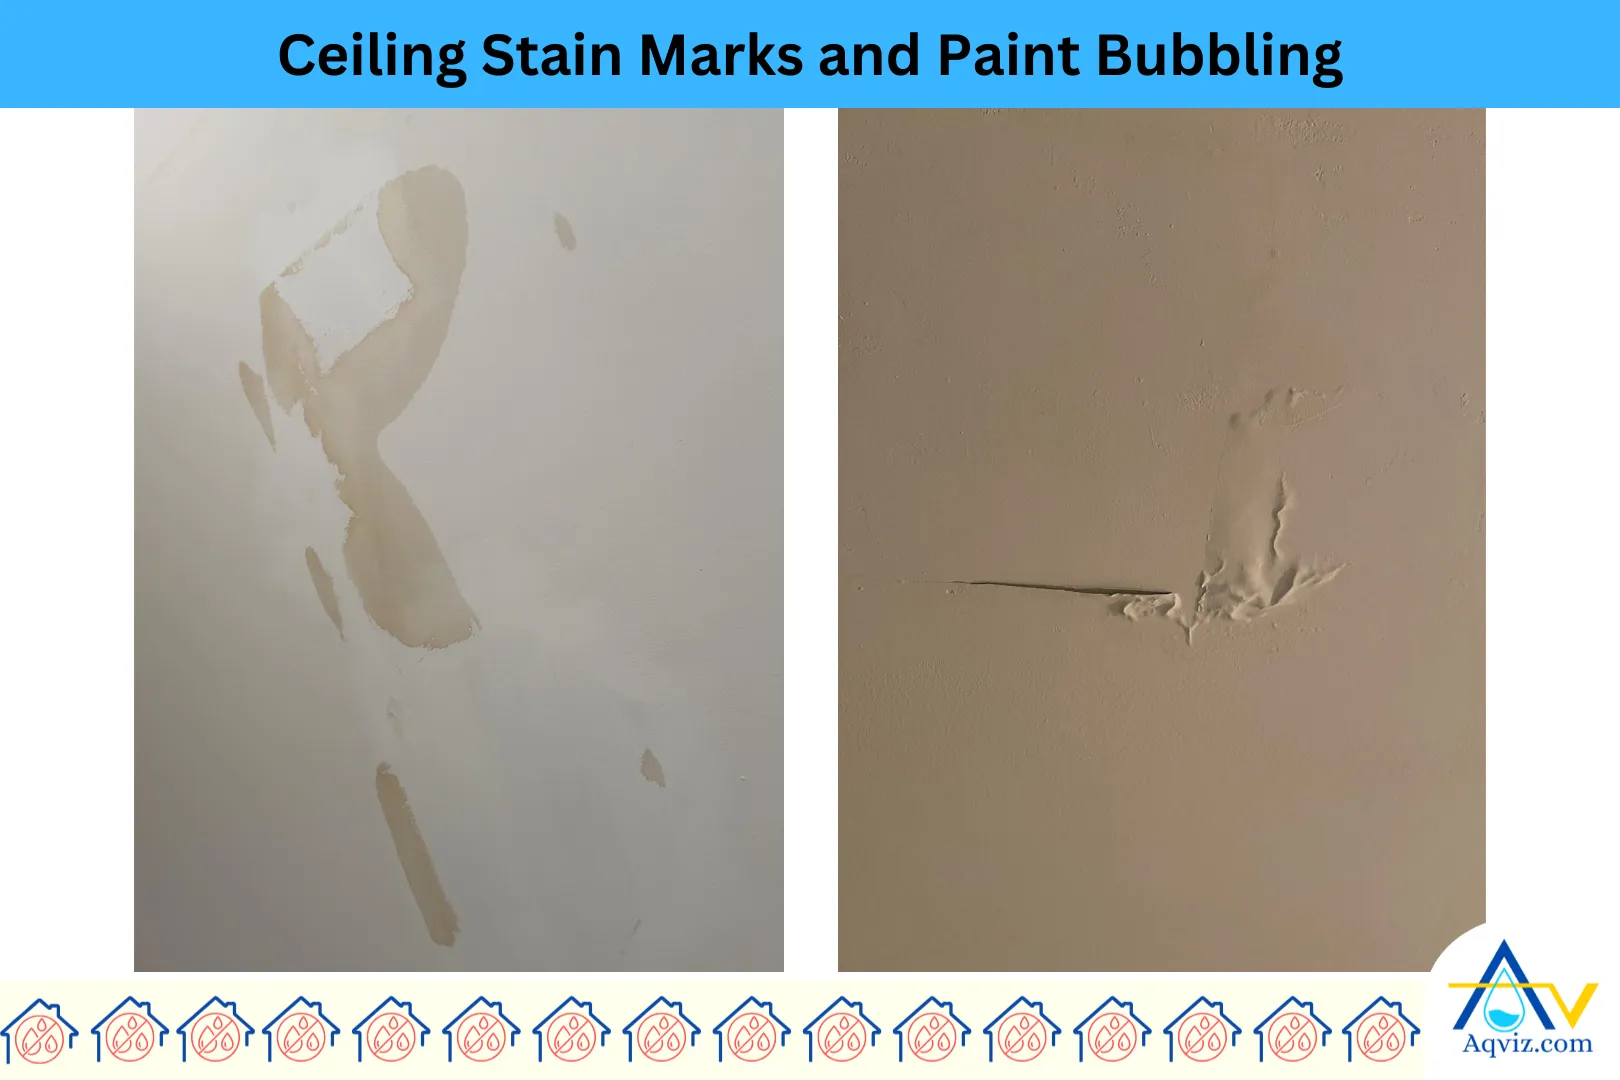
- Find visible stains or warping on the roof: Inspect rooms after heavy rain or temperature shifts. Brownish water stains, bulges, or warped ceiling sections often point to roof-related cracks above.
- Observe line-shaped or spider-web cracks on the ceiling: Check around the ceiling corners, light fixtures, and joint seams. Cracks forming in patterns or radiating lines usually indicate roof stress or settling.
- Discover attic issues with a flashlight: Go up into the attic and examine insulation, rafters, and sheathing. Look for moisture marks, sagging insulation, or visible light through roof gaps.
- Search for paint peels or plaster flakes: Flaking finishes, blistered paint, or loose plaster on the ceiling suggest that cracks beneath the surface are allowing moisture intrusion.
- Press and feel for soft spots: Gently press suspicious ceiling areas. A spongy, soft, or crumbly texture may reveal a hidden crack that’s weakening the ceiling layer.
Read More About: How to Inspect a Roof for Leaking?
What Are the Reasons for Ceiling Cracks?
These are the 7 main reasons for ceiling cracks. These 5 reasons cause ceiling cracks and provide negative impact to the structure.
- Roof leakage: Water intrusion from damaged roofing membranes or failed flashing seeps into the ceiling, weakening materials and causing cracks to form.
- Thermal expansion and contraction: Temperature changes cause roofing and ceiling materials to expand and contract, leading to stress fractures over time.
- Structural movement or settling: When a house shifts or the foundation settles, stress is transferred upwards, causing ceiling cracks, especially near walls and beams.
- Poor attic ventilation: Excessive heat and moisture buildup in attics leads to ceiling surface degradation and cracking due to trapped humidity.
- Heavy roof load: Snow accumulation, ponded water, or excessive roofing layers create pressure that transfers downward, straining the ceiling underneath.
- Improper ceiling installation: Loose drywall, weak plastering, or poor joint taping during ceiling installation results in early-stage cracking under slight stress.
- Aging and material fatigue: Over time, all building materials lose strength. Drywall, wood, and plaster lose elasticity and develop stress cracks under minor movements.
What are the Problems of Ceiling Crack?
These are the 5 problems of ceiling cracks. These problems reduce the functionality and aesthetic appeal of the ceiling.
- Water seepage and moisture intrusion: Ceiling cracks allow rainwater to penetrate, soaking ceiling materials and causing damp spots, blistering, and rot over time.
- Mold and mildew growth: Moisture trapped inside ceiling layers becomes a breeding ground for mold spores, posing health risks and structural decay.
- Structural weakening: Repeated water exposure and expanding ceiling cracks compromise the load-bearing capacity of ceilings and making them unsafe over time.
- Interior ceiling damage and discoloration: Ceiling paint peels, plaster flakes, and brown stains develop as water enters through even the smallest fractures.
- Increased energy bills: Ceiling cracks break the insulation layer, allowing indoor air to escape and outdoor air to enter, forcing HVAC systems to work harder.
A roof can be damaged by other roof problems, such as roof alligatoring, roof blistering, and roof seepage. So you should be aware all of these problems before fixing the roof damage.
How to Fix a Ceiling Crack?
To fix cracks in the celing you should follow the below 5 steps. The 5 steps help you to find the basic problem for the crack and address it promptly.
- Seal roof leaks first: Inspect and repair damaged roofing membranes, flashing, and joints to stop water intrusion before patching the ceiling.
- Cut out and remove roof loose material: Use a utility knife or scraper to clear away loose drywall, plaster, or paint around the ceiling crack for a clean repair surface.
- Apply joint compound or filler: Fill the ceiling crack using a high-quality joint compound or patching plaster. For deeper cracks, embed fiberglass tape for reinforcement.
- Sand and smooth the cracked surface on the ceiling: After the filler dries, sand the area evenly using fine-grit sandpaper to prepare it for finishing.
- Prime and repaint the ceiling: Apply a stain-blocking primer, then repaint with a moisture-resistant ceiling paint to restore appearance and protect from future issues.
How to Prevent Ceiling Cracks?
To prevent the ceiling cracks, you should follow these 5 steps. These 5 ceiling crack prevention methods are tested by the Aqviz experts in their sites. So we highly recommend that you follow these to stop further cracks on the ceiling.
- Maintain roof waterproofing regularly: Recoat roof waterproofing membranes, reseal flashing, and inspect for damage every 6 to 12 months to keep water out.
- Ensure proper attic ventilation: Install ridge vents, soffit vents, or exhaust fans to balance temperature and moisture levels inside the attic space.
- Control indoor humidity: Use dehumidifiers, especially in areas prone to condensation, to reduce moisture stress on ceiling materials.
- Reinforce ceiling joints: During construction or renovations, use joint tape and strong adhesives at corners and seams to improve flexibility and strength.
- Inspect roof structure after storms: Check for signs of shifting, leaks, or pooling after extreme weather to catch early signs of strain or hidden damage.