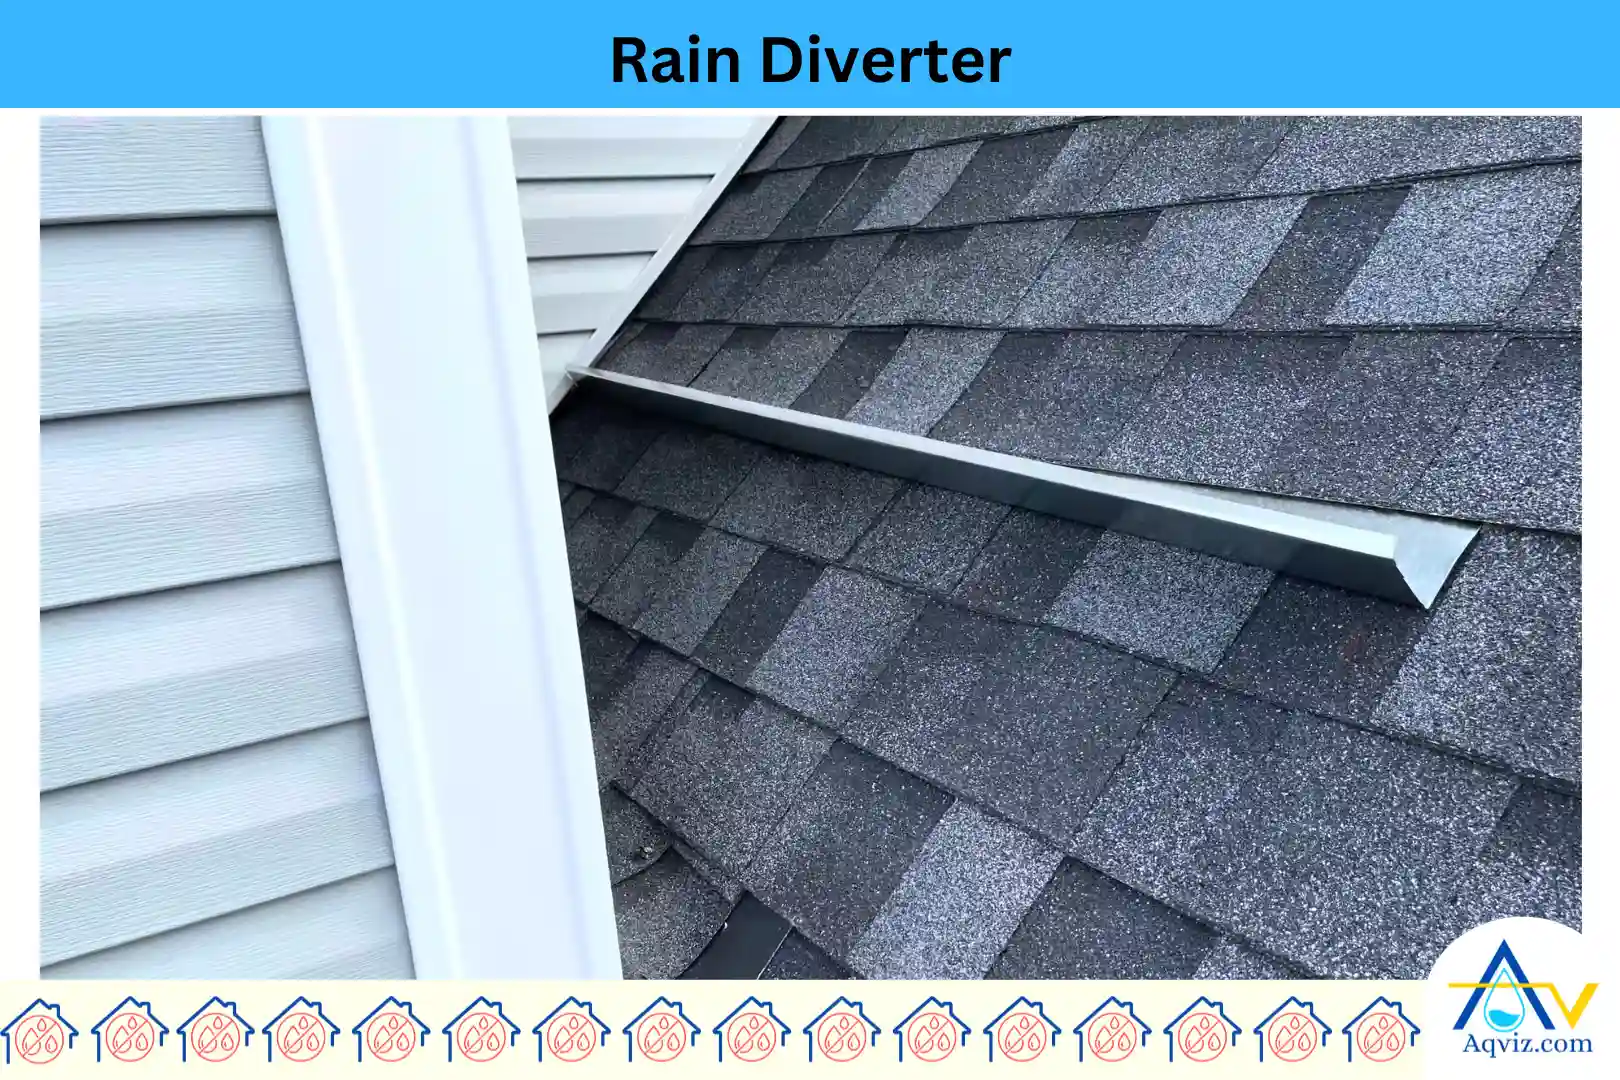
Roof Rain Diverter: Before Installation Guide

A rain diverter is a simple and effective roofing accessory designed to redirect rainwater away from critical or vulnerable areas of the roof. The main task of a rain diverter is to channel the water runoff path on the roof sideways into a gutter or safe drainage path. The angle of a rain diverter typically ranges between 30° to 45°, but it depends on the slope of the roof and the desired redirection path of the water.
The average length of a standard rain diverter is between 36 inches (91 cm) to 48 inches (122 cm). The recommended lap length of the roof rain diverter is the minimum of 300mm (12in) for the low rainfall areas and 450-600 mm (18-24 in) for the higher rainfall areas.
When installing a rain diverter, you should extend it at least 6 inches beyond the protection area. It helps to protect the area properly. A rain diverter benefits the homeowner and the structure to enhance the roof protection from unnecessary water spreading. But if you do not install it properly, it may cause much water-related damage to the roof. The recommended height of the roof tain divert is 50-75 mm (2-3 in) vertical kick out.
What Is a Rain Diverter?
A rain diverter is a simple and highly effective roof flashing accessory made of galvanized steel, aluminum, or copper, used to redirect roof water runoff away from vulnerable or high-flow rate areas. Rain diverters are installed on the pitched roofs, and the main task of a rain diverter is to channel the water runoff path on the roof sideways into a gutter or safe drainage path.
Rain diverters are installed in heavy water impact areas on the roof. Rain diverters are very important in heavy rains, light drizzles, and melting snow. They’re especially recommended on low-pitched roofs, metal roofs, or older asphalt shingle roofs where water tends to overshoot the gutters.
The main benefits of a rain diverter include preventing water intrusion, reducing splashback, protecting siding and trim, and minimizing soil erosion around the home’s foundation. It’s especially useful when gutters can’t be installed due to architectural limitations or aesthetic preferences.
How Does a Rain Diverter Work?
A rain diverter works by interrupting the downward flow of water on a sloped roof and guiding it laterally toward a collection point, such as a nearby gutter or downspout. It is typically a bent metal flashing, installed under the shingles and tilted slightly to redirect water sideways.
What Is the Average Length of the Rain Diverter?
The average length of a standard rain diverter is between 36 inches (91 cm) to 48 inches (122 cm). Rain diverters should fit the span of the protection area, and they should extend at least 6 inches beyond the protected zone, such as above doorways, garage entries, or bay windows, for proper runoff.
If the diverter is too short, it won’t cover the width of the vulnerable area. It allows water to leak at the edges. If it’s too long, especially over 60 inches (152 cm), it can interfere with nearby gutters or flashing systems and may require extra bracing to avoid buckling or detachment due to wind load.
What is the Recommended Lap Length of the Roof Rain Diverter?
The recommended lap length of the roof rain diverter is the minimum of 300mm (12in) for the low rainfall areas and 450-600 mm (18-24 in) for the higher rainfall areas. It should be beyond the protected opening that ensures effective water deflection and joint stability during rainfall.
- Low rainfall areas: Minimum 300 mm (12 in) beyond the opening on each side
This lap length allows roof runoff to fully transition onto the diverter and discharge away from door and window edges without backflow. - High rainfall areas: 450-600 mm (18-24 in) beyond the opening on each side
We specify this extended lap if rainfall intensity exceeds 75 mm/hour (3 in/hour) or roof slope is steep, because water velocity increases significantly.
This lap length prevents leakage at the diverter roof junction by overlapping the water flow path, improves mechanical strength at the joint connection, and reduces stress concentration caused by wind-driven rain. From our field experience, lap lengths below 300 mm (12 in) often fail during heavy storms, allowing water to bypass the diverter edges and re-enter the wall assembly.
Aqviz experts highly recommend always extending the lap length if the opening width exceeds 1,200 mm (47 in) or if the diverter sits below a roof valley, because concentrated runoff demands additional overlap to maintain long-term performance.
What is the Height of the Roof Rain Diverter?
The height of a roof rain diverter is the vertical kick-out dimension that lifts and redirects roof runoff away from walls, openings, and façade surfaces. The recommended height of the roof tain divert is 50-75 mm (2-3 in) vertical kick out.
This height helps to effectively break the downward water flow from the roof surface, guide rainwater outward and downward, and prevent splash-back onto doors, windows, and wall finishes. From our site experience, a diverter height below 50 mm (2 in) allows fast-moving rainwater to overrun the edge during heavy storms, while heights above 75 mm (3 in) may trap debris and interfere with proper shingle seating.
What Is the Angle of the Rain Diverter?
The angle of a rain diverter typically ranges between 30° to 45°, but it depends on the slope of the roof and the desired redirection path of the water. At Aqviz, we usually install it at a 35° angle, which offers the optimal balance for deflecting water laterally without interfering with the roof’s drainage performance. This incline is just steep enough to overcome the downward force of water flow during moderate to heavy rains.
If the rain diverter angle is too shallow, below 25°, water may not divert effectively and can still drip directly downward, defeating its purpose. On the other hand, if the rain diverter angle exceeds 45°, it may interrupt shingle alignment, cause premature wear, or lift under high wind pressure, leading to possible leaks or material damage.
Read More About: 10 Ways To Stop Roof Leaking
Where to Install a Roof Rain Diverter?
You should install a roof rain diverter in these 5 critical locations, such as above doors and windows, under roof shingles, at roof-to-wall interaction, above exterior wall penetrations, and below the valley of the drip point.
- Above doors and windows:
Install the rain diverter directly above the opening to divert roof runoff away from frames, seals, and interior finishes. We always position it 50–75 mm (2–3 in) above the trim line. - Under roof shingles:
Place the upper flange beneath the first or second course of shingles so water flows over the diverter, not behind it. This prevents backflow during heavy rain. - At roof-to-wall intersections:
Install the diverter where a sloped roof meets a vertical wall to redirect concentrated runoff away from siding and wall joints. - Above exterior wall penetrations:
Fit rain diverters above vents, meter boxes, exhaust outlets, and AC line entries to stop water tracking into wall cavities. - Below valleys or drip points:
Install at points where roof geometry concentrates water flow to prevent erosion, splash-back, and foundation wetting.
How to Install a Rain Diverter?
You can install a rain diverter by following these 7 steps.
- Gather tools: Use a pry bar, roofing nails or screws, roofing sealant, tin snips, hammer, measuring tape, and a rain diverter (metal flashing).
- Locate the divert position: Measure and mark the section above the roof area you want to protect.
- Lift roof shingles: Gently lift the bottom row of roof shingles where the diverter will sit. Use the pry bar to avoid roof damage.
- Cut the roof diverter to length: Trim the roof flashing to the correct length with tin snips. Make sure it extends at least 6 inches past each end of the target zone.
- Insert the roof diverter and secure: Slide the diverter under the lifted shingles, angling it slightly downward toward the drainage side. Nail or screw it into place beneath the shingle layer.
- Seal the roof edges: Apply roofing sealant around the nail heads and edges to prevent water penetration.
- Press and settle: Press the shingles back down and ensure they overlap the diverter smoothly without bulging.
Expert Tips for Roof Diverter Installation
- Always seal the roof diverter with high-quality elastomeric roofing sealant. You should do it especially in freeze-thaw regions.
- Use butyl tape instead of nails when installing roof diverters on standing seam metal roofs to avoid leaks and preserve the warranty
- Use Kynar-coated aluminum roof diverters for corrosion resistance and last long-lasting solution.
- Slide the diverter below the second shingle layer to avoid capillary action for roofs with asphalt shingles
What Are the Advantages of Rain Diverters?
There are 5 major advantages of using a rain diverter on a roof.
- Protects entryways and patios from direct water runoff.
- Reduces siding and trim rot by controlling water exposure.
- Prevents splashback and soil erosion around the foundation.
- Improves roof drainage where gutters are absent or ineffective.
- Minimizes ice formation and icicles near entrances in snowy climates.
Read More About: How to Waterproof a Concrete Roof?
What Are the Problems of Rain Diverters?
Rain diverters are helpful, but like any roof accessory, they come with potential drawbacks if not properly installed or maintained. At Aqviz, we’ve seen several issues arise over time. Here are the 5 key problems of rain diverters.
- Water backup under shingles: If the rain diverter is not sealed properly, diverters can cause water to back up beneath the shingles. It leads to the leaking and rotting of the roof structure. This is especially risky during heavy downpours or snowmelt.
- Interference with roof drainage: On steep-slope roofs, diverters can obstruct the natural flow of water, leading to pooling or overflows in unintended areas.
- Ice dam formation: In cold climates, diverted water may refreeze along roof edges, forming ice dams that damage roof shingles and gutters.
- Incompatibility with gutters: When rain diverters are placed too close to gutters can misalign runoff direction or cause overflow at gutter joints.
- Wind uplift risk: Poorly secured longer rain diverters can lift during strong winds. It can damage the roof shingles or flashing and create roof vulnerabilities.
Read More About: 13 Types of Roof Damages and How to Prevent Them?