20 Sump Pump Parts: Install, Repair and Replace

A sump pump system consists of different parts. Each part has a specific task and purpose. So Aqviz experts highly recommend that homeowners be aware of these parts and their functions. That will help when installing, repairing, and replacing a sump pump. There are 20 main parts in the sump pump.
20 Sump Pump Parts You Should Know
- Sump Pump Motor
- Sump Pump Impeller
- Sump Pump Float Switch
- Power Cord
- Pump Housing
- Sump Pump Discharge Pipe
- Sump Pump Check Valve
- Sump Pit/Basin
- Intake Screen/Grate
- Sump Pump Battery Backup (optional)
- Sump Pump Alarm System (optional)
- Seals and Gaskets
- Mounting Bracket (for pedestal pumps)
- Vent Hole (weeping hole)
- Control Panel (for advanced systems)
- Thermal Overload Protector
- Base Plate/Stand
- Guide Rail System (commercial setups)
- Anti-Airlock Hole
- Sump Pump Float Arm (for tethered/vertical switches)

1. Sump Pump Motor
The sump pump motor is the central component that powers the pumping action by converting electrical energy into mechanical energy. It drives the impeller, creating the suction and force needed to move water from the sump pit through the discharge pipe.
The sump pump motor helps push out large volumes of water efficiently during storms or flooding. It’s designed to withstand moisture and operate for extended periods without overheating. A well-built motor improves pump durability, decreases the risk of burnout, and ensures reliable drainage performance in critical situations. Selecting the correct horsepower motor is important for matching water volume and head height requirements.
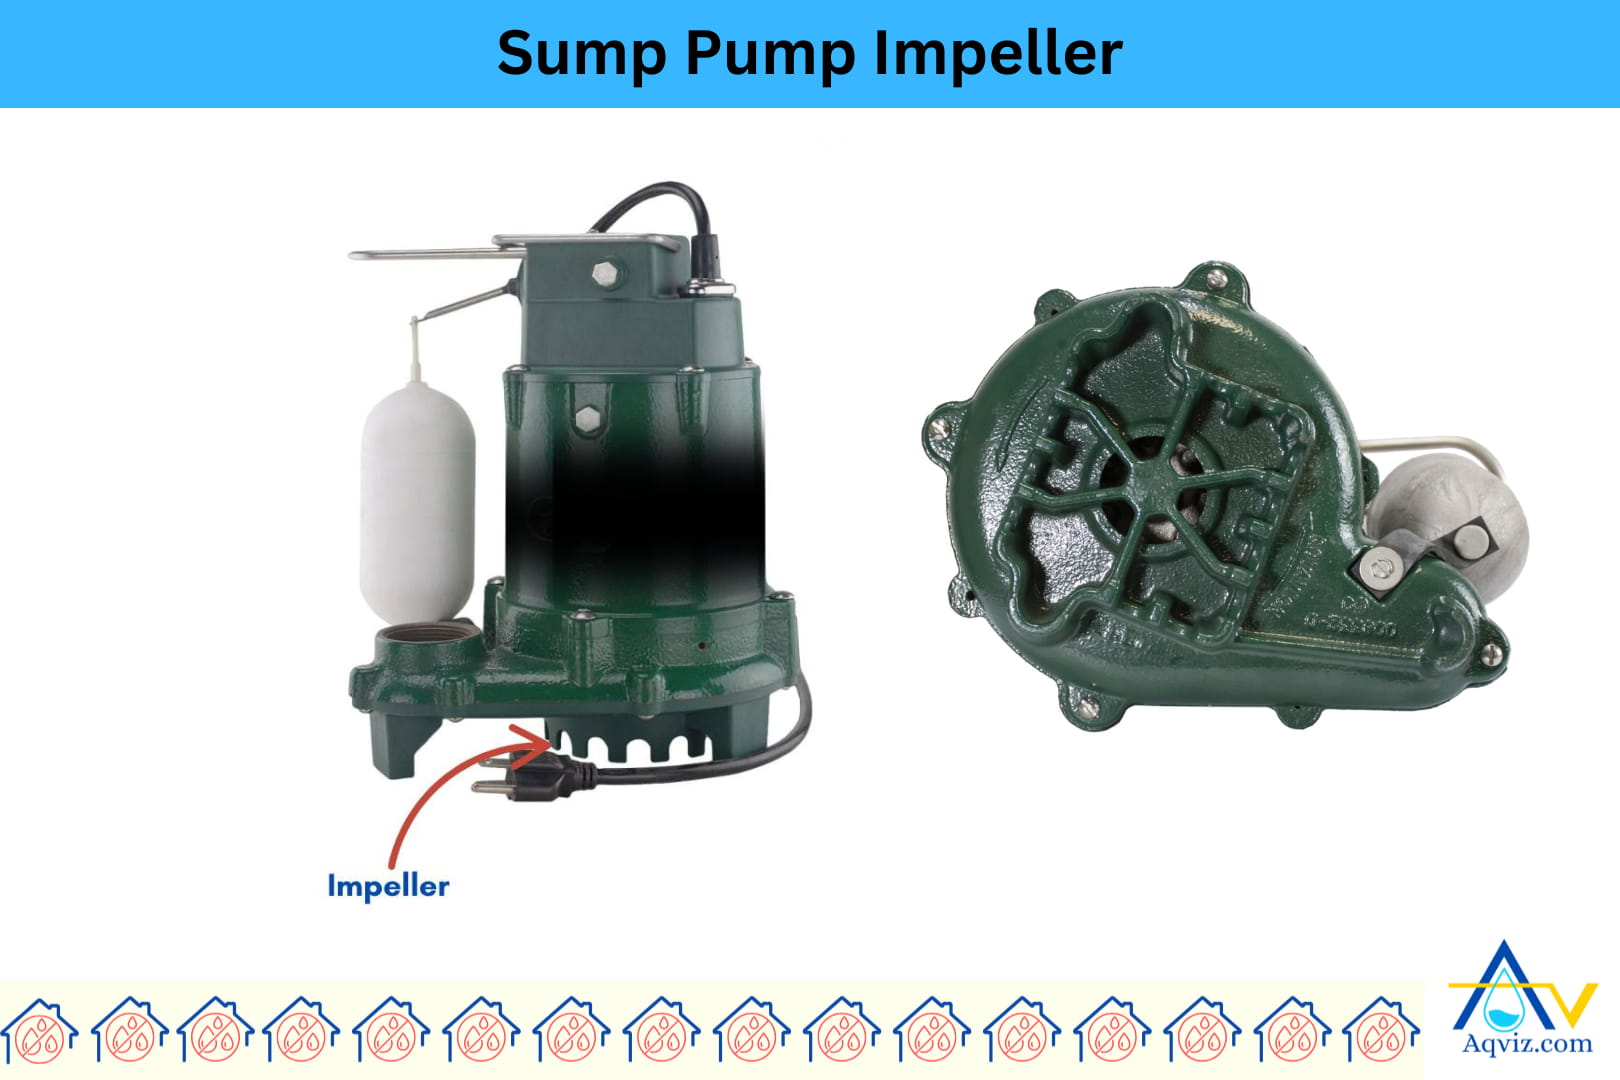
2. Sump Pump Impeller
The sump pump impeller is a rotating blade or fan-like component inside the pump housing that creates centrifugal force to move water through the discharge line. It spins rapidly when the sump pump motor runs, drawing water in through the intake and forcing it outward under pressure.
The impeller helps increase pumping speed and improves water flow efficiency. A durable, clog-resistant sump pump impeller is important for handling small debris and preventing jams. Replacing a worn or damaged sump pump impeller helps restore full pump performance, decrease motor strain, and maintain consistent water removal from the sump pit.
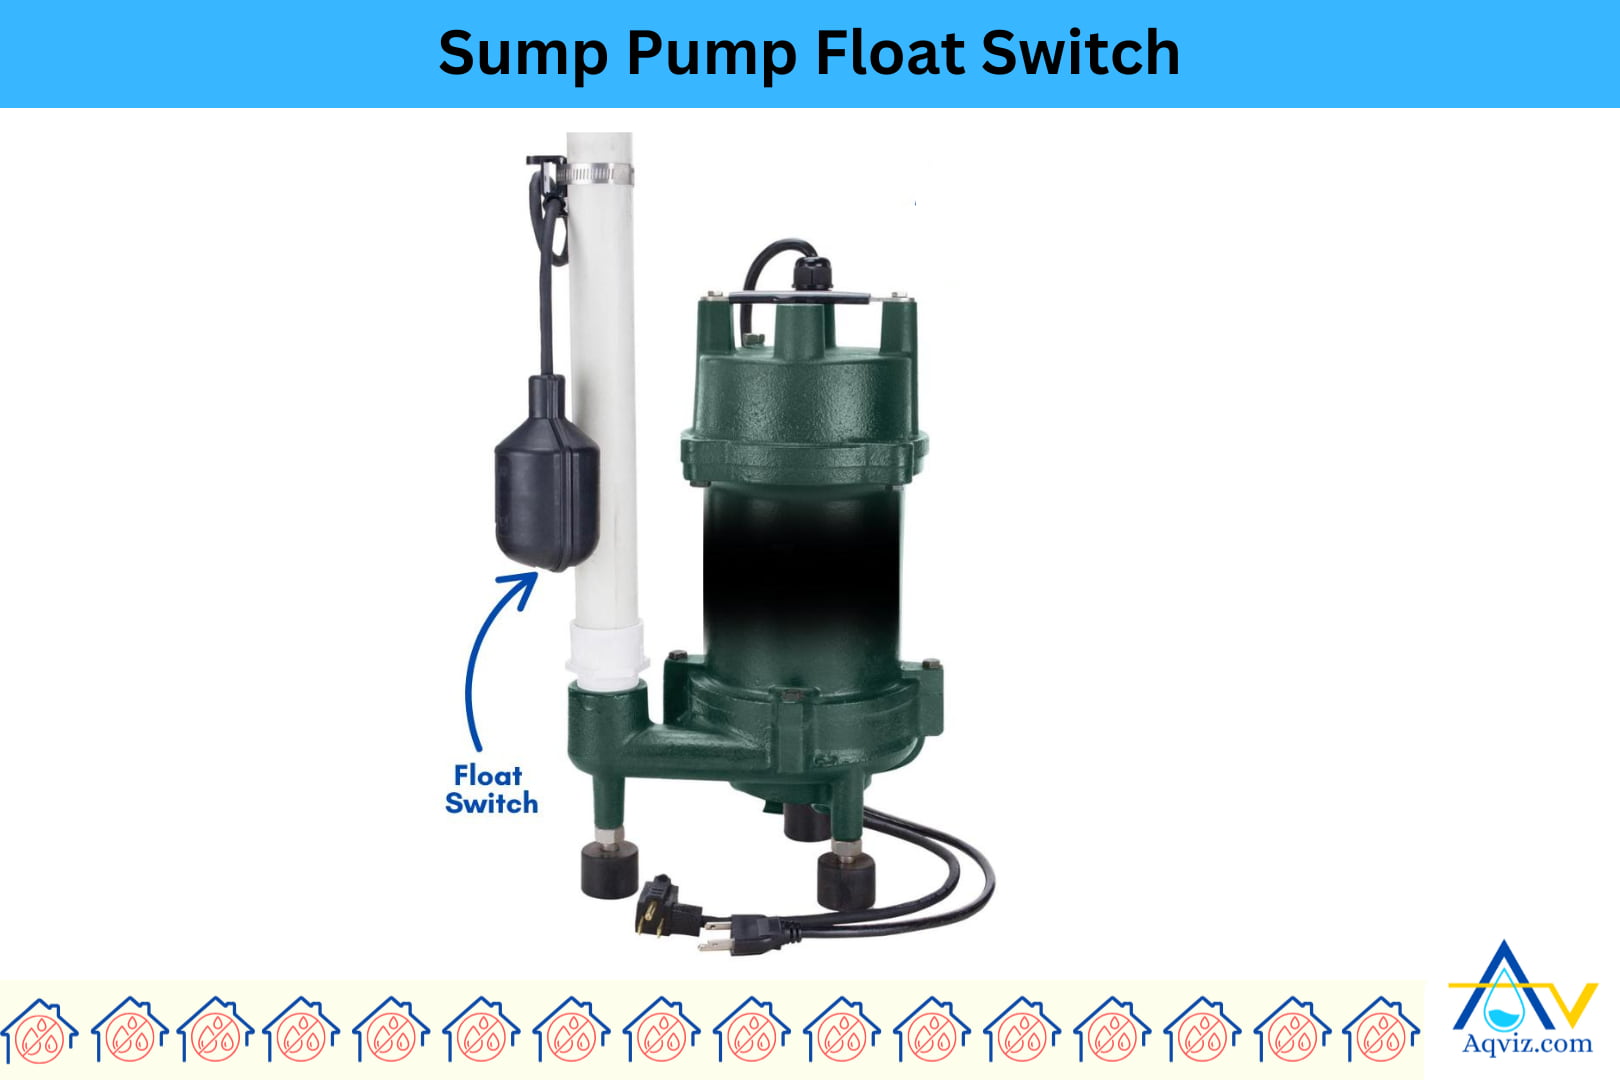
3. Sump Pump Float Switch
The sump pump float switch is a water level sensor that turns the sump pump on and off automatically based on the rising and falling water in the sump pit. As water rises, the float lifts and activates the switch to start the pump; when the water drops, it lowers to shut the pump off.
The float switch helps prevent overflow, reduce manual intervention, and protect the motor from dry running. It’s important for safe, automatic operation. Using a reliable tethered or vertical float switch improves response time, decreases failure risk, and ensures the sump pump system runs only when needed.
4. Power Cord
The power cord is the electrical cable that connects the sump pump motor to a power source, supplying the necessary voltage for operation. It is typically plugged into a GFCI-protected outlet to ensure safe and reliable power flow in wet environments.
A durable sump pump power cord helps prevent electrical shorts, withstands moisture exposure, and resists cracking or fraying over time. Using the correct cord length and gauge improves safety and decreases voltage drop. Regular inspection and tight, secure connections are important to ensure the sump pump runs efficiently without interruption or power failure.
5. Sump Pump Housing
The pump housing is the outer casing that encloses and protects the internal components of the sump pump, including the motor, impeller, and seals. It is typically made from cast iron, thermoplastic, or stainless steel, depending on the pump type and application.
A strong and durable sump pump housing helps withstand water pressure, resist corrosion, and cool the motor during operation. Quality housing improves overall pump performance, decreases vibration, and protects against mechanical damage. Choosing a non-corrosive, impact-resistant housing is important for long-term reliability, especially in high-moisture or debris-heavy sump pits.
6. Sump Pump Discharge Pipe
The sump pump discharge pipe is the outlet line that carries water from the sump pump to a designated drainage point outside the home. It’s typically made of 1½-inch or 2-inch PVC pipe, designed to handle high water flow under pressure.
A properly installed discharge pipe helps pump out water quickly, prevents backups, and directs flow away from the foundation. Using the correct pipe diameter and maintaining a consistent slope improves drainage efficiency and decreases the risk of clogs or freeze-ups. A tight, leak-free connection is important to ensure the sump pump system works effectively during heavy inflow.
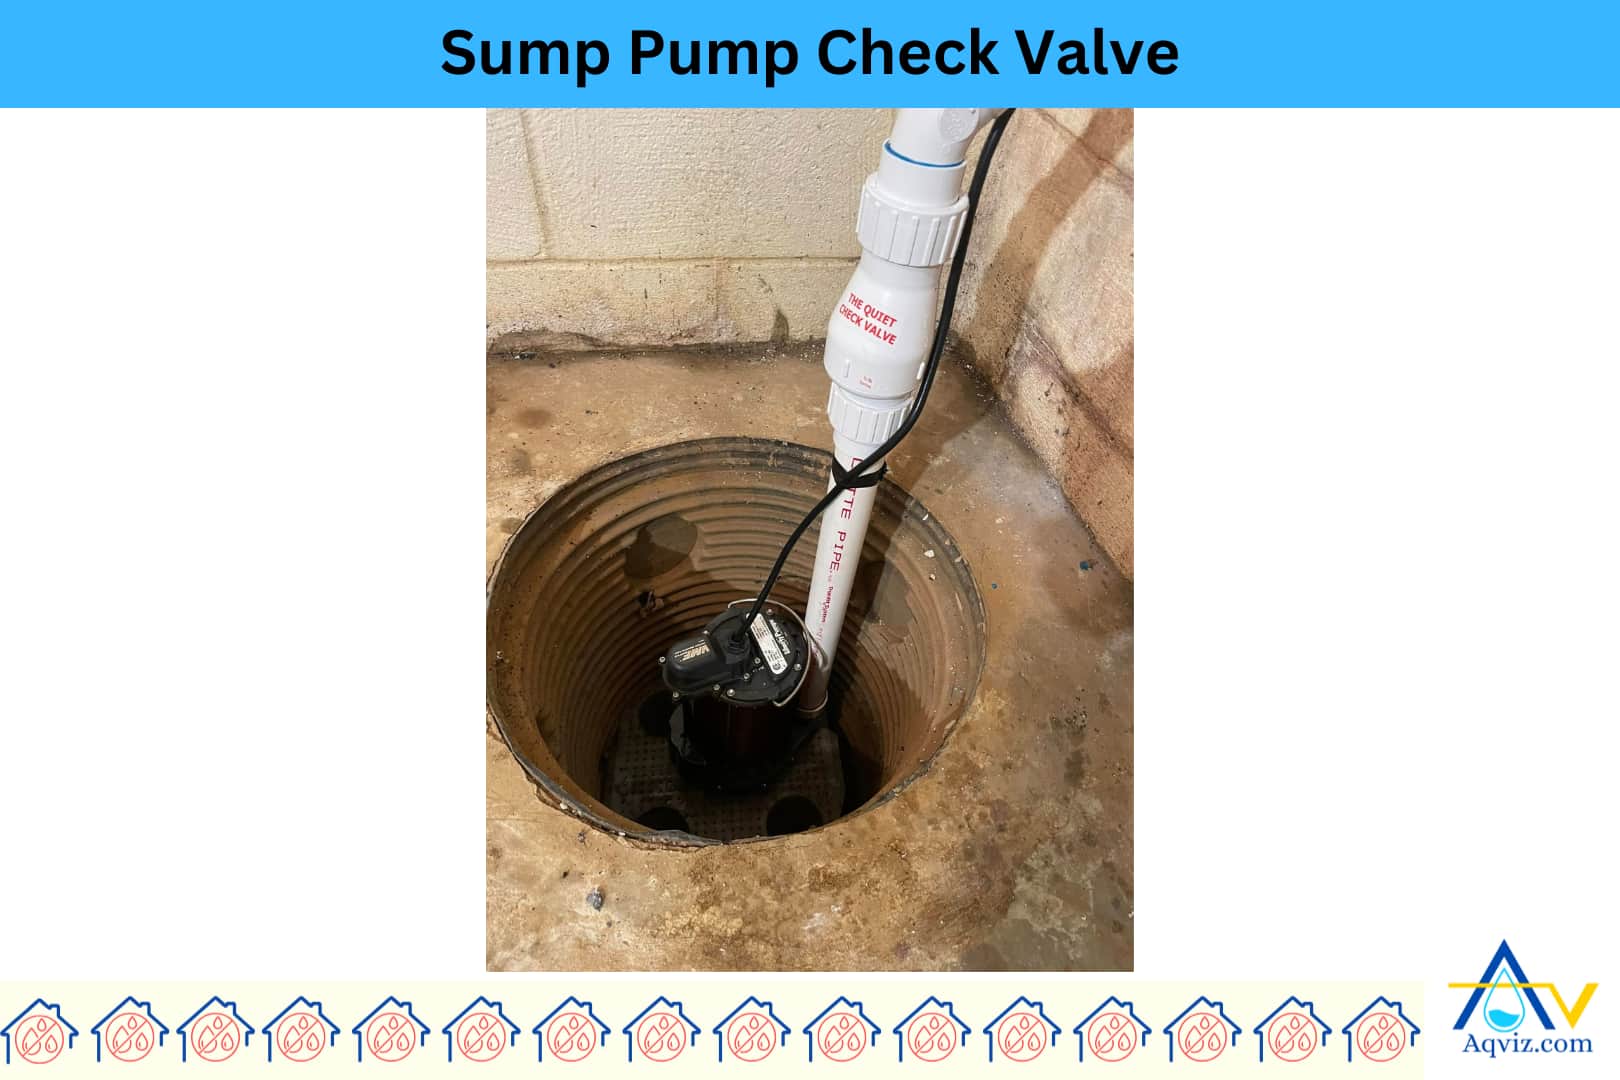
7. Sump Pump Check Valve
The sump pump check valve is a one-way valve installed on the discharge pipe that prevents water from flowing back into the sump pit after it’s been pumped out. It automatically closes when the sump pump shuts off, stopping backflow and reducing strain on the motor.
A properly functioning check valve helps improve pumping efficiency, decrease unnecessary cycling, and protect the system from pressure surges. It’s important to install the sump pump check valve tightly and in the correct direction. Using a durable, corrosion-resistant valve is best for long-term performance and flood prevention.
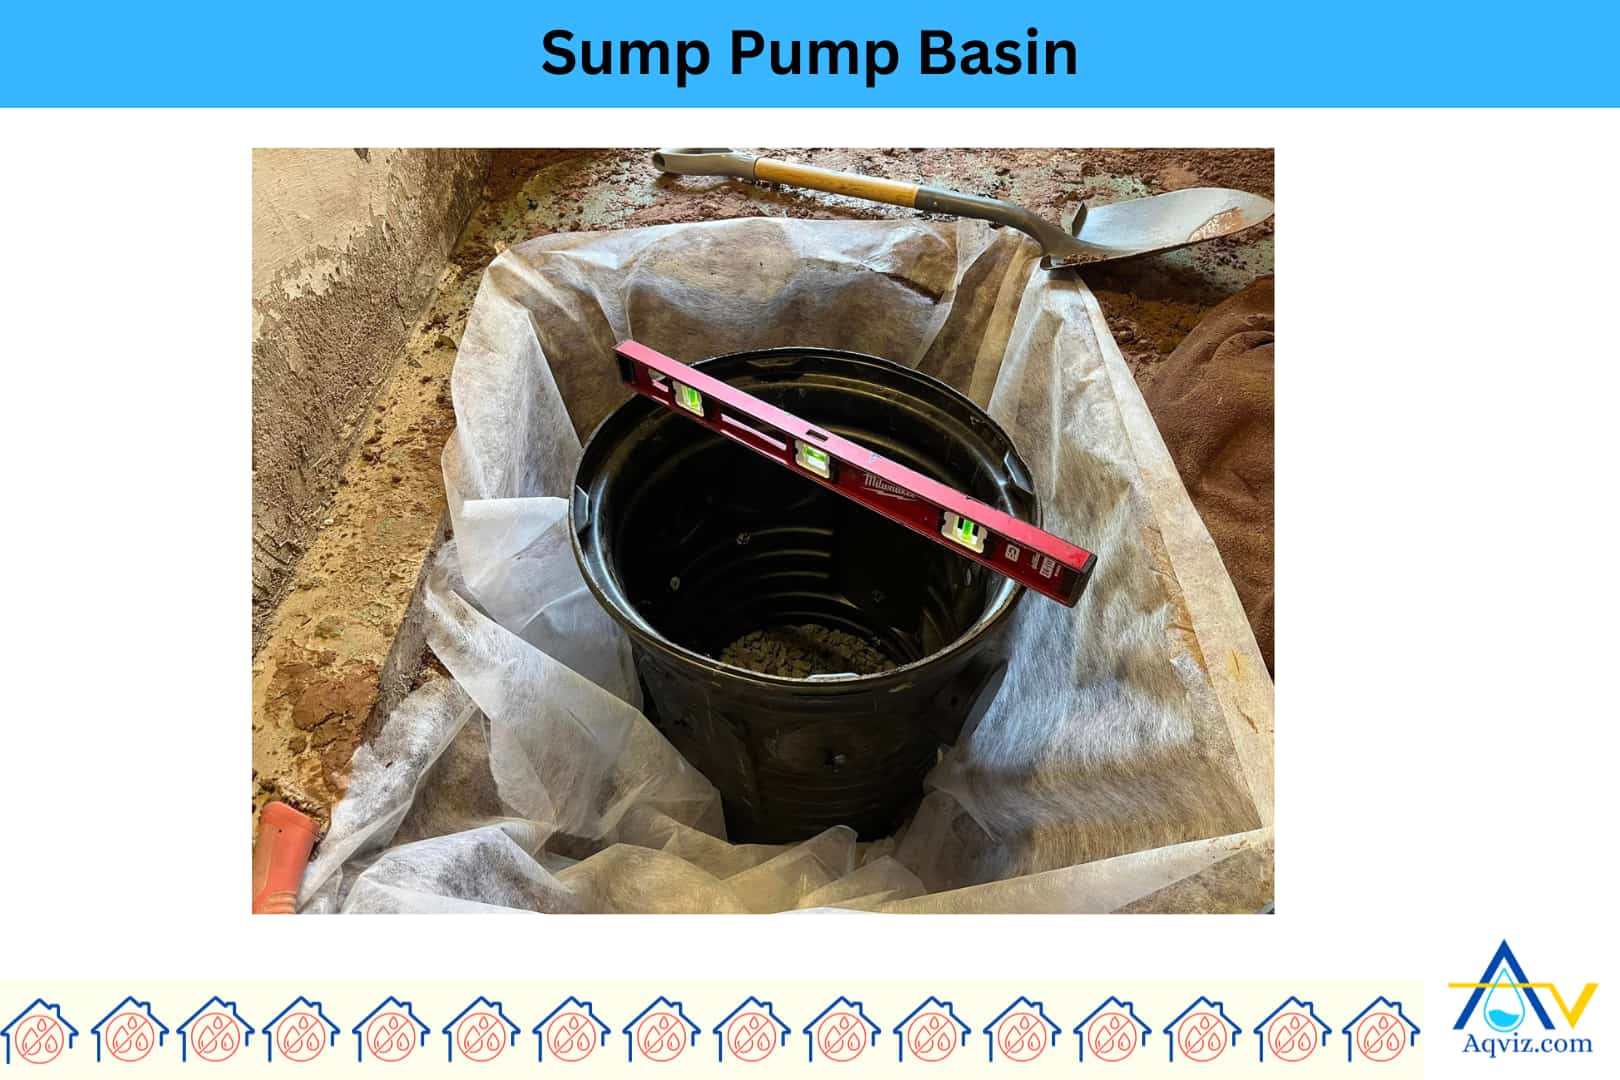
8. Sump Pit/Basin
The sump pit or basin is the underground reservoir that collects groundwater or excess moisture from drainage systems before it’s pumped out by the sump pump. It’s usually made of heavy-duty plastic, fiberglass, or concrete, with a typical size of 18-24 inches wide and 24-36 inches deep.
A properly sized and installed sump pit helps contain water efficiently, prevent flooding, and provide enough space for float operation and backup systems. A sealed, durable basin improves pump performance, decreases debris buildup, and increases the lifespan of the sump pump system. It’s important to place the basin at the lowest point in the foundation for maximum drainage.
Read More About: How to Install a Sump Pump?
9. Intake Screen/Grate
The intake screen or grate is a filtering component located at the base of the sump pump, designed to prevent large debris, gravel, and sediment from entering the pump housing and damaging internal parts like the impeller.
A clean and secure intake screen helps improve water flow, decrease the risk of clogs, and protect the sump pump motor from overworking. It’s important for extending pump life and maintaining efficient operation. Regularly inspecting and cleaning the sump pump grate ensures the system runs smoothly and continues to pump out water without interruption.
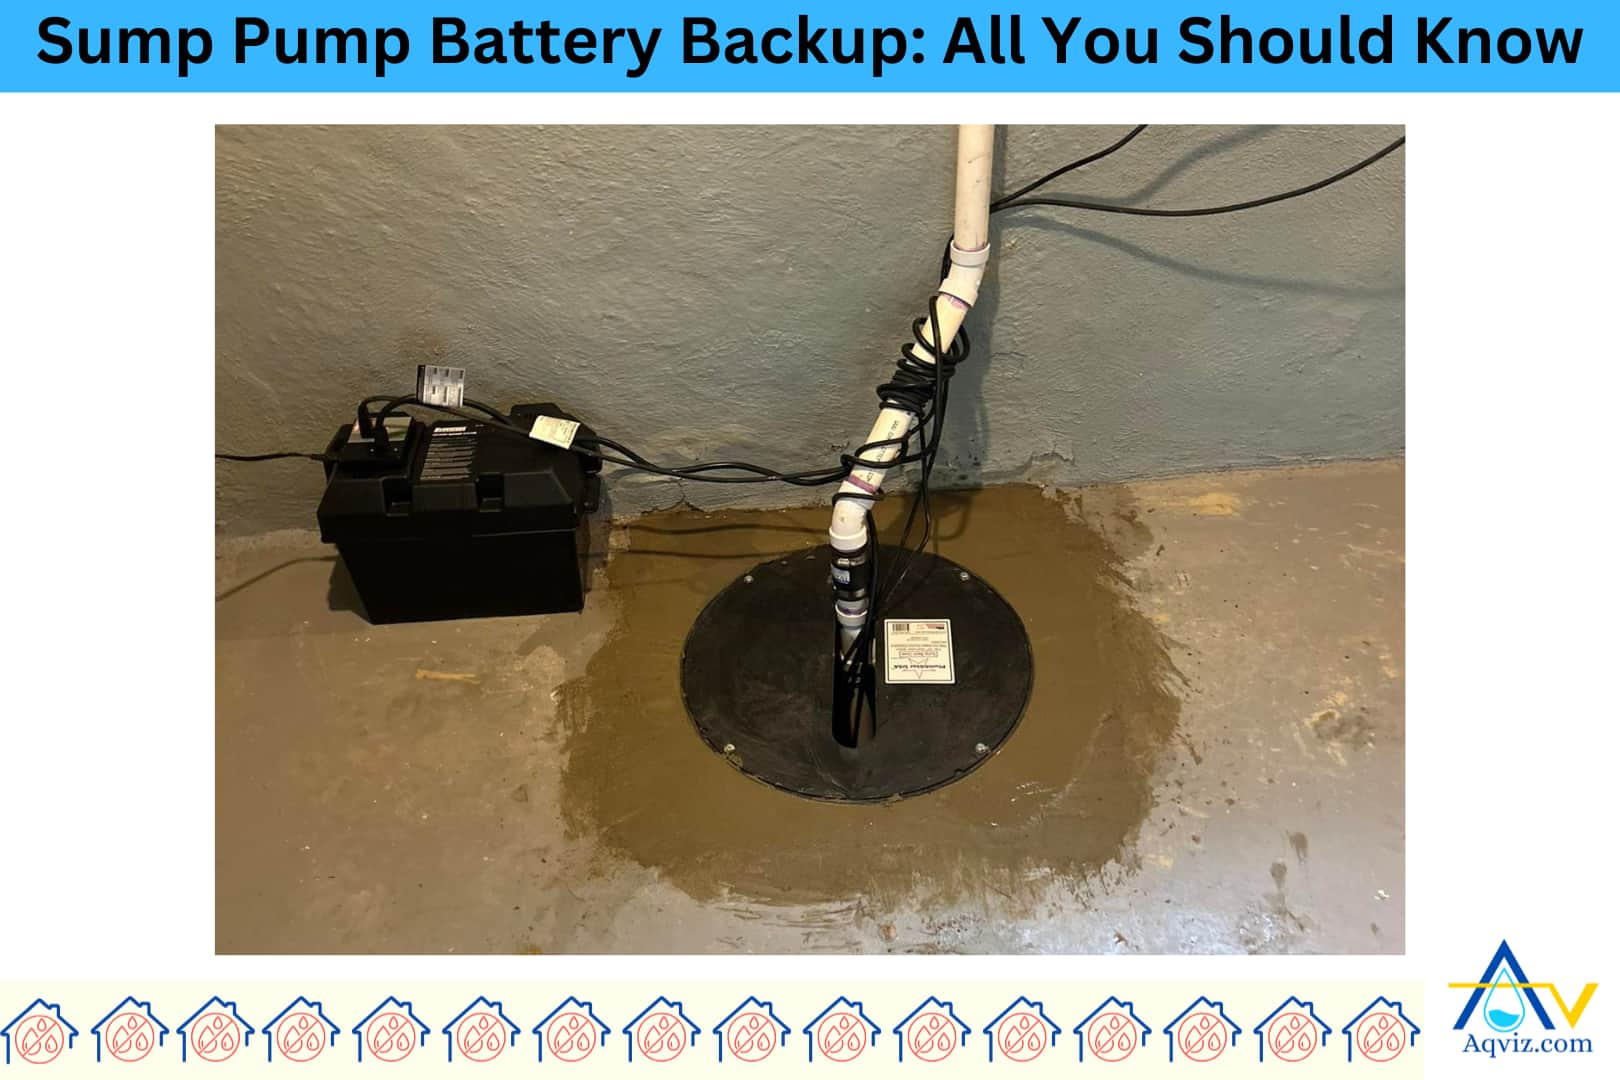
10. Sump Pump Battery Backup (optional)
The sump pump battery backup is an auxiliary power system that activates the sump pump during a power outage or main pump failure. It typically includes a deep-cycle battery, charger, and controller to keep the pump running when electrical service is lost.
A reliable battery backup system helps prevent basement flooding during storms, improve emergency drainage, and provide peace of mind when you’re away. It’s best for homes in flood-prone areas or where power outages are common. Installing a sump pump battery backup decreases water damage risks and ensures continuous operation when the main system goes offline.
11. Sump Pump Alarm System (optional)
The sump pump alarm system is an alert device that notifies homeowners when the water level in the sump pit rises too high or when the sump pump fails to activate. It typically includes a sensor, control panel, and audible or visual alerts.
An installed alarm system helps detect problems early, prevent overflow, and reduce the risk of unnoticed water damage. It’s good for remote monitoring and adds an extra layer of protection. Using a sump pump alarm system improves response time, increases awareness, and is especially important in finished basements or rental properties.
12. Seals and Gaskets
Seals and gaskets are critical components inside the sump pump that create watertight barriers between the motor, housing, and impeller sections. These parts prevent water from leaking into the motor compartment and protect internal electrical components from moisture damage.
Durable sump pump seals and gaskets help improve system longevity, decrease the risk of electrical failure, and maintain safe pump operation under pressure. Over time, worn or cracked seals can lead to internal leaks and motor burnout. Replacing damaged sump pump gaskets promptly helps restore performance and ensures the pump remains tight, efficient, and leak-free.
13. Mounting Bracket (for pedestal pumps)
The mounting bracket is a structural support used primarily in pedestal sump pumps to secure the pump motor above the sump pit while keeping the pump shaft aligned and stable inside the basin. It anchors the unit to the floor or pump stand for balanced operation.
A strong sump pump mounting bracket helps reduce vibration, improve stability, and ensure the motor stays upright during extended operation. Using a durable, rust-resistant bracket is important for long-term reliability. Tight and proper installation of the mounting bracket increases pump efficiency and prevents mechanical stress on the motor and float components.
14. Vent Hole (weeping hole)
The vent hole, also known as a weep hole or air relief hole, is a small hole drilled into the sump pump discharge pipe, just above the pump’s check valve. Its main function is to release trapped air and prevent airlock, which can stop the sump pump from pumping water.
A properly placed vent hole helps improve pump priming, decrease startup resistance, and ensure consistent water flow. It’s important for submersible pumps where air can build up inside the housing. Maintaining a clear sump pump vent hole increases system reliability and prevents dry running or motor strain caused by trapped air pockets.
15. Control Panel (for advanced systems)
The control panel is the central command unit in advanced sump pump systems, especially dual-pump or commercial setups. It manages pump operation, monitors water levels, switches between primary and backup pumps, and often includes alarms, indicators, and diagnostic functions.
A smart sump pump control panel helps improve system performance, increase automation, and prevent failures by detecting problems early. It’s best for high-demand or critical drainage areas. Installing a reliable control panel ensures precise pump cycling, reduces manual monitoring, and supports integration with battery backup and alarm systems for full sump pump control.
16. Thermal Overload Protector
The thermal overload protector is a built-in safety device that automatically shuts off the sump pump motor when it overheats due to excessive use, mechanical blockage, or electrical faults. It resets the motor once it cools down, protecting the pump from permanent damage.
A reliable sump pump thermal overload protector helps prevent motor burnout, decrease fire risk, and extend the life of the pump. It’s especially important during continuous operation or high water inflow. Choosing a sump pump with overload protection is best for safety, durability, and dependable performance under heavy-duty conditions.
17. Base Plate/Stand
The base plate or stand is the supporting platform at the bottom of the sump pump, designed to elevate the pump slightly above the pit floor. It helps stabilize the sump pump, keeps it level, and prevents debris from being sucked into the intake.
A strong sump pump base plate helps improve flow efficiency, decrease clogging, and protect the impeller from sediment damage. It’s important for maintaining proper water clearance beneath the pump. Using a corrosion-resistant pump stand ensures long-term durability and supports reliable performance in dirty or gravel-lined sump pits.
18. Guide Rail System (commercial setups)
The guide rail system is a metal track assembly used in commercial or heavy-duty sump pump installations to lower and raise the submersible sump pump without disconnecting piping. It keeps the pump aligned and allows for easy removal during maintenance or replacement.
A well-installed guide rail system helps improve safety, decrease service time, and prevent misalignment during operation. It’s best for deep or high-volume sump pits where regular inspection is needed. Using a durable, rust-resistant sump pump guide rail system ensures smooth movement, tight sealing with the discharge connection, and efficient pump servicing in demanding environments.
19. Anti-Airlock Hole
The anti-airlock hole, also called a bleed hole or vent relief hole, is a small opening drilled into the sump pump discharge pipe just above the pump’s impeller or check valve. Its purpose is to release trapped air that could prevent the sump pump from creating enough suction to move water.
A properly placed anti-airlock hole helps improve pump startup, decrease the chance of airlock, and ensure smooth water flow. It’s especially important in submersible pumps where air pockets form easily. Drilling and maintaining a clear anti-airlock hole increases pumping efficiency and protects the motor from dry running or strain.
20. Sump Pump Float Arm
The sump pump float arm is the mechanical lever that connects the float to the switch in many tethered or vertical float switch designs. As the water level rises in the pit, the float lifts the arm, which in turn activates the sump pump.
A properly functioning float arm helps ensure accurate switch control, improve pump activation timing, and prevent short cycling or dry running. It’s important to keep the sump pump float arm free of obstructions and properly aligned. A durable, rust-resistant float arm increases switch reliability and supports smooth, uninterrupted pump performance.
How to Install a Sump Pump?
You should follow the step-by-step guide to install a sump pump in the basement or crawlspace.
- Gather relevant tools and materials for sump pump installation
- Identify the lowest point for sump pump installation
- Mark and dig the sump pit
- Install the sump basin (liner)
- Backfill around the sump basin
- Place the sump pump
- Connect the sump pump discharge pipe
- Route sump pump discharge pipe out of the home
- Seal and restore the floor
- Test and power the sump pump system