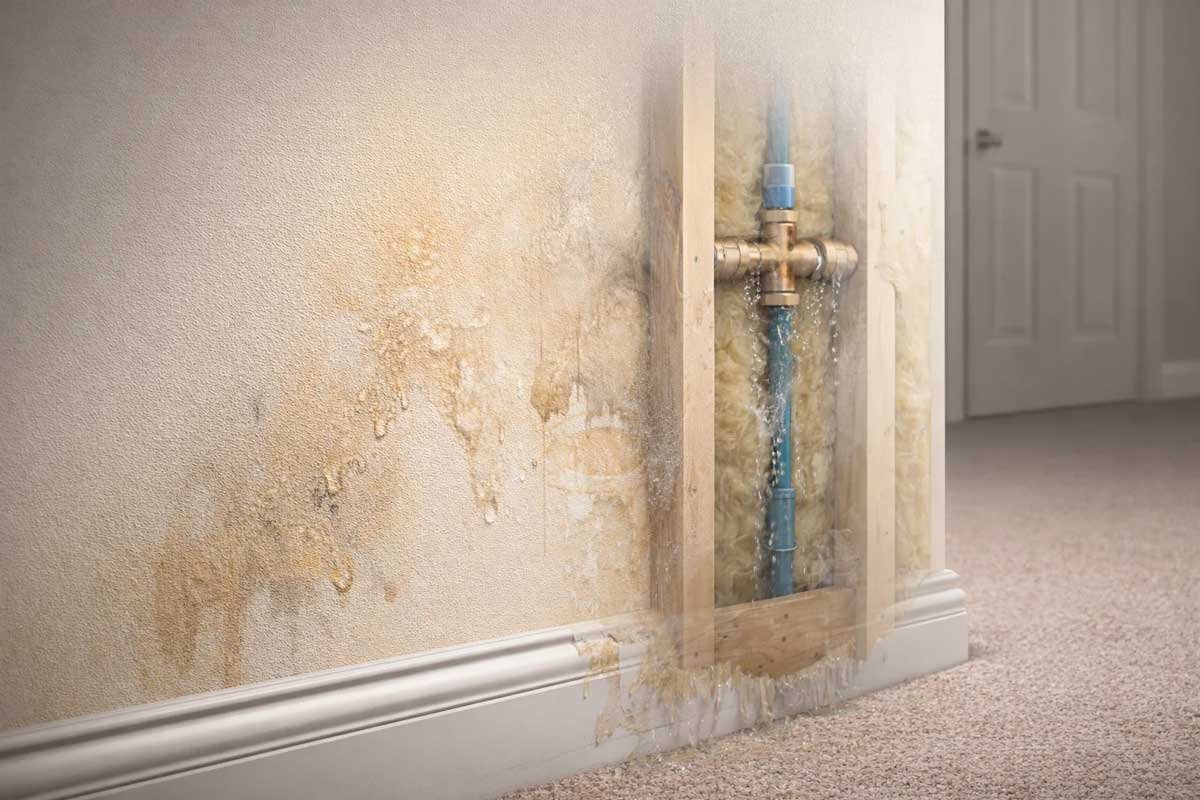

A waterproofing system can only do its job when the building stays dry from both sides. Many homeowners focus on rain, groundwater, roof runoff, and basement seepage, but some of the most damaging moisture problems begin inside the home. A slow pipe leak behind a wall, a loose fixture connection under a sink, or a water heater drip in a utility room can quietly soak building materials long before the problem is visible.
Interior leaks are especially important because they can confuse the diagnosis of a waterproofing failure. A wet patch near a foundation wall may look like exterior seepage, while the real source is a supply line, drain line, appliance hose, or fixture above it. Good waterproofing therefore starts with one practical habit: confirm where the water is coming from before repairing the surface damage.
Why Small Plumbing Leaks Become Big Moisture Problems
Waterproofing protects a structure by controlling where water can travel. Plumbing leaks break that control from the inside. Even a small drip can keep drywall, wood framing, subflooring, insulation, and concrete surfaces damp for long periods. Once materials stay wet, stains, odors, swelling, paint bubbling, mold growth, and corrosion can follow.
The U.S. Environmental Protection Agency notes that household leaks can waste nearly 1 trillion gallons of water nationwide each year, a useful reminder that “minor” leaks are rarely harmless when they continue day after day. The EPA’s WaterSense program also points to common leak sources such as worn toilet flappers, dripping faucets, leaking showerheads, and fixture connections. These are simple areas to inspect, but they are often ignored until a water bill rises or visible damage appears.
For a waterproofing inspection, this matters because the moisture path may travel far from the leak. Water can run along pipes, framing, tile backer board, or the underside of flooring before showing up in a different room. That is why a stain on a lower wall or ceiling should not be treated as an isolated cosmetic issue.
Common Interior Leak Sources That Affect Waterproofing
Bathrooms, kitchens, laundry rooms, and mechanical spaces deserve close attention because they combine water supply lines, drains, valves, fixtures, and waterproof finishes. A tiled shower may look sealed from the outside, but damaged grout, a failed drain connection, or a leaking valve body can send water into the wall cavity. Under a kitchen sink, small leaks around shutoff valves and P-trap connections can soak cabinets and floors. Laundry hoses can weaken with age, and water heaters may produce slow leaks around fittings before failing more dramatically.
Basements and crawl spaces are also vulnerable. A damp basement is often blamed on the outside wall, but the cause may be a condensate line, a sweating pipe, a leaking water main, or a drain backup. In crawl spaces, plumbing leaks can raise humidity, wet the subfloor, and create conditions that make the rest of the building feel musty.
The most reliable approach is to inspect plumbing and waterproofing together. If the wall is wet, check what pipes, fixtures, appliances, and drains are nearby. If the floor is damp, inspect above and below it when possible. If the water appears after using a shower, sink, washing machine, or dishwasher, the timing itself is a useful clue.
How to Separate Plumbing Leaks From Waterproofing Failures
Start with pattern recognition. Exterior seepage often appears after rain, snowmelt, poor drainage, or high groundwater. Interior plumbing leaks may appear during or after fixture use, while pressure-line leaks may remain active even in dry weather. Condensation usually forms on cold surfaces in humid conditions, while drain leaks often appear only when water is flowing through the fixture.
A simple water meter check can also help. Turn off all faucets, appliances, irrigation, and water-using equipment, then watch the meter. Movement may suggest a leak somewhere in the supply system. This does not identify the exact location, but it tells you whether further plumbing inspection is needed.
Homeowners should also look for secondary clues: warm spots on floors near hot water lines, loose tiles near showers, swelling baseboards, mildew odors, peeling paint, soft drywall, unexplained low water pressure, or recurring dampness after previous repairs. Moisture meters and thermal imaging can help professionals narrow the search without opening large areas unnecessarily.
For more serious or persistent leaks, it is worth bringing in a licensed plumber before waterproofing repairs begin. A leak detection and pipe repair specialist can confirm whether the water source is active, hidden, or connected to the drainage system; according to Anytime Plumbing, Inc., pipework repairs, sewer line repairs, water heater service, drain cleaning, and same-day emergency plumbing support are all part of preventing small plumbing issues from becoming larger property problems.
Waterproofing Repairs Should Address the Cause, Not Just the Stain
After the leak source is confirmed, the repair sequence matters. First stop the water. Then remove or dry wet materials according to the severity of the damage. Finally, restore waterproofing layers, sealants, finishes, and protective coatings. Skipping the first step leads to repeated failure, because new paint, grout, caulk, membrane, or patching compound cannot perform well if moisture is still entering from behind.
Building Science Corporation’s guidance on interior water management explains that plumbing and occupant use are potential sources of liquid water inside buildings, not just exterior rain or groundwater. That idea is important for homeowners because it broadens the inspection. A good waterproofing plan looks at exterior drainage, wall assemblies, foundations, roofing, ventilation, and plumbing systems as connected parts of the same moisture-control strategy.
In practical terms, a bathroom wall leak may require both plumbing repair and renewed waterproofing behind tile. A basement wet spot may require pipe repair plus better drainage or vapor control. A damaged laundry room floor may require replacing a hose connection, drying the subfloor, and restoring a waterproof floor finish.
Preventive Habits That Protect the Building Envelope
Routine checks reduce the chance of hidden water damage. Inspect under sinks every month, especially around valves and drain joints. Look behind toilets for floor discoloration or movement. Replace aging washing machine hoses before they crack. Keep access panels available for tubs, showers, and mechanical equipment. Watch water bills for unusual increases. Test sump pumps before storm season. Keep gutters and downspouts clear so exterior water is not mistaken for interior leakage.
It also helps to document repairs. If a plumber fixes a leaking pipe or replaces a water heater, keep the date, location, and notes. If a waterproofing contractor repairs a wall or installs a membrane, keep photos of the area before it is covered. These records make future diagnosis faster because they show what has already been corrected.
Waterproofing is not only about blocking water from outside the building. It is about managing every route water can take through a structure. Hidden plumbing leaks are one of the easiest routes to overlook, but they are also one of the most preventable. By checking plumbing sources early, confirming the real cause of dampness, and repairing moisture-control layers properly, homeowners can protect both the waterproofing system and the structure it is meant to preserve.