

According to PMI Little Town team, inspecting a roof for storm damage begins on the ground, not on the roof. Walk the perimeter of the house with a camera or a phone. Photograph every roof slope from multiple angles. This guide covers how to inspect roof storm damage in four steps — ground inspection, attic check, roof-level assessment, and insurance documentation.
Do not climb onto a roof that is wet, steep, damaged, or covered in debris. A fall from a roof is not worth a closer look at storm damage. The roof-level inspection described below can be performed safely from a ladder at the gutter line, with binoculars from the ground, or by a professional roofing contractor. If you are not comfortable on a ladder, hire the professional. The inspection costs $150 to $400. The fall from the roof costs whatever the hospital charges. The professional inspection is cheaper. Here is how to inspect storm damage safely and thoroughly.
Step 1: Ground-Level Inspection
Photograph everything before you touch anything. Walk the entire perimeter of the house. Photograph every roof slope from at least two angles. Photograph the gutters and downspouts — hail damage leaves visible impact marks on aluminum and galvanized steel. Photograph the siding — hail cracks vinyl and dents aluminum. Photograph the window screens and exterior light fixtures, hail dents and tears are visible. Photograph any debris on the ground: shingle fragments, pieces of shingle mat, granules in the driveway. The photos are time-stamped evidence of storm damage.
Check the air conditioning condenser. The fins on the outdoor condenser coil are soft aluminum. Hail impact leaves visible dents. A dented condenser is collateral evidence that hail of sufficient size and force struck the property. Photograph the dents from multiple angles with a coin, a quarter or a half-dollar, held next to the dents for scale. The adjuster will look at the condenser. The dents on the condenser corroborate the dents on the gutters and the impact marks on the shingles.
Collect representative hailstones if it is safe to go outside during or immediately after the storm. Place them next to a coin and photograph them. The hailstones will melt or shrink within hours. The photo is time-stamped evidence of hail size at the time of the storm. This is the single most persuasive piece of evidence in a hail claim. The hailstone is the smoking gun. The photo of the hailstone next to a coin is the proof.
Step 2: Attic Inspection
Go into the attic with a flashlight. Look at the underside of the roof deck. Water stains, darkened areas around nails, white mineral deposits where water evaporated, and damp insulation are all signs that water penetrated the roof during or after the storm. Mark any wet or stained areas with tape or chalk so you can show the adjuster exactly where the water entered. Photograph everything. A wet attic the day after a storm is evidence of storm-caused damage. A wet attic discovered two weeks later could be storm damage or could be a pre-existing leak. The timing of the inspection relative to the storm is part of the evidence.
Look for daylight through the roof deck. Turn off the attic light. If you can see pinpoints or shafts of daylight through the roof boards, the decking is compromised. Small holes around nail pops are common and repairable. Gaps wide enough to fit a pencil tip indicate decking failure, the plywood has cracked or delaminated. Daylight is a direct path for water. The hole that lets light through lets water through. Mark the location from inside the attic so the contractor or adjuster can find it from above.
The National Roofing Contractors Association (NRCA) recommends that homeowners obtain an independent roof assessment after a major storm rather than relying solely on the insurance company’s adjuster. An independent roofing contractor can identify storm damage that a non-specialist adjuster might miss and can be present during the adjuster’s inspection to point out specific areas of concern.
Step 3: Roof-Level Inspection (from a Ladder or with Binoculars)
Check the ridge cap first. The shingles that cover the peak of the roof are struck by hail at a near-perpendicular angle and often show the most severe damage on the entire roof. The ridge cap is also the most visible area from the ground and the easiest for an adjuster to access. Damage to the ridge cap is strong evidence that the entire roof was struck. Look for missing shingles, cracked shingles, impact marks, and granule loss.
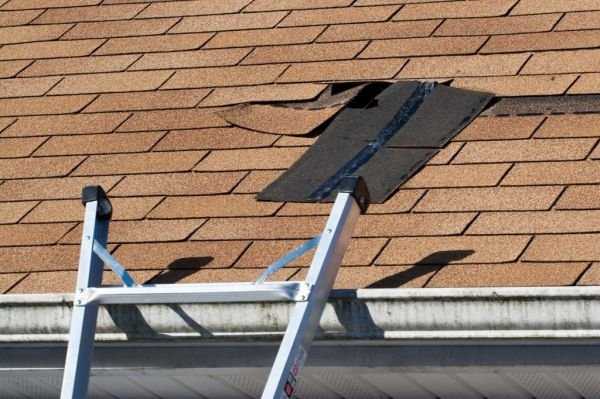
Look for missing, lifted, or creased shingles. Wind damage lifts shingles from the edges and corners. The sealant strip that bonds the shingle to the course below it breaks. The shingle may flap and reseat itself after the storm, appearing undamaged from the ground. Look for shingles that are not lying flat, the edges are lifted, the corners are curled, or the shingle has a visible crease where it folded back during the wind event. A creased shingle has been permanently damaged. The crease is a weak point that will eventually crack and leak.
Look for hail strikes, random, circular impact marks. Hail damage on asphalt shingles appears as dark, circular or oval-shaped marks where the granules have been knocked off, exposing the black asphalt underneath. The marks are random in distribution, they do not follow a pattern. They are concentrated on the slopes that faced the storm. Run your hand gently over the shingle surface, a hail impact that compressed the shingle mat feels like a soft, indented spot. Press on it. The undamaged shingle feels firm. The bruised area feels slightly spongy. The bruise is damage even if the granules are still in place. The mat is compressed. The shingle’s structural integrity is reduced. The bruise will eventually become a crack.
Check flashing and roof penetrations. Vent pipes, plumbing stacks, skylight frames, chimney caps, and attic fan housings should be inspected for impact marks, dents, cracks, or broken seals. Hail that cracks a plumbing vent boot creates a leak that may not be immediately visible from inside the attic. Wind that lifts the flashing around a chimney breaks the sealant bond. The flashing may look intact. The seal is broken. Water will enter at the next rain. The flashing is the most common leak point on a roof. Storm damage to flashing is the most common overlooked damage in a storm inspection.
Step 4: Documentation for Insurance
Compile your evidence before calling the insurance company. Organize your photos by category: ground-level damage, roof-level damage, soft-metal damage, attic moisture, and hailstone photos with scale. Create a written list of every damaged item with approximate measurements and photo references. The adjuster will review your documentation. The more organized it is, the more credible it is. The adjuster is evaluating the evidence. The quality of the evidence influences the outcome of the claim.
Get the storm report. The National Weather Service publishes storm reports documenting hail size, wind speed, and storm track. Search the NWS database for your address and the date of the storm. The storm report is independent verification that a storm event occurred. The insurance company will access this data. Having it in hand when you file the claim demonstrates preparation. The adjuster is more likely to approve a well-documented claim than a vague one.
Do not make permanent repairs before the adjuster completes the inspection. Tarp any active leaks. Do not replace shingles. Do not repair dents. The adjuster needs to see the damage as the storm left it. A repaired roof is a roof that was never damaged, as far as the insurance company is concerned. The tarp is removable. The new shingle is not. Wait for the adjuster. The claim depends on it.
Frequently Asked Questions
How soon after a storm should I inspect my roof?
Inspect from the ground immediately, photograph hailstones, debris, and dents before they disappear. Schedule a professional roof inspection within 48 hours. The closer the inspection is to the storm date, the stronger the causal link between the storm and the damage. A roof inspection performed months later cannot reliably attribute damage to a specific storm.
Can I inspect storm damage myself or do I need a professional?
You can perform the ground-level and attic inspection yourself. The roof-level inspection, walking the roof surface, identifying bruises, distinguishing hail damage from blister pops and normal wear, requires experience. Hire a professional roofing contractor for the roof-level inspection. The cost, $150 to $400, is reimbursable as part of the insurance claim if the claim is approved.
What does hail damage look like on a roof?
Hail damage appears as random, dark, circular impact marks where the granules are knocked off, exposing the black asphalt. The shingle may also have a bruise, a soft, indented spot where the hailstone compressed the mat. Collateral damage on soft metal, gutters, downspouts, AC fins, is definitive evidence of hail impact.
What does wind damage look like on a roof?
Wind damage appears as lifted, creased, or missing shingles concentrated along the edges and corners of the roof. The shingles may have a visible crease where they folded back. The sealant strip between courses may be broken, the shingle lifts easily when gently tested. Wind damage is directional, concentrated on the slopes that faced the wind.
When should I file an insurance claim for storm damage?
File a claim if the estimated repair cost exceeds your wind and hail deductible. Most policies have a separate deductible of 1% to 2% of the home’s insured value. If the damage is below the deductible, pay for the repair out of pocket. Filing a claim that pays nothing still counts against your claims history.
What if my insurance company denies my storm damage claim?
Request the denial in writing with specific reasons. Get a second opinion from an independent roofing contractor. If the contractor’s assessment differs significantly from the adjuster’s, request a re-inspection with the contractor present. A public adjuster, who works for you, not the insurance company, can be hired on contingency for 10% to 15% of the final claim payment.
The Inspection That Makes the Claim
Walk the perimeter. Photograph the gutters, the downspouts, the AC condenser, and the debris on the ground. Check the attic for water stains and daylight. Inspect the ridge cap and the storm-facing slopes with binoculars from the ground or from a ladder, do not walk the roof unless you are trained and equipped. Document everything. Compile the evidence. Call the insurance company within 48 hours. Schedule a professional roof inspection. Be present when the adjuster arrives. Have your contractor present if possible.
The 48 hours after a storm are the window when the evidence is freshest and the claim is strongest. The hailstones melt. The debris blows away. The water stains dry. The memories fade. The evidence degrades with time. The photos you take today are the proof you will need in three weeks when the adjuster finally arrives. Take them now. The storm is over. The inspection has begun. Ever walked outside after a storm, looked up at your roof, and thought “it looks fine” — then three months later noticed a water stain on the bedroom ceiling? The roof was not fine. The roof had damage that was invisible from the ground. The missing shingle was on the back slope. The bruised shingle was on the north side. The cracked vent boot was hidden behind the chimney. The damage was there the day after the storm. The inspection that would have found it did not happen until the ceiling stain forced it to happen. The stain was the result. The missed inspection was the cause. Inspect the roof after every major storm. The inspection finds the damage. The claim pays for the repair. The ceiling stays white. The sequence works in that order only. Reverse it and the ceiling pays the price.