The Fluidmaster 400A fill valve is the most common toilet fill valve in the United States. It is the replacement part in millions of toilets and the original equipment in many more. It costs $10 to $15, installs in 15 minutes, and fixes a toilet that runs continuously, fills slowly, or makes a hissing sound that never stops.
The installation is straightforward except for two steps that are easy to get wrong. The height adjustment must set the critical level mark above the overflow tube. The refill tube must not extend into the overflow tube below the water line, which creates a siphon. Here is how to install a Fluidmaster fill valve correctly the first time.
Step One: Remove the Old Fill Valve
Turn off the water at the shutoff valve behind the toilet. Flush the toilet and hold the handle down to drain as much water as possible from the tank. Sponge out the remaining water from the bottom of the tank. The less water in the tank, the less drips onto the floor when you disconnect the supply line.
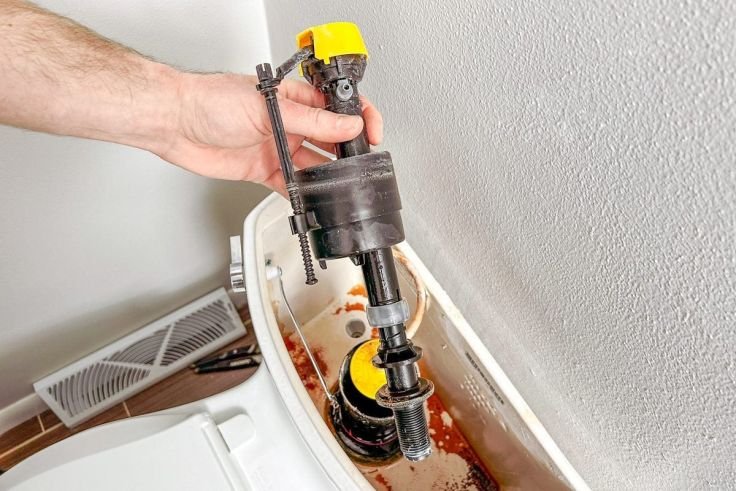
Disconnect the water supply line from the bottom of the fill valve under the tank. The nut unscrews by hand or with an adjustable wrench. Place a small bowl or towel under the connection. Water will drain from the supply line. Remove the lock nut that holds the fill valve to the tank. The lock nut is on the outside bottom of the tank, threaded onto the fill valve shank. Unscrew it by hand or with channel-lock pliers. Once the lock nut is off, lift the old fill valve straight up and out of the tank.
Step Two: Adjust the New Fill Valve Height
The Fluidmaster 400A adjusts to fit most toilet tanks. The valve body is two sections that twist to lock at different heights. Hold the lower section, the gray shank, and twist the upper section, the black head, counterclockwise to unlock it. Slide the upper section up or down to set the height. The critical level mark, abbreviated CL, is molded into the side of the valve body. It is a raised line with the letters CL. This mark must be at least 1 inch above the top of the overflow tube. The overflow tube is the open vertical pipe in the center of the tank. The CL mark is the point at which water would overflow the fill valve and drain into the tank if the valve failed. It must be above the overflow tube so that any overflow from the fill valve goes into the tank, not into the tube and down the drain unnoticed.
Set the height so the top of the fill valve is above the top of the overflow tube, and the critical level mark is at least 1 inch above the overflow tube. Twist the upper section clockwise to lock it at the correct height. The sections snap into place when fully locked. If the fill valve is too tall to fit under the tank lid, lower the upper section further. The lid must close completely. The fill valve must not touch the lid, which can prevent the float from rising fully and cause the valve to run continuously.
Step Three: Install the New Fill Valve
The Fluidmaster comes with a cone-shaped rubber shank washer. Slide the washer onto the threaded shank of the fill valve with the tapered end facing down toward the tank. The washer seals the hole in the bottom of the tank. Insert the fill valve into the hole in the tank. The fill valve should sit upright, not tilted. Thread the plastic lock nut onto the shank from outside the tank. Tighten the lock nut by hand until it is snug. The rubber shank washer creates the seal. The lock nut compresses the washer against the tank. Hand-tight is sufficient. Overtightening with pliers can crack the plastic lock nut or the tank. If the connection drips after the water is turned on, tighten the lock nut an additional quarter turn by hand.
Connect the water supply line to the threaded shank under the tank. Tighten the nut by hand. Turn the water on slowly. Watch the base of the fill valve inside the tank as the tank fills. If water seeps up around the shank, the lock nut is not tight enough or the shank washer is not seated correctly. Tighten the lock nut slightly. If the leak continues, the washer may be pinched or debris may be trapped between the washer and the tank.
Step Four: Connect the Refill Tube Correctly
The Fluidmaster has a small flexible tube that clips to the top of the overflow tube. This is the refill tube. It directs a small stream of water into the overflow tube to refill the toilet bowl after a flush. The refill tube must be positioned correctly to prevent siphoning. The end of the tube must be above the water line in the tank. It clips to the rim of the overflow tube with the included angle adapter. The tube should point straight down into the overflow tube but must not extend below the water line in the tank or the water level in the overflow tube. If the end of the refill tube is submerged, a siphon can form that drains the tank continuously into the bowl. The toilet runs and never stops.
The Fluidmaster includes a small angle adapter that clips onto the top of the overflow tube. The refill tube pushes onto the adapter. The adapter positions the tube above the overflow tube, pointing down, without extending into the water. Use the adapter. Do not simply stuff the refill tube into the overflow tube. The adapter is in the package for this specific reason.
Step Five: Adjust the Water Level
The water level is adjusted by moving the float up or down. The float is the black cylindrical cup that rides on the fill valve shaft. The float controls when the fill valve shuts off. When the water level raises the float to the shutoff point, the valve closes. To raise the water level, squeeze the adjustment clip on the side of the float and slide the float up. To lower the water level, slide the float down. The correct water level is approximately 1/4 inch below the top of the overflow tube. The water line is often marked on the inside of the tank.
Flush the toilet and observe the fill cycle. The water should rise to the set level, the float should lift, and the valve should shut off completely. No water should continue to trickle into the tank or through the refill tube after the valve closes. If the valve does not shut off completely, the float is set too high and water is spilling into the overflow tube, or the valve is defective.
The Fluidmaster 400A includes a small adjustment screw on top of the valve that fine-tunes the shutoff point. If the valve shuts off but a very small trickle continues, turn the adjustment screw slightly clockwise. This raises the shutoff threshold without moving the float. This adjustment is rarely needed. The float height adjustment is sufficient for most installations.
Frequently Asked Questions
The tank fills very slowly. Is the Fluidmaster defective?
Not necessarily. The Fluidmaster has a filter screen inside the valve inlet. If the screen is clogged with debris, the fill rate slows. Turn off the water. Unscrew the supply line. Look inside the valve inlet. The screen is visible. Pull it out with needle-nose pliers or a small pick. Rinse it under running water. Reinstall it. The fill rate should return to normal. A clogged inlet screen is the most common cause of slow filling with a Fluidmaster, not a defective valve.
The new fill valve is loud when filling. Is that normal?
The Fluidmaster is louder than some older fill valves because it fills at a higher flow rate. The noise is water flowing through the valve, not a defect. If the noise is a loud hammering or vibration, the water pressure is too high or the supply line is not fully open. Open the shutoff valve fully. Partially closed valves create turbulence that causes noise. If the noise is a continuous hiss after the tank is full, the valve is not shutting off completely. Adjust the float lower or turn the adjustment screw clockwise.
My toilet is 40 years old. Will a Fluidmaster 400A fit?
Yes, in most cases. The Fluidmaster 400A is designed to fit standard toilet tank openings. The shank diameter is 7/8 inch, which is the standard size for toilet fill valve openings. It fits toilets from the 1950s to current production. The only exception is some antique toilets with non-standard openings or some high-end modern toilets with proprietary fill valve designs. If your old fill valve is connected to a float ball on a brass rod, the Fluidmaster replaces the entire assembly, including the float ball and rod.