The toilet fill valve has been making a foghorn sound every time the tank refills. It started as a faint hum six months ago and has progressed through several increasingly concerning octaves. The sound reverberates through the wall and is audible from the living room. Guests have commented on it. The fill valve is failing. The diaphragm inside the valve, which opens and closes to control water flow, has hardened and is vibrating as water passes through it.
Replacing a toilet fill valve takes 20 minutes and costs $12 to $20. It requires turning off the water supply and draining the tank, but the toilet stays bolted to the floor. The fill valve is the tall plastic assembly on the left side of the tank. It is independent of the flush valve and flapper. Replacing it does not disturb the flush mechanism. This guide covers removal of the old valve, installation and adjustment of the new one, and the two most common mistakes that cause a new fill valve to perform exactly like the old one.
Buying the Right Replacement Fill Valve
Toilet fill valves are nearly universal. A Fluidmaster 400A or equivalent fits every standard gravity-flush toilet manufactured in the last 50 years. The replacement valve comes in a box with the valve body, a rubber shank washer, a plastic lock nut, a refill tube with a clip, and an adjustment mechanism for the float height. The entire assembly is plastic except for the rubber seals.
If the toilet is a Toto, Kohler, or other brand with a proprietary fill valve, the universal replacement still fits. The mounting hole in the bottom of the tank is a standard diameter across all brands. The only exception is older toilets with a brass ballcock fill valve that uses a threaded brass shank. A universal plastic fill valve replaces the brass ballcock without modification. The tank hole is the same.
Buy a fill valve that includes a brass shank rather than an all-plastic shank if the old valve has corroded threads or if the toilet is more than 20 years old. The brass shank is less likely to crack when the supply line nut is tightened. The cost difference is $3.
Step 1: Remove the Old Fill Valve
Turn off the water supply at the shutoff valve behind the toilet. Turn the valve clockwise until it stops. Flush the toilet and hold the handle down to drain as much water from the tank as possible. The remaining water in the bottom of the tank, about half an inch, cannot be drained by flushing. Soak it up with a sponge or a towel and wring it into the bowl. You will be working under the tank with the supply line disconnected. Water left in the tank will drip onto your hands and the floor.
Place a small bowl under the shutoff valve. Disconnect the water supply line from the fill valve shank under the tank. The supply line is attached by a plastic or metal compression nut. Unscrew it by hand or with pliers. Water in the line will drain into the bowl.
Remove the plastic lock nut on the outside of the tank that holds the fill valve in place. The nut is large, typically 2 inches in diameter, and can be loosened by hand or with channel-lock pliers. Turn it counterclockwise. Once the nut is off, lift the old fill valve straight up and out of the tank. The rubber shank washer may stay stuck to the inside of the tank. Peel it out.
Step 2: Install the New Fill Valve
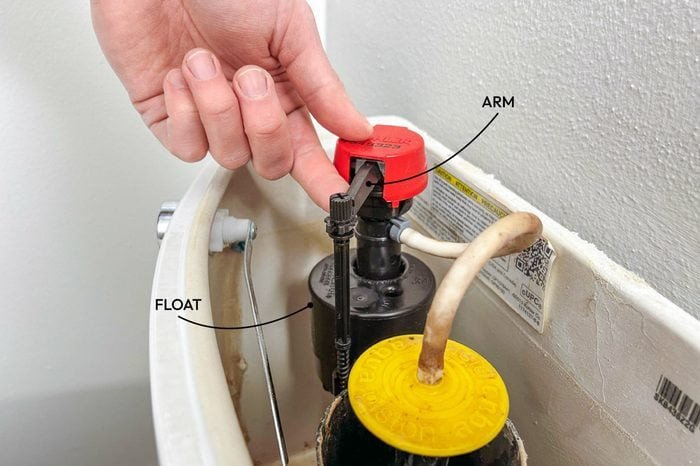
The new fill valve has an adjustable height. Before installing, set the height so the top of the valve body sits roughly 2 inches above the top of the overflow tube when installed. Most valves adjust by twisting the valve body to unlock it, sliding the shank up or down to the correct height, and twisting to lock. The exact adjustment mechanism varies by brand. The instruction sheet in the box shows the specific procedure.
Slide the rubber shank washer onto the threaded shank. Insert the shank through the hole in the bottom of the tank from the inside. The washer sits between the valve body and the inside of the tank. Thread the plastic lock nut onto the shank from underneath the tank. Hand-tighten, then a quarter turn with pliers. Do not overtighten. The nut is plastic and will crack if forced. The rubber washer creates the seal. Tighten just enough to compress the washer.
Position the fill valve so the refill tube outlet faces the overflow tube. The valve body can be rotated before the lock nut is fully tightened. Rotate it so the refill tube reaches the overflow tube without kinking or stretching. Tighten the lock nut after positioning.
Step 3: Connect the Supply Line and the Refill Tube
Reconnect the water supply line to the shank under the tank. Hand-tighten the nut, then a quarter turn with pliers. Do not use Teflon tape on the supply line threads. The rubber gasket inside the supply line nut creates the seal. Tape prevents the nut from seating fully and causes the exact leak you are trying to prevent.
Attach the refill tube to the fill valve outlet. Route the other end into the overflow tube. The refill tube must discharge into the overflow tube, not into the tank water. If the tube sprays into the tank, the toilet bowl does not refill properly after a flush and the fill valve runs longer than it should. Use the clip provided with the new valve to secure the tube to the top edge of the overflow tube. The clip holds the tube in position and prevents it from popping out.
The end of the refill tube must be above the standing water level in the overflow tube. If the tube extends below the water line, it creates a siphon that continuously draws water from the tank into the overflow tube. The toilet will run constantly. Trim the tube if it is too long or clip it to the top edge as designed.
Step 4: Adjust the Float and Water Level
Turn the water supply back on. Let the tank fill and watch the water level. The correct water level is about 1 inch below the top of the overflow tube. The water level mark may be molded into the inside of the tank or stamped on the overflow tube.
If the water level is too high and spills into the overflow tube, the float needs to be lowered. On most modern fill valves, turning the adjustment screw on top of the valve counterclockwise lowers the water level. On older ballcock-style valves, bending the float arm downward lowers the water level. Adjust in small increments, flush to test, and adjust again until the water stops at the correct level.
If the fill valve does not shut off completely regardless of the float adjustment, the valve is defective or debris from the plumbing has lodged in the diaphragm. Turn off the water, remove the cap from the top of the fill valve, and flush out any debris. Reinstall the cap and test again. If it still does not shut off, replace the valve. A fill valve that will not close is a manufacturing defect covered under exchange.
Two Mistakes That Make a New Fill Valve Act Broken
Mistake 1: The refill tube is pushed too far into the overflow tube. The tube end is below the water line, creating a siphon. The toilet runs continuously even though the fill valve is correctly adjusted. Pull the tube up and clip it to the top edge of the overflow tube. The siphon stops. The toilet stops running.
Mistake 2: The water level is adjusted to the wrong height. The water should stop about 1 inch below the top of the overflow tube. If it stops higher and spills over, the fill valve never shuts off. If it stops lower, the toilet produces a weak flush because the tank does not hold enough water. The adjustment screw on top of the fill valve is the only control you need to touch. Adjust it until the water level is correct, then leave it alone.
Frequently Asked Questions
Should I buy a fill valve with a brass shank or a plastic shank?
A brass shank costs $3 more and resists cracking when the supply line nut is tightened. It is the better choice for older toilets where the supply line connection takes more torque to seal. A plastic shank is fine for newer toilets where the supply line nut seals with minimal force. If in doubt, buy the brass shank. The price difference is negligible and the brass shank eliminates the risk of cracking the plastic shank during installation.
The new fill valve is louder than the old one. Is it defective?
Modern fill valves fill faster than older models because the valve opening is larger. Faster fill means more water noise. If the noise is a hum or a harmonic vibration, the flow restrictor inside the valve body may need cleaning. Turn off the water, remove the cap, and flush out any debris. If the noise is simply the sound of water flowing faster, replace the old galvanized steel supply line with a braided stainless steel line. Rigid metal pipes transmit vibration through the wall. A flexible braided line absorbs it.
How do I know what height to set the fill valve?
Set the valve so the top of the cap is about 2 inches above the top of the overflow tube. The critical measurement is the water level after the tank fills, not the valve height. Adjust the float after installation so the water stops 1 inch below the top of the overflow tube. The valve height setting determines whether the float has enough travel to reach the shutoff point. If the valve is set too low, the float bottoms out before the water reaches the correct level and the tank underfills.
The Tank That Fills in Silence
A new fill valve eliminates the foghorn noise, the slow fill, and the intermittent running that the old valve had developed over years of mineral buildup and diaphragm fatigue. The part costs less than $20. The replacement takes 20 minutes. The toilet fills faster and shuts off completely. The only sound is the click of the float reaching its stop.
Keep the old fill valve’s rubber shank washer and lock nut. They are the only parts not included in the new valve that can fail, and having spares means the next fill valve replacement, a decade from now, does not require a trip to the store.