The shower is a bare rectangle of plywood subfloor and open stud walls. The drain pipe is sticking up through a hole in the floor. There is no shower pan. There is no tile. There is no waterproofing. There is a stack of cement board in the hallway, boxes of tile in the garage, and a 50-pound bag of thinset that you carried up from the basement and will not need for several days. Installing and tiling a shower from this starting point is the largest single element of a bathroom renovation. It is not one project. It is five projects in sequence: the shower base, the wall substrate, the waterproofing, the tile, and the grout. Each depends on the one before it. Each can be done by a homeowner who is methodical and patient. None of them require a contractor’s license. All of them require doing the steps in the correct order without shortcuts.
This guide covers the full sequence from bare framing to sealed grout. It is long because the process is long. The shower will take a week of calendar time and 30 to 40 hours of active work for a solo first-timer. The result is a shower that does not leak and tile that stays on the wall for decades.
The Shower Base: Prefabricated Pan vs. Mortar Bed
The shower floor has two options. A prefabricated shower pan is a solid acrylic or fiberglass base that sits directly on the subfloor. It is the simpler choice. It costs $150 to $400, installs in an afternoon, and requires no tile work on the floor. The drain is integrated. The walls tile down to the pan flange. A mortar bed shower pan is a sloped cement base that is tiled over. It is the traditional choice. It requires building a sloped mortar bed, installing a waterproof membrane or liquid waterproofing, and tiling the floor. It costs $50 to $100 in materials but takes two to three days including curing time. A mortar bed allows custom sizing and tile continuity from the walls to the floor. A prefabricated pan is the right choice for a first shower installation. A mortar bed is the right choice if the shower is an unusual size that no standard pan fits.
Install the prefabricated pan according to the manufacturer’s instructions. The pan sits on the subfloor. The drain is connected to the plumbing below. The pan is leveled with shims if the subfloor is not perfectly flat. The flange around the perimeter of the pan extends up the wall about 1 inch. The cement board on the walls overlaps this flange, creating a shingled effect that directs water into the pan rather than behind it.
Cement Board on the Walls
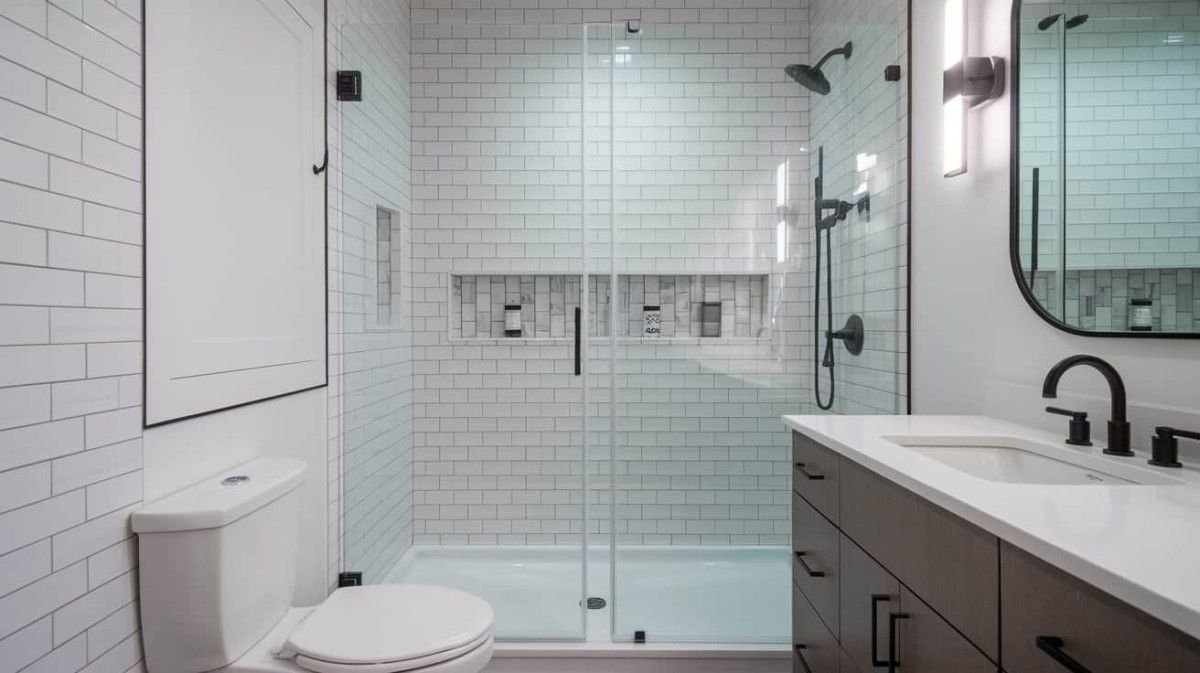
The wall substrate in a shower must be cement board, not drywall. Cement board is a Portland cement and fiberglass mesh panel that does not degrade when wet. Standard drywall, even moisture-resistant green board, disintegrates when water penetrates the grout over years of use. Cement board does not.
Hang the cement board horizontally, with the factory-finished side facing out. Stagger the seams so four corners never meet at a single point. Leave a 1/8-inch gap between panels for expansion. Screw the panels to the studs with cement board screws every 8 inches along each stud. The screw heads must be flush with the surface, not countersunk. Countersinking cement board screws cracks the board.
The bottom edge of the cement board overlaps the shower pan flange by about 1/4 inch. The board does not rest on the pan. It stops just above the pan deck so water cannot wick up into the board from the pan surface. The gap is filled with silicone caulk, not grout.
Tape and mud the seams between cement board panels with alkali-resistant fiberglass mesh tape and thinset mortar. Do not use drywall tape and joint compound. Drywall compound dissolves when wet. Thinset does not. The taped seams create a monolithic surface for the waterproofing membrane.
Waterproofing the Shower Walls
The tile and grout are the wear surface. The waterproofing membrane behind them is what keeps the framing dry. Apply a liquid waterproofing membrane, such as RedGard or Hydro Ban, over the entire cement board surface with a paint roller and brush. Two coats, the second applied perpendicular to the first. The total cured thickness should be roughly the thickness of a credit card. A wet-film gauge costs $2 at the paint store and confirms the thickness is correct. Guessing leads to pinhole leaks that allow water through the membrane one microscopic drop at a time. Over years, those drops rot the studs behind the cement board.
Extend the waterproofing at least 6 inches beyond the tiled area onto the adjacent wall. The transition between shower and drywall is where sideways moisture migration causes the most damage. The membrane must bridge this transition completely.
Let the waterproofing cure fully before setting tile. The cure time is on the product label, typically 24 hours for full cure. Tiling over uncured membrane causes the thinset to pull the membrane off the wall as it dries. The waterproofing peels. The shower leaks. The sequence resets to bare studs.
Tile Layout: The First Row Sets Everything
Plan the layout before mixing thinset. Measure the wall height from the shower pan to the ceiling. Divide by the tile height plus the grout line width. If the remainder is less than one-third of a tile height, shift the layout down by cutting the bottom row of tiles. The cut edge at the bottom is hidden by the pan. A sliver of tile at the ceiling is visible forever.
Snap a level horizontal reference line around the shower at the height of the first full row of tile. Screw a straight ledger board into the wall just below this line. The first row of full tiles rests on the ledger. The ledger prevents tiles from sliding down the wall while the thinset cures. After the thinset sets, remove the ledger, fill the screw holes with waterproofing membrane, and cut the bottom row of tiles to fit.
On each wall, center the layout so the cut tiles at the left and right corners are equal widths. A 1-inch sliver at one corner and a full tile at the other looks accidental. Equal corner cuts look intentional.
Setting the Tile
Mix polymer-modified thinset to the consistency of peanut butter. Let it slake for 10 minutes, remix, and begin. Spread thinset on the wall with the flat side of the trowel first, pressing it into the cement board, then comb with the notched side at a 45-degree angle. Cover about 3 square feet at a time. Thinset skins over in 20 to 30 minutes. If the surface develops a dry film, scrape it off and apply fresh. Tile set into skinned-over thinset falls off.
Press each tile into the thinset with a slight twist. Insert spacers. Check level every third row. A drift of 1/16 inch becomes 1/4 inch by the ceiling. Correct drift while the thinset is still workable. For large tiles, back-butter by spreading a thin layer of thinset on the back of the tile before setting. This ensures full coverage. After setting the first tile, pull it off and check the back. The thinset ridges should be fully collapsed with at least 95 percent coverage. Less than that, and the tile will eventually crack or come loose.
Cut tiles around the shower valve and showerhead pipe with an angle grinder and a diamond blade. The valve trim plate covers the cut edge by about half an inch. The cut does not need to be precise. It needs to be hidden by the trim plate.
Grout, Caulk, and Seal
Wait 24 hours after setting the last tile. Remove the ledger board and fill the screw holes. Cut and set the bottom row. Let that cure overnight. Remove all spacers. Mix grout and apply with a rubber float at a 45-degree angle, pressing it fully into the joints. After 15 to 20 minutes, wipe the tile with a damp sponge.
Fill all inside corners, the joint between the tile and the shower pan, and the joint around the valve trim plate with 100 percent silicone caulk, color-matched to the grout. Grout in corners cracks because walls expand and contract. Caulk flexes.
After 72 hours, when the grout is fully cured, apply penetrating grout sealer with a foam brush. The sealer prevents water absorption. Reapply every 2 to 3 years.
The Week-Long Timeline
| Day | Work | Hours |
| Day 1 | Install shower pan, hang cement board, tape seams | 6-8 |
| Day 2 | Apply waterproofing (coat 1 morning, coat 2 afternoon) | 2 (plus drying) |
| Day 3 | Layout planning, set ledger, tile first 3-4 rows | 6-8 |
| Day 4 | Continue tiling walls, make cuts around valve and pipe | 6-8 |
| Day 5 | Finish tiling, remove ledger, cut and set bottom row | 4-6 |
| Day 6 | Grout walls, caulk corners | 3-4 |
| Day 7+ | Wait 72 hours, apply sealer | 0.5 |
Frequently Asked Questions
Should I use a liquid membrane or a sheet membrane for waterproofing?
Liquid membrane is easier for a first-timer because it rolls on like paint and requires no measuring or cutting. Sheet membranes, such as Kerdi, require precise cutting, overlapping seams by 2 inches, and embedding the sheet in thinset. Sheet membrane is faster for professionals who do it every day. Liquid membrane is more forgiving for a homeowner doing it once. Both work when installed correctly.
Can I use green board instead of cement board in a shower?
No. Green board is moisture-resistant drywall. It has a treated paper facing that resists humidity better than standard drywall. It is not waterproof. It is not rated for wet areas like shower surrounds. Cement board is required by building code for shower walls. Green board in a shower will fail. The only question is how many years it takes.
Can I screw cement board into the shower pan flange?
No. The cement board overlaps the flange but is not screwed through it. Screws through the flange puncture the pan and create a leak path. The board is screwed to the studs above the flange. The bottom edge of the board floats over the flange and is held in place by the thinset and tile above it.
The Shower That Works for Decades
Installing and tiling a shower is a project that demands patience. The work is not technically difficult. The difficulty is in maintaining discipline through every step: the cement board gaps, the two coats of waterproofing, the 24-hour cure times, the ledger board, the level checks every three rows, the 72-hour wait before sealing. Every step that seems skippable is a step that prevents a leak five years from now. A shower that leaks from day one announces itself immediately. A shower that leaks from year five leaks because a step was skipped during installation. The ceiling below does not care which step it was.
The first shower in a shower you built yourself is a specific kind of satisfaction. The water hits tile you set on a wall you waterproofed over board you hung. Nothing leaks. The corners are caulked. The grout is sealed. The shower works exactly the way it was designed to work, and you designed it, and you built it, and it is still dry.