The toilet flange in a house built on a concrete slab is not sitting on top of the concrete. It is embedded in it. The flange was set into the form before the concrete was poured, or it was inserted into a sleeve in the slab, and the concrete was finished around it. Fifty years later, the flange has rusted, the closet bolt slots have snapped off, and the concrete around the flange is the only thing holding it in place. Replacing a flange that is cast into a concrete slab means either chipping out the concrete around the flange to free it, or cutting the flange out from the inside and installing a replacement that fits inside the existing pipe without disturbing the concrete. One path involves a hammer and a cold chisel and an hour of loud, dusty work. The other path involves an inside pipe cutter and a push-in replacement flange and takes twenty minutes.
The correct path depends on whether the existing flange fits inside or outside the drain pipe. A flange with a hub that fits inside the pipe can be cut out from the inside and replaced without touching the concrete. A flange with a collar that fits outside the pipe, or a flange that was cast directly into the concrete as a monolithic piece, cannot be removed from the inside because the concrete surrounds the outside of the flange. You must chip the concrete away to access the outside of the flange or the pipe. Before you pick up a chisel, determine which type of flange you have.
Inside-Fit vs Outside-Fit — The Diagnosis That Determines the Entire Job
Scrape the wax ring off the flange and look at the seam between the flange and the pipe. If the flange has a smooth plastic or metal surface that transitions into the pipe opening without a visible seam, the flange is probably a closet collar that fits inside the pipe. Stick your finger into the drain opening and feel for a step where the flange ends and the pipe begins. If you feel that step a half inch or an inch below the top of the flange, the flange fits inside the pipe. If you cannot feel a step, or if the flange appears to be a single continuous piece of metal or plastic with no separate pipe insert, the flange may fit outside the pipe or may be cast into the concrete.
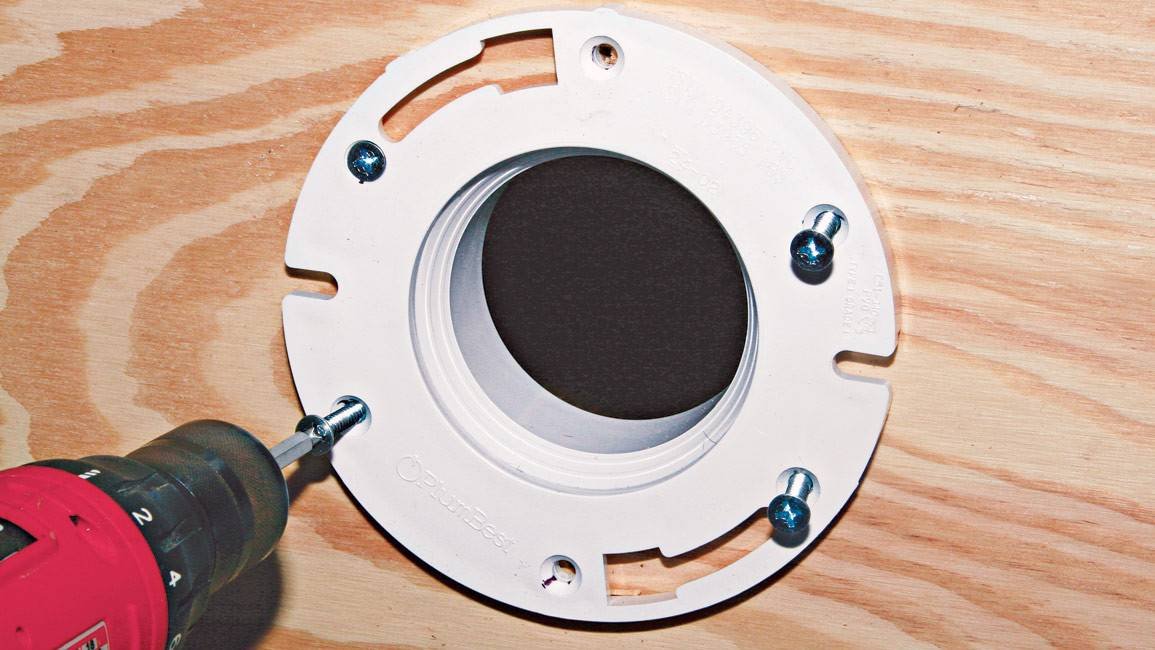
A flange that fits inside the pipe is the easier scenario. Use an inside pipe cutter with a drill to cut through the flange from the inside, just below the level of the finished floor. Work around the circumference, cutting a continuous groove. Do not cut deeper than necessary. The drain pipe below the flange is what the new flange will seal against, and cutting into the pipe reduces the sealing surface. Once the cut is complete, pry the pieces of the old flange out with a flathead screwdriver. The concrete around the outside of the flange is undisturbed. The new flange slides into the existing pipe and is secured with concrete anchors through the mounting holes.
A flange that fits outside the pipe, or a flange that is completely surrounded by concrete with no visible gap, requires chipping. The concrete directly around the outside of the flange must be removed to a depth of about two inches and a width of about an inch all the way around the flange. This exposes the outside of the pipe and allows the old flange to be pried off. Use a cold chisel and a two-pound hammer. A rotary hammer with a chisel bit does the same work in a fraction of the time and is available at any tool rental counter for about forty dollars a day. Wear safety glasses and a dust mask. Concrete chips fly in every direction, including directly at your eyes, and concrete dust is silica.
Chipping Concrete Around an Embedded Flange
Score the concrete around the flange with an angle grinder and a diamond blade before you start chipping. A scored line creates a clean edge where the concrete will break, rather than an irregular crater that extends farther than you intended. Score a circle about an inch outside the flange, cutting about half an inch deep. The score line is your boundary. Concrete beyond the score line should remain intact. Concrete inside the score line is what you are removing.
Start at the score line with the cold chisel angled inward toward the flange. Tap the chisel with the hammer, working around the circle in small increments. Do not hit the chisel hard enough to crack the pipe. Cast iron pipe will crack, PVC will crack, and ABS will crack. The concrete breaks away in small pieces. Patience is the difference between a clean removal that exposes the pipe and a broken pipe that requires opening the slab. As the concrete breaks away, increase the angle of the chisel to pry the pieces out. Work down until you have exposed about an inch and a half of the pipe below the bottom of the flange.
Once the pipe is exposed, the old flange can be pried off. If the flange is cast iron and was leaded onto the pipe, drill out the lead as described in the cast iron flange replacement guide. If the flange is PVC and was glued onto the outside of the pipe, cut it off with a reciprocating saw or an oscillating multi-tool with a flush-cut blade. Cut carefully. The blade should cut through the flange without cutting into the pipe. Once the flange is removed, clean the outside of the pipe with a rag and sandpaper to remove old glue residue and debris.
Installing the Replacement Flange in the Concrete Opening
The replacement flange must fit the pipe that is now exposed in the hole you chipped out. If the pipe is three-inch PVC, use a three-inch PVC flange with a hub that fits inside or a collar that fits outside. Dry-fit the flange to confirm the fit and the height. The bottom of the flange should sit flush on the finished concrete floor. If the flange sits above the floor because the pipe extends too high, cut the pipe down with an inside pipe cutter. If the flange sits below the floor because the pipe is recessed, use a flange extender.
Glue the new flange onto the pipe with PVC primer and cement, following the same procedure as a standard PVC flange installation. Push the flange onto the pipe, rotate it a quarter turn, and hold it in place for thirty seconds while the cement sets. Align the closet bolt slots perpendicular to the back wall. Once the glue has cured for ten minutes, drill pilot holes through the flange mounting holes into the concrete and secure the flange with Tapcon screws or lead anchors. Do not skip the mechanical fasteners. A glued flange on a PVC pipe will hold the toilet in place under normal use, but a person who stumbles and grabs the toilet to catch themselves will apply a lateral force that a glued joint alone is not designed to resist. The concrete anchors are the backup that prevents the flange from breaking loose.
Fill the gap around the flange with non-shrink grout or hydraulic cement. The grout supports the flange from the sides and prevents it from shifting under load. Smooth the grout flush with the surrounding concrete and let it cure for the time specified on the packaging, typically twenty-four hours for full strength. Do not set the toilet on a flange surrounded by an open hole in the concrete. The absence of fill material around the flange allows the flange to flex, and a flexing flange cracks the wax seal.
FAQ — Replacing a Toilet Flange in Concrete
Is there a way to replace the flange without chipping the concrete at all?
If the old flange fits inside the pipe, yes. An inside pipe cutter removes the flange from the inside, and a push-in replacement flange seals inside the existing pipe with a rubber gasket. The concrete is not touched. If the old flange fits outside the pipe, or if the flange is broken off flush with the concrete and there is no way to grip it from the inside, chipping is necessary. Before you commit to chipping, try an inside pipe cutter on the assumption that the flange fits inside. If the cutter finds no purchase because there is no inside step, you have confirmed that the flange fits outside, and you are out five minutes and no material.
What if I crack the drain pipe while chipping the concrete?
Stop. Assess the damage. A small crack in a PVC pipe above the slab can sometimes be repaired with an epoxy patch or a rubber repair coupling if you can access the cracked area. A crack that extends below the slab, or a crack in a cast iron pipe that splits the pipe, requires opening the slab to access and replace the damaged section. Opening a concrete slab is a major job that requires a concrete saw, a jackhammer, and the skills to replace drain pipe and pour new concrete. If you are not confident in your ability to chip concrete without damaging the pipe, hire a plumber. The cost of a plumber is less than the cost of slab repair.
Should I replace a cast iron flange in concrete with PVC or with another cast iron flange?
PVC. A PVC flange glued or pushed into a cast iron pipe, using a rubber transition coupling if the pipe is cast iron, will not rust. A new cast iron flange installed in a concrete slab will eventually rust just like the old one did, and someone will be chipping it out again in thirty years. The transition from cast iron pipe to PVC flange is standard, code-approved, and permanent.