Painting window trim is 80 percent preparation and 20 percent painting. The painting itself takes 15 minutes per window. The preparation takes an hour. The difference between trim that looks like a professional painted it and trim that looks like a landlord special is not the quality of the brush. It is the time spent sanding, filling, caulking, and taping before the paint can opens.
Here is how to prep window trim, choose the right paint, cut in around glass cleanly, and avoid the three mistakes that make painted trim look bad.
Interior vs. Exterior Window Trim
The preparation steps are similar. The products are different. Interior trim is painted with interior latex or acrylic paint in a satin, semi-gloss, or gloss sheen. Higher sheens resist fingerprints and are easier to clean, which matters on window trim that gets touched when opening and closing the window. Use a paint labeled trim, door, and cabinet or interior enamel for the most durable finish.
Exterior trim is painted with exterior acrylic latex paint. Exterior trim takes more abuse from sun, rain, and temperature changes. Use an exterior paint labeled for trim or an exterior acrylic enamel. Exterior paint has UV inhibitors and mildewcides that interior paint does not. Do not use interior paint on exterior window trim. It will fade, chalk, and fail within a year. Do not use exterior paint on interior window trim. It off-gasses more volatile organic compounds and is not formulated for the abrasion and cleaning that interior trim receives.
Preparation: The Part That Determines How It Looks
Clean the trim. Dust, dirt, grease from hands, and insect residue all prevent paint from adhering. Wipe the trim with a damp cloth and mild detergent. Let it dry completely. For kitchen windows with grease buildup, use a degreaser or TSP substitute. Paint will not stick to grease.
Sand the trim lightly with 120-grit sandpaper. The goal is not to remove the old paint. It is to dull the gloss and create a slightly rough surface for the new paint to grip. Scuff every surface that will be painted. Wipe away the sanding dust with a tack cloth or a damp rag. Let it dry.
Fill holes, dents, and cracks. Use a lightweight spackling compound for interior trim or an exterior-grade wood filler for exterior trim. Press the filler into the defect with a putty knife and scrape it flush with the surface. Let it dry completely. Sand the filled areas smooth with 220-grit sandpaper. If you prime and paint over unsanded filler, the filled spots will be visible bumps under the new paint. Wipe away the dust from sanding the filler.
Scrape loose paint if the existing paint is peeling. Use a paint scraper or a 5-in-1 tool. Sand the edges of the scraped area to feather the transition between bare wood and old paint. If you paint over a sharp edge where the old paint ends and bare wood begins, that edge will be visible under the new paint. Feather the edge until you cannot feel the transition with your fingertips.
Caulk the gaps. There is almost always a gap between the window trim and the wall, between the trim and the window frame, and at the mitered corners of the trim itself. These gaps collect dust and make the paint job look sloppy even if the paint is perfect. Apply a thin bead of paintable acrylic caulk to every joint, corner, and gap. Tool the caulk smooth with a wet finger. Wipe away excess with a damp paper towel. Let the caulk dry completely before priming. Primer and paint do not adhere to wet caulk.
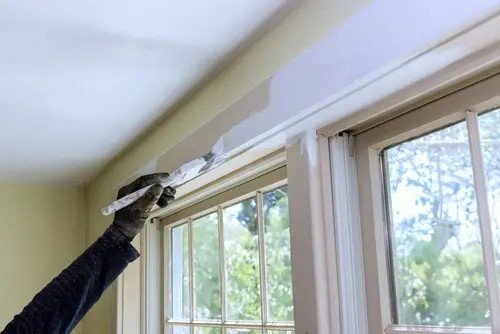
Taping the Glass: The Line Between Good and Great
The cleanest paint line at the glass does not use tape. Professional painters paint window trim with a steady hand and an angled sash brush, cutting in freehand against the glass. If you paint slightly onto the glass, you scrape the excess off with a razor blade after the paint dries. This produces a perfectly straight line with no tape bleed.
For most homeowners, tape is the safer option. Use blue painter’s tape designed for delicate surfaces. Apply the tape to the glass approximately 1/16 inch away from the trim. This creates a tiny reveal of unpainted glass between the tape and the trim that will be painted. Press the tape down firmly with a putty knife or your fingernail along the edge that will be painted. The edge of the tape must be fully adhered to the glass. Paint bleeding under the tape happens because the edge was not pressed down, not because the tape was bad.
Remove the tape while the paint is still wet. Do not let the paint dry completely with the tape in place. Dry paint forms a film that bridges from the trim to the tape. When you pull the tape, the film tears and leaves a ragged edge. Pull the tape at a 45-degree angle away from the trim, slowly, while the paint is still tacky. If the paint has already dried, score along the tape edge with a utility knife before pulling to cut the paint film and prevent tearing.
Priming: When You Need It and When You Do Not
Prime bare wood. If your preparation exposed raw wood from scraping or sanding through the old paint, those spots need primer. The bare wood absorbs paint differently than the surrounding painted surfaces, which creates a visible patchiness called flashing. A coat of primer seals the bare wood and creates a uniform surface. Spot-prime the bare areas. You do not need to prime the entire window trim unless you have stripped it to bare wood entirely.
Prime over wood filler. Filled areas absorb paint differently than the surrounding surface. A thin coat of primer over each filled spot prevents the filler from showing through the finish paint as a dull spot.
Skip the primer if the existing paint is in good condition and you are painting over it with a similar color. Modern paint-and-primer combination products adhere well to clean, sanded, previously painted surfaces. The sanding step provides the mechanical bond that primer would otherwise provide. If you skip primer, the cleaning and sanding steps are not optional. They are the bond.
Prime if you are painting a light color over a dark color. The primer blocks the dark color from bleeding through and reduces the number of topcoats needed. A tinted primer close to the new paint color is the most efficient approach.
Painting Window Trim
Use a 2-inch or 2-1/2-inch angled sash brush. The angled bristles are designed for cutting in against glass and along edges. A straight-cut brush is for flat surfaces such as doors and baseboards. A sash brush is for windows and trim. The angled tip is not a gimmick. It works.
Load the brush with paint by dipping the bristles no more than a third of their length into the paint. Tap the brush against the inside of the can. Do not wipe it on the rim. Wiping removes too much paint and creates drips down the outside of the can. A properly loaded brush holds enough paint to cover 12 to 18 inches of trim before reloading.
Paint the inside edge of the trim first, where it meets the glass. Use the angled tip of the brush to cut a straight line. Work in sections of about 12 inches. After cutting the edge, fill in the flat face of the trim with long, smooth strokes in the direction of the wood grain. Lay off each section with a light final stroke from one end to the other to eliminate brush marks. Do not go back over paint that has started to set. Brushing paint that is partially dry drags the surface and leaves permanent brush marks.
Paint the top horizontal piece of trim first, then the sides, then the bottom sill. This order prevents drips from the upper pieces landing on freshly painted lower pieces. If a drip does land on wet paint, smooth it out immediately with the brush. If it lands on dry or partially dry paint, leave it alone. A drip you try to fix on partially dry paint becomes a smear. Let it dry, sand it smooth, and touch it up later.
Close the window slightly while the paint dries. Do not close it completely against the wet paint, which will glue the window shut. Leave a gap. Open the window fully once the paint is dry to the touch, typically two to four hours. If the window sticks after the paint has fully cured, run a utility knife along the seam between the window sash and the painted trim to break the paint seal.
Frequently Asked Questions
Should window trim be semi-gloss or satin?
Semi-gloss is the traditional choice for window trim because it is the most durable and easiest to clean. It reflects light, which highlights the trim against the wall. Satin is a softer sheen that hides surface imperfections better than semi-gloss. It is the current trend for interior trim. Either is appropriate. The decision is aesthetic. Semi-gloss is more practical. Satin is more forgiving of an imperfect surface.
How do I prevent the window from sticking shut after painting?
Leave the window slightly open while the paint dries so it does not contact the painted surfaces. After the paint has cured for 24 hours, open and close the window several times to break any light adhesion between the paint and the sash. If the window sticks, run a utility knife or a 5-in-1 tool along the seam where the sash meets the trim. Do not force the window open. Forcing it tears the paint and possibly the wood.
My house was built before 1978. Should I worry about lead paint?
Yes. Houses built before 1978 may have lead-based paint under the layers of newer paint. Sanding and scraping lead paint creates lead dust, which is hazardous, especially to children. The Environmental Protection Agency requires contractors to be lead-safe certified for work on pre-1978 homes. As a homeowner working on your own house, you are not required to follow the same regulations, but you should follow the same safety practices. Use wet sanding or a HEPA vacuum attachment to control dust. Wear an N95 respirator. Contain the work area with plastic sheeting. Clean up with a HEPA vacuum and wet wiping. Assume the old paint contains lead and treat it accordingly.