Plywood Is Not Waterproof, and That’s a Problem
Standard plywood soaks up water like a sponge. Its layered veneer construction, held together by adhesives that vary widely in water resistance, as explained by Wikipedia, means moisture can seep in from any edge, any cut surface, any scratch in the face. Once water gets inside, the plies delaminate. The wood swells. Mold follows. Left unchecked, a piece of plywood that cost you forty bucks can rot through in a single wet season.
Knowing how to waterproof plywood correctly changes the equation entirely. A well-applied waterproof coating doesn’t just sit on the surface, it penetrates, bonds, and creates a barrier that turns a fragile material into something you can trust outdoors, in bathrooms, on boat decks, under tile, anywhere moisture lives.
The method you pick depends on where the plywood lives, what it needs to look like, and how long you need it to last.
“Need advice for waterproofing plywood. I made an exhaust fan manifold for my camper van. What would you use to seal the plywood? Polyurethane? I’ll try to avoid camping in heavy rain, but I want it to handle it.”
— u/kirbykoot in r/woodworking · 54 upvotes · 121 comments
Before Anything: Surface Prep Is Not Optional
No coating, no matter how expensive, will save plywood that hasn’t been prepped. The surface needs to be clean, dry, and slightly rough for any sealant to grip properly. Sand the plywood with 120 to 150 grit sandpaper, focusing on edges and corners where moisture intrusion starts.
Wipe away all dust with a tack cloth or a rag dampened with mineral spirits. Do not use water for cleaning, you are literally trying to keep water out of the wood.
Fill any voids, knot holes, or gaps with wood filler and sand flush once dry. The edges of plywood are the most vulnerable point. End grain is exposed across every ply, and water wicks into those layers fast. If you are doing this right, you will spend extra time on the edges with every method below.
“Will this waterproof my plywood? Planning to use it as a base for my outdoor turtle pond area.”
— u/potchy_22 in r/BeginnerWoodWorking · 9 comments
Method 1: Exterior Paint (Budget-Friendly, Solid Protection)
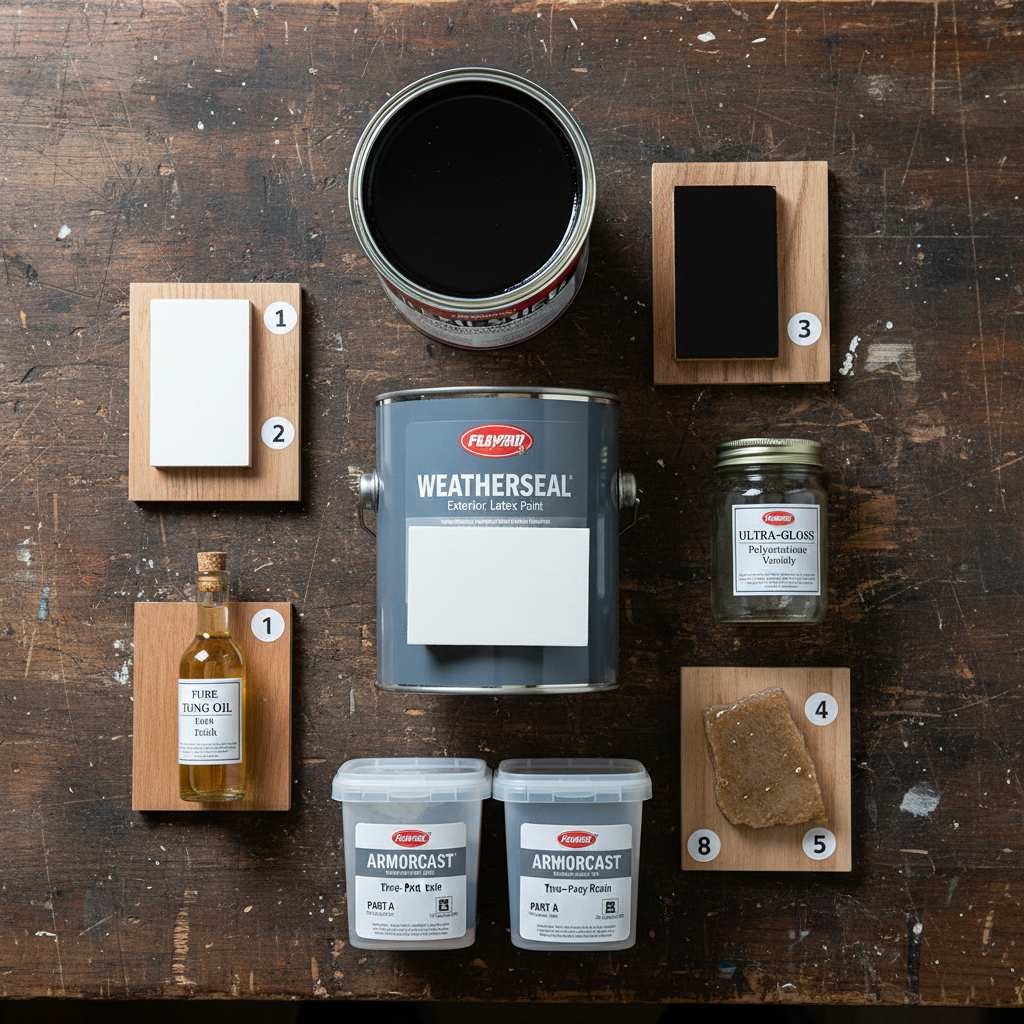
Exterior-grade latex or oil-based paint is the most accessible way to waterproof plywood. It is cheap, comes in any color, and requires no special equipment beyond a brush or roller. The paint forms a protective film on the surface that repels water and blocks UV damage. For plywood used in outdoor furniture, shed walls, or garden boxes, paint is often the right answer.
Start with an exterior wood primer, one coat, allowed to dry fully. Then apply two to three coats of exterior paint, letting each coat dry before the next. Pay extra attention to edges. Give them an extra pass.
Paint will crack and peel eventually, especially somewhere with freeze-thaw cycles, so plan on repainting every two to three years. It is not a forever solution, but it is a perfectly good one for most people.
Method 2: Polyurethane Varnish (Clear Finish, Natural Wood Look)
If you want the plywood to still look like wood, polyurethane is the move. Oil-based polyurethane penetrates deeper and provides better water resistance than water-based versions, though both work. The trade-off: oil-based poly yellows slightly over time, which matters on light woods like birch, but on darker plywood the color shift is barely noticeable.
Apply with a high-quality brush in thin, even coats. Thin coats cure harder and more evenly than thick ones. Sand lightly with 220 grit between coats to knock down any raised grain. Three coats is standard, four if the piece lives outside. Polyurethane holds up well on plywood furniture, cabinet boxes, and interior trim in moisture-prone rooms like bathrooms and laundry areas.
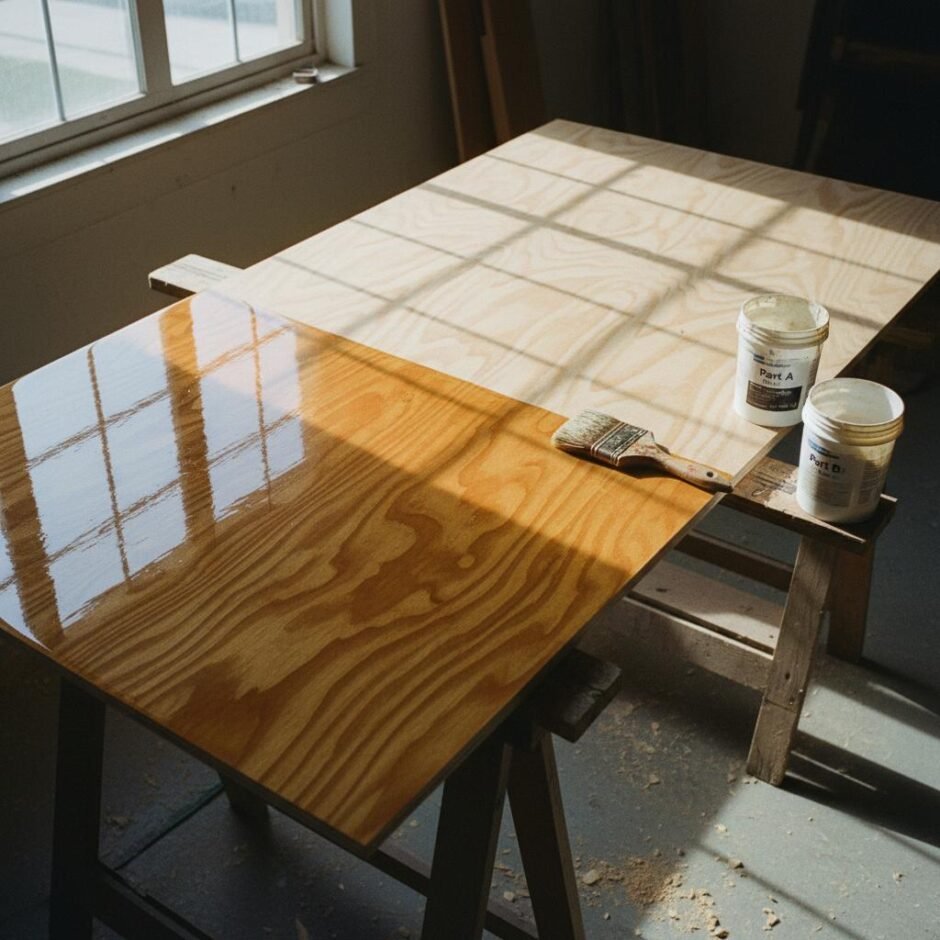
Method 3: Epoxy Resin (Maximum Protection, Marine-Grade)
Epoxy is what you use when the plywood absolutely cannot fail. Boat builders use it. Shower pan installers use it. Anyone who has ever watched a plywood project disintegrate and swore never again uses it. Epoxy creates a hard, impermeable shell that water cannot penetrate, period. It also adds structural strength, bonding the veneers together more tightly than the original glue.
The catch is cost and effort. Epoxy is expensive, requires mixing two parts in precise ratios, has a limited working time once mixed, and needs proper ventilation and gloves. You apply it with a roller or spreader, working quickly.
Two coats are typical, with light sanding between coats. The result is a glassy, nearly indestructible surface. If you are waterproofing a plywood boat deck or an outdoor kitchen countertop, epoxy is the answer and everything else is a compromise.
Method 4: Penetrating Wood Oil (Natural Look, Easy Reapplication)
Tung oil, linseed oil, and specialized deck oils soak into the wood fibers rather than sitting on top. They do not create a film, which means they never peel or crack. The wood breathes.
The trade-off: protection is less absolute than epoxy or polyurethane, and you need to reapply every six to twelve months depending on exposure. For plywood garden furniture, raised beds, or decorative outdoor pieces where you want the wood grain visible and you don’t mind an annual maintenance ritual, oil is the simplest path.
Apply liberally with a rag or brush, let it soak in for fifteen to twenty minutes, then wipe off the excess. Multiple thin coats beat one heavy one. The oil darkens the wood slightly and gives it a warm, matte finish that paint and poly can’t match.
Method 5: Liquid Rubber or Membrane Coating (Heavy-Duty, Flexible)
Liquid rubber coatings like Durabak or Red Guard create a thick, flexible waterproof membrane. Unlike paint or epoxy, these coatings stretch slightly as the wood expands and contracts with temperature and humidity changes. This makes them ideal for plywood decks, balconies, and flat roofs where movement is inevitable.
Application is straightforward: roll it on like thick paint, two to three coats, with curing time between each.
The finish is textured and rubbery, not something you would use on furniture, but for structural applications it is hard to beat. Red Guard waterproofing membrane is one of the most widely available options for this approach, commonly used under tile in bathrooms but equally effective on exterior plywood when applied according to manufacturer specs.
If the plywood will be walked on heavily, consider a deck coating waterproof system designed for foot traffic rather than a standard membrane product.
“What’s the best way to waterproof plywood for a travel trailer floor? I’ve got a 1991 camper and the floor needs replaced. Trying to figure out what product to use so I don’t have to do this again.”
— u/mountain_ad_8332 in r/traveltrailers · 7 upvotes · 10 comments
Which Method Should You Pick?
| Situation | Best Method | Durability |
|---|---|---|
| Outdoor furniture, visible wood grain wanted | Polyurethane or Wood Oil | 2-4 years |
| Painted shed/garden box | Exterior Paint | 2-3 years |
| Boat deck, shower pan, absolute waterproof | Epoxy Resin | 10+ years |
| Balcony, deck, flat roof | Liquid Rubber / Membrane | 5-10 years |
| Camper van, trailer floor | Epoxy or Liquid Rubber | 5-10 years |
Frequently Asked Questions
Can you permanently waterproof plywood?
No method makes plywood permanently waterproof in all conditions. Epoxy resin comes closest, lasting a decade or more with proper application. But all coatings degrade over time from UV exposure, temperature swings, and physical wear. The goal is to choose a method where the maintenance cycle matches your willingness to reapply.
How to waterproof plywood for outdoor use?
For outdoor plywood, exterior paint is the simplest option and works well for most projects. Epoxy resin offers the longest protection if you are willing to invest the time and money. Liquid rubber membranes excel on horizontal surfaces like decks. The key for all outdoor applications is sealing the edges thoroughly, since that is where water enters first.
Do you need to waterproof both sides of plywood?
Yes. Waterproofing only one side creates uneven moisture absorption, which leads to warping and cupping. Seal all six sides, faces and edges, for any plywood that will face moisture. If one side is inaccessible after installation, seal it before you put the piece in place.
Is marine plywood already waterproof?
Marine plywood uses waterproof glue between the veneers, but the wood itself still absorbs moisture. It resists delamination far better than standard plywood, but it still benefits from a surface sealant. Think of marine plywood as water-resistant, not waterproof. A coat of epoxy or polyurethane on top extends its life significantly.
How long does waterproofed plywood last outside?
With proper sealing and maintenance, outdoor plywood can last five to fifteen years depending on the method used and climate conditions. Epoxy-sealed plywood in a moderate climate can last over a decade. Painted plywood in a wet climate may need attention every two to three years. The biggest variable is how well the edges were sealed at the start.