
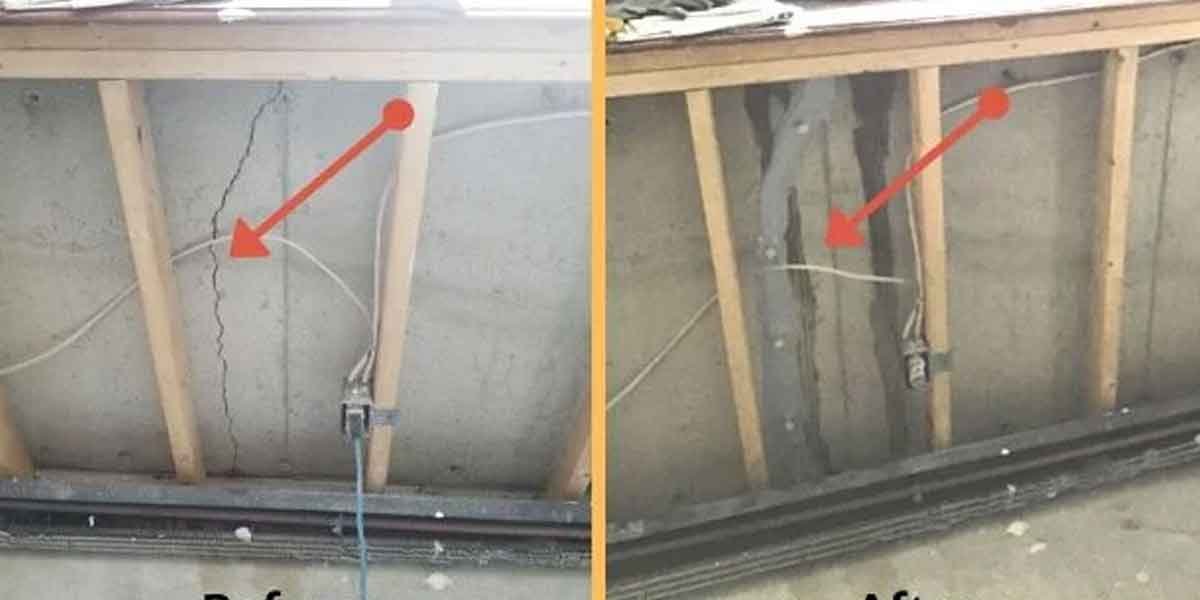

A foundation crack repair kit seals most poured-concrete cracks from inside the basement.
They handle the narrow vertical and diagonal cracks that open after concrete cures and the soil around it settles, and they cost a fraction of a waterproofing crew’s invoice. Narrow is the word doing the work in that sentence. A crack under half an inch wide, in a wall that is not bowing and not stepping, is the case these kits were built for.
The purchase comes down to three measurements and one material choice.
What a foundation crack repair kit actually contains
Injection kits are not patching kits. Nothing in them gets smeared across the face of a crack; the material is pumped through ports glued along the crack and fills its full depth.
That is why the contents look medical. The Sikadur Crack Repair Kit from Sika ships with two 300 ml cartridges of Capseal paste, two 250 ml cartridges of low-viscosity injection resin, 16 injection ports, static mixing nozzles, a flexible extension hose and gloves. Sika rates the kit at roughly 15 to 20 linear feet of cracked concrete and calls that figure a theoretical estimate.
Most foundation crack repair kits sold to homeowners trim that idea to a caulking gun and one or two cartridges. Flexomeric sells its DIY kits as single-component resins that react with moisture inside the crack, and RadonSeal ships two-component polyurethane in split cartridges with a static mixer. Both need a standard 10 oz gun and nothing else.
Two items in the box decide how the afternoon goes. The ports set the pace, because you inject from one until material reaches the next. The surface sealant decides whether resin ever enters the crack or comes straight back out around the port it was pushed into.
Measure the crack before you order anything
The narrowest point of the crack picks the resin. Injection material has to squeeze through that point to travel the rest of the crack, and a resin too thick for it seals the first two inches of surface and stops.
A quarter coin works as a gauge. Flexomeric notes that a quarter measures about 1/16 inch thick, so if the coin slides into the thinnest part of the crack, the job needs the wider-crack kit: FLEXKIT-100 at $159, or $189 for the complete version with extra ports.
If the coin will not enter anywhere along the crack, the hairline kit FLEXKIT-200 covers it at the same prices. Retail listings move faster than the kits do: the RadonSeal RAD-301 kit on Lowe’s product page carries a discontinued notice, so a big-box or marketplace listing named in an old write-up may no longer be on the shelf. Shop by the width rating rather than by the brand name.
Then estimate volume, because injection resin is sold by the millilitre. Sika’s coverage note makes the arithmetic visible: one 250 ml cartridge fills a crack 1/8 inch wide and 1 inch deep for about 10 linear feet. Two cartridges carry the 15 to 20 feet the company quotes for the finished kit.
Width is the variable that punishes a bad estimate. Halve the crack’s width and the same cartridge travels twice as far; double it and you need twice the material. RadonSeal’s epoxy example works the same rule from the other end: a 10-foot kit holding roughly 60 cubic inches of resin fills a 1/16 inch wide crack 10 inches deep for about 8 feet.
Depth is where the estimate goes soft, because manufacturers assume a wall thickness. Flexomeric’s coverage figure assumes an 8 inch wall and RadonSeal’s epoxy example assumes 10 inches of depth. A 12 inch foundation wall with the same crack can take half again as much resin.
Buy one cartridge past the arithmetic.
Polyurethane or epoxy
Polyurethane is the default for a crack that is damp, leaking, or still capable of small movement.
It foams on contact with moisture. RadonSeal states that its two-component version expands up to 20 times its volume, roughly double what a single-component foam manages, reacts in 2 to 4 minutes, and sets as a closed-cell foam that stays flexible enough to follow minor movement in the wall.
Epoxy suits a crack that is dry, stable, and worth bonding shut. It does not expand, so it depends on low viscosity to reach the far end of the crack: Sika measures its injection resin at about 500 cps and reports cured material reaching up to three times the strength of the surrounding concrete.
The resin meets ASTM C881 Types I and II, Grade 1, Class C, the standard specification for epoxy-resin bonding systems used in concrete repair.
Air and concrete temperature move the schedule more than most people expect. Sika lists its injection resin as fully cured at 72 hours on a 40°F wall and at 12 hours at 86°F. The cap seal is tighter still: 145 minutes of usable time at 41°F against 30 minutes at 86°F, and the resin has to be injected inside that window.
Cold concrete slows every step of that chemistry.
Dampness itself is not a reason to wait. Both resin families tolerate a damp surface as long as no standing moisture sits in the void, and the epoxy line is sold specifically for surfaces that cannot be dried.
Running the injection, bottom port first
Preparation decides the outcome more than injection technique does. Sika asks for concrete at least 21 to 28 days old and surfaces free of dust, laitance, oil, curing compounds, and old patch material. Ports get mounted and sealed before any resin is mixed.
Clean the crack void with a brush, a wet/dry vacuum, or oil-free compressed air. On a damp wall, air blown in at the highest port drives standing moisture down and out through the lower ones, which is the step most homeowners skip when a crack is already weeping.
Port spacing follows the crack width. Each port is bedded in non-sag paste, and on the Sikadur system that paste is a two-part mix at 10:1 with a 6 minute open time and 50 minutes before injection has to begin at 68°F.
A port that pops loose under pressure sends resin out around the seal instead of into the crack, and that failure always shows up as a wet stain on the floor rather than an obvious blowout.
Injection starts at the lowest port and continues until material appears at the port above. Move up one port and repeat, finishing at the top. RadonSeal runs the same bottom-up sequence on its polyurethane kits, with the foam reaching the next port a few minutes after the reaction starts.
Then leave it alone. The sealant strips off once the resin has set, the ports come away with a hammer, and the stubs get ground flush with the wall face.
Day two looks unfinished. The ports are still stuck to the wall in a line, the paste has gone hard and a shade darker than the concrete, and each one has left a faint ring of resin dust on the floor. Nothing about the wall suggests a repair until the ports come off and the crack reads as a thin grey line that no longer flexes when a thumb pushes against it.
The real test arrives with the next wet season. A crack that stays dry through a full spring thaw held; one that weeps in the same place again was moving, and the resin cured inside a gap that reopened after it set.
When a kit is the wrong tool
RadonSeal’s own list of what its kits cannot repair covers most of the cases where homeowners waste money: horizontal cracks, cracks in concrete block and mortar, cracks in bowing walls, cove joints where the wall meets the floor, floor cracks, and stone or brick foundation walls.
One entry on that list contradicts the page it sits on. An actively leaking crack appears among the exclusions while the polyurethane kits on the same site are sold for wet, leaking cracks that foam on contact with moisture. The narrower reading holds up better: resin handles a crack that seeps slowly, and loses to a crack running hard enough to wash the material out of the void before it reacts.
Sika’s page carries its own limits. The Sikadur kit “may only be used by experienced professionals,” and the company sets ambient and substrate temperatures between 40°F and 95°F with the substrate at least 5°F above the dew point. Condensation on the concrete face ruins adhesion to the ports, which is why a warm basement in winter can still be the wrong day to inject a cold wall.
Structural movement is a different category of problem. A crack that has widened since last year, one face standing proud of the other, stair-step cracking through block, or a wall bowing inward all point to a cause that neither a rigid nor a foaming resin can hold. Those four patterns are worth reading about before ordering anything, and our own notes on matching a filler to a crack cover what each one signals.
A kit applied over active movement buys one season.
What the kit costs against a contractor
RadonSeal quotes waterproofing contractors at $100 to $200 per linear foot for foundation crack repair, so a 12 foot crack sits between $1,200 and $2,400 against $159 to $189 for a homeowner kit.
The gap is the whole case for buying a foundation crack repair kit and spending a Saturday on the wall yourself.
The trade is not purely financial. Most waterproofing contractors guarantee the repair and return at no charge if the crack leaks inside the guarantee period, and a homeowner with a cartridge gun has no such backstop. What the DIY route buys is the ability to re-inject the same crack for the price of another cartridge, which is often what the second rainy season requires anyway.
Questions that decide the purchase
Should you fill hairline cracks in concrete?
Not every hairline needs filling. A shrinkage crack that stays dry and holds its width through a heating season can be left alone, and coating it changes nothing. A hairline in a basement wall that weeps or leaves a damp stain on the inside face is worth a foundation crack repair kit rated for hairline widths, because low-viscosity resin reaches openings that no troweled filler can enter.
What is the best foundation crack repair method?
A foundation crack repair kit used from inside the basement is the standard repair for a narrow vertical or diagonal crack in poured concrete. Polyurethane covers damp or moving cracks, epoxy covers dry stable cracks that need bonding strength, and the material choice matters more than the brand. Excavation belongs to the cases where the leak path never passes through the wall itself.
What can I use to fill small cracks in concrete?
A cement-based filler or a polyurethane sealant handles a small dry crack in a slab, a patio, or a driveway. In a foundation wall that passes moisture, a surface filler closes only the face of the crack while an injection kit fills its depth and length, which is the difference that survives a winter.
Do foundation crack repair kits work on concrete block walls?
They do not, and the reason is mechanical. Concrete blocks are hollow, so expanding polyurethane escapes into the cores instead of sealing the crack path, which wastes most of the resin in a space that was never the leak. Block walls need a different repair approach from the start.
Can you fix a basement crack from the inside?
Yes, and that is how professional waterproofing crews repair most wall cracks. Injection from the inside fills the crack through its full depth without excavation, which is the entire reason these kits exist. The limits sit on the crack itself: horizontal cracks, block walls, and bowing walls are not injection work from either side.
Measure the narrowest point of the crack, count the linear feet, and assume 8 to 10 inches of depth until your wall thickness says otherwise. Then add one cartridge to whatever that estimate produces.