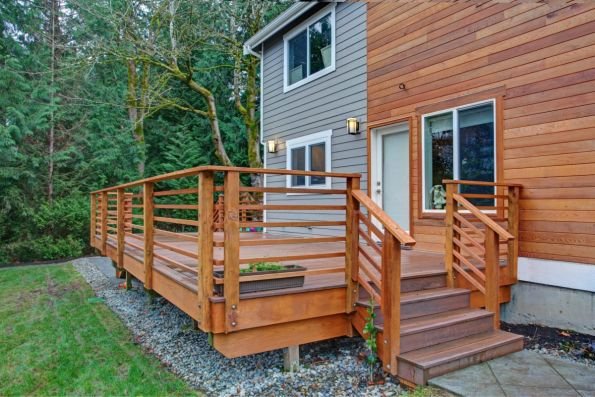
The ledger board is a horizontal two-by-ten or two-by-twelve bolted to the side of the house. It supports one entire side of the deck, and it is the most common point of catastrophic deck failure in residential construction. When a deck collapses, the ledger board pulled away from the house because it was nailed instead of bolted, because the flashing was omitted or installed incorrectly and the rim joist behind it rotted, or because the bolts were driven into brick veneer instead of the structural framing behind it. Building a raised deck attached to a house means building a ledger board connection that will hold thousands of pounds of live load, dead load, and snow load for decades without pulling away, rotting, or failing. Every other part of the deck can be repaired. The ledger board cannot be repaired because its failure is the failure of the entire deck.
A raised deck, defined by most building codes as a deck more than thirty inches above grade, requires a building permit, a lateral load connection to the house, guardrails at least thirty-six inches high with balusters spaced no more than four inches apart, and stairs with graspable handrails. The height introduces structural requirements that a ground-level deck does not have. The ledger board introduces waterproofing requirements that a free-standing deck does not have. The combination of height and house attachment makes this the most demanding deck a homeowner can build, and the only part that cannot be learned from a YouTube video is the part you will do wrong the first time if you skip the flashing.
The Ledger Board — The Connection That Holds the Deck to the House
The ledger board must be bolted to the structural framing of the house, not to the siding, not to the sheathing, and not to brick veneer. Brick veneer is a single wythe of brick with an air gap between the brick and the structural wall. Bolting a ledger board through the brick and into the air gap provides zero structural support. The deck will pull the brick off the house in a single season. The correct method for brick veneer is to cut out the brick at each bolt location, bolt the ledger directly to the structural rim joist or wall studs through the sheathing, and install flashing that diverts water away from the penetration.
The bolts must be half-inch diameter hot-dipped galvanized or stainless steel lag screws or through-bolts, spaced in a staggered pattern no more than sixteen inches apart. Every bolt must penetrate the rim joist or the wall studs. Bolts driven into the sheathing alone will pull out. The correct fastening schedule is specified in the building code and depends on the joist span, the deck size, and the snow load in your area. The plans examiner at the building department will tell you the required bolt size, spacing, and pattern when you submit your permit application.
Flashing the ledger board is not optional. Water runs down the side of the house, hits the ledger board, and pools on top of it. Without flashing, the water seeps behind the ledger board, rots the rim joist or the wall sheathing, and eventually the bolts are holding onto rotted wood that crumbles under load. The flashing must extend up behind the siding at least four inches, lap over the top of the ledger board, and extend down the face of the ledger board at least one inch. The ledger board must be spaced away from the house with washers or a continuous spacer to allow water to drain behind the ledger board rather than being trapped against the house. A ledger board that is bolted tight to the siding traps water. A ledger board spaced a quarter inch off the siding with flashing diverting water over the top and a drip edge at the bottom keeps the connection dry.
Footings, Posts, and the Outer Beam
The outer edge of the deck is supported by posts set on concrete footings poured below the frost line. The number of posts depends on the beam span. A deck that is twelve feet wide with a beam supported by posts at each end and additional posts spaced every six to eight feet along the beam is typical. The posts are typically four-by-four or six-by-six pressure-treated lumber, with six-by-six required for decks more than eight feet above grade in many jurisdictions. The post must be connected to the footing with a galvanized post base that holds the bottom of the post an inch above the concrete. The post must be connected to the beam with a post-to-beam connector that resists uplift.
Diagonal bracing is required on raised decks to resist lateral movement, the side-to-side sway that makes a deck feel unstable. Knee braces, which are diagonal two-by-fours or two-by-sixes connecting the posts to the beam or the joists, stiffen the frame and transfer lateral loads to the footings. The building code specifies the size, location, and fastening of diagonal bracing based on the deck height and the seismic zone. A deck without bracing will sway noticeably when people walk on it, and the sway loosens every connection over time.
Joists, Blocking, and Decking Above Grade
Joists are attached to the ledger board with joist hangers, not toenailed. Every joist hanger must be fastened with the manufacturer’s specified nails or structural screws in every hole. Joist hangers installed with deck screws instead of the specified fasteners will fail under load. The joists span from the ledger board to the outer beam, sitting on top of the beam and secured with hurricane ties or joist hangers. The joist ends should be flush with the outside edge of the beam or cantilevered no more than two feet beyond the beam.
Blocking between joists at mid-span prevents the joists from twisting and stiffens the frame. For a raised deck, blocking is structural, not cosmetic. A row of solid blocking at mid-span is standard. Two rows, at the one-third and two-third points of the joist span, produce a noticeably stiffer deck. The blocking must be cut from the same dimensional lumber as the joists and fastened with nails or structural screws through the joists into the ends of the blocks.
Decking on a raised deck is laid with the same spacing and fastening as on a ground-level deck, with one additional consideration. Water drains through the gaps between the deck boards, and on a raised deck, it drips onto whatever is below. If the space under the deck will be used as a patio or storage area, install an under-deck drainage system, a series of panels or membranes that catch the water and channel it to a gutter, before laying the deck boards. An under-deck drainage system adds about three to five dollars per square foot to the material cost and turns the space under the deck from a damp, drippy area into a dry, usable patio.
Guardrails, Stairs, and the Final Safety Checks
Guardrails on a raised deck are governed by the building code and are not a place to save money or get creative. The railing must be at least thirty-six inches high, measured from the deck surface to the top of the rail. The balusters must be spaced no more than four inches apart so that a four-inch sphere cannot pass between them. The railing must resist a concentrated load of two hundred pounds applied in any direction at any point on the top rail. A railing that meets these requirements is safe. A railing that does not is a lawsuit waiting for a guest who leans on it.
The railing posts must be attached to the framing, not to the deck boards. Through-bolts or structural lag screws driven through the posts into the rim joist or the joists are standard. A post attached only to deck boards with screws will snap off at the base when a person leans against the top rail. The lever arm created by the post height multiplies the force at the base by a factor of ten or more. A railing post is a lever. The base connection is the fulcrum. The code requirements for post attachment exist because decks have killed people, and almost every death involved a railing that separated from the deck.
Stairs on a raised deck must have uniform riser heights and tread depths, graspable handrails on at least one side, and a landing at the bottom. The maximum riser height is typically seven and three-quarters inches. The minimum tread depth is ten inches. Every riser must be the same height within a tolerance of three-eighths of an inch. A stair with one riser that is a quarter inch shorter than the others is a trip hazard that the human brain registers as a misstep. The stringers, the diagonal boards that support the treads, must be cut from two-by-twelve lumber and must be attached to the deck frame with stringer hangers, not toenailed.
FAQ — Raised Deck Attached to House
Can I bolt the ledger board through the vinyl siding instead of cutting it away?
No. Vinyl siding compresses under the clamping force of the bolts, loosening the connection over time. It also traps water behind the ledger board. Cut away the siding in the area where the ledger board will be mounted. Install the ledger board directly against the sheathing, with flashing that extends behind the siding above the ledger and over the top of the ledger. The siding is cosmetic. The ledger board is structural. The two cannot occupy the same space.
At what height does an attached deck become too dangerous to build without professional help?
There is no single height threshold, but the risk increases with every foot above grade. A deck four feet off the ground is a broken ankle if it collapses. A deck twelve feet off the ground is a trip to the emergency room or worse. If the deck is more than eight feet above grade, if it requires posts taller than twelve feet, or if the house is masonry and the ledger board connection requires engineering, hire a structural engineer to specify the connections and a licensed contractor to build them. The engineer’s fee is a few hundred dollars. The cost of a collapsed deck does not have a price because it is not measured in money.
The house has an old ledger board from a previous deck. Can I reuse it?
Remove it and inspect the rim joist behind it. A ledger board that has been in place for ten years or more has almost certainly trapped water against the house at some point. Probe the rim joist with an awl or a screwdriver. If the wood is soft, dark, or crumbly, it has rotted and must be replaced. Replacing a rotted rim joist requires opening the floor from inside the house or the ceiling from below. It is expensive and invasive, and it is the direct result of a ledger board that was not flashed correctly. If the rim joist is solid and dry, you can install a new ledger board in a different location, but use new flashing and space the ledger off the sheathing. Do not reuse the old ledger board. The lumber may appear solid but have internal decay at the bolt holes where water penetrated.