The basement walls are bare concrete. They have been bare concrete since the house was built. You walk down there to grab the holiday decorations and think about how much usable square footage is just sitting there, gray and cold and entirely uninviting. Finishing those walls turns a storage cave into a room. But basements are not upstairs rooms. Moisture moves through concrete in ways it does not move through wood framing. Get the wall assembly wrong and you will not know for two years, until the baseboard comes off and the studs behind it are black.
Finishing basement walls is a sequence of four trades: moisture control, insulation, framing, and drywall. Each depends on the one before it. Skip the moisture step and the insulation traps water against the concrete. Use the wrong insulation and the framing rots from the back side forward. Hang standard drywall and the first humid summer swells the edges. This guide covers the correct assembly, in order, for basement walls that stay dry and look finished for decades.
Moisture First: The Rule That Overrides Everything Else
According to wikiHow’s basement finishing guide, the most critical step before closing up any basement wall is eliminating moisture problems. Concrete is porous. Water vapor passes through it continuously from the wet soil outside to the drier air inside. A finished wall assembly must either block that moisture entirely or allow it to dry to the interior. Trapping moisture between the concrete and a vapor barrier is the most common cause of basement wall failure.
Before you buy a single sheet of insulation, tape a 2-foot square of clear plastic sheeting to the bare concrete wall on all four sides with duct tape. Leave it for 48 hours. If condensation forms under the plastic, you have moisture transmission through the concrete that must be addressed before framing. If the concrete under the plastic is dry, you have a good candidate for finishing.
Also check for liquid water intrusion. After a heavy rain, look for water entering through cracks, at the joint where the wall meets the floor, or around windows. These are not negotiable. Fix them before closing the walls. According to the Minnesota Extension Service, ground water intrusion and condensation are the two primary sources of basement moisture, and both must be resolved before insulation or framing begins.
Fill cracks with hydraulic cement, which expands as it cures and locks into the concrete. Apply an interior masonry waterproofing sealer with a roller. This is not a substitute for exterior waterproofing, but for walls that pass the plastic-sheet test, it is sufficient preparation for the assembly that follows.
Insulation: Rigid Foam, Not Fiberglass
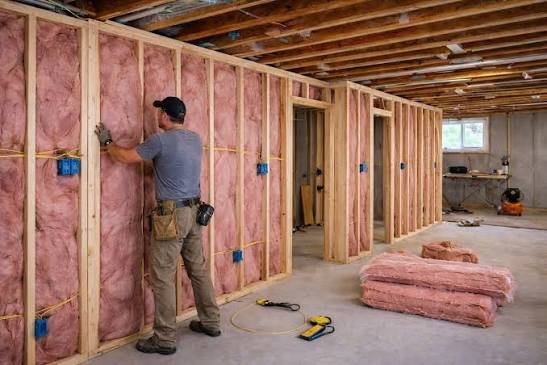
The insulation strategy for basement walls is different from upstairs walls. Fiberglass batts between studs are the wrong choice for a basement. Fiberglass is air-permeable. Moisture vapor passes right through it, condenses on the cold concrete behind it, and soaks the batt. Wet fiberglass loses its R-value and becomes a mold substrate.
The correct approach is extruded polystyrene (XPS) rigid foam insulation, minimum 3/4-inch thick, applied directly to the concrete wall with foam-compatible adhesive. XPS is moisture-resistant and does not support mold growth. It also acts as a vapor retarder, slowing moisture transmission from the concrete into the wall cavity without trapping it. The wikiHow basement wall guide, co-authored by home improvement specialist Ryaan Tuttle with over 17 years of experience, recommends running insulation tape over all seams between foam panels to create a continuous thermal break.
For colder climates, building codes typically require R-10 to R-15 on basement walls, which means 2-inch XPS foam. The 3/4-inch minimum is for conditioned basements in moderate climates where the primary goal is moisture control rather than thermal performance. Check your local code before buying insulation.
A note on spray foam: closed-cell spray foam applied directly to concrete is the best-performing basement insulation and the most expensive. It seals, insulates, and acts as a vapor barrier in a single step. It also costs $1.50 to $3.00 per square foot installed, versus $0.50 to $1.00 for XPS rigid foam. If the basement has irregular stone or brick walls, spray foam is worth the premium because rigid panels cannot conform to uneven surfaces.
Framing: Wood vs. Steel and the Gap Question
There are two schools of thought on basement wall framing. The traditional method builds a standard 2×4 stud wall directly against the XPS foam. The newer method leaves a small gap between the foam and the framing to create a drainage and drying plane. Both work. The difference is risk tolerance.
Against-the-foam framing is faster and preserves an inch of floor space on every wall. The stud wall is screwed through the foam into the concrete using Tapcon screws or driven with spring spikes. The downside is that any moisture that does get past the foam has no path to dry to the interior.
Gap framing leaves a half-inch air space between the foam and the back of the studs. The stud wall is attached to the floor and ceiling joists, not to the concrete wall. This costs an inch of room width on each side but gives moisture an escape path. For basements that passed the plastic-sheet test with flying colors, against-the-foam framing is acceptable. For basements that had marginal test results, gap framing is the safer bet.
Steel studs are an alternative to wood. They do not rot, do not support mold, and are dimensionally stable in humidity. They also cost about 30% more than wood and require different fasteners and techniques. Wood is the standard choice for DIY because the tools and skills are more common. If the basement has a history of moisture issues that have since been resolved, steel studs remove the lingering worry of hidden wood rot.
Spacing is 16 inches on center for both wood and steel. The bottom plate must be pressure-treated lumber if it contacts concrete, even through the foam. Standard lumber in contact with concrete will wick moisture and rot, slowly, from the bottom up.
Drywall: Moisture-Resistant Only
Standard drywall has a paper facing. Paper is mold food. In a basement, where humidity is naturally higher than upstairs, standard drywall absorbs moisture from the air and can develop mold on the back side where you cannot see it.
Use moisture-resistant drywall, commonly called green board or purple board, for all basement walls. It has a treated core and a fiberglass or treated-paper facing that resists mold growth. It is not waterproof. It will not survive direct water contact. But it tolerates the 50-60% relative humidity that is normal in a finished, conditioned basement without degrading.
Hang the drywall horizontally, which puts the long seams at a comfortable working height and reduces the number of butt joints. Leave a half-inch gap at the floor. This gap is covered by baseboard and prevents the drywall from wicking moisture from the concrete slab. If the basement ever takes on a small amount of standing water, the drywall survives because it does not touch the floor.
Ryaan Tuttle, CEO of Best Handyman Boston, recommends using drywall adhesive on the studs in addition to screws for basement walls. The adhesive reduces screw pops caused by the slight expansion and contraction that concrete walls undergo with seasonal temperature changes.
The Vapor Barrier Question: Usually the Answer Is No
This is the most argued-about detail in basement finishing. The conventional wisdom from above-grade construction says to put a plastic vapor barrier between the insulation and the drywall. In a basement, this is often wrong.
Concrete basement walls allow moisture to enter from the outside. If you put a vapor barrier on the inside of the stud wall, moisture that gets into the wall cavity cannot dry to the interior. It is trapped. The result is mold behind the vapor barrier, hidden until the drywall softens or the smell becomes unavoidable.
The correct approach depends on the insulation type. XPS rigid foam at sufficient thickness acts as its own vapor retarder. No additional plastic is needed. Closed-cell spray foam is a vapor barrier by itself. No additional plastic. The only scenario where an interior vapor barrier makes sense is when using fiberglass batts in a basement, which is the wrong insulation for a basement and should not be done in the first place.
If your local building code requires a vapor barrier on basement walls regardless of insulation type, follow the code. The inspector’s signature matters more than the theoretical best practice. But know that the rigid foam alone is the vapor control layer in a properly designed basement wall assembly.
What Finishing Basement Walls Costs
| Item | DIY Cost (per linear foot of 8-ft wall) | Pro Cost |
| Moisture repair + sealer | $2-5 | $8-15 |
| XPS rigid foam insulation + adhesive + tape | $4-8 | $10-18 |
| Framing (wood studs, plates, fasteners) | $5-10 | $12-22 |
| Moisture-resistant drywall + screws + adhesive | $3-6 | $8-14 |
| Tape, mud, sand (finishing) | $1-3 | $5-10 |
| Total per linear foot | $15-30 | $45-80 |
| 100 linear feet (average basement) | $1,500-3,000 | $4,500-8,000 |
DIY saves roughly 50 to 60 percent. The trade is not just money. It is the time to do it right, the physical labor of carrying drywall down a flight of stairs, and the risk that a hidden mistake takes years to surface. For a basement that passed the moisture test and has straightforward rectangular walls, DIY is within reach of a homeowner with framing experience. For a basement with complex angles, existing water issues, or a requirement for electrical rough-in inside the walls, the pro brings value beyond the labor hours.
When to Hire a Professional
Some basements are not DIY candidates:
- Active water intrusion that requires exterior excavation or drain tile installation.
- Walls that are significantly out of plumb, requiring custom framing that is not captured by standard stud-wall techniques.
- Electrical rough-in needed inside the walls before drywall. Bad wiring in an above-ground wall is dangerous. Bad wiring in a below-grade wall with potential moisture is worse.
- Mold already present behind existing finished walls that failed. Remediation before reconstruction requires containment and PPE.
- The basement is a walk-out with tall walls that require scaffolding to reach the top plate. Working from a ladder while holding a sheet of drywall overhead is how backs get injured.
Frequently Asked Questions
Can I just glue drywall directly to the concrete walls instead of framing?
No. Drywall glued directly to concrete will absorb moisture from the concrete, develop mold on the back side, and fail within a few years. The wall needs a thermal break, which the insulation provides, and an air gap or drainage path, which the framing provides. Direct-adhered drywall also cannot be removed without destroying it, so any future electrical or plumbing work inside the wall becomes demolition rather than access.
Do I need pressure-treated lumber for all the framing in a basement?
Only the bottom plate that contacts the concrete floor needs to be pressure-treated. The vertical studs, top plate, and any blocking can be standard kiln-dried lumber. The bottom plate is the only piece that sits on the slab and can wick moisture. Use pressure-treated lumber rated for ground contact and fasten with ACQ-compatible screws, since the copper in pressure-treated wood corrodes standard fasteners.
Can I finish only part of the basement walls and leave some unfished?
Yes. Many basements are partially finished, with one room framed and drywalled while the rest remains as storage or utility space. The finished section needs its own insulated, framed walls. The transition between finished and unfished areas should be a framed partition wall. Do not stop the drywall mid-wall on a continuous exterior concrete wall. The unfinished section remains exposed and continues to breathe, which is fine because it is not enclosed.
What R-value do I need for basement walls?
Building codes vary by climate zone. In cold climates, such as the northern United States, basements typically require R-10 to R-15 continuous insulation on exterior walls. This means 2 inches of XPS rigid foam. In moderate climates, R-5 to R-10 may be sufficient. Check your local building code before purchasing insulation. The code minimum is the floor. Meeting it keeps the basement comfortable and the inspector satisfied.
The Wall That Stays Dry
A finished basement wall is an assembly in a specific order: dry concrete, sealed with masonry waterproofer, covered with rigid foam insulation taped at the seams, framed with a pressure-treated bottom plate, and faced with moisture-resistant drywall. When the order is right and the moisture was solved first, the wall lasts as long as the house. When a step was skipped, the wall tells you by smelling like a basement even after it is finished.
Run a dehumidifier in the finished basement year-round. Set it to 50% relative humidity. A finished basement that smells like a basement is a basement that is slowly rotting behind the drywall. The dehumidifier costs $200 to buy and $15 a month to run. It is the cheapest insurance policy in the house.