The showerhead has been dripping since February. It is not a constant stream. It is one drop every ten seconds, landing in the tub with a sound that carries through the bathroom wall into the bedroom. You have tightened the showerhead onto the arm as hard as you can by hand. You have wrapped the threads in fresh Teflon tape. The drip continues because the problem is not at the showerhead. It is inside the wall, in the valve that controls the water.
A leaking shower faucet is a valve problem, not a showerhead problem. Water is getting past the cartridge, the seats and springs, or the rubber washers inside the valve body, and gravity carries it up the shower arm and out the showerhead. The fix is the same as repairing a tub faucet with one added complication: there is no tub spout to drain the water trapped in the riser pipe between the valve and the showerhead. Every time you remove a part, water that was sitting in the vertical pipe above the valve drains out around your hands. This guide covers the repair sequence for each valve type, plus the shower-specific issues that tub faucet guides skip.
Diagnose the Leak: Showerhead vs. Valve vs. Diverter
According to master plumber Dave Jones, Regional Vice President at Roto-Rooter and a licensed plumber in Pennsylvania, North Carolina, and Georgia, identifying the leak source correctly avoids replacing parts that were never the problem.
- Drip from the showerhead when the faucet is off: water is leaking past the valve cartridge, washer, or seats and springs inside the valve body. The valve needs repair. This is the problem in the majority of cases.
- Drip from the showerhead only when the tub spout is running: the diverter inside the tub spout is not sealing completely. A small amount of water bypasses the diverter and travels up to the showerhead. Replace the tub spout. The valve is fine.
- Leak from behind the handle or escutcheon plate when the faucet is on: the O-ring on the valve stem or cartridge is worn. Water is escaping around the stem rather than through the showerhead. The fix is replacing the O-ring. The cartridge may still be good.
- Leak from the shower arm connection at the wall: water is dripping from where the shower arm screws into the fitting inside the wall. The threaded connection needs Teflon tape and re-tightening, or the shower arm itself has a pinhole leak and needs replacement.
Confirm the diagnosis before disassembling anything. Run the tub spout and watch the showerhead. If it drips during tub mode, the diverter is the problem. Turn the faucet off and watch the showerhead. If it drips with the faucet off, the valve is the problem. Remove the escutcheon plate and feel around the valve stem with a dry paper towel while the faucet runs. If the towel gets wet, the stem O-ring is leaking.
Shut Off the Water and Prepare for the Downward Drain
Most shower valves do not have individual shutoff valves. Turn off the main water supply to the house. Open the shower faucet and a lower faucet in the house to drain the pipes. The shower valve is typically higher than any other fixture on the same plumbing stack. Water will remain in the vertical riser pipe between the valve and the showerhead even after the pipes are drained.
When you remove the cartridge or valve stem, the trapped water in the riser will drain down through the open valve body and out around your hands. Place a towel inside the wall opening below the valve. The towel catches the water before it runs down inside the wall cavity and stains the ceiling below. A small plastic container wedged under the valve opening catches most of it. Expect about a cup of water. It will be cold.
Fixing a Single-Handle Cartridge Shower Valve
Most shower faucets installed in the last 30 years use a cartridge valve. The handle is removed by loosening a set screw on the underside or by removing a decorative cap and unscrewing a center screw.
Once the handle is off, remove the escutcheon plate to expose the valve body. The cartridge is held in place by a retaining clip, typically a U-shaped brass or plastic pin that slides into a slot in the valve body. Remove the clip with needle-nose pliers. Grip the cartridge stem with pliers and pull it straight out. If it resists, use a cartridge puller tool. The tool costs $15 and threads onto the cartridge stem, using a screw mechanism to extract the cartridge without breaking it. A broken cartridge fragment left inside the valve body turns a 15-minute repair into a valve replacement that requires cutting the wall open.
Take the old cartridge to the hardware store. Moen, Delta, Kohler, and American Standard each use proprietary cartridges. The cartridge must match the brand and model. Most manufacturers offer free replacement cartridges under warranty. Call the manufacturer with the faucet model number, which is on the original packaging or stamped on the escutcheon plate, before buying one. You pay for shipping, which is typically $10, rather than $40 to $60 for the cartridge itself.
Coat the new cartridge’s O-rings with plumber’s grease before inserting it. Push the cartridge into the valve body until it seats. Reinstall the retaining clip. Turn the water back on and check for leaks before reinstalling the escutcheon and handle. If the valve drips with the new cartridge installed, the valve body itself may be cracked, which is rare, or the wrong cartridge was installed, which is common. Verify the part number and try again.
Fixing a Two-Handle Compression Shower Valve
Compression valves use a rubber washer at the end of a brass stem to stop water flow. The washer wears out and the faucet drips. The repair is the same as a two-handle tub faucet with one difference: the stems are usually deeper inside the wall because shower plumbing is roughed-in further back than tub plumbing.
Remove the handle by prying off the decorative cap and unscrewing the center screw. Use a handle puller if the handle is stuck. Remove the escutcheon plate. Use a deep socket wrench to unscrew the stem retaining nut. Pull the stem out. At the bottom of the stem is a black rubber washer held by a small brass screw.
Remove the screw, swap the washer, coat the new washer in plumber’s grease, and reinstall. Replace the O-ring on the stem body at the same time. The O-ring prevents water from leaking out around the handle when the faucet is on. Both the washer and O-ring together cost $3 to $5. Reassemble in reverse order. Turn the water on and test. If the showerhead still drips, the valve seat inside the valve body is pitted. A pitted seat will destroy a new washer within weeks. Resurface the seat with a seat-dressing tool, which is a small abrasive cylinder on a handle that spins inside the valve body and smooths the brass seat surface. The tool costs $10 and takes 30 seconds per seat.
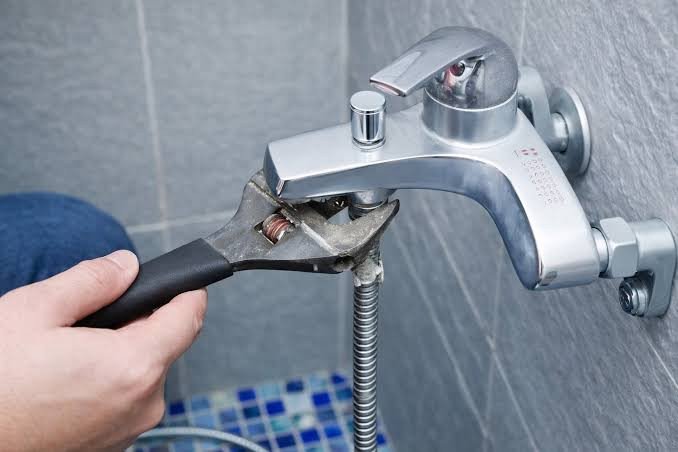
Fixing a Leak at the Shower Arm
If water drips from where the shower arm enters the wall, not from the showerhead itself, the threaded connection between the arm and the pipe fitting inside the wall has failed. Unscrew the shower arm by turning it counterclockwise. If the arm is chrome-plated, wrap the jaws of your pliers in electrical tape to prevent scratching the finish. The arm threads into a brass drop-ear elbow or a threaded fitting inside the wall.
Clean the threads on the shower arm with a wire brush. Inspect the arm for pinhole leaks. A small spray of water from the arm itself, rather than from the connection, means the arm has corroded through. Replace it. Shower arms cost $10 to $20.
Wrap the clean threads with Teflon tape. Wrap clockwise, which is the direction the arm turns when threading into the fitting, so the tape does not unravel during installation. Three to four wraps. Screw the arm back into the fitting by hand, then tighten with pliers another half turn. Do not overtighten. The fitting inside the wall is brass and can crack if the arm is forced beyond snug. Connect the showerhead and test. If the leak persists, the fitting inside the wall has failed, which requires opening the wall to replace. That is a plumber’s job.
Fixing a Diverter That Sends Water to the Showerhead in Tub Mode
The diverter is the mechanism in the tub spout that redirects water from the spout up to the showerhead when you pull up the knob. If water drips from the showerhead while the tub spout is running, the diverter gate inside the spout is not sealing. The fix is replacing the tub spout.
Tub spouts attach in one of two ways. A slip-on spout slides over a copper pipe and is held by a setscrew on the underside. Loosen the setscrew with an Allen wrench and pull the spout off. A threaded spout screws onto a threaded pipe nipple. Turn the entire spout counterclockwise to unscrew it. Look for a setscrew first. If there is none, the spout is threaded.
Take the old spout to the hardware store to match the connection type. A slip-on spout cannot be replaced with a threaded spout because the pipe fitting is different. Install the new spout and test. The showerhead should be completely dry when the tub spout is running.
What Shower Faucet Repairs Cost
| Repair | DIY Cost | Pro Cost |
| Replace cartridge (single-handle) | $15-60 (free under warranty) | $150-300 |
| Replace washers + O-rings (two-handle) | $3-5 | $150-250 |
| Replace shower arm | $10-20 | $100-150 |
| Replace tub spout diverter | $15-30 | $100-150 |
| Replace valve body (cracked) | Not DIY | $400-900 (includes wall repair) |
Frequently Asked Questions
The cartridge is stuck and the puller will not budge it. What now?
Soak the cartridge in white vinegar for 30 minutes by filling the valve body opening with vinegar through a turkey baster. Vinegar dissolves mineral deposits that cement the cartridge in place. Try the puller again. If it still will not move, stop. The cartridge has corroded to the valve body. Continued force will break the cartridge or the valve body. Call a plumber. The plumber has tools and experience with seized cartridges that a homeowner with a $15 puller does not. The plumber’s service call costs less than cutting the wall open to replace a broken valve body.
Can I just replace the showerhead to fix the leak instead of the valve?
No. The showerhead is a passive opening at the end of the pipe. It has no mechanism to stop water flow. If water is reaching the showerhead, it has already passed through the valve. Replacing the showerhead will not stop a leak caused by a worn cartridge or washer. The only exception is a showerhead with a built-in shutoff valve or pause button. If the showerhead has a pause feature and the leak is coming from the face of the showerhead, the pause valve inside the showerhead may be the problem. Unscrew the showerhead and test the shower arm by turning the faucet on briefly. If water flows freely from the arm with the faucet on and stops completely with the faucet off, the valve is fine and the showerhead is the problem.
The showerhead drips and the water pressure is low. Are these related?
Possibly. A failing cartridge can restrict water flow while also leaking. Replace the cartridge for both symptoms. If the pressure is low but there is no drip, the showerhead screen or the valve inlet screen is clogged with mineral deposits. Clean the showerhead by soaking it in vinegar overnight. If pressure is still low, the problem is the valve or the pipes, not the showerhead.
The Showerhead That Finally Stops Dripping
A leaking shower faucet is a valve repair disguised as a plumbing problem. The water is not coming from the showerhead. It is coming from inside the wall, past a rubber seal that costs between three and sixty dollars depending on whether your faucet uses compression washers or a proprietary cartridge. The repair takes less than an hour. The most difficult part is identifying the brand and model so you buy the right cartridge the first time.
If the shower drips and you cannot identify the faucet brand, take photos of the handle, the escutcheon plate, and the cartridge once removed, and bring them to a plumbing supply house. Not a big-box store. A dedicated plumbing supply house. The person behind the counter has been matching cartridges to photos for years and will identify the part in under a minute. The trip takes longer than the repair.