A ceiling fan with a remote control adds a wireless receiver between the house wiring and the fan. The receiver mounts inside the fan canopy. The wall switch that used to control the fan or the light now supplies constant power to the receiver, and the remote sends radio frequency signals to turn the fan on and off, change speeds, and dim the light. The wall switch must remain in the on position at all times for the remote to work. If someone turns the switch off, the receiver loses power and the remote does nothing.
Installing a fan with a remote takes the same 1 to 2 hours as installing a standard fan. The additional steps are connecting the receiver, pairing the remote, and training everyone in the house not to touch the wall switch. Here is how to do it correctly and how to troubleshoot it when the remote stops working.
How a Ceiling Fan Remote Control Works
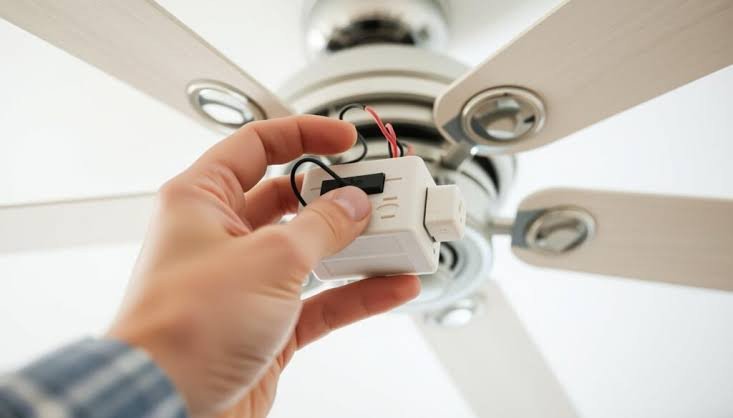
The remote control system has two parts: a handheld transmitter and a receiver module. The transmitter is the remote you hold. The receiver is a small black or white box that installs inside the fan canopy, between the house wiring and the fan motor and light. The receiver draws constant power from the house circuit. When you press a button on the remote, the transmitter sends a radio frequency signal, typically 303 to 315 megahertz, to the receiver. The receiver interprets the signal and adjusts the fan speed, the light brightness, or the fan direction.
The receiver and transmitter communicate on a specific channel or code. Most fan remotes use DIP switches, which are tiny physical switches on the receiver and inside the remote battery compartment, to set the channel. The switches on the receiver and the remote must be set to the same position. If you have two fans in adjacent rooms with remotes set to the same DIP switch code, one remote controls both fans. Change the DIP switch settings on one fan to separate them.
Per ENERGY STAR program guidelines, ceiling fans with remote controls that include a DC motor can reduce energy consumption by up to 65 percent compared to standard AC motor fans with wall-switch control. The energy savings come from the more efficient motor, not from the remote itself, but the remote is standard equipment on most DC-motor fans.
Installing a Fan That Comes With a Factory Remote
Turn off the power at the breaker. Remove the old fixture. Install a fan-rated ceiling box if one is not already present. Mount the fan bracket to the box. These steps are identical to any ceiling fan installation.
The receiver is the component that differs from a standard fan installation. The receiver has three sets of wires: input wires that connect to the house wiring, and two sets of output wires that connect to the fan motor and the light. The input side has a black hot wire, a white neutral wire, and sometimes a green ground wire. The output side has a black wire for the fan motor, a blue wire for the light, a white neutral wire shared by both, and sometimes a green ground wire. The wiring diagram is printed on the receiver or in the manual. The colors are standardized. Black is fan motor. Blue is light. White is neutral.
Connect the house black wire to the receiver black input wire. Connect the house white wire to the receiver white input wire. Connect the house ground wire to the receiver ground wire if present, or directly to the fan bracket ground screw. Connect the receiver black output wire to the fan motor black wire. Connect the receiver blue output wire to the fan light blue wire. Connect the receiver white output wire to both the fan motor white wire and the light white wire, which are typically combined into a single connector on the fan side.
All connections are made with wire nuts. Tuck the receiver into the fan canopy above the mounting bracket. The canopy must close completely. The receiver is larger than you expect. Test-fit the receiver in the canopy before making the final wire connections. A receiver that fits in the canopy when the wires are loose may not fit once all the wire nuts are in place. Tuck the wires around the receiver, not on top of it. The canopy should seat flush against the ceiling without forcing it. A canopy that is forced closed presses against the receiver and can crack the circuit board or pinch a wire.
The wall switch that previously controlled the fan must remain in the on position. If the switch is turned off, the receiver loses power and the remote cannot control the fan. If your household has a habit of turning off light switches when leaving a room, either remove the switch and wire the circuit as always-on with a blank cover plate, or install a switch guard that physically prevents the switch from being turned off. A switch guard is a plastic or metal cage that screws onto the switch plate and costs $3 to $5. It allows the switch to be operated intentionally but prevents accidental operation.
Adding a Remote Control to an Existing Fan
If your existing ceiling fan did not come with a remote, you can add one with a universal remote control kit. The kit includes a receiver and a handheld remote. The receiver installs inside the existing fan canopy, between the house wiring and the fan. The installation is the same as for a factory remote: connect the house wires to the receiver input, and connect the receiver outputs to the fan motor and light wires.
A universal remote kit costs $25 to $40. The kit works with most AC-motor ceiling fans that do not have an integrated remote receiver already. It does not work with DC-motor fans, which have proprietary motor controllers, or with fans that already have a receiver because two receivers in series will conflict. Universal remote kits are available at hardware stores and online. Brands include Hampton Bay, Hunter, and Westinghouse.
After installing the receiver, set the DIP switches on the receiver and in the remote to matching positions. The receiver is inside the canopy, so set the receiver switches to a unique code before closing the canopy. Choose a code that is not the factory default, which is typically all switches in the down position. Neighboring fans may be using the default code and your remote could control them.
Pair the remote with the receiver. On most systems, pairing is automatic when the DIP switches match. On some systems, there is a pairing button on the receiver that must be pressed within 30 seconds of restoring power, or a specific button sequence on the remote that initiates pairing. The manual specifies the pairing procedure. If the manual is lost, the default pairing method for most universal remotes is to turn on the power to the fan, then press and hold the fan off button on the remote for 5 to 10 seconds until the fan light blinks or the fan beeps.
Troubleshooting Remote Problems
The remote does not work at all. Check the wall switch. Someone turned it off. The receiver has no power. Turn the switch on and the remote works. Check the remote battery. The LED indicator on the remote should light when a button is pressed. No light means a dead battery. Replace the battery with a fresh A23 12-volt battery, which is the standard for most fan remotes. Check the DIP switches. The remote and the receiver must be set to the same code. If you changed the battery and the DIP switches match and the remote still does not work, the receiver may be defective and must be replaced.
The remote controls the wrong fan. The DIP switch code matches a neighboring fan. Change the DIP switches on one fan to a different code. Write the new code on a piece of tape and stick it inside the remote battery compartment. You will not remember it six months from now when the remote is replaced.
The remote works intermittently or only at close range. The receiver antenna is blocked. The antenna is a thin wire extending from the receiver. It should be uncoiled and positioned as far from the metal fan bracket as possible. A coiled antenna or an antenna trapped between the receiver and the metal bracket has reduced range. The remote battery is weak. A weak battery works at close range but not from across the room. Replace the battery. There is radio frequency interference from another device. LED bulbs, particularly cheap ones, can emit electromagnetic interference that disrupts the remote signal. If the problem started when you changed the light bulbs, try different bulbs.
The fan hums when the remote is connected. The receiver is not compatible with the fan motor. Some AC motor fans hum when powered through a remote receiver because the receiver chops the AC waveform to vary the fan speed. The humming is more noticeable at low speeds. If the humming is objectionable, the only fix is to remove the receiver and wire the fan directly to the house circuit, controlled by a wall switch. A fan with a DC motor does not have this problem because the motor controller is integrated into the motor, not added externally.
Sources and Limitations
The ENERGY STAR efficiency comparison cited in this guide is based on program specifications published by the U.S. Environmental Protection Agency. The radio frequency ranges for fan remotes are based on Federal Communications Commission Part 15 device specifications. Independent verification of specific product compatibility should be obtained from the fan and remote control manufacturers’ documentation. At the time of writing, additional authoritative sources for residential ceiling fan installation could not be independently verified through web retrieval.
Frequently Asked Questions
Can I control two fans with one remote?
Yes, if both fans have receivers set to the same DIP switch code. One remote controls both fans simultaneously. They will always run at the same speed and the lights will be at the same brightness. If you want independent control, set the receivers to different codes and use separate remotes. You can also use a wall-mounted remote that controls multiple fans independently by switching between channels, but this requires a compatible receiver system.
Can I use a dimmer switch with a remote control fan?
No. A dimmer switch on the wall reduces the voltage supplied to the fan. The remote receiver requires full line voltage to operate. A dimmer between the house circuit and the receiver causes the receiver to malfunction, the fan to hum, and possibly the receiver to fail. The wall circuit supplying a remote control fan must be a standard on-off switch or must be wired as always-on.
How long does the remote battery last?
An A23 12-volt battery in a ceiling fan remote typically lasts 1 to 2 years with normal use. The battery powers a very low-power radio transmitter that is only active when a button is pressed. There is no parasitic drain. When the remote LED dims or the fan responds inconsistently, replace the battery. The A23 battery is available at hardware stores, drugstores, and online for $3 to $5.