The basement window is a rectangular hole in the concrete foundation wall. It has been there since the house was built. A metal or vinyl window frame is set into the opening, and light comes through. When you finish the basement, the new framed wall running along the concrete will pass directly over this window. If the framing around the window is not done correctly, two things happen: the window becomes a recessed box that collects condensation, and the drywall around the window develops cracks where the framing meets the concrete.
Framing a basement window is a sub-project within the larger wall framing job. It consists of building a window buck, which is a wooden frame inside the concrete opening, and integrating the wall framing around it so the drywall has continuous support from the wall into the window well. This guide covers both parts.
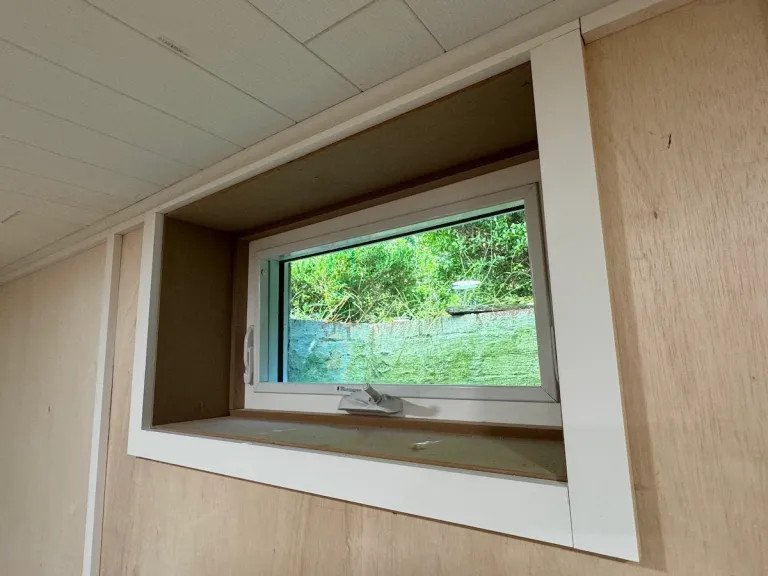
The Window Buck: What It Is and Why It Matters
A window buck is a wooden frame built inside the concrete window opening. It serves three purposes. It provides a flat, square surface for attaching drywall or trim around the window, since the concrete opening is rarely perfectly square or smooth. It creates a thermal break between the cold concrete and the interior finish, reducing condensation on the window frame. And it provides a mounting surface for an interior window stool and casing, the same way a window in an above-ground wall is trimmed.
Without a buck, the drywall must be attached directly to the concrete around the window, which is impractical because concrete screws do not hold drywall reliably, and the concrete transmits cold directly to the drywall surface. The buck is not optional for a finished basement window.
Materials for the Window Buck
- 1x lumber: 1×4, 1×6, or 1×8 boards, depending on the depth of the concrete wall. The board width must be wide enough to span from the inside face of the concrete to the inside face of the finished wall framing. For a typical 8-inch concrete wall with a 1/2-inch gap plus 3-1/2-inch framing, the total depth is roughly 12 inches. A 1×12 board or two narrower boards joined together span this depth.
- 2×4 lumber: for framing around the window opening.
- Construction adhesive: polyurethane-based, compatible with concrete and wood.
- Tapcon screws or powder-actuated fasteners: for attaching the buck to the concrete.
- Spray foam: low-expansion window and door foam for sealing the gap between the buck and the concrete.
Step 1: Build the Window Buck
Measure the concrete window opening on all four sides. The opening will not be perfectly square. The width at the top may differ from the width at the bottom by 1/4 inch or more. Measure both and use the smaller dimension for the buck width, so the buck fits inside the opening without forcing.
Cut four pieces of 1x lumber to form a rectangular frame that fits inside the concrete opening. The top and bottom pieces run the full width of the opening. The side pieces fit between them. Dry-fit the frame inside the opening. It should slide in with slight friction. If it is too tight, plane or sand the edges. If it is too loose, the gap will be filled with spray foam later, but the buck must be held in position while the foam cures. A gap of up to 1/4 inch on each side is acceptable and will be foamed.
Apply construction adhesive to the back edges of the buck frame where it contacts the concrete. Slide the buck into the opening. Position it so it projects into the room far enough to meet the face of the finished wall framing. For a standard 2×4 framed wall with a 1/2-inch gap behind the studs, the buck should extend roughly 4 inches past the interior face of the concrete.
Shim the buck in the opening until it is level and square. Measure the diagonals. If the two diagonal measurements are equal, the buck is square. Secure the buck to the concrete with Tapcon screws through the sides of the buck into the concrete. Two screws per side, top and bottom. The buck is now fixed in position.
Fill the gap between the buck and the concrete with low-expansion window and door spray foam. Low-expansion foam is critical. Standard spray foam expands with enough force to bow the buck inward. Apply the foam in a thin bead along the gap. It will expand to fill the space. Let it cure, then trim the excess flush with a utility knife.
Step 2: Frame the Wall Around the Window
The wall framing running along the concrete wall must accommodate the window opening. The window is an interruption in the stud layout. The framing around it must transfer the load of the drywall above the window down to the bottom plate without relying on the window buck for support.
The window opening in the wall framing is framed like a door opening. A header spans the width of the opening. King studs run from the bottom plate to the top plate on either side of the opening. Trimmer studs inside the king studs support the header. The header for a non-load-bearing interior wall can be a flat 2×4 laid on its face. Cripple studs fill the space between the header and the top plate above the window.
The rough opening in the framing should be 1/2 inch wider and taller than the window buck. This gap allows the buck to be shimmed into final alignment after the wall framing is complete. The gap is covered by the drywall that wraps into the window well.
Step 3: Insulate Around the Window
The gap between the window buck and the wall framing is a thermal weak point. Cold air from the concrete opening conducts through the buck and into the room if the gap is not sealed. Cut strips of rigid foam insulation to fit into the gaps between the framing and the buck. Spray foam any remaining small gaps. The goal is a continuous thermal break from the concrete to the interior.
If the window itself is old and single-pane, consider replacing it before building the buck. A new window installed into the concrete opening is a separate project from framing, but the framing is built around the window that is there. Replacing the window after the buck and drywall are installed is significantly more difficult. Replace it now if it needs replacing.
Step 4: Drywall and Trim the Window
Drywall extends from the wall surface into the window well, covering the window buck. Cut drywall pieces for the top, bottom, and sides of the window well. The drywall in the well butts against the window frame and meets the wall drywall at the outside corner. Install corner bead on the outside corners where the wall drywall meets the well drywall. Tape and mud the seams. The result is a smooth transition from the wall into the window well.
Install a window stool, which is the horizontal sill piece at the bottom of the window, and casing around the perimeter. The stool and casing cover the drywall-to-window-frame joint and provide a finished appearance. The trim is nailed to the window buck, not to the window frame itself.
Frequently Asked Questions
What if the basement window has a metal frame embedded in the concrete?
Do not remove the metal frame. It is part of the window assembly and is embedded in the concrete when the foundation is poured. Build the wood buck inside the metal frame, attaching the buck to the concrete, not to the metal. The wood buck sits inside the metal frame and extends past it into the room. The gap between the buck and the metal frame is filled with spray foam.
What if I need to enlarge the window for egress?
Enlarging a basement window for egress, which is required for any basement bedroom, involves cutting the concrete foundation wall. This is not a DIY framing project. It requires a concrete cutting contractor, a structural engineer to specify the lintel over the new larger opening, and a building permit. The framing around the new egress window is built as described in this guide, but the window installation itself is a separate, permitted project that must be completed before the framing begins.
The Window That Looks Finished
A framed and trimmed basement window brings natural light into a finished space and removes the last visual reminder that the room is below ground. The window buck squares the opening. The wall framing integrates the window into the room. The drywall wraps into the well. The trim finishes the transition. The window looks like any other window in the house. The concrete it sits in is invisible, which is the point of finishing a basement.