A flange spacer is a thin, rigid plastic or metal ring that sits on top of the existing toilet flange to raise the sealing surface by a precise amount, typically an eighth or a quarter of an inch per spacer. Unlike a foam or rubber flange extender, which compresses to fill irregular gaps, a spacer is a solid shim. It raises the flange without adding any compressibility to the connection, which means the wax ring does all the sealing and the spacer does only one thing: it moves the sealing surface up to the level of the finished floor. For a flange that is uniformly recessed by a known amount, a rigid spacer stack is more stable and more permanent than a compressible extender. The toilet will not settle, the spacer will not compress further over time, and the wax seal will not be gradually deformed by a foam gasket that is slowly squishing under the weight of the toilet and its occupant.
A flange spacer is the correct solution when the existing flange is solid, the recess depth is uniform around the entire circumference, and the amount of rise needed is within the range that rigid spacers can provide, typically up to about three-quarters of an inch before the stack becomes unstable. For a flange that is unevenly recessed, tilted, or has a broken sealing surface, a flexible extender or a flange replacement is the better solution. A rigid spacer on an uneven flange rocks, and a rocking spacer is worse than no spacer at all.
Spacer vs Extender — When to Use the Rigid Solution
A rigid spacer is the right choice when the recess depth is precisely known and the existing flange surface is flat and smooth. A bathroom where the original vinyl floor was replaced with quarter-inch tile produces a uniform recess of about three-eighths of an inch, accounting for the tile thickness and the thinset. A stack of one quarter-inch spacer and one eighth-inch spacer fills that gap exactly. The spacers sit flat on the old flange, the wax ring sits on the top spacer, and the toilet compresses the wax ring as if the flange had never been recessed.
A flexible extender, the type with a rubber or foam gasket that compresses to fill the gap, is the right choice when the recess depth varies or when the existing flange surface is too pitted or irregular for a rigid spacer to sit flat. A flexible extender conforms to the irregular surface and creates a seal between the extender and the old flange. The trade-off is that a flexible extender adds a compressible layer between the toilet and the floor, and over years of use, the foam gasket can compress further, allowing the toilet to settle and the wax seal to lose compression. A rigid spacer stack does not settle. Once it is screwed down, the height is fixed permanently.
For a recess of less than a quarter inch, a single rigid spacer is almost always the better choice. For a recess between a quarter and a half inch, both solutions work, and the decision comes down to the condition of the existing flange surface. For a recess between a half and three-quarters of an inch, a stack of rigid spacers with silicone caulk between each layer can work, but a flange extender designed for that depth is more reliable. For a recess greater than three-quarters of an inch, replace the flange.
Installing a Rigid Flange Spacer
Remove the old closet bolts from the existing flange. Clean the flange surface with a rag and a putty knife to remove all old wax, rust, and debris. A spacer requires a clean, flat surface to sit on. Any bump or irregularity on the old flange will prevent the spacer from sitting flush, and a spacer that does not sit flush will rock. Dry-fit the spacer on the flange and confirm it sits flat with no rocking. If the spacer rocks, identify the high spot on the old flange and file it down or scrape it clean until the spacer sits flat.
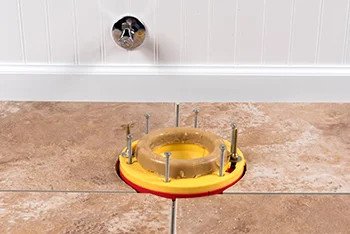
Apply a thin, continuous bead of silicone caulk to the top surface of the existing flange where the spacer will contact it. Do not apply caulk to the drain opening. The caulk fills microscopic irregularities in the flange surface and creates a gas-tight seal between the spacer and the old flange. Place the spacer on the caulk, align the closet bolt slots with the slots in the old flange, and press down firmly. The caulk should squeeze out slightly around the edges of the spacer, indicating full contact.
Screw the spacer to the floor through the mounting holes in the spacer and the old flange. If the old flange screw holes are stripped in PVC, use a slightly larger diameter stainless steel screw. If the old flange is cast iron and the holes are rusted out, drill new pilot holes through the spacer and into the floor adjacent to the old screw locations. Tighten the screws evenly until the spacer is tight against the old flange and immobile. Wipe away the excess caulk that squeezed out.
If stacking multiple spacers, apply a bead of silicone caulk between each spacer layer. Do not stack spacers dry. The spacers are not perfectly flat, and the microscopic gaps between dry-stacked spacers will trap sewer gas and eventually leak. Caulk between every layer, tighten the screws through all layers into the floor, and wipe away the excess. The stack should feel like a single solid block, not a stack of loose rings.
Insert new closet bolts into the aligned slots. The closet bolts must be long enough to reach through the spacer stack and the toilet base. If the original closet bolts are too short, use extra-long bolts. Install the wax ring on the toilet, lower the toilet onto the bolts, and tighten the nuts evenly. Do not overtighten. The wax ring compresses under the weight of the toilet, and adding bolt pressure on top of that is unnecessary and risks cracking the porcelain.
The Half-Moon Spacer — When You Cannot Remove the Closet Bolts
A half-moon spacer, also called a slip-on spacer or a split spacer, is a spacer ring with one side open so it can slide around the existing closet bolts without removing them. This is useful when the closet bolts are rusted in place and cannot be removed without cutting them, or when the toilet is being reinstalled and the bolts are already in position. The half-moon spacer slides in from the side, the open end closes around the bolts, and the spacer is screwed down like a full ring.
A half-moon spacer does not seal as reliably as a full ring spacer because the split in the ring creates a gap that must be filled with caulk. Apply silicone caulk generously in the gap after the spacer is screwed down, and tool it smooth. The caulk-filled gap is a weak point in the seal, which is why a full ring spacer is preferred when the closet bolts can be removed. Use a half-moon spacer only when a full ring cannot be installed. A full ring spacer costs the same as a half-moon spacer and seals better.
FAQ — Toilet Flange Spacers
Should I use a PVC spacer or a metal spacer?
PVC is standard for residential toilets. It will not rust, it is slightly flexible so it conforms to minor irregularities in the old flange, and it bonds well with silicone caulk. A metal spacer, typically stainless steel or galvanized steel, is stiffer and more durable but can rust if the finish is scratched during installation. Use the spacer material that matches the existing flange or the repair ring. A metal spacer on a PVC flange is fine. A PVC spacer on a metal flange is fine. The material matters less than the flatness of the surface and the seal between the layers.
I need to raise the flange by an inch. Can I stack four quarter-inch spacers?
No. A stack of four spacers is too tall and too unstable. The closet bolts will flex under load, the stack will shift over time, and the wax seal will fail. If the flange is recessed more than three-quarters of an inch, the correct repair is to replace the flange with one that sits at the correct height, or to use a flange extension kit that includes a single-piece tall extension sleeve that fits inside the drain pipe and provides a new sealing surface at the correct height. A tall extension fits inside the existing pipe, seals with a rubber gasket, and extends upward to the finished floor level. It costs about fifteen to twenty dollars and is more reliable than a tall stack of spacers.
Should the spacer go on top of the repair ring or under it?
On top. The repair ring sits directly on the old flange and provides the structural connection for the closet bolts. The spacer sits on top of the repair ring and raises the sealing surface. Reversing the order puts the spacer under the repair ring, where it serves no purpose because the repair ring is already at the same height as the old flange.