What Counts as a Large Hole
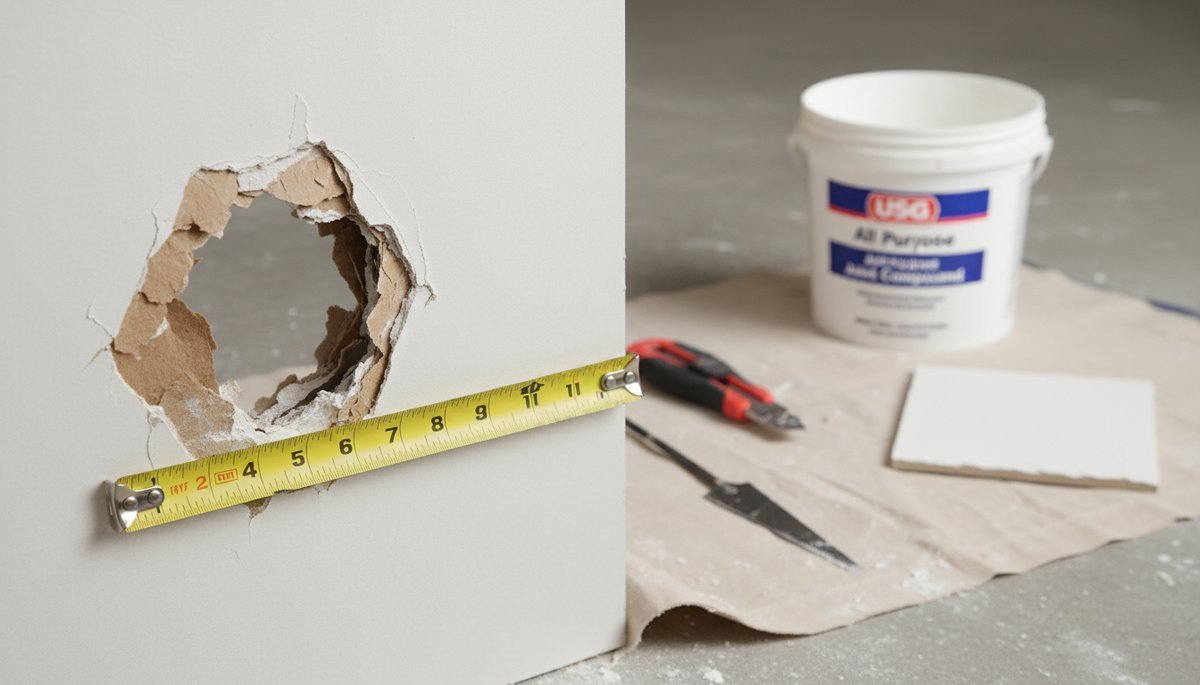
A small hole is something you can cover with an adhesive mesh patch and a few swipes of joint compound. A large hole is anything wider than six inches across, the kind left behind by a doorknob punch-through, a plumbing access cutout, or a badly aimed piece of furniture during a move. At this size, standard drywall mesh alone will not hold. The patch needs structural support behind it, or you need to cut a new piece of drywall to fit.
There are two approaches that work, and which one you pick depends on the hole size and your comfort level with drywall work. The backer board method is the standard, the one professionals use.
The California patch, sometimes called a butterfly patch, is faster and requires fewer materials but demands more precision. Both beat the hack job of stuffing newspaper in the hole and mudding over it, which absolutely does not work and you already knew that.
“How to fix a somewhat large hole in the drywall? About the size of a fist. My landlord is coming next week and I need to get this sorted.”
— u/anonymous in r/HomeMaintenance · 30 upvotes · 43 comments
Tools and Materials You Need
Before cutting into anything, gather everything. Nothing is more frustrating than holding a piece of drywall in place with one hand and realizing the screw gun is still in the garage. Here is what you need for either method:
- Drywall panel (2 ft x 2 ft patch panel covers most holes, about $8 at Home Depot)
- Utility knife with fresh blades
- Drywall saw or jab saw
- Measuring tape and pencil
- Wood backer board, 1×3 or 1×4 pine (only needed for backer board method)
- 1-1/4 inch drywall screws
- Power drill or screwdriver
- Mesh drywall tape
- All-purpose joint compound (pre-mixed tub, about $12)
- 6-inch and 10-inch putty knives
- 150-grit sandpaper and sanding block
- Primer and matching paint
Method 1: The Backer Board Technique
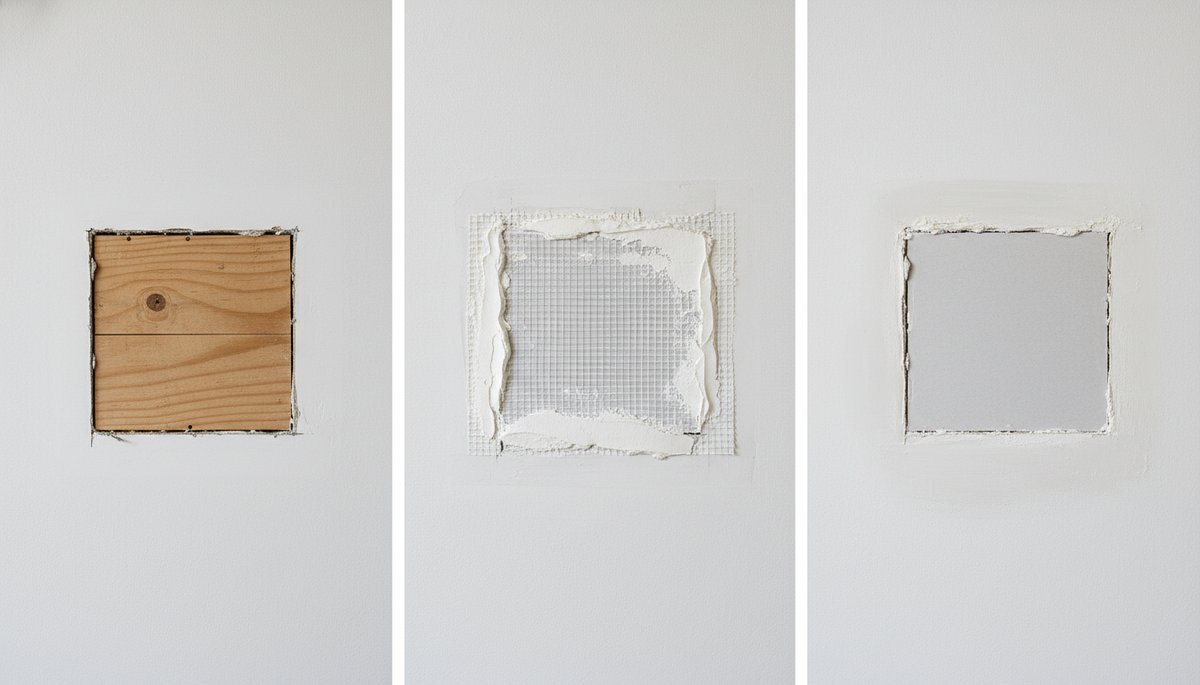
This is the method for holes larger than about twelve inches across, or any hole where structural support behind the patch matters. It takes longer than the California patch but produces a repair that is indistinguishable from the original wall once painted.
Step 1: Square up the hole. Use the drywall saw to cut the damaged area into a clean rectangle or square. Find the nearest studs on either side of the hole. Ideally, your cutout extends to the center of the studs on both sides so you have something to screw into. If the hole does not reach the studs, no problem. That is what the backer board is for.
Step 2: Install the backer board. Cut two pieces of 1×3 or 1×4 pine about four inches longer than the height of your cutout. Slide one piece into the hole and position it vertically behind the drywall on the left side of the opening.
Screw through the existing drywall into the backer board above and below the hole. Repeat on the right side. You now have a solid frame behind the opening to screw your patch into.
Step 3: Cut and attach the patch. Measure the opening and cut a piece of drywall to fit. It should be slightly smaller than the opening to leave a thin gap around all four sides for joint compound to fill. Screw the patch into the backer boards using drywall screws spaced every six inches. The screw heads should dimple slightly below the surface without breaking the paper face.
Step 4: Tape, mud, sand, repeat. Cover all four seams with mesh drywall tape. Apply the first coat of joint compound with the six-inch knife, pressing it through the tape and feathering the edges out about four inches beyond the seams.
Let it dry completely, usually 24 hours. Apply a second coat with the ten-inch knife, feathering farther out. Sand lightly between coats. Most patches need three coats to disappear. Prime and paint to match.
“Large hole in drywall. How to fix? This is behind my bathroom door. The doorstop failed and the handle went straight through.”
— u/anonymous in r/HomeMaintenance · 28 upvotes · 51 comments
Method 2: The California Patch
The California patch works for holes roughly six to twelve inches across. It is faster than the backer board method because you do not need wood supports or to screw into studs. The patch itself provides the structure. The trick is cutting the drywall correctly.
Step 1: Cut the patch blank. Cut a square of drywall about two inches larger than the hole in both directions. On the back side of this piece, measure in two inches from each edge and score a line through the gypsum core with a utility knife, but do not cut through the front paper.
Snap the gypsum along the score lines and peel away the excess, leaving a two-inch paper border around all four sides of the face. This paper flap is what bonds the patch to the wall.
Step 2: Trace and cut the wall opening. Hold the patch over the hole and trace around the gypsum portion, not the paper border. Cut along this line with the drywall saw. The opening in the wall should now match the gypsum piece exactly.
Step 3: Mud and set the patch. Spread a thin layer of joint compound around the edges of the opening on the wall. Press the patch into place. The paper border should lay flat against the surrounding wall surface.
Use the putty knife to embed the paper into the compound, working from the center outward to squeeze out air bubbles. Apply a thin skim coat over the entire patch and paper border.
Step 4: Finish like normal. Let the first coat dry. Apply two more coats, feathering each one wider than the last. Sand, prime, paint. The paper border creates a seamless transition that, done right, disappears completely.
“Can I patch a hole in drywall without using mesh tape? I ran out and the store is closed. My wife wants this fixed tonight.”
— u/anonymous in r/HomeImprovement · 16 upvotes · 37 comments
Mistakes That Turn a One-Day Job Into a Week
Skipping the backer board when you need it. If the hole is wider than twelve inches and you try a California patch, the unsupported drywall will flex every time someone leans on the wall. The joint compound cracks. You end up doing the job twice. Use the right method for the hole size.
Applying joint compound too thick. Joint compound shrinks as it dries. If you trowel it on a quarter-inch thick hoping to finish in one coat, you get shrinkage cracks and a lumpy surface. Three thin coats always beat one thick one. Dry time between coats is not optional. If the compound feels cool to the touch, it is still wet inside even if the surface looks white.
Sanding without dust control. Drywall dust is fine enough to float through an entire house. Tape plastic sheeting over doorways to contain the mess. A damp sponge can knock down ridges between coats without generating dust at all. For final sanding, hook a shop vac to a sanding block with a dust port, or use a vacuum-assisted hand sander. Your lungs and your furniture will thank you. Once the wall is patched and painted, take the opportunity to inspect the rest of your home for hidden issues. A quick foundation check can catch structural problems before they turn into bigger repairs.
Painting over unprimed compound. Joint compound is porous. If you paint directly over it without primer, the paint absorbs at a different rate than the surrounding wall and the patch flashes through no matter how many coats you apply. One coat of PVA drywall primer, then paint.
Frequently Asked Questions
How to patch large holes in drywall without replacing the whole sheet?
Both the backer board method and the California patch avoid replacing the entire drywall sheet. For holes up to twelve inches, the California patch is faster and requires fewer materials. For larger holes, the backer board method provides structural support that a paper-only patch cannot match. Neither method requires removing full sheets.
Can you use spackle for large drywall holes?
Spackle is designed for nail holes and small dents, not structural repairs. For holes larger than a few inches, spackle lacks the strength to bridge gaps and will crack as it dries. Joint compound, applied in thin layers over mesh tape or a drywall patch, is the correct material. Spackle is the wrong tool for this job.
How long does a drywall patch take from start to finish?
Expect two to three days for a professional-looking repair. Day one: cut the hole, install the patch, and apply the first coat of compound. Day two: apply second and third coats with drying time between. Day three: sand, prime, and paint. Rushing the drying between coats is the number one reason patches fail.
What if there are wires or pipes behind the hole?
Before cutting, probe the hole with a bent wire hanger to check for obstructions. If you find electrical wiring or plumbing, keep your saw shallow. Cut through the drywall only, not deeper. For peace of mind, shut off power to the room at the breaker before working near any wall that might contain wiring. If the hole is from a doorknob, the only thing behind it is empty stud space.
Do you need to use mesh tape on drywall patches?
For the backer board method, yes. Mesh tape prevents cracks from forming along the seams where the patch meets the existing wall. For the California patch, the paper border serves the same purpose as tape. The paper flap bonds to the joint compound and creates a reinforced seam without needing separate mesh tape.