
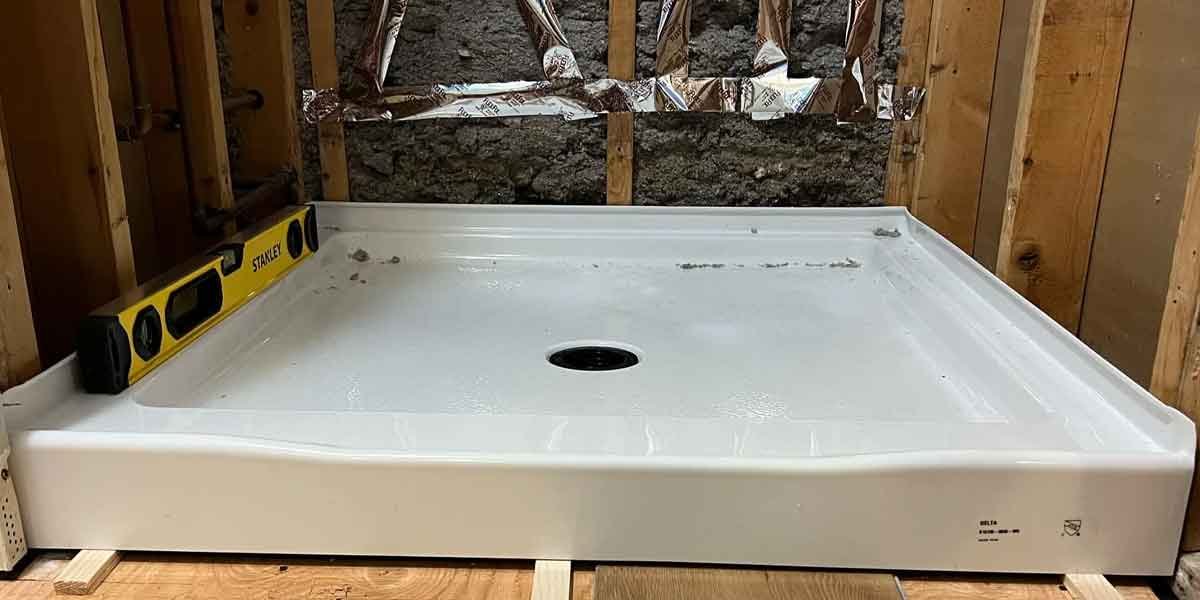

Slope goes under the waterproofing, never on top of it. That is the line between a shower pan that lasts and one that quietly rots the floor beneath it, and shower pan installation is mostly the work of honoring it.
The pan is not one procedure. The base you choose decides where the slope comes from, what carries the waterproofing, how high the curb stands, and whether the drain is counting on a ring of weep openings to stay clear. Settle the system first, because every later step is a consequence of that choice.
What follows is the order that keeps water moving: rough in the drain, build the sloped bed, waterproof it, and test the assembly before anything covers it. The preslope and weep-hole rules that most U.S. inspectors enforce come from the International Residential Code, and a shower pan installation reads as a short sequence once you know what each line protects.
How a Shower Pan Sheds Water
A tiled shower leaks a little by design. Water passes through the grout and the mortar bed above the liner, reaches the liner itself, and has to travel to the drain. The liner’s slope, not the tile’s, decides whether that water leaves or stands.
A preslope is the pitched mortar bed that sits under the liner and aims it toward the drain. The code describes the same thing from the other end: the lining must be sloped a quarter inch per foot toward the drain’s weep openings, carried on a subbase smooth and solid enough to hold that pitch without sagging. The drain then clamps the liner between two flanges, and the clamping ring carries the openings that let water escape from the bed above.
Take the lower slope away and the liner lies flat. Water reaching it has no reason to move toward the drain, because the drain sits in the middle of the liner rather than at its low corner. The mortar bed above stays damp, the framing around it stays damp, and the first visible sign is usually a soft tile or a stain on the ceiling below rather than a puddle in the shower.
The weep openings close the loop. A weep opening is the small channel at the drain flange that connects the space above the liner to the waste line, and the final mortar bed is often poured straight over it. Once those openings are plugged, the liner still holds water; it just has no way to release it.
Four Pan Systems, and What Each One Locks In
The four common assemblies differ on three points: what creates the slope, what carries the waterproofing, and whether the drain depends on weep openings. Prefab bases and foam trays arrive sloped; a site-built mud bed and a bonded membrane take their slope on site.
Each choice narrows what you can build later. A prefab base fixes the footprint and the curb in a factory, while a mud bed lets you set both. A draped liner keeps the drain tied to its weep openings, and a bonded membrane removes that dependency but has to sit on a sound, compatible substrate and lap correctly at every change of plane.
| Assembly | What sets the slope | Waterproof layer | Curb | Fits best when |
|---|---|---|---|---|
| Prefab acrylic or fiberglass base | Molded into the base | The base shell | Integral, factory height | A tub-to-shower swap in a stock size, done fast |
| Pre-sloped foam tray plus bonded sheet membrane | Molded into the tray | Sheet membrane bonded with thin-set | Low, or curbless with a ramp | A tiled floor with a low threshold |
| Site-built mud bed with a draped liner | Preslope poured on site | PVC or CPE sheet clamped at the drain | Framed and mudded on site | Non-standard dimensions or a drain that has to move |
| Site-built mud bed with a bonded membrane | Preslope poured on site | Sheet membrane bonded to the bed | Framed and mudded on site | A custom size without the weep-opening dependency |
The code lists the accepted waterproofing materials for a site-built shower: sheet lead, sheet copper, a plastic liner meeting ASTM D4068 or D4551, hot mopping, and a sheet-applied bonded membrane meeting ANSI A118.10. Those materials are not interchangeable trade for trade. Lead, copper, and hot mop survive in a few regions, and the working choice for most owners is a PVC or CPE liner or a bonded sheet such as KERDI, an 8-mil membrane applied with thin-set over a sloped bed or a factory tray.
Two questions settle the picking. Can the rough opening be built to a stock size? If it can, a prefab base or a pre-sloped tray removes the preslope question entirely, because the slope arrived from the factory. Does the drain have to move? A center drain over an existing trap favors a prefab base, while a linear drain or a relocated trap favors a site-built bed, where the slope is shaped around wherever the drain lands.
A stock opening and a stationary drain point at the factory-made pans; anything else points at the mud bed.
Shower Pan Installation Order: Drain First, Tile Last
The order of a shower pan installation runs drain first, slope second, waterproofing third, a test fourth, and tile last. Reversing any of the last three means pulling tile to reach a buried layer, which is why the sequence is worth keeping even when it costs a day of waiting.
One plumbing fact shapes the start. A shower drain takes 2-inch pipe, while the tub drain you may be replacing is usually 1-1/2 inch, and the trap has to sit directly under the shower drain instead of under the old tub’s overflow. That distance between the old trap and the new drain is the part of a tub-to-shower conversion that eats a weekend.
- Locate the drain and the trap, and confirm the trap will fall under the new drain outlet.
- Cut only as much subfloor as the plumbing needs, then check the joists and the sheathing for rot or soft spots.
- Set the drain flange so its top meets the finished surface of the sloped bed, clamped and ready for the liner or membrane.
- Build the preslope at a quarter inch per foot, mixed stiff enough to hold a straightedge without slumping.
- Install the waterproofing, carrying it up the walls and over the curb with the required laps at every inside and outside corner.
- Flood-test the pan before it is covered.
- Pour the top bed and tile, keeping fasteners out of the liner near the threshold.
The wall details carry the same weight as the floor. The lining has to run at least two inches above the finished threshold, with no nails or screws driven through it within an inch of that line, and the curb must measure between two and nine inches from its top to the top of the drain.
Those numbers exist because a liner fails at a corner or a penetration far more often than it fails in the middle of the floor.
Setting the Pan on Wood or Concrete
Prefab bases and foam trays need support under their whole footprint, and mortar is the usual answer on both wood and concrete. A base laid directly on a slab, or set on a few dabs of adhesive, flexes underfoot and eventually cracks or rocks.
On a wood subfloor the bed does two jobs: it takes out the small variations in the plywood, and it fills the hollow beneath a molded base so the floor of the pan carries the person standing on it instead of the rim. Much of shower pan installation is this substrate work, and it is the part that decides whether the base feels solid years later.
Whether a pan can go straight onto a slab depends on the assembly. A site-built receptor is constructed there, layer over layer. A prefab base is not poured at all; it is bedded in mortar that has been packed to fit its underside. For the bonded-membrane route, the sheet bonds to a flat, sound substrate, so any dips get filled before the membrane goes down.
When the Floor Is Out of Level
An out-of-level floor does not stop a pan from going in, but it changes the method. Shims under the rim lift the base and leave its middle unsupported, while a mortar bed shaped to the underside supports the whole footprint and lets the front edge meet the floor without a gap.
Older houses are where this turns up. A remodeler describing his own sixty-five-year-old bathroom put the problem plainly in a thread about setting a 36-by-48-inch base on a floor that measured level end to end but pitched at 2 percent.
“The floor is perfectly level, but slopes at 2 percent. I need to install a pre-made shower base… My plan is to shim the base to make it level, which will require raising one end 1 inch.”
MrProject, DIYChatroom, July 2020
The reply that followed rejected the shim plan and pointed at the bed instead: pack mortar under the base, let it take the shape of the pan’s underside, and level from there. The bed carries the base so its rim can sit down on the floor tile without a shadow line under it.
The Flood Test and What It Catches
Before the pan is covered, the lining has to hold water. The 2021 International Residential Code requires the receptor to be filled at least two inches deep at the threshold and held for fifteen minutes with no leakage, though some local amendments call for a longer hold.
A flood test is the last checkpoint in a shower pan installation: plug the drain, fill to just under the top of the curb, mark the water line on the liner, and read it again after the hold period. A drop means the liner or membrane has a defect at the drain, at a corner, or at a wall seam, and finding it now is far cheaper than finding it through the ceiling below. Ask your inspector what the local standard is before you fill.
The test also forces the two mistakes that cause most failures into view. A missing preslope shows up as water that stays in the pan after the test is drained, because it has nowhere to run. A liner that was fastened through near the threshold shows up as a ring of punctures at the curb, still visible before the tile arrives to hide them.
Everything above the liner can be replaced later — the liner cannot, and nothing after the tile goes on will tell you whether it held.
Shower Pan Installation FAQ
What is the most common shower pan installation mistake?
Leaving out the preslope is the one that surfaces last and costs the most. Water that passes the tile has no pitch to carry it to the weep openings, so it sits in the bed until the framing around it rots and the ceiling below stains.
Do I need to put anything under a shower pan?
A prefab base or foam tray needs a full mortar bed across its footprint. The bed brings the base to level, fills the hollow under a molded underside, and keeps the pan from flexing when someone stands near an edge. A site-built pan carries its mortar bed under the liner instead.
How do you secure a shower pan to the floor?
The base is bedded in mortar and its flange is fastened to the wall framing, not to the floor. The mortar holds the pan level and in contact across its whole underside, and the wall fasteners keep it from shifting. Screws driven through the pan floor, or through the liner near the curb, are the ones to avoid.
How difficult is it to install a shower pan?
A prefab base set in mortar is a weekend job for a careful homeowner who can handle basic plumbing. A site-built pan with a preslope, a clamped liner, a flood test, and a top bed is a tile setter’s work; the tolerance on the slope and the folds at the corners is where first attempts fail.
Can I pour a shower pan directly onto a concrete slab?
A receptor can be built over a slab, but not poured against bare concrete. The slab is filled, leveled, and shaped with mortar first, so the preslope or the prefab base sits on a continuous pitched surface instead of the slab’s own uneven one.
Should a shower pan be set in mortar?
Yes, for any factory-made base. Mortar is what fills the space under a molded underside and keeps the pan from rocking. A base set on adhesive alone leaves the middle unsupported, and the crack starts where a heel lands.