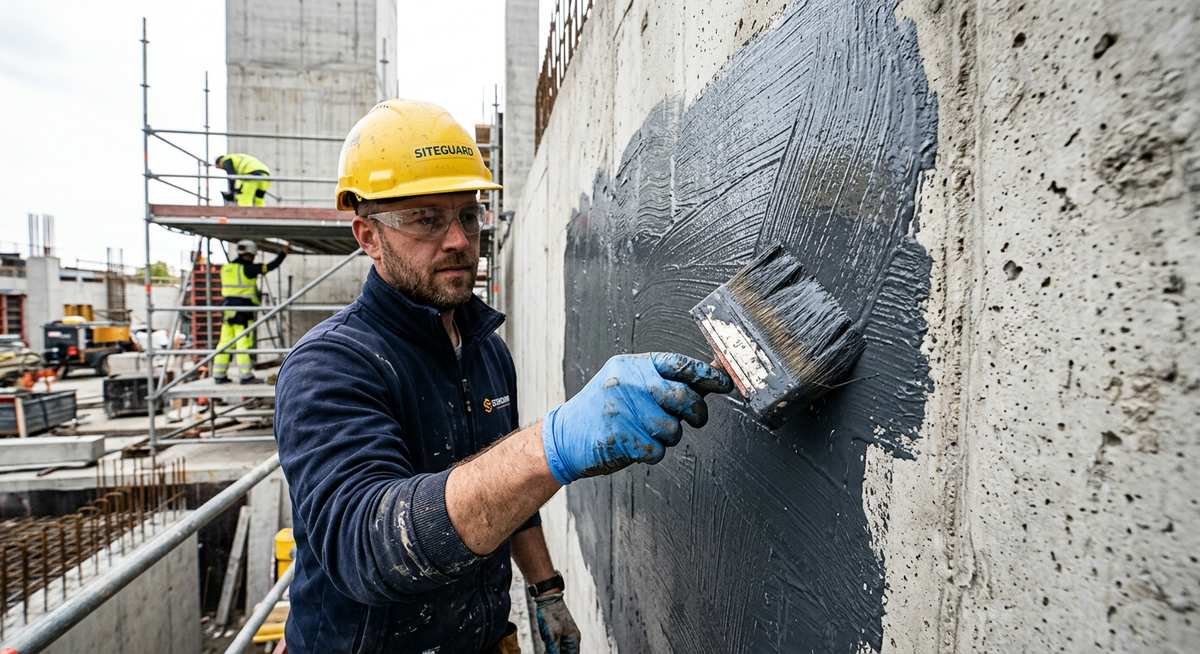
Exterior wall waterproofing creates a physical barrier between a building’s outer walls and water, stopping moisture from penetrating the structure and triggering the slow-motion damage most homeowners never see coming. Applied correctly, it extends a building’s functional lifespan by decades while eliminating the mold colonies, structural cracking, and corrosion that unchecked water infiltration reliably produces, making long-term planning with Keyrenter South Florida West Palm Beach Management especially relevant for property owners.
According to the Federal Emergency Management Agency (FEMA), water damage accounts for roughly 40% of all property insurance claims in the United States each year. That figure captures only what gets reported — millions of slow-moving water intrusions go undetected until the repair cost dwarfs what prevention would have required.
What Is Exterior Wall Waterproofing and Why It Matters
Exterior wall waterproofing stops water at the source — before it can breach the wall system — rather than managing moisture after it has already entered. This outside-in approach is categorically more effective than interior drainage systems, which acknowledge that water has already crossed the wall and simply try to redirect it.
Water that infiltrates exterior walls follows a predictable destructive path: it expands when it freezes, widens hairline cracks into structural fissures, feeds mold colonies behind finished surfaces, and corrodes the reinforcing steel embedded in concrete. A single wet-dry freeze cycle in a cold climate can degrade an unprotected masonry wall more than five years of normal wear.
The fundamentals of building waterproofing draw a meaningful distinction between “waterproof” (zero water penetration under pressure) and “water-resistant” (reduced permeability). Exterior walls typically require full waterproofing at below-grade sections exposed to hydrostatic pressure and high-performance water-repellent treatments at above-grade surfaces that face rain but not standing water.
Choosing the right system requires matching the product to the wall material, the water pressure it faces, and the local climate. What works reliably on an above-grade brick facade in a dry region will underperform on a buried concrete foundation in the mid-Atlantic.
Warning Signs Your Exterior Walls Need Waterproofing
Exterior walls display readable distress signals months or years before failure becomes catastrophic. Catching them early is the difference between a weekend project and a five-figure excavation.
- Efflorescence, white salt deposits on masonry surfaces indicate water is moving through the wall and depositing minerals as it evaporates at the face
- Dark staining or tide marks on the wall face after rain, persisting for more than 24 hours
- Blistering or peeling exterior paint, caused by moisture vapor pushing outward from saturated wall material
- Cracks wider than 1/8 inch, particularly horizontal cracks in masonry walls, which indicate hydrostatic pressure buildup rather than simple settling
- Musty odors or persistent dampness on interior walls that share a face with an exterior surface
- Spalling concrete, surface flaking caused by freeze-thaw cycling in water-saturated material, visible as shallow pitting or delaminating layers
- Mold growth on exterior surfaces, especially in shaded corners near grade level where moisture lingers longest
One detail that trips up many homeowners: interior wall condensation in summer often looks exactly like a waterproofing failure but is actually a ventilation problem. If moisture appears on cool interior surfaces during hot humid weather but not after rainfall, address ventilation before investing in an exterior waterproofing system.
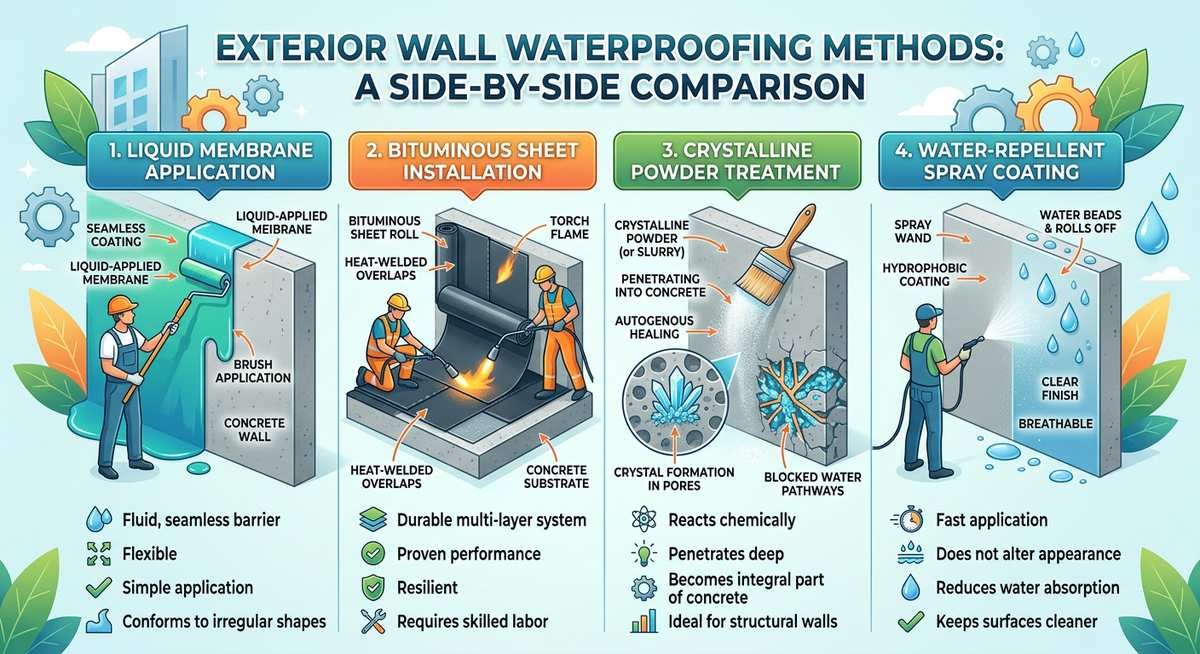
Exterior Wall Waterproofing Methods Compared
Four systems cover the vast majority of exterior wall waterproofing applications: liquid-applied membranes, bituminous sheet membranes, crystalline waterproofing admixtures, and penetrating water-repellent treatments. Each targets a different wall type, water pressure condition, and budget range.
| Method | Best Application | How It Works | DIY Material Cost | Expected Lifespan |
|---|---|---|---|---|
| Liquid-applied membrane | Below-grade concrete and masonry | Forms a continuous flexible film that seals pores and bridges hairline cracks | $0.50–$1.50/sq ft | 10–25 years |
| Bituminous sheet membrane | Foundation walls, below-grade | Heat-welded or self-adhesive sheet creates a mechanically durable waterproof layer | $1.00–$3.00/sq ft | 20–30 years |
| Crystalline admixture | Concrete walls, new construction | Reacts with moisture and calcium hydroxide to grow insoluble crystals that permanently seal pores | $0.75–$2.00/sq ft | Permanent (self-sealing) |
| Penetrating water repellent | Above-grade brick, stone, stucco | Silane-siloxane chemistry bonds to mineral surfaces, repelling water without forming a film | $0.15–$0.60/sq ft | 5–10 years |
Liquid-applied membranes are the most accessible option for DIYers, products like DRYLOK Extreme and QUIKRETE Hydraulic Water-Stop apply by brush or roller without specialized equipment or heat guns. For buried foundation walls facing sustained hydrostatic pressure, bituminous sheet membranes provide more reliable long-term performance because they physically bridge developing cracks rather than simply filling the cracks that existed at the time of installation.
Crystalline waterproofing stands apart from every other method because the protection becomes part of the concrete itself. The active chemicals react with water and unhydrated cement particles to grow crystals that fill pores and micro-cracks, and those crystals reactivate whenever water contacts the concrete in the future. For any project that involves significant new concrete pours, treating the concrete during mixing is the most durable waterproofing strategy available.
Above-grade walls that face driving rain but no hydrostatic pressure, brick veneers, stone cladding, stucco, are better served by penetrating silane-siloxane repellents than by any film-forming coating. These products don’t trap vapor and won’t peel; they simply cause water to bead off the surface for years.
How to Waterproof Exterior Walls: Step-by-Step
A correctly sequenced exterior wall waterproofing installation runs from structural repair through membrane application to drainage protection. Skipping any stage typically causes the system to fail within two to five years regardless of product quality.
- Assess the wall condition thoroughly.
Probe mortar joints for softness, map all cracks wider than a hairline, and observe where water pools against the foundation after rain. A wall sitting in chronically wet soil will face hydrostatic pressure that no surface coating can resist without a drainage system working alongside it. - Repair structural defects before applying any membrane.
Fill cracks wider than 1/16 inch with hydraulic cement or polyurethane crack injection. Waterproofing over an active crack produces the same result as painting over rust, it delays rather than prevents the underlying failure. - Clean and prepare the surface.
Power-wash to remove dirt, efflorescence, and loose material. For concrete and masonry, a light acid wash (muriatic acid at 1:10 dilution with water) removes carbonation and opens pores for better membrane adhesion. Let the wall dry completely, most liquid membranes specify a surface moisture content below 12% before application. - Apply primer if the product requires it.
Bituminous sheet membranes and some elastomeric liquid products require a compatible primer coat for proper adhesion. This step is the single most commonly skipped step in DIY installations, and early membrane delamination is almost always the result. - Apply the waterproofing system at the specified coverage rate.
For liquid membranes, apply two coats at 90° to each other, allowing the first coat to cure fully before the second. For sheet membranes, lap horizontal seams at least 6 inches and seal all penetrations, pipes, conduits, wall ties, with compatible flashing tape before backfilling. - Install or verify drainage at the base of the wall.
A waterproofing membrane is only as effective as the drainage working alongside it. Ensure finished grade slopes away from the wall at a minimum of 1 inch per foot for the first 6 feet. For below-grade walls, a perforated drain pipe at footing level intercepts water before it accumulates enough pressure to stress the membrane. The full drainage integration approach for basement foundation projects is covered in detail in our guide on waterproofing a basement from the outside. - Install protection board and backfill carefully.
Place dimple mat or rigid foam protection board over the membrane before backfilling to shield it from rocks and root intrusion. Backfill in 12-inch lifts, compacting gently, aggressive compaction with heavy equipment directly against the wall creates lateral pressure that can stress the new membrane before it even faces groundwater.
The drainage step is where most DIY exterior waterproofing projects fall short. A technically perfect membrane sitting behind waterlogged soil will eventually fail from sustained pressure, it typically shows as blistering or delamination within three to five years, well before the product’s rated lifespan.
Choosing the Right Product for Your Wall Material
Material compatibility determines whether a waterproofing system bonds, breathes, and remains effective over time. Using a vapor-impermeable film coating on historic brick or a cementitious product on wood-framed walls causes more long-term damage than it prevents.
| Wall Material | Recommended System | Key Consideration |
|---|---|---|
| Poured concrete (below grade) | Bituminous sheet membrane or crystalline slurry | Must withstand hydrostatic pressure; crystalline products suit new pours |
| Concrete block / CMU (below grade) | Liquid elastomeric membrane + drainage mat | Mortar joints are the primary failure points; ensure full joint coverage |
| Brick veneer (above grade) | Penetrating silane-siloxane water repellent | Brick must remain vapor-permeable; film-forming coatings trap moisture and cause spalling |
| Stucco (above grade) | Elastomeric acrylic coating or silicone water repellent | Address hairline cracks first; elastomeric coatings bridge gaps up to 1/16 inch |
| Natural stone (above grade) | Penetrating silane-siloxane treatment | Avoid solvent-based products on porous limestone or sandstone |
| Wood-framed wall (above grade) | Weather-resistive barrier (WRB) behind cladding, with proper flashings | Wood wall systems rely on a designed drainage plane, not surface coatings |
Concrete block walls deserve particular attention because the block units themselves are relatively durable while the mortar joints between them are not. According to the Portland Cement Association, mortar joints in masonry walls typically show measurable water permeability within 5–10 years without treatment, even in well-constructed walls. Any waterproofing system that doesn’t specifically address joint intersections will produce limited results on CMU construction.
For projects that combine below-grade concrete walls with floor slabs, the intersection between the slab edge and the footing is a critical transition point that many waterproofing systems handle poorly. Selecting a membrane system that provides continuous coverage through that joint and using compatible slab-to-wall flashing is covered in our guide on basement waterproofing membranes.
Frequently Asked Questions
How long does exterior wall waterproofing last?
Below-grade bituminous sheet membranes typically last 20–30 years; liquid-applied membranes range from 10–25 years depending on product quality and substrate conditions. Crystalline concrete treatments are effectively permanent because the crystals become part of the concrete matrix and reactivate when exposed to water. Above-grade penetrating silane-siloxane treatments on masonry require reapplication every 5–10 years as UV exposure breaks down the silane chemistry.
Can you waterproof exterior walls from the inside?
Interior coatings can reduce vapor transmission through above-grade walls but cannot resist hydrostatic pressure from the exterior side. For below-grade foundation walls under sustained water pressure, interior coatings applied without exterior drainage work will eventually debond from the wall face as pressure builds behind them. Interior waterproofing is most useful as a secondary layer for above-grade walls or as a vapor barrier in conditioned spaces.
What is the best product for waterproofing exterior walls?
For below-grade concrete foundations, self-adhesive bituminous sheet membranes (such as Grace Ice & Water Shield or Henry BlueskinVP) deliver the most reliable long-term performance. For above-grade brick or stone, a penetrating silane-siloxane product (such as Prosoco R-Guard or RadonSeal Silane-Siloxane) outperforms any film-forming coating because it bonds chemically with the mineral substrate without altering vapor permeability.
How much does exterior wall waterproofing cost?
DIY material costs range from $0.15 per square foot for surface water repellents to $3.00 per square foot for bituminous sheet systems. Professional installation, which includes excavation for below-grade work, typically runs $3–$8 per square foot for foundation walls, with full basement exterior waterproofing projects commonly priced between $8,000 and $25,000 for an average-sized home. Above-grade surface treatments on a typical two-story facade usually cost $500–$2,500 professionally applied.
Does exterior wall waterproofing always require excavation?
Below-grade foundation wall waterproofing typically requires excavating down to the footing to treat the full wall height and install drainage at the base. Trenchless injection methods exist that pump waterproofing grout through drilled holes into the soil adjacent to the wall, but these are primarily suited for crack injection rather than full-perimeter membrane installation. Above-grade wall treatments require no excavation.
How do you test if exterior walls are already waterproofed?
Spray a section of the wall with water from a hose and observe whether it beads and runs off (treated) or darkens and absorbs (untreated or depleted treatment). For below-grade walls, check for efflorescence, active dampness after rain, and any visible membrane material during landscaping or excavation near the foundation. A qualified waterproofing contractor can also perform a calcium chloride vapor emission test on interior floor slabs adjacent to foundation walls to quantify moisture transmission.
Protecting Your Building for the Long Term
The right exterior wall waterproofing system repays its cost many times over by preventing the kind of slow-moving damage that becomes visible only after it has progressed to structural failure. None of the methods are technically difficult to understand, but each requires careful attention to surface preparation, drainage, and material compatibility to perform as intended.
Start with drainage and crack repair, no membrane performs well over a crumbling substrate or against a wall sitting in saturated soil. Address the fundamentals, match the system to the wall material, and the protection will hold for decades rather than years.