Aqviz

How to Caulk: Clean Beads, the Right Tube, and Mistakes

To caulk a joint: strip the old material, clean and dry the surface, cut the nozzle small at 45 degrees, pull one steady bead along the gap, and smooth it with a wet fingertip within a few minutes. The technique takes one afternoon to learn; picking the wrong tube is what makes caulk jobs fail.

The gun and the bead get all the attention, and the two decisions that outrank them happen earlier: matching the caulk type to the joint, and preparing the surface it has to grip. Get those right and even a wobbly bead seals for years. Get them wrong and the prettiest line peels by spring.

The Tube Decides More Than the Technique

the tube decides more than the technique
Three chemistries, three territories; the label matters more than the brand.

Acrylic latex is the trim-and-drywall workhorse: paintable, water cleanup, forgiving to smooth. Grades with silicone added, like DAP’s Alex Plus or the heavier Dynaflex 230, stay flexible longer for baseboards, window casings, and wall gaps. Silicone is the wet-area specialist for tubs, showers, sinks, and glass: waterproof and mold-resistant, and permanently unpaintable, which is why a silicone bead on painted trim is a mistake you live with. Polyurethane handles exterior joints, concrete, and masonry, the same chemistry as the Sikaflex family used on slab cracks.

One vocabulary note settles a common aisle confusion: “caulk” and “sealant” overlap heavily in practice, and where the words split, caulk means the more rigid, paintable acrylic products and sealant means the more flexible, waterproof ones. The question that picks the tube is not which word is on the label; it is whether the joint gets wet, gets painted, or moves.

Prep: Most of the Job Happens Before the Gun

New caulk over old, peeling caulk does not bond; it rides the old material off the joint. Strip the existing bead with a utility knife or a plastic scraper, wipe the residue with mineral spirits on silicone or a damp rag on latex, kill any mold with diluted bleach, and let the joint dry completely. Moisture under a fresh bead is the top cause of early failure, and a hair dryer on deep joints beats waiting a day.

Tape is optional insurance. Two strips of painter’s tape flanking the gap turn a shaky hand into a straight line, at the cost of a few minutes and the discipline to pull the tape while the bead is still wet. Skip the tape once your freehand bead stops needing it, not before.

Running the Bead: Five Moves

  1. Cut the nozzle small, at 45 degrees. The hole should match the gap width, and small beats big because you can always cut more; puncture the inner foil seal with the gun’s poker or a long nail.
  2. Load the gun and take up slack. Squeeze until caulk just reaches the tip before touching the joint, so the bead starts where you start.
  3. Pull, do not push. Drag the nozzle along the joint at a steady speed with the gun at roughly 45 degrees, letting the caulk feed into the gap rather than smear over it.
  4. One pass per joint. A continuous bead beats stop-and-go patching; release the gun’s pressure just before the end to avoid the blob.
  5. Tool it within minutes. Smooth the bead before it skins over, in one light pass that presses it into the joint and carries away the excess.

No gun for a small job? Squeeze tubes exist for exactly the tight, short touch-ups where a full-size cartridge is overkill, and they follow the same five moves minus the loading.

Smoothing: Finger Beats Tool for Most People

A fingertip dipped in soapy water is the smoothing method most tradespeople default to on latex caulk: it follows the joint’s irregularities, presses the bead in, and gives immediate feedback. Profiling tools earn their place on silicone, which sticks to skin and drags, and on long runs where a consistent concave profile matters. Either way the working window is minutes, and re-tooling a half-cured bead makes it worse, not better.

The standard most DIYers hold themselves to is stricter than the standard anyone else applies, and the trade’s own forums are full of that exact anxiety:

“I hate caulking because I can never get the bead perfect. It’s never completely smooth and always has minor issues. Am I being too picky with my work? It looks great from 2-3 feet away, but when you look close at the details it’s disappointing. I normally will tape and/or use a profiling tool, this particular scenario I had to use a wet finger. Any tips would be appreciated.”
– r/handyman, February 2026 (40 upvotes)

The consensus reply to that post, from people who caulk for a living: a bead that reads clean from three feet is a professional bead, and paint erases the rest on trim work. Product choice quietly does a lot of that work too:

“A tube of Dynaflex 230 is under $8 and is much easier to work with and ends up looking better.”
– r/handyman, March 2026 (17 upvotes)

The Mistakes, and Where Caulk Does Not Belong

The recurring errors are a short list: cutting the nozzle huge on the first job, caulking over old caulk, painting silicone, and tooling after the skin forms. The subtler mistakes are about location. The small gaps at the bottom of brick walls are weep holes, drainage the wall needs, and caulking them traps water inside the masonry. Horizontal joints people walk on want a traffic-rated sealant, not tub caulk. And a crack that keeps reopening season after season is moving; caulk bridges gaps, it does not restrain structures, and a foundation crack that swallows bead after bead is a repair problem wearing a cosmetic disguise.

The corollary from basement work applies everywhere: caulk the stable joints first, let them cure, then treat the surfaces. Caulk is the cheapest step in almost any sealing project and the one that decides whether the expensive steps hold.

How to Caulk FAQ

How should a beginner start caulking?

Start with acrylic latex on interior trim, a dripless gun, a small 45-degree nozzle cut, and painter’s tape on both sides of the joint. Trim gaps are forgiving, paintable, and invisible from three feet, which makes them the practice ground before any bathroom silicone.

Can you caulk without a caulk gun?

Yes, with squeeze tubes for small jobs and pressurized cans for touch-ups; both trade capacity for convenience. For anything longer than a window frame, a $10 cartridge gun pays for itself in control and cheaper caulk per ounce.

How long before caulk can get wet or painted?

Acrylic latex typically takes paint in 30 minutes to 2 hours depending on the product, while silicone needs about 24 hours to cure before regular water exposure. Cure times stretch in cold or humid rooms, and the tube’s own label beats any rule of thumb.

Why does my caulk crack or pull away?

Cracking usually means a rigid caulk on a moving joint or a bead stretched over too wide a gap; pulling away means the surface was dusty, damp, or coated in old residue. Wide gaps want backer rod under the bead, and joints that keep moving want a more flexible sealant class, not a thicker bead.
Downspout Drains Underground: Depth, Pipe, and Clog-Proofing

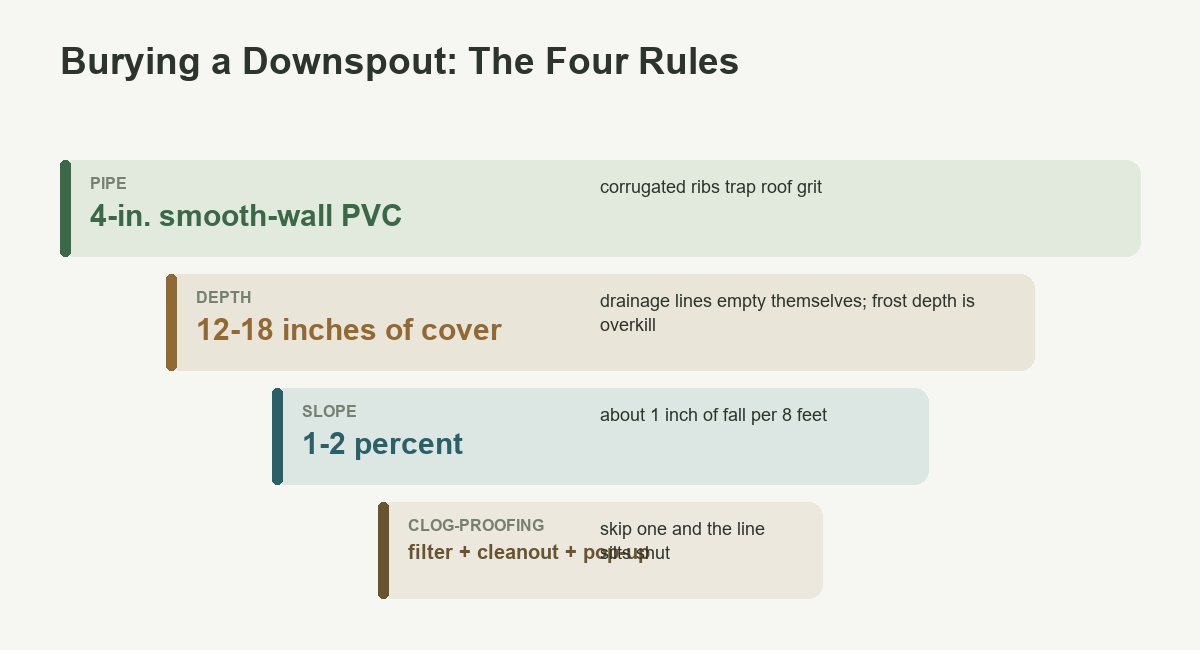
Downspout drains underground carry roof water through buried 4-inch pipe to a pop-up emitter or drain 10 feet or more from the house, with the pipe set 12 to 18 inches deep at a 1-to-2-percent slope, point out Keyrenter Folsom experts. Done with smooth-wall PVC, a leaf filter, and a cleanout, the line works for decades; skip those three parts and it silts shut.

Burying the downspout is usually worth it. A single downspout can drain hundreds of square feet of roof, and dumping that at the foundation is how basements get wet; the buried line moves the same water past the danger zone invisibly, with nothing to trip over or mow around. The two asterisks are maintenance access and, in a minority of municipalities, whether burial is allowed at all.

Clog-Proofing: The Three Parts That Are Not Optional

Buried downspout lines have one enemy: roof debris with no way out. Leaves, shingle grit, and seed pods wash off every roof, and a buried pipe collects them at the elbow where the downspout turns underground. Tradespeople see the same failure on repeat:

“I run a gutter installation and repair business (not a plumber) and I’m constantly running into the same issue: customers with underground downspout extensions that get clogged, usually where the pipe connects at the bottom of the downspout or somewhere along the buried run. Right now I just tell them I can come look, but I don’t have the right tools to actually clear a blocked line. This comes up often enough that I’m wondering if it’s worth investing in equipment (a drain rod, a small sewer j…”
– r/askaplumber, July 2026 (9 upvotes)

Three parts prevent the service call. A leaf filter or debris trap at the downspout-to-pipe connection stops the material before it goes underground. A cleanout fitting at that same corner gives a hose or auger a straight shot down the line when something gets past. And a pop-up emitter at the far end opens under water pressure, passes what arrives, and closes flat to the lawn, keeping rodents and backfill out of the pipe’s mouth.

Pipe: Smooth PVC Beats Corrugated Underground

pipe smooth pvc beats corrugated underground
The four decisions that separate a decades-long line from a shovel-out.

The black corrugated tubing sold beside the downspout adapters costs less and bends around obstacles, and its ribbed interior is where grit settles and snags. Smooth-wall 4-inch PVC, at a few dollars per 10-foot stick, self-scours at the same slope, glues into positive joints that roots resist, and takes an auger without shredding when a clog does form. For a line meant to be buried once and forgotten, the PVC premium across a 20-foot run is the price of two coffees.

Size up, not down. A 4-inch line swallows anything a residential roof delivers; the 3-inch adapters exist because they are cheap, and an undersized line backs up into the gutter during exactly the cloudburst it was buried for.

Depth: 12 to 18 Inches, and the Frost-Line Myth

Bury the line with 12 to 18 inches of cover: enough to shrug off aeration, mowers, and shovel work, shallow enough to keep the trench a weekend job. The often-repeated rule that drainage pipe must sit below frost depth confuses it with water supply lines; a properly sloped drainage line is empty except while raining, so there is no standing water to freeze.

The slope is the real spec: 1 to 2 percent, about an inch of fall every 8 feet, held continuously from the downspout to the outlet. The outlet belongs at least 10 feet from the foundation and downhill of it, with the emitter’s small anti-freeze weep hole letting the last cupful seep away after each storm. In hard-freeze climates the failure point is an emitter iced shut during a mid-winter thaw, which the weep hole plus a slightly proud emitter placement prevents.

Two legal lines matter. Connecting roof water to a sanitary sewer is prohibited nearly everywhere, and some municipalities go further, restricting buried downspout lines entirely or dictating where they may discharge; homeowners find out at gutter-replacement time:

“Hi all, I got our gutters replaced and had to choose locations for our downspouts. The downspouts were previously leading underground, which isn’t allowed in our city. These were the best locations we could think of working with the contractor, but there is a lot of pooling in the back corners of our house, mainly the one over the walkway. I bought a flexible extender for now to mitigate the pooling at the back, but it doesn’t really solve the problem and we have to walk over it. Just FYI, we l…”
– r/Home, April 2026 (195 upvotes)

One call to the building department and one call to 811 for utility marking settle both questions free. With the green light, a DIY run prices at roughly $100 to $250 per downspout: pipe, fittings, filter, cleanout, emitter, and a trenching weekend. Professional installs commonly land at $300 to $800 per line, or $1,500 to $3,000 for a whole-house set with the trenching machine doing the digging.

Where the Water Ends Up: Four Destinations

The pop-up emitter on the lawn is the default ending, and three alternatives fit specific yards. A dry well takes the discharge where no downhill route exists, in soil sandy enough to soak it between storms. A rain garden turns the outlet into a planted basin that drinks the roof water, the prettiest legal endpoint a flat yard gets. And a permitted storm-drain connection is the urban option where the municipality offers one.

Whichever ending, the test is the same: run a hose full-bore into the downspout for ten minutes and watch the outlet keep up. A destination that backs up in a hose test will back up in the first real storm, at the gutter, above your front door.

Underground Downspout FAQ

Can a downspout drain underground?

Yes; a buried solid pipe from the downspout to a pop-up emitter or drain is a standard residential drainage detail. The requirements are continuous slope, a debris filter at the inlet, a legal discharge point, and a municipality that permits the burial.

Can I connect a downspout to the sewer?

Not to a sanitary sewer; roof water overwhelms treatment systems and the connection is illegal in nearly every jurisdiction. Some cities allow permitted connections to storm sewers; the building department answer decides it, not the previous owner’s plumbing.

How far from the house should the line discharge?

Ten feet is the working minimum, farther where grade allows, and always to a spot that slopes away from both your foundation and the property line. Discharging at 3 or 4 feet moves the puddle, not the problem.

How do you unclog a buried downspout line?

Open the cleanout at the downspout corner and run a garden hose at full pressure, then a drain auger for what the hose cannot move. A line that clogs repeatedly without a filter upstream is telling you which part it is missing, and corrugated lines that clog deep are commonly replaced with PVC rather than fought.

Slope for Yard Drainage: The Numbers and How to Measure

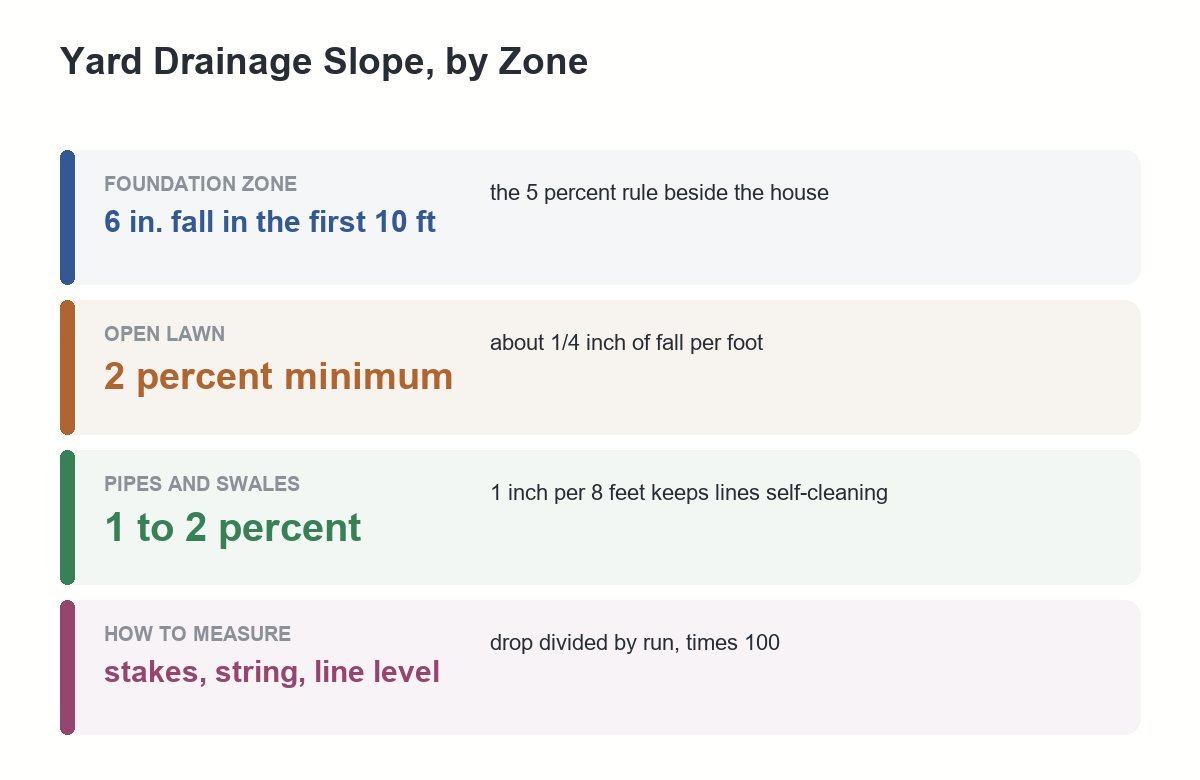
The slope for yard drainage is 5 percent beside the house, meaning the ground falls 6 inches over the first 10 feet from the foundation, then a 2 percent minimum across open lawn, about a quarter inch per foot, reports Yellow Keys Realty Property Management. Drainage pipes and swales hold 1 to 2 percent.

Those three numbers settle most of the arguments a wet yard starts. The measuring takes two stakes and a string; the regrading takes topsoil and a rake weekend; and knowing which zone you are standing in tells you which number applies.

Three Zones, Three Numbers

three zones three numbers
Steepest where water does the most damage, gentlest where pipes carry it.

The foundation zone gets the strict rule. The model residential code calls for grade falling at least 6 inches within the first 10 feet of the wall, and the logic is blunt: this is the water that ends up in basements, and drainage guides for wet-basement homes lead with the same 6-in-10 figure. Where a lot line or hardscape makes 10 feet impossible, the fall has to happen faster or a swale has to carry the water sideways.

Open lawn needs only enough tilt that water keeps walking: 2 percent as the working minimum, one foot of fall across a 50-foot yard. Below about 1 percent, mowing dips and thatch stall the sheet flow and the birdbaths return. Above roughly 12 percent, lawns get hard to mow and erosion starts winning, which is retaining-wall and groundcover territory.

Pipes and swales carry water in a channel, so they need the least: 1 percent minimum, 2 percent where the run allows. Flatter silts shut; much steeper is fine for water but wastes trench depth on long runs.

What 1 and 2 Percent Mean in Inches

Percent slope is drop divided by run, times 100, with both in the same unit. One percent is 1 foot of fall per 100 feet, which works out to about 1 inch per 8 feet. Two percent doubles it: roughly 1 inch of fall every 4 feet, or a quarter inch per foot.

The worked example most yards need: a downspout line to a pop-up emitter 24 feet away at 2 percent wants 24 × 0.02 = 0.48 feet, call it 6 inches of total drop. If the yard only gives you 3 inches over that run, the line still works at 1 percent; if it gives you nothing, no amount of pipe fixes it and the water needs a different destination.

Measuring: Two Stakes, a String, and a Level

Drive a stake at the high point and one at the low point, tie a string at ground level on the uphill stake, and pull it tight to the downhill stake. Hang a $5 line level on the string, raise or lower the string on the downhill stake until the bubble centers, then measure from the string down to the ground at the downhill stake. That distance is your drop; the string length is your run; divide and multiply by 100.

Twenty minutes of this around the house perimeter maps the whole problem. Anywhere the tape reads less than 6 inches of fall in the first 10 feet, water is loitering against the foundation, and the spots where the ground tilts toward the wall explain themselves.

Fixing a Bad Grade

Regrading the foundation zone is shovel work, not engineering: cart in topsoil (not gravel, which lets water through to the wall), build the grade up against the foundation to create the fall, tamp in lifts, and keep the finished soil at least 6 inches below siding or the brick weep holes so the fix does not invite rot or termites in place of water. Seed or sod, then remeasure after the first hard rain settles it. A pickup load of topsoil and a weekend covers most single-wall problems; whole-yard regrades with equipment quote in the $1,000-to-$3,000 range.

Buried utilities, window wells, and vent pipes set the limits, and the neighbor’s lot sets the hardest one. Where the adjacent property sits higher, no legal amount of your regrading reverses the flow, and buyers stare at exactly this situation:

“Landscaping experts, what would you do with this negative slope in the backyard? We are trying to decide on a home purchase, and we love everything about this house except the negative backyard slope makes us nervous. I’ve read about regrading it with retaining walls and using drainage hardware such as French drains as a solution. But it’s hard for me to picture how that would fit for this yard. I would love to also hear input on rough estimates for getting this backyard into shape – I would as…”
– r/landscaping, January 2026 (50 upvotes)

The playbook for a yard that slopes toward the house from beyond your control: regrade the first 10 feet to push water back out, catch what arrives anyway with a swale or interception drain across the flow line, and give the collected water a piped route around the house to wherever gravity still cooperates. Slope handles the water you can redirect; hardware handles the water you cannot.

Swales: Slope in a Shallow Channel

A swale is a wide, shallow grass channel that borrows slope where the whole yard has little to give: instead of tilting the entire lawn 2 percent, you shape one gentle trough that falls 1 to 2 percent along its own length and let the rest of the yard drain sideways into it over short distances. Cut 6 to 12 inches deep and several feet wide, seeded like the rest of the lawn, it mows like lawn and works like pipe.

Swales suit the two cases regrading handles worst: long flat yards where 2 percent everywhere would mean moving mountains of soil, and cross-slopes that deliver a neighbor’s water along a whole property line. The end of the swale needs the same thing every drain needs, a legal low place for the water to finish.

Yard Drainage Slope FAQ

Can you grade a yard yourself?

Yes for the foundation zone and small low spots: topsoil, a rake, a tamper, and the string-line check are the whole toolkit. Whole-yard regrades, cuts near big trees, and anything involving retaining walls justify equipment and a contractor.

How do you calculate a 2 percent slope?

Multiply the run by 0.02 in the same unit: a 30-foot run needs 0.6 feet, about 7 inches of fall. In reverse, divide measured drop by run and multiply by 100 to grade what a yard already does.

What is the minimum slope on concrete and patios?

Hard surfaces shed water at 1 percent minimum, an eighth inch per foot, with a quarter inch per foot the comfortable standard pitch away from the house. Existing slabs that pond can sometimes be mudjacked back into pitch for less than replacement.

When is the best time to regrade a yard?

Late spring through early fall, when soil is dry enough to work and grass has a growing season left to root. Regrading into saturated soil compacts it into new low spots, and a fall regrade without established grass erodes over winter.

Catch Basin for Yard Drainage: Size, Install, and Problems

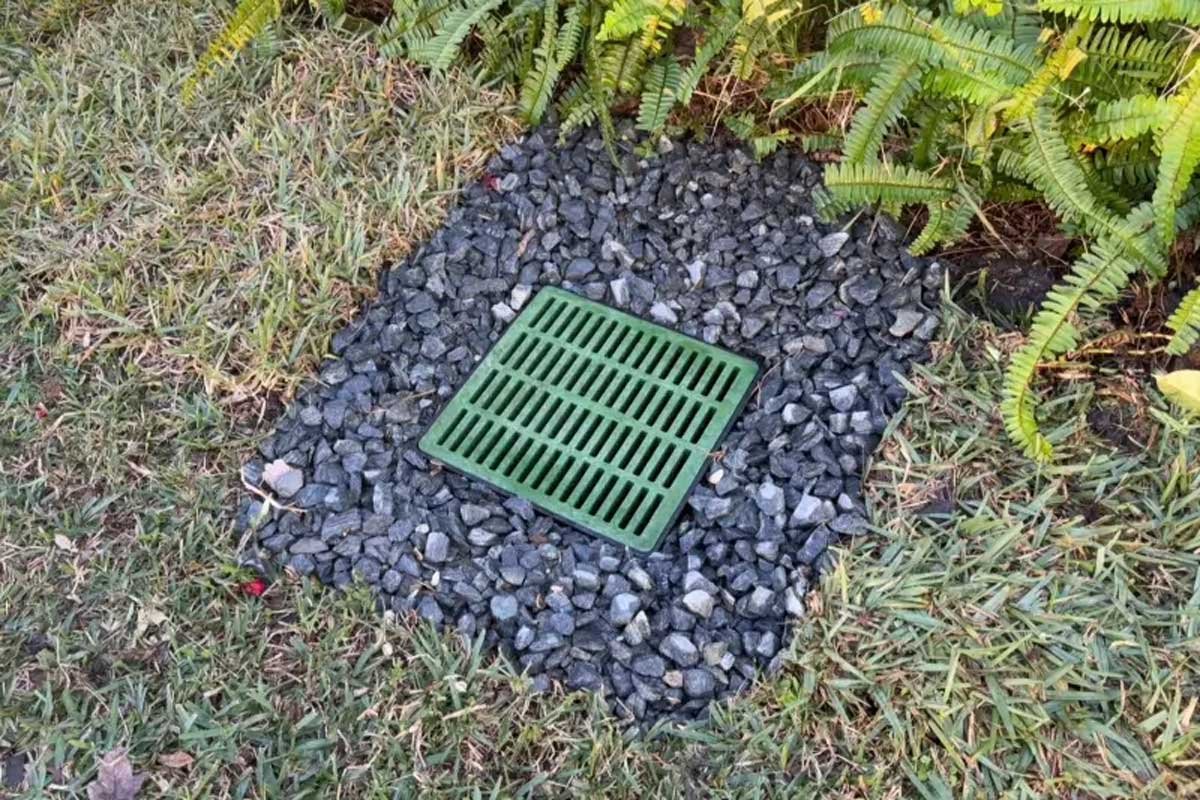
A catch basin for yard drainage is a buried box with a grate on top, set at the low spot where water pools, with a sump below its outlet pipe to trap sediment. Kits cost $40 to $250 by size, and the water leaves through a pipe sloped at 1 percent to a legal discharge point.

It is the right tool for one specific job: a visible puddle that forms in the same place every rain. Water you can point at goes to a basin; soil that stays soggy over a wide area is subsurface water, and that is french drain work. Picking between them by symptom saves buying the wrong trench.

Catch Basin, Yard Drain, or French Drain?

The names blur in store aisles, and the sorting is simple. A catch basin is a point collector: one box, one grate, standing water pours in from the surface. A yard drain is the same idea in a smaller body, often without a real sediment sump. A french drain has no opening at the surface at all; it is a gravel trench that sips water out of saturated soil along its whole length.

Two symptoms, two tools. A birdbath puddle at the patio corner or under a downspout wants a basin. A lawn that squishes for days after rain wants the trench. Properties with both symptoms combine them, and the basin’s outlet pipe can share the same discharge line.

Sizing: Match the Box to the Flow

sizing match the box to the flow
Size by the water arriving, then hold the slope rule on every foot of pipe.

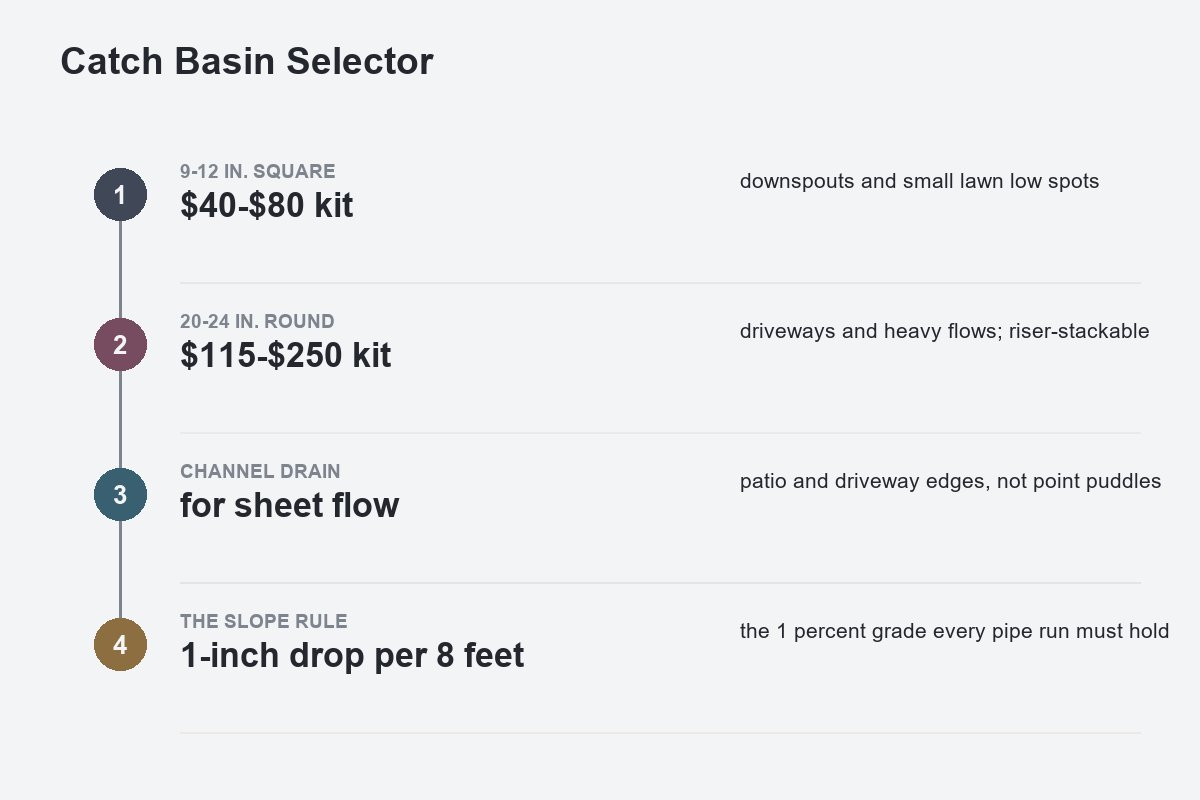
Small 9-to-12-inch square basins, $40 to $80 as kits, handle a single downspout or a modest lawn low spot. Large 20-to-24-inch round basins, $115 to $250, carry driveway and multi-source flows, hold more sediment between cleanings, and stack risers to reach grade in deeper installs; retail listings put a 12-inch kit near $49 and a 20-inch six-knockout kit at $115. For water sheeting across a patio or driveway rather than pooling at a point, a channel drain along the edge beats any box.

Grate material matters more than basin brand. Plastic grates are pedestrian-rated; a basin in a driveway needs a metal grate rated for vehicle load, a $30-to-$60 difference that prevents a cracked grate the first winter.

Installing One: The Slope Is the Project

The install order, condensed from NDS’s installation guide: set the basin at the natural low point, dig its pit 6 inches wider than the box with 2 to 4 inches of crushed-stone base, trench the outlet route with 12 to 18 inches of cover over the pipe, and hold a minimum 1 percent grade to the discharge point. One percent means about a 1-inch drop for every 8 feet of pipe; check it with a line level before backfilling, because a bellied pipe collects silt at its sag until it closes.

Solid pipe, not perforated, carries the water out. The destination options and their legality are the same as for any drainage line: daylight on a downhill slope, a dry well in sandy soil, a storm connection where the municipality allows it, or a pop-up emitter at the curb (the same endpoint buried downspout lines use). The basin is the easy half; the sloped route to somewhere legal is the half that decides whether the project works.

The Problems, and What Prevents Each One

Catch basin failures are boring and predictable. Leaves mat over the grate and the puddle returns with the basin working fine underneath; a leaf-guard grate or a fall sweep fixes it. Silt fills the sump until it reaches the outlet; scooping the sump twice a year keeps the pipe clean. Standing water in the sump breeds mosquitoes in summer; a few drainage holes drilled in the basin bottom over the gravel base lets it weep dry between rains. And a line laid without slope silts shut in its first season, which is a redig, not a cleaning.

The ground immediately around the grate is its own small design problem, and owners think about it more than any product page does:

“How should I manage the sediment around this catch basin? Should I do concrete in a cone shape towards the basin and pea gravel on the non-concrete sides (with non-woven landscape fabric below the pea gravel)? What should the process look like for doing that concrete?”
– r/landscaping, August 2026 (4 upvotes)

The principle behind any of those finishes: grade the last few feet toward the grate so water arrives, and armor that surface (concrete cone, mortared stone, or fabric-backed gravel) so the arriving water does not carry the yard in with it.

Catch Basin for Yard Drainage

Cost: DIY Kit vs the $1,800 Quote

A DIY install lands around $150 to $400 all-in: the basin kit, solid pipe at a few dollars a foot, gravel, and a weekend of trenching. Professional installs for a basin with a 15-to-20-foot run commonly quote $1,500 to $3,000, and the spread between those numbers is labor and the contractor’s discharge planning. The quotes homeowners bring to forums sit right in that band:

“Hi, so we have water pooling up within 6 feet of our foundation. We probably need to regrade our backyard. An irrigation/drainage company quoted us 1800 to dig a trench sending water from gutter downspouts to a low spot 15-20 feet away from the house. This would also include a catch basin where water that I guess drains into basin joins downspout water to be sent 15 feet away. My questions are 1) is this a good idea And 2) they quoted us an additional 2k to make it a French drain instead of a c…”
– r/landscaping, November 2025 (3 upvotes)

That $2,000 upgrade question has a symptom-based answer: pay for the french drain only when the soil itself stays saturated. Pooling surface water beside a foundation is what the basin-and-pipe configuration exists for, and paying trench-drain money to solve a puddle is the most common oversell in residential drainage.

Catch Basin FAQ

How deep does a catch basin need to be?

Deep enough for the basin body plus 2 to 4 inches of gravel base, typically 18 to 30 inches of digging for residential units, with the grate finishing flush to grade. The outlet pipe leaving it wants 12 to 18 inches of cover along its route.

Can I build a catch basin myself?

Yes; a kit basin, solid pipe, and a line level are a weekend project for anyone willing to trench. The parts that decide success are holding the 1 percent slope on the pipe and having a legal place to send the water, both settled before the first shovel.

How often does a catch basin need cleaning?

Scoop the sump and clear the grate twice a year, spring and fall, plus a check after any storm that drops heavy leaf litter. A basin that suddenly backs up after years of working usually has a full sump or a silted low spot in its pipe, in that order.

Does a catch basin need a dry well?

Only when no gravity discharge exists (see how to size a dry well): the basin collects, but the water still needs somewhere to go. Daylight or a storm connection beats a dry well where available, and clay-soil properties should test how fast a pit drains before trusting one.

Basement Leak Fix: The Right Repair for Each Entry Point

A basement leak fix depends on where the water enters: wall cracks take injection or hydraulic cement, rebar tie holes take hydraulic cement, window wells take sealing and drainage, and the cove joint where wall meets floor takes pressure relief, because no sealant survives there. Match the repair to the entry point and most leaks close for good; mismatch it and the water finds the patch’s edge by next spring.

Finding the entry point is the diagnosis, and it is visual. Wait for rain, take a flashlight, and watch where the first wet line appears. It will be one of five places, and each one wants a different repair.

Wall Cracks: Injection From the Inside

A vertical or diagonal crack in poured concrete is the classic leak, usually from settling or shrinkage rather than structural failure. The professional repair is injection from the interior: polyurethane foam that expands and stays flexible, or epoxy where the crack also needs structural bonding. Injection kits price around $60 to $150 for a confident DIYer, and pros commonly charge $350 to $800 per crack.

The DIY-store alternative is chiseling the crack into a dovetail groove and packing it with hydraulic cement (the bead technique is the same either way), which sets in minutes and expands as it cures. It works on hairline seepage in walls that stay put. It fails on cracks that still move seasonally, which is what the flexible polyurethane exists for; a rigid patch on a moving crack cracks beside itself.

Width is the triage line. Hairline to an eighth of an inch, patch or inject and monitor. Wider than a quarter inch, horizontal, or stair-stepping through block mortar: that is a structural conversation with a foundation contractor before it is a waterproofing one.

Rebar Ties and Honeycombs: The 20-Year Verdict on Sealants

Poured walls carry a grid of round scars where form ties passed through, and each one is a potential drip path. One home blogger at All About The House documented the long version of this repair: he sealed his tie holes with 50-year silicone in 1999, watched a bubble form over a tie two decades later, and redid the repair concluding he should have used hydraulic cement from the start. Surface sealants stick to the wall; hydraulic cement locks into the hole and pushes back against the water.

The same $20 tub handles honeycombing, the gravelly voids where concrete did not fully consolidate against the form. Chisel loose material out, dampen, pack, done. These are the most satisfying basement repairs there are: cheap, permanent, and finished in an afternoon.

The Cove Joint: Where Sealants Go to Die

Leaks at the seam where floor meets wall are different in kind, and the difference costs homeowners a lot of wasted caulk. Water at the cove joint is being pushed up by hydrostatic pressure under the slab; seal the seam and the pressure stays, finding the next gap or lifting the patch. Every product marketed for this seam is fighting physics.

The repairs that work drain the pressure away: exterior water management first, and an interior perimeter drain with a sump when groundwater is the source. Even an existing drain system can lose to this seam when it clogs or was undersized, which is exactly how it presents:

“Water leaks in from one corner and over flows into the rest of the basement even though I have an interior french drain installed. Any ideas to fix? Could it just be a clogged drain?”
– r/basement, August 2026 (7 upvotes)

Yes, it can be a clogged drain, and a flush through the system’s access ports is the first cheap test before anyone quotes a new one.

Window Wells, Grading, and the Snowmelt Test

Window Wells

A window well that fills like an aquarium in heavy rain will beat any interior repair, and the fix is outside: clear or add gravel drainage at the well’s base, seal the frame, and cover the well. The same logic scales to the whole perimeter, since gutters dumping at the foundation and grade sloping toward the house are behind a large share of leaks that get blamed on walls. New owners tend to meet all of these at once, in the first big melt:

“Hey everybody! My wife and I closed on our fixer upper this week. We were aware of some wetness and minor water intrusion in the basement, but this week’s 2ft snowfall and subsequent melt where we live has exposed a nice surprise! There seems to be a pretty significant leak as shown in the video. All other wet/damp areas in the basement we were planning on taking care of this summer or next. However, this probably needs to be addressed asap to eliminate standing water and sediment flowing into….”
– r/HomeMaintenance, March 2026 (38 upvotes)

Snowmelt and long storms are the honest inspectors: they load the soil the way a summer shower never does. If a leak only appears under those conditions, the outside fixes deserve the first dollars, and they cost hundreds against the thousands of interior systems.

The Cost Ladder, Cheapest First

Basement leak repairs sort into a ladder, and the right move is the lowest rung that matches your entry point. Hydraulic cement patches for ties, honeycombs, and stable cracks: $20 to $60 in material. Crack injection: $60 to $150 DIY, $350 to $800 per crack professionally. Gutter extensions, regrading, and window well work: several hundred to about $2,000. An interior perimeter drain with a sump, for cove-joint and under-slab water: $3,000 to $8,000 and up. Exterior excavation and membrane, the cause-level fix for a chronically wet wall, sits above all of it.

“Permanent” is the word every product label promises and only matched repairs deliver. A $30 patch on a tie hole is permanent. A $30 patch on a pressurized cove joint is a season pass.

Basement Leak Fix FAQ

What is the best way to fix a leaky basement?

Match the repair to the entry point: inject or patch wall cracks, pack tie holes and honeycombs with hydraulic cement, fix window wells and grading outside, and relieve cove-joint water with drainage. No single product fixes all five entries, which is why “best way” starts with a flashlight, not a cart.

Does homeowners insurance cover basement leaks?

Insurance covers sudden accidental water, like a burst pipe flooding the basement, and excludes gradual seepage and groundwater, which is what most basement leaks are. Flood damage from outside water needs separate flood coverage; crack injection, patching, and drainage systems are out of pocket at every insurer.

Should a basement leak be fixed from the outside or the inside?

Cracks, tie holes, and honeycombs repair well from the inside; chronic wall wetness and cove-joint pressure are managed better from outside or with interior drainage. Exterior excavation treats the cause and costs the most, so it is the escalation step, not the default.

Who do you call for a basement leak?

A basement waterproofing contractor for seepage, cracks, and drainage; a plumber first if the water might be a supply or drain line, which clean water or constant flow suggests. For wide, horizontal, or stair-step cracks, a structural or foundation specialist sees the wall before the waterproofer sells you anything.

Interior French Drain: Cost, How It Works, and Its Limits

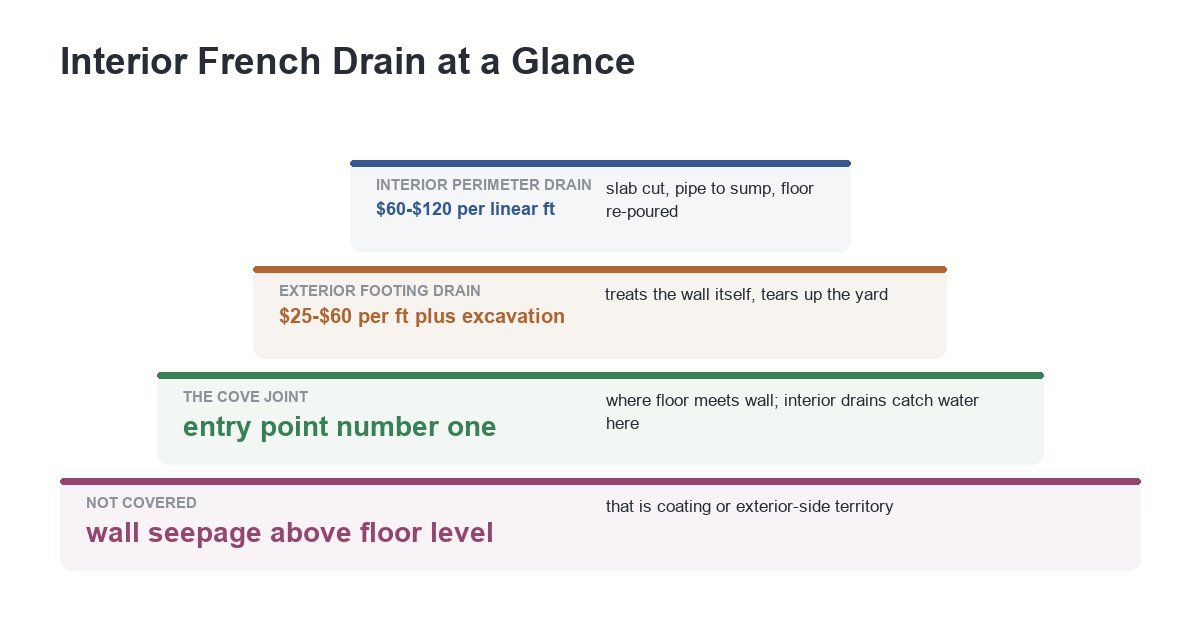
An interior french drain is a perimeter channel cut into the basement slab edge, catching water where the floor meets the wall and piping it to a sump pump. Installed, it prices at $60 to $120 per linear foot, or $3,000 to $8,000 for a typical basement.

It is the standard fix for a basement that leaks along the floor line, and the industry sells it hard. What the sales pages skim past is the boundary: an interior drain manages water that has reached your foundation, catches it at one specific entry zone, and does nothing about the causes upstream. Both halves belong in the decision.

How It Works: The Cove Joint Is the Target

Saturated soil pushes water against buried concrete, and the pressure finds the weakest opening, which in most basements is the cove joint, the seam where the floor slab meets the wall footing. An interior system intercepts water at that seam: crews cut and remove the slab edge, trench beside the footing, lay perforated pipe in washed stone, tie the loop to a sump basin, and pour the floor back over it.

Everything else in the system exists to serve that one seam.

From above, a finished install is a hairline concrete seam around the room’s edge. Below it, every wall’s seepage gets collected before it can cross the floor, and the sump ejects it outside. Gravity does the work until the pit, which makes the pump the lone point of failure and the reason outage-prone areas pair these systems with a battery backup. A homeowner who has watched a storm arrive with the power already out understands why that pairing is not an upsell.

When It Is the Right Fix

An interior drain earns its cost when water enters along the floor perimeter on more than one wall, when the yard-side fixes have been done and the leaks continue, or when finished landscaping makes exterior excavation a five-figure event. It is also the practical winner for year-round scheduling, since crews work indoors in any weather.

The fair comparison with the exterior route is cause versus symptom. An exterior footing drain and membrane keep the wall itself dry, at the price of excavating everything against the foundation; an interior system lets the wall stay damp and controls where the water goes. Contractors who sell interior systems describe exterior drains as clog-prone, and there is truth there, but the deciding factors for most homes are the deck, the mature landscaping, and a price difference that can reach five figures.

What Moves the Price

what moves the price
Price the perimeter length, then the extras: sump, backup, and disposal of the cut slab.

The $60-to-$120-per-foot band from published cost breakdowns covers slab cutting, pipe and stone, and concrete restoration. A 120-foot perimeter lands mid-range around $7,000 to $10,000 with a new sump basin and pump included. Three line items move quotes beyond that: a second sump for long or L-shaped footprints, upgraded channel systems for problem soils, and haul-away of the cut concrete.

One soil condition deserves its own question during the estimate: iron ochre. The orange, slimy bacterial deposit clogs drain systems aggressively enough that manufacturers sell dedicated flush-port versions for it, and a contractor who has not asked about rust-colored staining in your area has not finished scoping the job.

Depth: Footing Level or the Shortcut Above It

A full interior drain sits beside the footing, below slab level, deep enough to relieve water before it reaches the floor. Some popular systems install shallower, on top of the footing at the slab edge, in what marketers call the clear water zone; Basement Systems’ WaterGuard is the best-known example. The shallow placement avoids disturbing the footing soil and resists silt, and the trade is that it collects water later in its path, at the slab edge rather than beside the footing.

Neither placement is wrong; they are different products wearing one name. Ask which depth a quote describes, because a baseboard-level channel, a slab-edge system, and a true footing-depth drain can differ by thousands of dollars and by how much hydrostatic pressure relief they deliver.

What It Does Not Fix

The system catches water at the floor line. Water entering through wall cracks or porous block above that line keeps entering; as coating manufacturer SaniTred’s own critique of footing drains puts it, wall-level issues are simply not addressed by a floor-level system. Mid-wall seepage needs crack injection, interior coatings on prepared masonry, or exterior-side work.

The walls also stay wet on the soil side by design, which means efflorescence and block-core dampness continue even while the floor stays dry. In a basement being finished into living space, that argues for pairing the drain with a vapor-tight wall covering, and for keeping a dehumidifier in the plan. A dry floor is not the same claim as a dry room.

Try the Yard Before the Jackhammer

Interior drains handle water that reached the foundation; the cheaper victories happen before it gets there. Extended downspouts, regraded soil, and an exterior interception trench uphill of the house each cost a fraction of slab work, and homeowners keep documenting exactly that sequence working:

“We bought our first home this November and in April realized we needed to address the property drainage. My neighbors and I sit the lowest on the street and the properties behind us are 3-4’ higher. I ran 150’ of French drains and buried the sump pump discharge to daylight into a mostly native rain garden which has been handling the water amazingly well. Cut back the low hanging branches of the evergreens in the backyard and significantly increased the useable space. The neighbor and I both wan…”
– r/landscaping, June 2026 (700 upvotes)

The decision rule: water arriving from the surface or a slope gets intercepted outside; water rising from a high water table under the slab is what the interior system exists for. A season of gutters-and-grading first is rarely wasted money, and if the basement still leaks afterward, the interior quote is being paid to solve the right problem, with the outside work still improving how rarely the new sump has to run.

Interior French Drain FAQ

Where should an interior drain not go?

Skip the interior route when water enters mid-wall or at windows, when the slab hides radiant heat lines or plumbing that cutting would destroy, and when a crawl space or shallow footing leaves nothing to trench beside. Those cases point to exterior work, coatings, or surface drainage first.

Interior or exterior french drain: which is better?

Exterior drains fix the wall and cost more in excavation and landscape repair; interior drains manage the water for less money and less disruption. For an occupied home with finished grounds, interior usually wins on price; for a wall with structural moisture damage, exterior treats the cause.

Can you install one yourself?

Physically yes with a rented concrete saw and jackhammer, and a fit DIYer can save half the cost on a straightforward perimeter. The catch points are slab thickness surprises, footing layouts that force redesigns mid-trench, and tying the sump discharge somewhere legal, which is where owner-installs most often stall.

Do interior systems need maintenance?

Yes: the sump pump needs an annual test and eventual replacement, and the drain channel benefits from a flush every few years, especially in iron ochre soils. Clog-free is a marketing adjective, not an exemption; systems with access ports make the flushing a garden-hose job.

French Drain vs Sump Pump: Which One Your House Needs

A french drain collects water and moves it by gravity; a sump pump ejects water that gravity cannot take anywhere. They solve different halves of the same problem, which is why wet basements so often end up with both.

The two systems get framed as rivals by contractors who happen to sell one of them. The useful framing is a single site question: from the spot where water gathers, can a pipe slope continuously downhill to daylight, a storm drain, or a dry well? If yes, gravity does the work for decades without a moving part. If no, electricity has to lift the water out, and that is pump territory.

What Each System Does

A french drain is a gravel trench with perforated pipe at the bottom, wrapped in filter fabric. Water in saturated soil enters through the perforations and follows the pipe’s slope away. Outdoors it intercepts surface and subsurface water before the foundation; indoors, run under the basement slab edge, it collects what rises against the footing.

A sump pump sits in a pit at the low point. Groundwater seeps or drains into the pit, a float switch trips, and the pump pushes the water up and out through a discharge line. It moves impressive volumes, and it needs power, a working switch, and a maintained impeller every time a storm arrives.

The combination is not a compromise; it is how basement waterproofing is normally engineered. An interior perimeter drain does the collecting, the pit does the concentrating, and the pump does the lifting. Asking drain-or-pump for a chronically wet basement is like asking gutters or downspouts.

Cost: Why Published Numbers Disagree

cost why published numbers disagree
Price the configuration, not the product name.

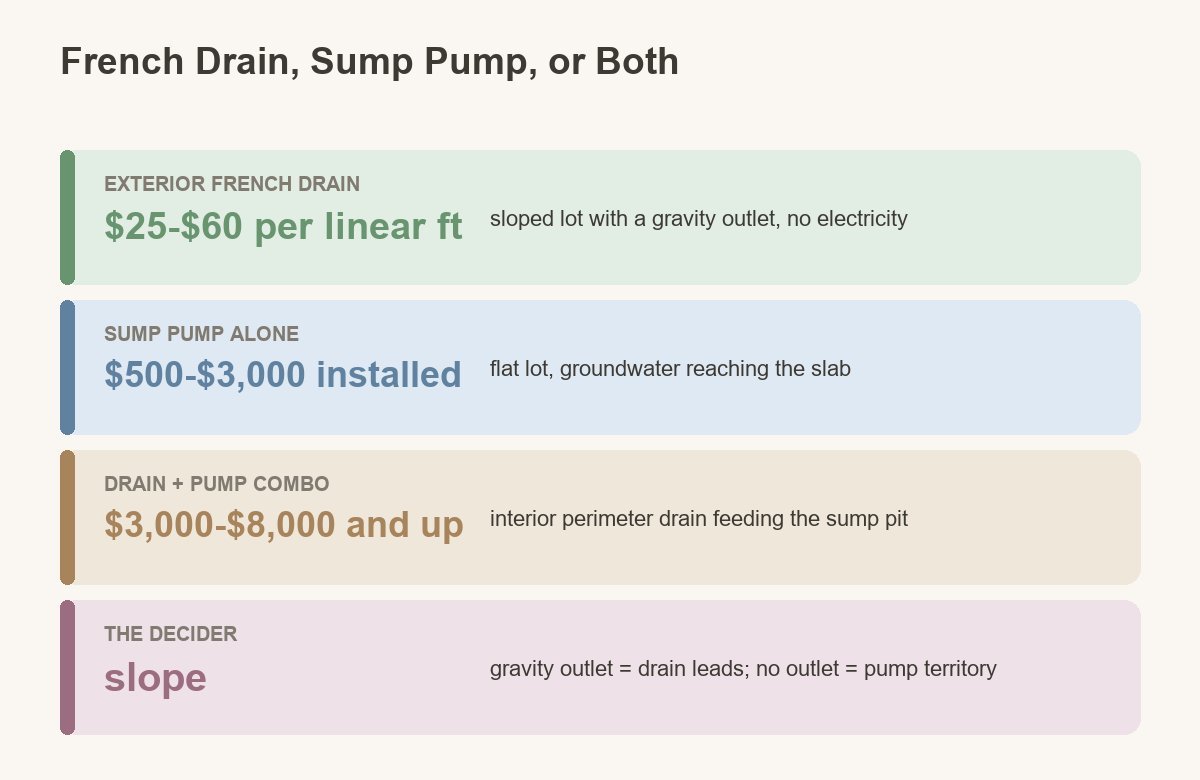
Cost guides quote wildly different figures for the same words because “french drain” names three different projects. Per The Basement Guide’s breakdown, an exterior yard drain prices around $25 to $60 per linear foot, an interior perimeter system $60 to $120 per foot with concrete cutting included, and a basic sump pump install lands between $1,200 and $3,000, with the unit itself as little as $200. A shallow gravel trench dug through a lawn shares nothing but a name with jackhammering a slab edge.

Budget three ways: a 100-foot exterior drain on a sloped lot commonly totals $2,500 to $6,000; a sump pump alone, $500 to $3,000 depending on who installs it; a full interior drain-plus-pump system, $3,000 to $8,000 and beyond for large perimeters. Add the operating difference: the drain consumes nothing, while the pump adds electricity, a battery backup if outages matter, and a replacement unit on a schedule.

Match the Configuration to the Water

  • Soggy yard, sloped lot: exterior french drain alone. Surface and subsurface water gets intercepted uphill of the house and gravity carries it to daylight. No pit, no power, no monthly thought. This is the configuration owners rave about when it fits.
  • Water at the slab, flat lot: sump pump, possibly alone. With nowhere downhill to send water, collection without ejection is a bathtub. A pit and pump handle groundwater rising under the floor; short interior drain runs feed it if seepage enters along more than one wall.
  • Perimeter seepage in a basement: the combo. Interior drain to collect, pump to discharge. One system without the other either collects water it cannot remove or removes only the water lucky enough to reach the pit.

The outcome when the right configuration meets the right problem is the point of the spend:

“French drain for us after two floods through a window (damn window wells). We had major flooding in our area in 2023, which was the second window flood. Got the drain installed after. Even worse flood in 2024 and we stayed dry. Huge fan of the French drain. Finally got insurance back this year too 🙌.”
– r/basement, June 2026 (6 upvotes)

Lifespan and the Ways Each One Fails

A fabric-wrapped drain built with washed stone is a 30-year installation; skip the filter fabric and silt can choke it inside a decade, which is where the “french drains only last 10 years” claims come from. Its other failure mode is more basic, and drainage veterans warn about it constantly:

“A French drain needs to be fairly deep (200-300mm) to have grass grow over it and has to drain away somehow-somewhere otherwise it just becomes a soak/dry-well (not much better than what you’ve got.) A surface drain, grated drain, even just a sump that water runs into is probably better. I’d get a landscaper/plumber to work it out tho. If you cross connect it with roof drainage or don’t get the fall right, it can make things worse/be a waste of effort.”
– r/GardeningAustralia, May 2026 (11 upvotes)

A drain with no discharge point is an underground bathtub wearing a french accent. Before any trench gets dug, the destination has to exist, and it has to be legal: routing runoff onto a neighbor or into a sanitary sewer can require permits, and you stay responsible for water that leaves your lot and causes damage downstream.

Sump pumps fail on a schedule. FEMA’s maintenance guidance is to check the pump yearly and replace any unit past 10 years old, and the common failures arrive sooner: a stuck float switch, a clogged intake, or a power outage during the exact storm that filled the pit. The pump’s lifetime cost is the unit, its successor, the electricity between them, and ideally a battery backup for the outage case.

Where the Water Goes: Four Legal Destinations

Every configuration ends at a discharge point, and picking it belongs at the start of planning, not the end. Daylighting to a downhill slope is the cheapest and most reliable outlet when grade allows. A dry well works on flat lots with sandy soil but fails in clay, where it fills and stays full. Municipal storm drain connections are the cleanest urban option where the city permits them. The curb, via a pop-up emitter, is the common default for pump discharge lines.

Two destinations invite trouble: the sanitary sewer, which many municipalities prohibit for groundwater, and the neighbor’s lot line, which courts take a dim view of when their yard turns to marsh. A ten-minute call to the local building department about discharge rules is the cheapest part of the entire project.

French Drain vs Sump Pump FAQ

What are the disadvantages of a french drain?

A french drain needs a downhill discharge point, serious excavation through anything in its path, and a silt-filtering design to avoid clogging over the years. It also handles only the water that reaches its gravel; a rising water table under a flat slab defeats it without a pump.

Will a sump pump work without a french drain?

Yes, when groundwater naturally converges on the pit, which happens in many flat-lot basements where the pit sits at the true low point. Seepage entering along multiple walls needs collection piping to reach the pit, and that piping is the interior drain half of the combo.

What does a 100-foot french drain cost?

An exterior 100-foot run commonly totals $2,500 to $6,000 at the $25-to-$60-per-linear-foot rates in published cost breakdowns, landing higher with deep trenches, poor access, or hardscape in the way. The same length as an interior perimeter system costs roughly double or more because of concrete work.

What works better than a french drain?

For roof-driven water, gutters, extended downspouts, and regrading beat any trench and cost far less; for flowing surface water, a channel or catch-basin drain outperforms buried gravel. A french drain earns its place specifically for subsurface water moving through soil, and nothing cheaper substitutes there.

Concrete Waterproofing Sealer: Types, Uses, and Limits

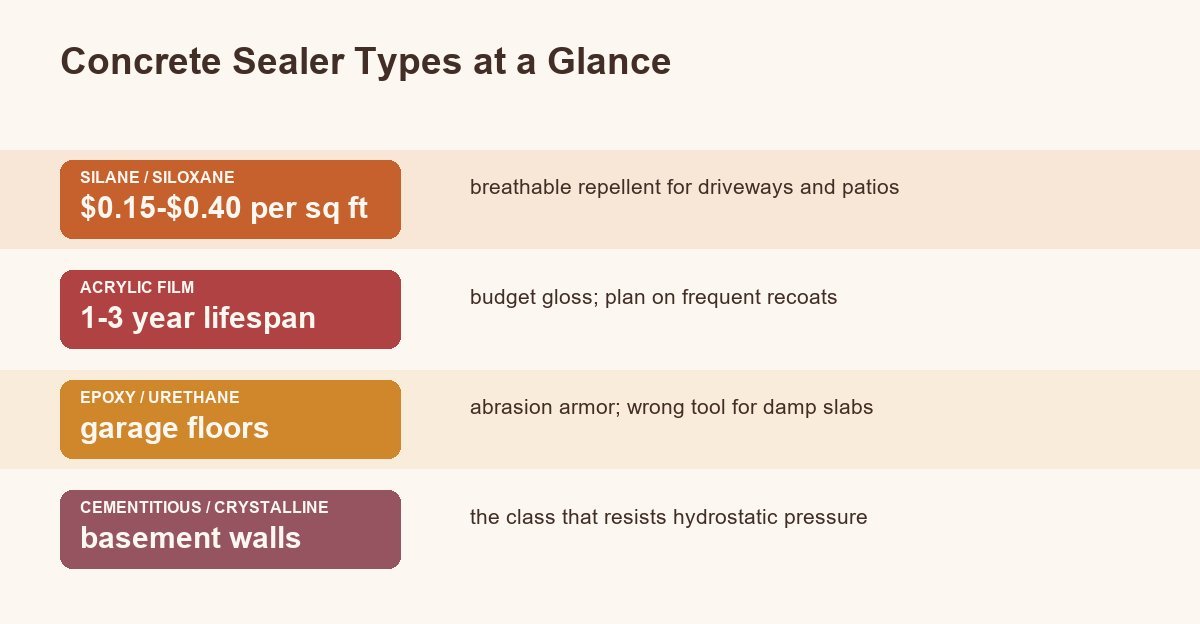
A concrete waterproofing sealer is either a water repellent or a true waterproofer, and the label rarely admits which. Repellents like silane and siloxane shed rain from driveways and patios; only cementitious and crystalline products stand up to water pushing through a basement wall.

That one distinction sorts the whole shelf. Buy by the problem in front of you: falling water on a horizontal slab is a repellent job, water under pressure from soil is a waterproofer job, and a product marketed for one will quietly fail at the other.

Sealer vs Waterproofer: The Difference That Matters

A sealer keeps liquid water from soaking into the surface while letting the slab breathe; a waterproofer resists hydrostatic pressure, the constant push of water in saturated soil against buried concrete. The chemistry is different, the failure modes are different, and the words get used interchangeably by everyone selling both.

The test is which side of the water you are on. A patio gets rained on, and the water leaves; any quality penetrating sealer wins there. A basement wall holds back wet earth around the clock, and a surface repellent on its inside face does close to nothing; that wall needs a cementitious coating or crystalline treatment that bonds into the concrete, and past a point, exterior drainage instead of chemistry.

The Four Types, Sorted

the four types sorted
Two of these repel rain; only one class resists water under pressure.
Type Where it belongs Lifespan What it will not do
Silane/siloxane (penetrating) Driveways, patios, walkways, exposed aggregate 7–10 years No gloss, no film; will not bridge cracks
Acrylic (film) Decorative and colored concrete needing sheen 1–3 years Wears fast under tires; recoat cycle never ends
Epoxy/polyurethane (film) Garage and shop floors 5–10 years Traps moisture in damp slabs; peels without prep
Cementitious/crystalline (waterproofer) Basement and retaining walls, tanks, below grade 10+ years No cosmetic finish; will not fix active leaks at cracks

Veteran applicators land on the same conclusion from the field side. Exterior restoration contractor Scott Paul, who has tested sealers for three decades at Concrete Sealer Review, puts it flatly: no single product wins every situation, and type-to-surface matching decides the outcome before brand ever enters it. The failure gallery behind that rule is specific: solvent acrylics blushing white over damp slabs, epoxy lifting off exterior aprons in sheets, repellents disappearing into old porous concrete that wanted double the coverage rate. Type first, brand second.

Match the Product to the Surface

Outdoor flatwork in freeze-thaw country wants a penetrating silane/siloxane: it repels the water that would otherwise freeze inside the pores and spall the surface, without changing the look or making the slab slick. Garage floors take epoxy or urethane for abrasion, with the caveat that a slab reading damp underneath will push any film coating off. Basements get the waterproofer class on interior walls, and Ghostshield’s guidance matches the industry default: below-grade water problems get solved on the wet side or with drainage when coatings alone keep losing.

Application has a weather window.

The 50°F-to-85°F range on clean, fully dry concrete comes up in every professional spec sheet for a reason: sealer applied to a damp or hot slab flashes, blotches, or fails adhesion, and the redo costs more than the first coat.

What No Sealer Fixes: Cracks and Joints

Every season, homeowners point at cracked concrete and reach for a jug of sealer, and the most-upvoted version of that reflex reads like this:

“This is the concrete outside my garage foundation. Do I need to seal these cracks in prep for winter weather? If so, what is the best way?”
– r/HomeMaintenance, October 2025 (110 upvotes)

The tradespeople in the replies never say sealer, because pourable sealers have no ability to span a moving gap. Cracks and joints get a flexible polyurethane caulk, and the specific recommendation repeats across threads:

“I wouldn’t use self leveling material here because the Concrete isn’t level. I would use a sika flex 1a. The color “stone” would match this well. Once the materials tooled out, sprinkle some play sand on it and lightly rub it. Let cure for 24 hrs”
– r/HomeMaintenance, October 2025 (28 upvotes)

The working order for any slab: caulk the cracks and joints first, let them cure, then seal the field. Sealing over open cracks waterproofs everything except the paths water was using in the first place. The $8 tube is the cheapest step in the whole project and the one that decides whether the $50 gallon accomplishes anything. And a basement wall leaking at a crack under pressure is past both products; that is injection or drainage territory.

What It Costs to Do a Slab

Penetrating sealers cover about 150 to 300 square feet per gallon depending on how porous the surface is, and quality silane/siloxane products retail around $30 to $60 per gallon. A 500-square-foot driveway lands near $60 to $200 in material for the recommended two wet-on-wet coats, an afternoon with a pump sprayer, and a 7-to-10-year interval before it needs thinking about again.

The pattern to avoid is the cheap-acrylic treadmill: a $20 jug that looks glossy for a season, wears through in tire paths by year two, and needs stripping before anything better goes on. Across a decade the bargain product gets bought five times, and the stripping labor between coats costs more per square foot than the quality sealer would have. Where the slab shows from the street, buy once.

Concrete Waterproofing Sealer FAQ

What is the best waterproof sealant for concrete?

Silane/siloxane penetrating sealer is the best waterproofing product for outdoor slabs, and cementitious or crystalline coatings are the best for walls holding back soil. For cracks and joints, the best product is not a sealer at all but a polyurethane caulk like Sikaflex.

Can you seal concrete to be fully waterproof?

Against rain and surface water, yes; a penetrating sealer makes a slab shed water for years. Against sustained hydrostatic pressure, surface sealers cannot; that calls for crystalline or cementitious waterproofing bonded into the concrete, and for serious pressure, exterior drainage.

What works on basement walls?

Interior basement walls take a cementitious waterproof coating or crystalline treatment, applied to bare, clean masonry after any active leaks are addressed. Surface prep is most of the job: coatings brushed over old paint or efflorescence peel within seasons, which is where most basement-sealer disappointment comes from. Wire-brush to bare block, treat the white mineral bloom, then coat.

How often does concrete need resealing?

Penetrating silane/siloxane lasts about 7 to 10 years, film-forming acrylics 1 to 3, and epoxy floors 5 to 10 depending on traffic. The sprinkle test gives the reapply signal: water that soaks in and darkens the slab instead of beading means the sealer is done.

French Drain Fabric: Which Type Works and Which Clogs

French drain fabric means non-woven geotextile, a gray felt-like material that lets water pass straight through while holding silt out of the gravel. One product category does this job; the woven and “landscape” fabrics sold two shelves over are how french drains end up clogged.

The confusion is understandable, because every roll in the aisle calls itself drainage-adjacent. The sorting rule fits in a pocket: if it looks like felt, it filters; if it looks like a woven tarp, it blocks; if it tears like paper after a season in soil, it was weed fabric all along.

Woven vs Non-Woven: Why Only One Belongs in a Drain

Non-woven geotextile is made of tangled polypropylene fibers needle-punched into a mat, so water moves through its whole surface while soil particles stay behind. Woven geotextile is a different tool: tight ribbons designed for strength under driveways and roads, with far less water flow through the weave. Suppliers who sell both put it plainly; Pro Fabric Supply’s drainage line is entirely non-woven, with woven fabric reserved for stabilization jobs.

The third category, thin weed-barrier fabric from the garden section, fails twice: its flow rate drops sharply once fine soil loads it, and the material itself degrades in ground contact. Michigan drainage contractor French Drain Man makes the point bluntly: thin landscape fabrics biodegrade and break down, which is why his crews install double-punched non-woven geotextile and nothing else.

“We’ve been installing lawn drainage systems for over 30 years, primarily to reduce standing water, protect foundations, and move surface water away from homes. Over that time, we’ve found that subsurface French drains using perforated ADS pipe surrounded by washed stone have worked extremely well for our customers. It’s a system we’ve had a lot of confidence in. That said, there are a lot of different approaches in this industry. Some contractors prefer surface inlet (catch basin) drains to col…”
– r/basement, June 2026 (29 upvotes)

Weight: 4 oz Is the Residential Default

weight 4 oz is the residential default
Buy by the ounce rating and the word non-woven, not by the garden-aisle label.

Geotextile is sold by weight per square yard, from 3 oz garden-duty up to 32 oz industrial. For a yard or foundation drain, 4 oz non-woven is the standard: the highest practical flow with enough strength to survive backfilling. Heavier 6 to 8 oz cloth trades some flow for puncture resistance, and earns that trade where the soil is fine silt that will press against the fabric for decades, or where vehicles pass above the trench.

French Drain Man’s crews split the choice by flow: 4 oz where water volume is the priority, 8 oz where flow is low and durability matters more. Either way the fabric is the cheap line item, with listed roll prices working out to roughly $0.10 to $0.45 per square foot depending on weight and roll size.

Is the Fabric Necessary at All?

Yes, in any soil with fines: skip the fabric and silt migrates into the gravel with every rain, filling the voids the drain depends on until water has nowhere to travel. A french drain without a filter is a temporary drain.

The choke is gradual, which is what makes it expensive: year one drains beautifully, year three slows, year six the lawn is spongy again and nobody connects it to a decision made at the supply house. Digging up and re-graveling a clogged run costs close to the original install, and the slow silt-choke is a major source of the claims that french drains only last a decade.

It is the last place in the project to save ten dollars.

The asterisk comes from engineering practice, where a properly graded sand-and-gravel envelope can do the filtering the way agricultural drains have for a century. That method depends on getting particle-size gradation right, which is why residential installers standardized on fabric: a wrapped trench with washed stone is repeatable by any crew, and the failure mode of a botched gradation is invisible until the lawn is soggy again.

The exception where fabric hurts: soils dominated by fine clay can slowly blind any filter surface, fabric included. In heavy clay, the drain wants more gravel surface area and shallower expectations, not a thicker sock.

“Nothing will exactly stop either over time with fine grained soils such as clay and silt. Clogging will eventually occur with both given seepage. Installing sand in conjunction with geofabric will prolong the life. With french drains the water holding capacity is a function of void space. So if you have ample space you could go crazy and install sand between two layers of filter/geofabric and hopefully just have to dig around the sides sequentially and replace the sand layer when the time comes…”
– r/AskEngineers, April 2026 (6 upvotes)

French Drain Fabric

How Much Fabric a Trench Needs

A standard trench 12 inches wide and 18 inches deep needs about 6 feet of fabric width: enough to line the bottom and both walls with a foot of overlap at the top. For a 50-foot drain that is roughly 300 square feet (our french drain calculator figures the gravel side of the same trench), one 6-by-100-foot roll with slack for pinning; a 100-foot drain wants two.

The Burrito Wrap, Step by Step

Wrapping the gravel envelope takes four moves, and the last one is the one crews skip:

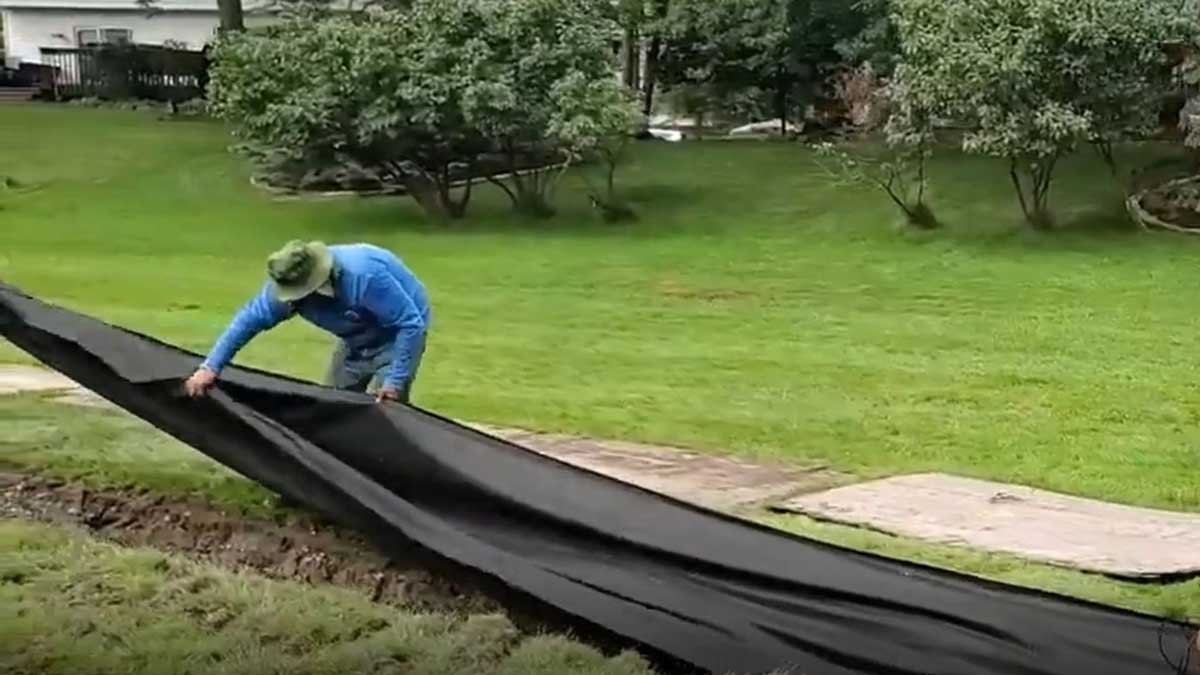
  1. Line the open trench with fabric, walls and bottom, pinning the edges at grade.
  2. Add a few inches of washed stone, lay the perforated pipe (holes down), then fill washed stone to near grade.
  3. Fold the fabric flaps over the top of the gravel with a 12-inch overlap, the burrito wrap that keeps topsoil from raining in from above.
  4. Cap with a couple of inches of soil or decorative stone, and the drain disappears into the yard.

Fabric that stops at the trench walls but never closes over the top leaves the gravel open to the very silt it was meant to exclude.

French Drain Fabric FAQ

What fabric is best for a french drain?

A 4 oz non-woven geotextile is the best fabric for a typical residential french drain, stepping up to 6 or 8 oz in silty soil or under traffic. The label needs the words non-woven and a weight rating; brand matters far less than category.

Will landscape fabric work for a french drain?

No. Thin weed-barrier fabric clogs quickly once soil fines load it and degrades in ground contact, taking the drain down with it. It costs a few dollars less than real geotextile up front and the whole trench’s lifespan later.

Does the fabric go around the pipe or around the gravel?

Around the gravel. The fabric lines the trench and folds over the stone envelope, keeping soil out of the whole system; the perforated pipe inside stays in clean gravel contact. Tight fabric socks on the pipe itself are where silt blinds a drain fastest in fine soils.

How long does french drain fabric last?

Quality non-woven polypropylene is rated for decades buried, and installers who use double-punched 4-to-8 oz cloth describe it as a lifetime component. The lifespan risks are installation tears from sharp backfill and sun exposure before burial, not underground aging.

Best Crawl Space Dehumidifier: Sizing, Picks, and Lifespan

The best crawl space dehumidifier for most sealed spaces is a low-temperature-rated unit in the $800 to $1,500 range from Santa Fe, AprilAire, or AlorAir. For warm, tall, mildly damp spaces, a $250 oversized consumer unit does the job for a fraction of the price.

Which side of that split you land on has little to do with brand loyalty and everything to do with one number: the temperature down there in January. Sellers of $1,400 units rarely mention it, and neither do the reviews of $230 ones.

Two Routes, One Deciding Number

two routes one deciding number
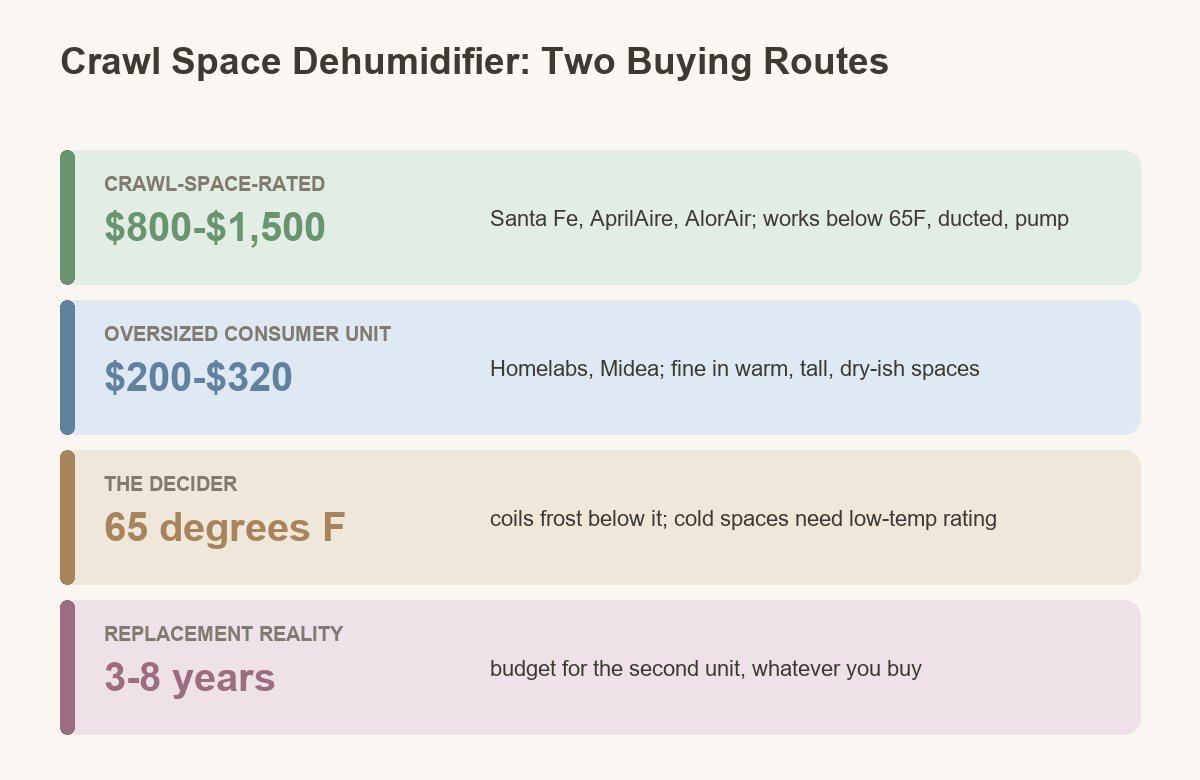
65°F is the physics line that separates the two buying routes.

Standard dehumidifier coils frost up when air temperature drops below about 65°F, and ENERGY STAR’s guidance is explicit: spaces that fall below that line need a product specified for low-temperature use. That is the engineering difference the crawl-space-rated premium buys, along with ducting collars, a condensate pump, and a housing built to sit in dirt-floor humidity:

Crawl-space-rated Oversized consumer unit
Price $800–$1,500 $200–$320
Works below 65°F Yes, by design Poorly; coils frost and the compressor cycles
Drainage Pump or gravity line included Bucket, or a $40 add-on pump on some models
Clearance needed Low-profile, made to sit in the pit Upright; needs headroom near the access door
Fits Sealed or encapsulated spaces, cold winters Warm climates, tall vented spaces, mild dampness

The budget route is not a compromise pick invented here; it is what owners keep reporting works:

“I was in a very similar situation with a damp crawl space and musty smell starting to creep into the house. I looked hard at the expensive crawl space specific units and honestly got scared off by the price and complexity. What worked for me was focusing on moisture control first and not overengineering it. A [Homelabs Dehumidifier](https://www.reddit.com/u/remediesblackboards/s/p4x5BBP1RG) sized larger than the crawl space made a noticeable difference within weeks. The air felt lighter and the…”
– r/BuyItForLife, January 2026 (44 upvotes)

The Models That Keep Coming Up

Three names dominate the crawl-space-rated category wherever installers and testers compare notes. Santa Fe Compact70 is the one HVAC technicians on hvac-talk default to for reliability, noting the brand moved to coated coils after industry-wide corrosion failures. AprilAire’s E080 and E100 get the same treatment from r/hvacadvice, where the E100 is the stock recommendation. AlorAir’s Sentinel series is the value play in the rated category, and the HD55S is the unit Bob Vila’s test team measured pulling their crawl space from 66 to 55 percent humidity inside 18 hours.

On the consumer side, the recurring names are Homelabs and Midea Cube 50-pint units. Nobody claims they are crawl space equipment; the case for them is arithmetic. At $250 against $1,300, you can replace the cheap unit four times before matching the rated one’s purchase price, and replacement is a subject this product category forces you to think about early.

Sizing: Count Pints, Not Square Feet

Size by moisture load, measured in pints per day, and lean bigger: a damp 1,500 to 2,000 square foot crawl space wants a unit rated around 50 to 70 pints under current test conditions. Square footage ratings on the box mislead, because a soggy 800-square-foot pit out-demands a dry 2,000-square-foot one.

Two sizing traps catch buyers. First, capacity numbers shrank a few years ago when test conditions changed to cooler air; an old “70-pint” and a new “50-pint” can be the same machine, which explains why spec sheets seem to contradict each other in confusing threads. Second, undersizing costs twice: a small unit at 100 percent duty cycle dies young and never reaches target humidity, while an oversized one coasts. ENERGY STAR’s sizing charts say it plainly: better to oversize.

The target is 50 to 55 percent relative humidity on a $15 hygrometer, comfortably under the 60 percent line where mold gets going, without paying to chase desert-dry air that the dirt will just re-moisten.

Lifespan: The Number Nobody Prints on the Box

Plan on 3 to 8 years, whatever you spend. The rated units aim for the top of that range and back it with 5-to-6-year warranties; consumer units cluster at the bottom, and owner patience with them is blunt:

“Big big caveat before you buy one. Dehumidifiers (at least the ones made on this side of the century) do not last more than 3 years max. That is just a gamble you have to be willing to take, doesn’t matter how expensive or cheap it is. So I’d say don’t spend more than roughly around 300 bucks on one. Also [size up heavy](http://youtube.com/post/UgkxytH9TW1EwG7Wruj52GBETlUZWC85m_pO?si=PNhZ_h7VFsXicsHU), your basement might be smaller but with the levels of humidity, you need it to be hefty and s…”
– r/heatpumps, June 2026 (120 upvotes)

The technicians’ version of the same warning is more specific: cooling coils corrode in the acidic condensate environment, and coil failure is the death certificate on most units. It is why Santa Fe’s switch to coated coils gets discussed like news in trade forums, and why a long parts warranty on the coil specifically is worth more than any feature on the spec sheet. Whichever route you take, write the purchase date on the housing and treat the machine as a wear item with a funded replacement, not a permanent fixture.

Install Details That Decide Whether It Works

A dehumidifier only fixes a crawl space that is ready for one. Down a sealed, moisture-managed space, it maintains; over bare dirt with open vents, it dehumidifies the neighborhood (the seal-first order and its price are covered in our encapsulation cost breakdown). Ground cover and vent sealing come first, and the unit is the finishing component.

Then solve water twice. The condensate has to leave: a gravity line to a drain or sump beats a pump, and a pump beats a bucket by more than convenience, because a bucket-drained unit in a space you enter through a 16-by-24-inch hatch gets emptied enthusiastically for three weeks and unplugged by October. Set the unit on blocks above the liner, give it a dedicated outlet, and put the hygrometer at the far end of the space from the machine, where the reading is earned, not local.

Crawl Space Dehumidifier FAQ

Is it worth putting a dehumidifier in a crawl space?

Yes, once the space is sealed against ground moisture and outside air; it is the component that holds humidity at the 50-to-55-percent target year round. In an unsealed space with bare dirt, spend the money on a vapor barrier first, because the dehumidifier will lose that fight.

What size dehumidifier does a 2,000 sq ft crawl space need?

A damp 2,000-square-foot crawl space needs roughly 50 to 70 pints per day of capacity under current ratings, and more if standing moisture or open vents feed it. When in doubt between two sizes, ENERGY STAR’s own sizing advice is to take the bigger one.

What do Consumer Reports and testers recommend?

Consumer Reports tests portable household dehumidifiers, not pit-installed crawl space units, so “the CR pick” for this job does not exist. The tested data that does: Bob Vila’s team measured the AlorAir HD55S dropping a crawl space from 66 to 55 percent humidity in under 18 hours, and trade-forum consensus backs Santa Fe and AprilAire for longevity.

What is the number one rated crawl space dehumidifier?

No single unit holds that title across sources, but Santa Fe Compact70 comes closest to a consensus among installers, with AprilAire E100 the runner-up and AlorAir Sentinel HD55S the price-to-performance pick. Match the choice to your winter temperature and drainage plan before comparing the three.